|
|
| Creating the Web container cluster
First we describe how to create the Web cluster, which we decided to call "WEBcluster". As mentioned before, this cluster will be used to provide workload balancing and failover for servlets and JSPs.
Creating a cluster consists of three steps:
|
| 1.
| Step 1 allows you to enter basic cluster information.
|
| 2.
| Step 2 is to define the cluster members. These can be either existing appservers or you can create new ones.
|
| 3.
| Step 3 basically summarizes the information you entered before.
To create a new cluster:
|
| 1.
| Log on to the WebSphere Administrative Console and select Servers -> Clusters. In the right pane, a list of clusters defined within the cell is shown. This list should currently be empty.
|
| 2.
| Click New to create your first cluster (see Figure 7-21). This launches the window for Step 1 of the Create New Cluster process as shown in Figure 7-22.
.

Figure 7-21 Create a new cluster
.

Figure 7-22 Creating a new cluster, Step 1: Enter Basic Cluster Information
|
| 3.
| Now enter the basic cluster information:
|
|
a.
Enter WEBcluster for the mandatory Cluster name field.
|
|
b.
Uncheck the box Prefer local enabled. Selecting Prefer local indicates that the EJB running on the local node should be routed the request first if available.
Important: We chose to disable the Prefer Local option in order to demonstrate the workload management features of IBM WAS Network Deployment V5.1. However, we recommend this optimization to be enabled in a performance-tuned environment.
|
|
|
c.
Check the box Create Replication domain for this cluster.
|
|
d.
Accept the default for the Existing server option, and click Next to continue. This brings up the window shown in Figure 7-23, which allows you to create new appservers to be added to the cluster.
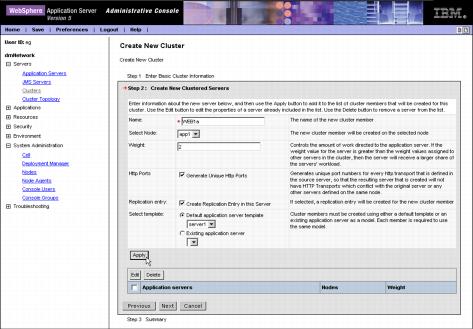
Figure 7-23 Creating a new cluster, Step 2: Create New Clustered Servers
|
| 4.
| To create new clustered appservers:
|
|
a.
Enter WEB1a for the name of the first new clustered server (cluster member).
|
|
b.
Select app1 from the Select Node drop-down box.
|
|
c.
Check the box Create Replication Entry in this Server.
|
|
d.
Accept the default for all other options and click Apply to continue.
|
|
e.
Using the same procedure, add a second appserver called WEB1b to node app1.
|
|
f.
Again, using the same procedure, add a third appserver called WEB2, but add this server to node app2.
|
|
g.
After adding the three clustered servers, click Next to continue.
|
| 5.
| Check the summary (see Figure 7-24) and click Finish to create the new cluster.
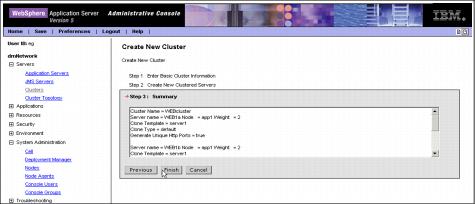
Figure 7-24 Creating a new cluster, Step 3: Summary
|
| 6.
| After completing the above steps, the WebSphere Administrative Console warns that changes have been made to the local configuration. Click Save in order to save the changes to the master configuration. Select the Synchronize changes with Nodes check box to make sure the changes are synchronized to all nodes in the cell. Click Save once again.
Note We created a replication domain for the cluster as well as replication entries for each cluster member. This is done in order to later use WebSphere internal messaging for persistent session support.
WebSphere internal messaging uses a small and fast publish/subscribe engine supplied with WebSphere. It consists of two key elements, a replication domain and replication entries. These are defined at the cell level. A replication domain defines the set of replicator processes that communicate with each other and share a common publish/subscribe cluster. A replicator runs inside an appserver process. The replicator entry defines its basic settings, such as a communication port among replicators and a communication port with clients.
|
|
|
Prev | Home | Next
WebSphere is a trademark of the IBM Corporation in the United States, other countries, or both. IBM is a trademark of the IBM Corporation in the United States, other countries, or both. |