IBM Tivoli Directory Integrator
At its core, the browser provided by ITM presents data that is
gathered by agents.
ITM agents are characterized by the following definition:
"The agents (referred to as managed systems) are installed
on the system or subsystem requiring data collection and monitoring.
The agents are responsible for data gathering and distribution of
attributes to the monitoring servers, including initiating the heartbeat
status." (Extract from the ITM documentation)
There can be various kinds of agents: agents to monitor operating
systems or specific applications, or specifically tuned agents (that
is, using the Universal Agent interface). The following diagram, taken from the ITM documentation, describes both the architecture
and the deployment process of agents:
ITM Agents diagram

TEMS = Tivoli Enterprise Monitoring Services
TEP = Tivoli Enterprise portal
If we have an ITM Agent configuration XML file, we can import
it in the ITM Agent Builder 6.2 and it will create ITM Agent project
automatically. To import such a file, right-click in the ITM Agent
Builder workspace, select Import... and
select IBM Tivoli Monitoring Agent for import.
Point to the configuration XML file (default name: itm_toolkit_agent.xml) and click Finish. This will create an ITM Agent Builder
project with an appropriate name.
If you wish to create
the agent yourself, go to section Creating a TDI agent for ITM using
ITM Agent Builder 6.2; otherwise
go to section Generating the ITM Agent.
The ITM Agent Builder is an Eclipse based platform for creating
ITM Agents. The Agent that we will create for this example uses the
JMX interface. From the ITM Agent Builder choose File -> New -> IBM Tivoli Monitoring Agent.
The ITM Agent Wizard will show up. The first step is an introduction -
click Next. On the second step you
will be asked to enter a project name. In this example we will use "TDI"
as project name. Clicking Next brings
us to the following step:
ITM Agent wizard Agent information
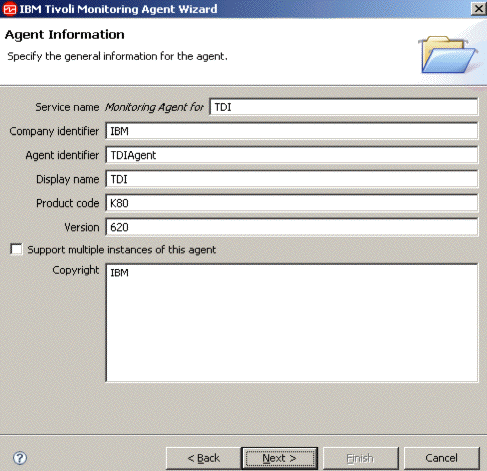
Fill all the fields with appropriate data. The Product code should
be between K80 and K99 for JMX agents. click Next.
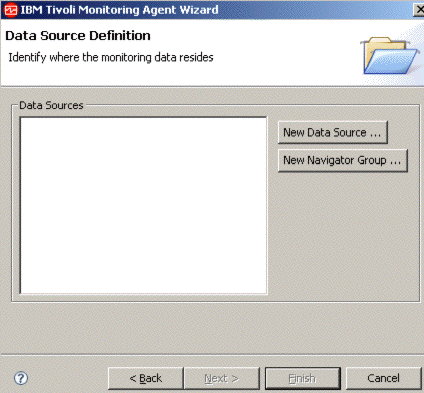
On the next step check the This agent will
gather data from an external data source. option and click Next. On this step the data source definition
window is displayed:
ITM Agent wizard, Data source definition
In order to make this step easier to configure start a TDI Server
in daemon mode and run an AssemblyLine that never ends (for example an AssemblyLine with
an HTTP Server Connector listening for connections). Make sure the
JMX API is enabled in TDI (there is a description on how to do this
later in the example).
Click the New Data Source ... button
and then choose the Collect data from Java
Management Extensions (JMX) MBeans option. Click Next. On the next window click Browse which should display the JMX Browser:
JMX Browser
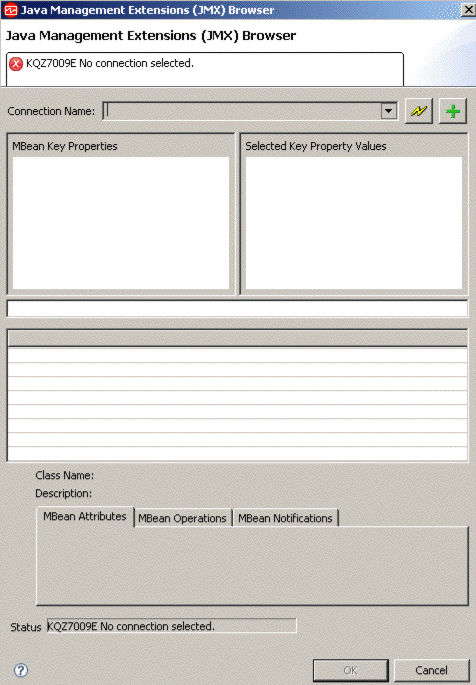
Click the Edit Connection Definitions button
(the green plus button). On the next step select Standard JMX Connections (JSR-160) and
click Next. The new wizard window will
display the available templates. Select JSR-160
-Compliant Server and again click Next to
see the Connection properties of the JMX Server.
Server Connection wizard
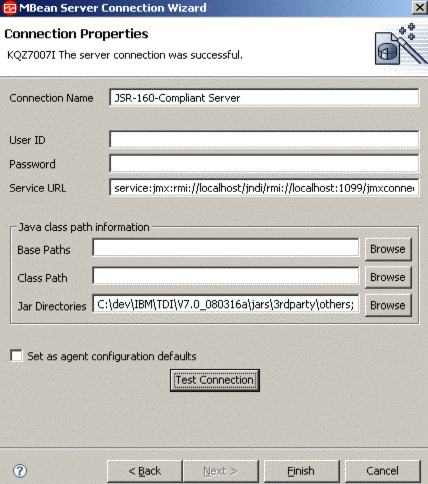
In order to establish a successful connection with the TDI JMX
Service we will need to enter a valid JMX Service URL (the default
TDI JMX Service URL is service:jmx:rmi://localhost/jndi/rmi://localhost:1099/jmxconnector)
and to configure the jar dependencies that are required for successful
JMX MBeans creation (for the TDI JMX MBeans we will need the jar
files in TDI_install_dir\jars\3rdparty\IBM; TDI_install_dir\jars\3rdparty\others; TDI_install_dir\jars\common directories).
We can test these settings by clicking the Test
Connection button. If the whole configuration is correct a message
like this will be displayed: "The server connection was successful."
After this setup click Finish. The
wizard should bring us the previous configuration step, but this time
connected to the TDI JMX Server and will display additional information:
Browsing TDI in JMX Browser
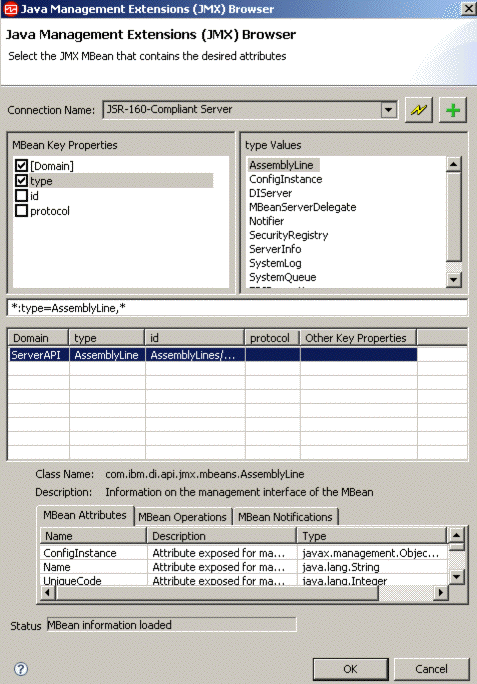
Select the type MBean Key Property
and AssemblyLine from the type values.
To see the MBean Attributes we need to select a row in the table
above them. In our case there is only one row. Click OK and then Finish to
complete the setup of this data source.
Create one more data source with type value ConfigInstance in
the same way we created the AssemblyLine data source. These two data
sources will gather information from the JMX Server for running AssemblyLines
and started Configuration Instances.
The third data source is a little different from the other two.
It is a kind of listener which listens for notifications (events)
sent by the TDI JMX Server. To create one like that, after clicking
the New Data Source... button, we do not need to browse the JMX Server but simply enter *:type=Notifier,* for
MBean pattern and click Finish. Two
data sources will be created - one for the notification part
and one for the static MBean part. Since we do not need the static
part for this data source we need to remove it; right-click and select Remove Data Source(s).
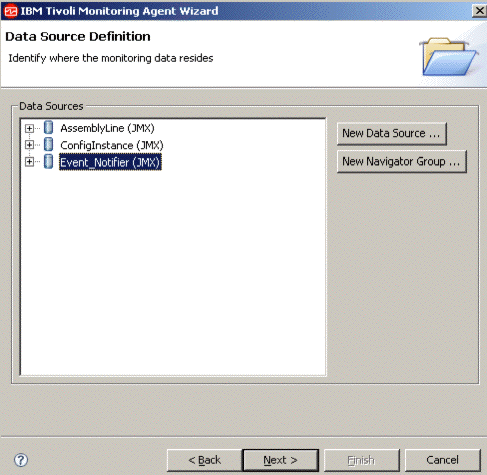
After completing these steps we should have three data sources
created:
ITM Wizard, completed Data Source Definition
Expand the AssemblyLine data source and double-click the ConfigInstance attribute. In the ConfigInstance
attribute configuration check the key attribute checkbox.
Expand the ConfigInstance data source and double-click the ConfigId attribute. In the ConfigId attribute
configuration check the key attribute checkbox.
Click Next in order to configure
the JMX Agent - Wide Options. Uncheck the JMX monitor attribute
groups checkbox and select JSR-160-Compliant
Server from the Server configuration choices.
JMX Agent-wide options

Click Finish to complete the ITM
Agent creation steps and save the Agent.
After the successful creation of the ITM Agent configuration, we
need to generate it in order to deploy it in ITM. From the IBM Tivoli
Monitoring Agent Editor menu in the ITM Agent Builder choose Generate Agent. The Generate Agent Wizard
will appear. This wizard has several options of Agent generation.
If we use ITM and ITM Agent Builder on a single machine then the Generate the agent files in an ITM installation
on this machine option is suitable for you. The only field which
needs to be configured is the ITM installation directory. Click Finish to generate and deploy the ITM Agent
in ITM. This may take several minutes to complete.
If we want to have the agent on another machine then
we can use another agent generation option - Create a compressed file so that the agent can
be installed on another system. This will generate an archive
that contains the ITM Agent installation. To install such an archived
agent, you first have to copy the file to the machine where ITM is
installed. Extract the files from the archive and from the command
prompt start the InstallIRA.bat file
with parameter the ITM install folder.
For example if ITM is installed
in C:\IBM\ITM the command will look like:
<AgentDirectory>:\>InstallIRA.bat C:\IBM\ITM
After the successful deployment of the agent (either using an archive
file or the ITM Agent Builder option to deploy it on the same machine)
we have to configure it in ITM. To do so, start Manage
Tivoli Monitoring Enterprise Services where we can manage all
ITM Agents:
Manage Tivoli Monitoring Enterprise Services
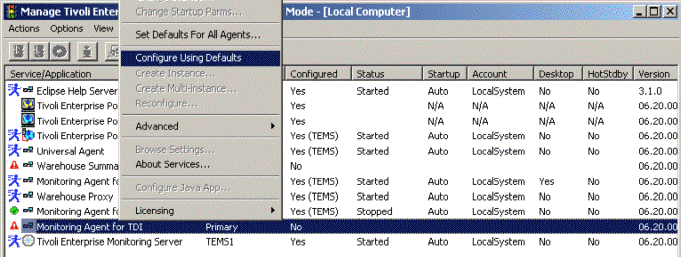
Right-click the TDI Agent and select Configure
Using Defaults.
On the next configuration window we need to configure the JVM properties
for the Agent. Browse to the Java Home that you wish to use. The log
trace level is set to "Error" by default. It can be changed
to higher level in order to log additional information. After finishing
the Java configuration click the Next button.
On the next configuration step you are asked to configure the JSR-160
Compliant Server properties, that is, enter username, password, Service
URL and Class Path dependencies. For our example we need to enter
Service URL and Jar directories like we did in order to create the
agent - Service URL service:jmx:rmi://localhost/jndi/rmi://localhost:1099/jmxconnector and
Jar directories TDI_install_dir\jars\3rdparty\IBM; TDI_install_dir\jars\3rdparty\others; TDI_install_dir\jars\common.
Click OK to complete the Agent Configuration.
The TDI Agent should be ready for use. The next step is to start
the Agent. We can start it from the Manage TEMS window by right-clicking
the TDI Agent and choosing Start. If
all steps are successful the TDI Agent will be running now.
To monitor data, we need to start the Tivoli Enterprise Portal
(TEP), which is available in the ITM installation. In the navigator
TEP window we can see the running Agents. The TDI Agent is also there
and we have to expand it to see the specific monitoring data sources:
Tivoli Enterprise Portal (TEP) - Wizards

We can find our custom made data sources there - AssemblyLine, ConfigInstance, Event Notifier. If we have a running TDI Server and
a running AssemblyLine in it, we can see it in the report table of the AssemblyLine
data source.
In order to display data in the Notifier report table, the TDI Agent has to be running before a TDI notification is triggered.
This browser can be tuned in several ways: for numeric data it
is possible to have a more human readable presentation (like diagrams).
It is also possible to change the layout of the tables.
This functionality is not very complex, and is well described in
the ITM documentation.
As the aim of this document is not to present the whole ITM product
in intricate detail, but to focus on the usage that can be done in
correlation with TDI, we will present here only the two trickiest
concepts: defining thresholds, and links between tables.
For other functionality, please refer to the ITM documentation.
Defining thresholds
To show how the threshold mechanism works, we will create the following
simple example: display a warning when more than one AssemblyLine
is currently running.
This threshold will depend on data provided by the AssemblyLine
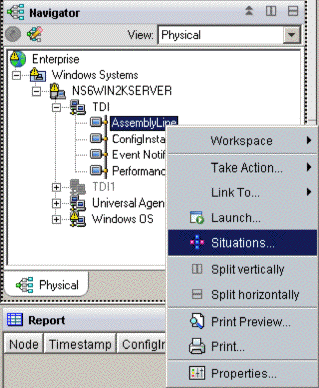
table. First we need to create a situation by right-clicking on the
table of the agent, and by selecting Situations in
the contextual menu:
Situations context menu
Click on the Create Situation button
in the upper-left corner and fill in the displayed form:
Situation form
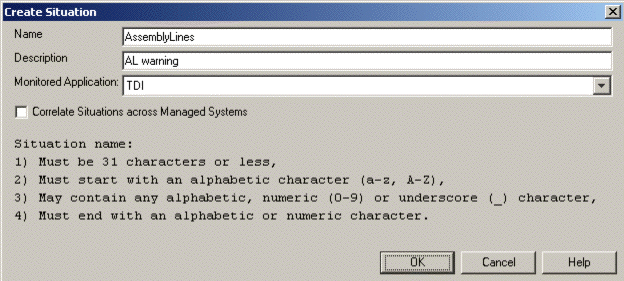
This will be the name associated to the warning. Here we describe
a case study, but in real situations you would give it meaningful
names.
Then we choose with which table attribute our situation will deal:
Situation: select condition
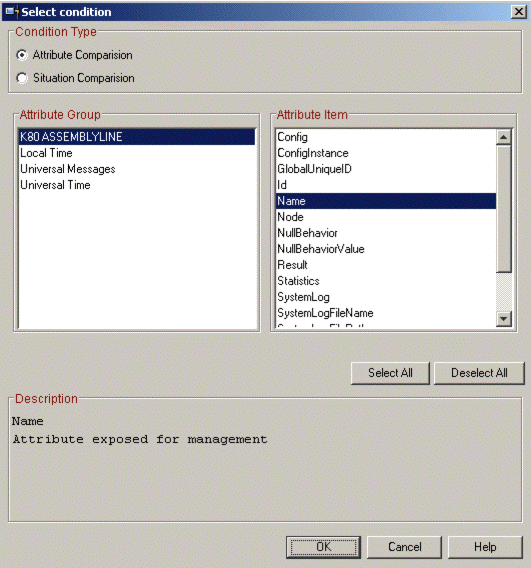
Indeed, we only have to consider the name of the AssemblyLine to identify
it.
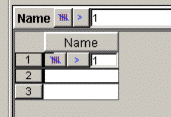
Click in one of the cells, for example the one in line number 1:
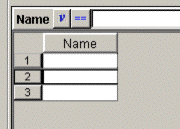
The display changes:
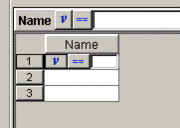
Click on the , and change it to "Count of group members".
Click on the ==, and change it to >.
Set the cell space remaining on the right to 1.
We have configured a condition to the Name column, which will be true if we have more than one AssemblyLine running:
And change the following default settings:

To this:

The situation is set, so Apply and
validate this window.
Start TDI Server and start at least two
AssemblyLines at the same time; for example two HTTP Server Connectors
that are listening on different ports.
ITM displayed warning
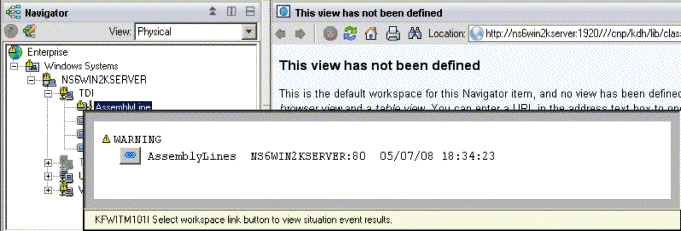
The Warning window is opened while
highlighting the warning icon.
Creating links between tables
Purpose of links
It is possible to specify links between different tables in ITM.
These links can be based upon some criteria of our choice, as we will
see in this example. When a link is created we can automatically
see a subset of a table by following the specified link. In this example
we will create a link from the Event Notifier table that will show
the currently running AssemblyLine in the AssemblyLine table. The
link will be available in the Event Notifier table only for records
that have the type "di.al.start". This type indicates that
an AssemblyLine has been started. If the link is pressed and the AssemblyLine
is still running, the AssemblyLine table will be automatically selected
and only the corresponding AssemblyLine will be displayed in the table.
If the AssemblyLine has already finished its execution then the displayed
table will be empty.
This is an example Event Notifier table with defined link to the
AssemblyLine table:
Example Event Notifier table
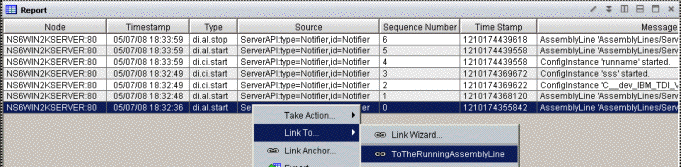
The table has three loaded configurations, three started AssemblyLines
(one of which has been stopped). When the ToTheRunningAssemblyLine link
is selected, the AssemblyLine is displayed in the AssemblyLine table
(no other AssemblyLines are shown in the table):
Example Event

Construction of links
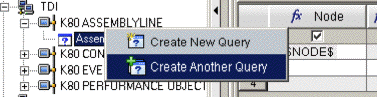
First we need to create a key in the AssemblyLine table which will
be accessible from the Event Notifier table and will correspond to
the AssemblyLine ID. Right-click in the AssemblyLine table and select
properties.
AssemblyLine properties

In the opened window, assign a new query by clicking the Click here to assign a query button.
The Query Editor will be opened where we must define another query
because the existing one is static and cannot be modified. We will
be asked to enter a name for it (for example "AssemblyLine2").
Create query selection
Go to the Id column of the table
and enter $keyid$ as its value.
Query Editor
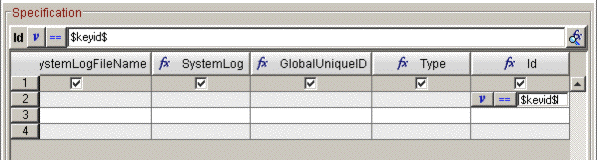
Click OK and apply the changes in
the properties window and then click "OK button.
This is all that needs to be done in the AssemblyLine table.
Go to the Event Notifier table (we will be asked to save the changed
in the AssemblyLine table - click Yes).
Right-click on the selected row in the Event Notifier table and
choose Link To... -> Link Wizard... (make
sure that the type column of the selected row equals "di.al.start").
Link Wizard selection

The Link Wizard will be displayed and will ask whether a new link
will be created, modify existing link or delete existing link. Select Create a new link and click Next. On the next screen the name and the
description of the link must be entered. In this example we will use ToTheRunningAssemblyLine as name and "Display
the corresponding AssemblyLine in the AssemblyLine table." as
description. The next step will ask to specify the link type. In the
example we will use Absolute as link
type because we are linking to a specified non-dynamic workspace in
the navigator view. Proceed to the next step where we must specify
the workspace to which the link will direct (the AssemblyLine table).
Link Wizard - target workspace
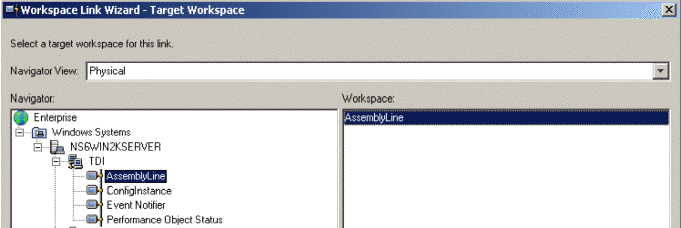
After selecting the AssemblyLine workspace click Next. This is the final step where we have
to create the link conditions. We will modify two parameters in order
to create the link properly - contextIsAvailable and keyid.
Select the contextIsAvailable parameter
and click the Modify Expression... button
(or double-click the parameter). The Expression editor window will
be displayed. Delete the current contents and click the Symbol... button. From the Symbols
select the Type attribute:
Link Wizard - Type attribute

Click OK to return to the Expression
Editor window; add == "di.al.start" to create a
conditional expression.
Link Wizard - Expression editor

Click OK to confirm the expression
value.
Open the Expression editor of the keyid symbol in Query - AssemblyLine2 and add the
User Data symbol.
Link Wizard - User attribute
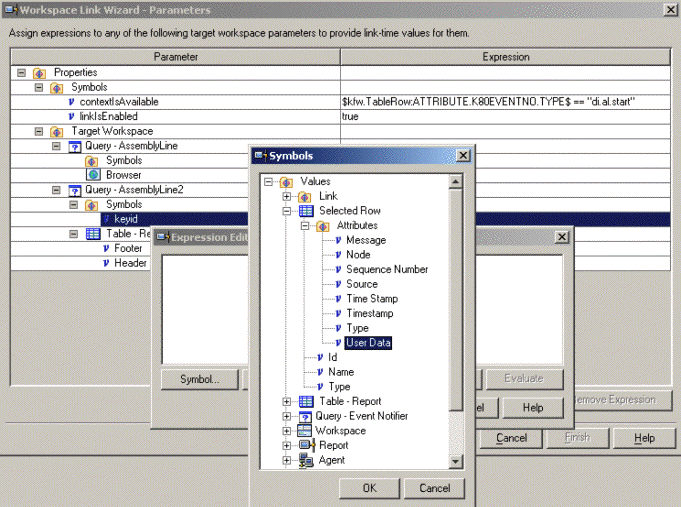
Click OK in the Expression editor
and click Next in the Link Wizard, which will show you a summary of the created link.
Link Wizard - summary

Click Finish to close the Link Wizard.
Now you are ready to perform the steps in section Purpose of links.
A configuration file that demonstrates sending custom notifications
is shipped with the example. The file is located at TDI_install_dir/examples/Tivoli_Monitoring/TDI_Monitored_by_ITM/custom_notifications_server.xml.
To send custom notifications we need to write our own script
that does it. The following code demonstrates it:
session.sendCustomNotification(aType, aId, aData);
This
piece of code sends a custom, user defined notification to all registered
listeners. The aType parameter is the notification type. aId is
the notifications ID. aData is custom user data. Note that
the aType is automatically prefixed with "user.". This means
that if you send a notification of type myType it will be
received as user.myType.
The created Agent can not be used for managing the TDI Server. For example it cannot start/stop AssemblyLines.
It can be used for monitoring purposes only, even though the Tivoli
Directory Integrator Server JMX layer exposes such methods.