Implementing adapter-based authenticators
We can authenticate users of mobile applications using an adapter-based authenticator.
Adapter-based authentication consists developing custom authentication logic using a JavaScript function within a MobileFirst adapter.
Adapter-based authentication is flexible and customizable. The following diagram illustrates one possible implementation. The process is illustrated and described as follows.
Figure 1. Adapter-based authentication process
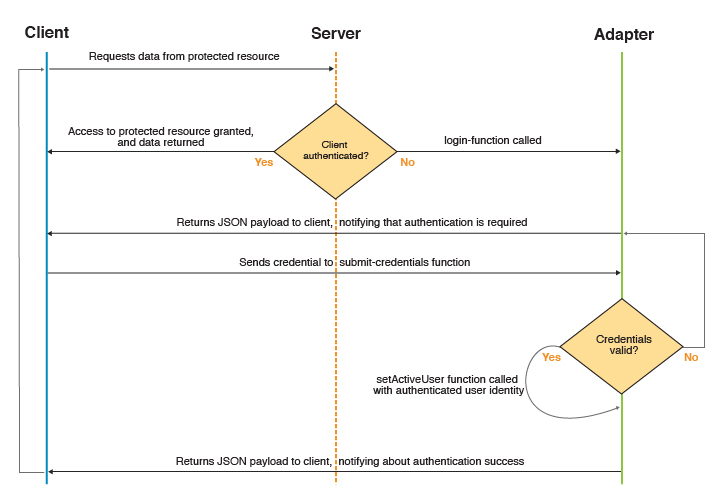
- The client makes a request to the resource that is protected by adapter authentication.
- MobileFirst Server checks
whether the client is already authenticated.
- If it is, the requested data is returned.
- Otherwise, authentication continues.
- If it is, the requested data is returned.
- The adapter procedure defined in authenticationConfig.xml as a login-function is called.
- The login-function procedure is used to return a custom JSON payload
to the client.
- The client processes the custom JSON payload and sends its credentials
to the adapter procedure used for authentication.
- The adapter procedure used for authentication receives
credentials and validates them.
- If validation fails, the flow returns to step 4.
- Otherwise, authentication continues.
- If validation fails, the flow returns to step 4.
- The adapter procedure used for authentication creates a user identity and returns a success status to the client.
- The client receives the success status and issues the original
request.
- The flow returns to step 2.
See The authentication configuration file.
- Configure authenticationConfig.xml.
- Add security tests to the <securityTest> section of the file. Because the security test that you are using is protecting
an adapter procedure, we use the <customSecurityTest> parameter.
- Add authentication realms to the <realms> section.
For the className parameter, use the com.worklight.integration.auth.AdapterAuthenticator to indicate that the server-side part of the authenticator is defined in the adapter. Define two parameter-value pairs for login and logout:
- login-function: whenever the MobileFirst authentication framework detects an attempt to access a protected resource, the login-function
is called automatically.
- logout-function: when logout is detected (explicit or session timeout), the logout-function is called automatically.
In both cases, the value syntax is adapterName.functionName.
- login-function: whenever the MobileFirst authentication framework detects an attempt to access a protected resource, the login-function
is called automatically.
- Add a login module to the <loginModules> section. All of the validation logic that is done in a login module is performed in the adapter's JavaScript code and we need no further validation. For that reason, adapter-based authentication must be used with a NonValidatingLoginModule only. No additional validation is performed by the MPF, and the developer takes responsibility for the validation of credentials within the adapter. See Non-validating login module.
- Add security tests to the <securityTest> section of the file. Because the security test that you are using is protecting
an adapter procedure, we use the <customSecurityTest> parameter.
- Code the server side.
Fully qualified name of the Java class for adapter authenticators is com.worklight.integration.auth.AdapterAuthenticator. It takes the mandatory login-function parameter and the optional logout-function parameters. Both parameters specify adapter function names. The syntax is: adapter-name.function-name, for example, myAuthAdapter.onAuthRequired. You need to implement the login-function and logout-function in your adapter.js source file. In the example, these parameters are implemented as AuthAdapter.onAuthRequired and AuthAdapter.onLogout.
- Both login-function and logout-function should only be used internally by a MobileFirst Server.
For this reason, it is important that you do not expose them as procedures in the adapter XML file.
- In contrast, the function that receives credentials is directly called by a client. Therefore, we must expose it in the adapter XML
file. Keep in mind that this function must be accessed by unauthenticated
clients, therefore do not protect it by a security test.
- Alternatively, we can define a more sophisticated security test for this function. Just make sure the security context on the client side is sufficient to answer the challenge. One way to do this is to enrich the client security context by a call to WL.Client.connect before the adapter is called.
In addition to implementing login-function and logout-function, you also need to implement an adapter function that receives credentials from the client, validate them, and create a user identity, for example, function submitCredentials (user, password).
- The login function
The login-function parameter specifies the name of the JavaScript function to be invoked once the login process is triggered. The triggering can happen either when the client application explicitly invokes the WL.Client.login API, or when an unauthenticated attempt to access a resource protected by the adapter authentication realm is made. Use this function to return a payload to the client to notify it about the required authentication. The login-function receives original request headers that are converted to JSON as a first function argument so they can be used to decide on the kind of authentication that is needed, for example. Then it is the login-function that returns the response to the client, instead of the original function
- The logout function
The logout-function parameter specifies the name of the JavaScript function to be invoked once logout from the realm has occurred. The logout can be triggered by having the client application call the WL.Client.logout API, or when the MobileFirst Server decides to invalidate the session (for example, a session timeout). The logout-function receives no arguments.
- The submit credentials function
This is the function that actually performs the authentication. The client should call this function with arguments containing user credentials or authentication data. It should then validate the credentials and once validated, this function should use WL.Server.setActiveUser(realm, identity) to register the authenticated identity. The function can include a flag or message in the response to let the application know if the login was successful or not. If not, it is advised to programatically limit the number of login trials in the application.
- Both login-function and logout-function should only be used internally by a MobileFirst Server.
For this reason, it is important that you do not expose them as procedures in the adapter XML file.
- Code the client side.
- Create a MobileFirst application, with an element for displaying the application content and an element for authentication. For example, when authentication is required, the application hides the applicative element and shows the authentication element. When authentication is complete, it does the opposite.
- Create a challenge handler, using the WL.Client.createChallengeHandler method to create a challenge handler object. We must implement the following mandatory methods: isCustomResponse, handleChallenge. In addition, the following mandatory methods are available in every challenge handler that we must use: submitAdapterAuthentication, submitSuccess, submitFailure.
We must attach each of these mandatory challenge handler functions to its object. For example: myChallengeHandler.submitSuccess.
- Create a MobileFirst application, with an element for displaying the application content and an element for authentication. For example, when authentication is required, the application hides the applicative element and shows the authentication element. When authentication is complete, it does the opposite.
Example
The following example demonstrates how to implement an adapter-based authentication mechanism that relies on a user name and a password.
- Configuration of authenticationConfig.xml./dt>
-
<securityTests>
  <customSecurityTest name="SingleStepAuthAdapter-securityTest">
    <test isInternalUserID="true" realm="SingleStepAuthRealm"/>
  </customSecurityTest>
</securityTests>
<realms>
  <realm loginModule="AuthLoginModule" name="SingleStepAuthRealm">
    <className>com.worklight.integration.auth.AdapterAuthenticator</className>
      <parameter name="login-function"
        value="SingleStepAuthAdapter.onAuthRequired"/>
      <parameter name="logout-function"
        value="SingleStepAuthAdapter.onLogout"/>
  </realm>
</realms>
<loginModules>
  <loginModule name="AuthLoginModule">
    <className>com.worklight.core.auth.ext.NonValidatingLoginModule
    </className>
  </loginModule>
</loginModules>
- Code the server side authentication
-
Perform the following steps:
- Create an adapter that takes care of the authentication process.
In this example, it is SingleStepAuthAdapter.
- SingleStepAuthAdapter could include the following two procedures, for example:
<procedure name="submitAuthentication"/>
<procedure name="getSecretData" securityTest="SingleStepAuthAdapter-securityTest"/>
- The submitAuthentication procedure takes care
of the authentication process and authentication is not required to call it.
- The getSecretData procedure is available to authenticated users only.
- The submitAuthentication procedure takes care
of the authentication process and authentication is not required to call it.
- Define the onAuthRequired function:
function onAuthRequired(headers, errorMessage) { errorMessage = errorMessage ? errorMessage : null; return { authRequired: true, errorMessage: errorMessage }- This function receives the response headers and an optional errorMessage parameter.
The object that is returned by this function is sent to the client application. The authRequired:true and errorMessage:errorMessage pairs
define a custom challenge object that is sent to the application.
- The authRequired:true property is used in a challenge
handler to detect that the server is requesting authentication.
- Whenever the MobileFirst framework detects an unauthenticated attempt to access a protected resource, the onAuthRequired function is called, as you defined in authenticationConfig.xml.
- This function receives the response headers and an optional errorMessage parameter.
The object that is returned by this function is sent to the client application. The authRequired:true and errorMessage:errorMessage pairs
define a custom challenge object that is sent to the application.
- Define the submitAuthentication function. The function is called by the client app to validate the user name and password.
/* In this sample, the credentials are validated against some * hardcoded values, but any other validation mode is valid, * for example using SQL or web services. */ if (username==="worklight" && password === "worklight"){ /* If the validation passed successfully, the WL.Server.setActiveUser method * is called to create an authenticated session for the SingleStepAuthRealm, * with user data stored in a userIdentity object. We can add our own custom * properties to the user identity attributes. */ var userIdentity = { userId: username, displayName: username, attributes: { foo: "bar" }; WL.Server.setActiveUser("SingleStepAuthRealm", userIdentity); /* An object is sent to the application, stating that the authentication * screen is no longer required. */ return { authRequired: false } /* If the credentials validation fails, an object that is built * by the onAuthRequired function is returned to the application * with a suitable error message. */ return onAuthRequired(null, "Invalid login credentials"); } - Define the getSecretData function. For the purposes
of demonstration, at the conclusion of successful authentication, you could return a hard-coded value:
function getSecretData() { return { secretData: "Very very secret data" } - Define the onLogout function, to be called automatically on logout. It can perform a cleanup, for example.
function onLogout(){
  WL.Server.setActiveUser("SingleStepAuthRealm", null);
  WL.Logger.debug("Logged out");
}
- Create an adapter that takes care of the authentication process.
In this example, it is SingleStepAuthAdapter.
- Code the client side authentication
-
Perform the following steps:
- Create a MobileFirst application.
- You might create some HTML code, for example, to display application content only after authentication is complete.
- Create the challenge handler. Use the WL.Client.createChallengeHandler method to create a challenge handler object; supply a realm name as a parameter.
For example:
var singleStepAuthRealmChallengeHandler = WL.Client.createChallengeHandler("SingleStepAuthRealm"); /* The isCustomResponse function of the challenge handler * is called each time a response is received from the server. * That function is used to detect whether the response contains * data that is related to this challenge handler. The function returns true or false. */ singleStepAuthRealmChallengeHandler.isCustomResponse = function(response) { if (!response||!response.responseJSON||response.responseText === null) { return false; if (typeof(response.responseJSON.authRequired) !== 'undefined'){ return true; } else { return false; }; - Define a handleChallenge function. That function
behaves differently according to the result of the authRequired function
in the previous step.
/* If the isCustomResponse function returns true, the
 * framework calls the handleChallenge function. This function
 * is used to perform  required actions, such as to hide the
 * application screen or show the login screen. */
singleStepAuthRealmChallengeHandler.handleChallenge =
  function(response){
  var authRequired = response.responseJSON.authRequired;
 if (authRequired == true){
  $("#AppDiv").hide();
  $("#AuthDiv").show();
  $("#AuthPassword").empty();
  $("#AuthInfo").empty();
  if (response.responseJSON.errorMessage)
      $("#AuthInfo").html(response.responseJSON.errorMessage);

 } else if (authRequired == false){
    $("#AppDiv").show();
    $("#AuthDiv").hide();
    singleStepAuthRealmChallengeHandler.submitSuccess();
};
$("#authCancelButton").click(function(){
  singleStepAuthRealmChallengeHandler.submitFailure();
});
The code in this step demonstrates two of three additional challenge handler functions that we need to use:- The submitSuccess function notifies the MobileFirst framework that the authentication process completed successfully. The MobileFirst framework then automatically issues the original request that triggered authentication.
- The submitFailure function notifies the MobileFirst framework that the authentication process completed with failure. The MobileFirst framework then disposes of the original request that triggered authentication.
- The submitSuccess function notifies the MobileFirst framework that the authentication process completed successfully. The MobileFirst framework then automatically issues the original request that triggered authentication.
- The third challenge handler function use is submitAdapterAuthentication.
It sends collected credentials to a specific adapter procedure. It has the same signature as the WL.Client.invokeProcedure function.
Here is an example:
$("#AuthSubmitButton").bind('click', function () {
  var username = $("#AuthUsername").val();
  var password = $("#AuthPassword").val();
  var invocationData = {
    adapter : "SingleStepAuthAdapter", procedure : "submitAuthentication", parameters : [ username, password ]
  singleStepAuthRealmChallengeHandler.submitAdapterAuthentication(invocationData, {});
});
- Create a MobileFirst application.
What to do next
For a more extensive example of implementing form-based authentication, see the tutorials on the Get Started page.
Parent topic: Configure authenticators and realms