MobileFirst application authenticity overview
MobileFirst security is based on obtaining identity through challenge handling. An application authenticity realm validates the identity of an application. This process is referred to as application authenticity.
Any entity can access HTTP services available from MobileFirst Server by issuing an HTTP request. Application authenticity makes sure that applications trying to connect to MobileFirst Server are authentic, and have not been not tampered with or modified by some attacker.
This authenticity feature is not available if we use the internal MobileFirst Development Server embedded in MobileFirst Studio.
Authenticity process
Application authenticity checks use the same transport protocol as other MobileFirst authentication framework realms:
- The application makes an initial request to MobileFirst Server.
- MobileFirst Server goes through the authentication configuration and finds that this application must be protected by an application authenticity realm.
- MobileFirst Server generates
a challenge token and returns it to application.
- The application receives the challenge token.
- The application processes
the challenge token and generates a challenge response.
- The application submits the challenge response to MobileFirst Server.
- If the challenge response is valid, MobileFirst Server serves the application with the required data.
- If the challenge response is invalid, MobileFirst Server refuses to serve the application.
- The token is not processed by JavaScript;
instead it is processed with compiled native code. This procedure ensures that no attacker can see the logic behind the token processing.
- Application authenticity is based on certificate keys, used to sign the application bundle. Only the developer or enterprise who has access to the original private key of the application can to modify, repackage, and resign the bundle. This process ensures tight security.
In a cluster environment, the application authenticity setting is not synchronized between nodes. If we do need to modify the application authenticity setting in a production environment, we must do it on each cluster node separately.
Enable an application authenticity check (example)
Currently, application authenticity is supported only on iOS, Android and Windows Phone 8 environments.
The following example shows the steps for enabling application authenticity on iOS, Android, and Windows Phone 8:
- Modify authenticationConfig.xml.to add relevant authenticity realms to the security tests:
- If we use <mobileSecurityTest>, add the <testAppAuthenticity/> child element to this file.
- If we use <customSecurityTest>, we must add <test realm="wl_authenticityRealm"/> child element to the file.
After we have updated authenticationConfig.xml. rebuild, and redeploy the .war file.
- If we use <mobileSecurityTest>, add the <testAppAuthenticity/> child element to this file.
- Modify application-descriptor.xml of the application.
Remember: In application-descriptor.xml, also define a security test. See Security tests.
The procedure is different for iOS, Android and Windows Phone 8 environments.
- For iOS
-
- Specify the bundleId attribute of the application exactly as you defined it in the Apple Developer portal:
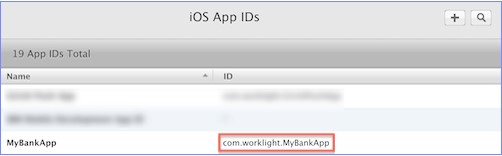
For example:
<iphone bundleId="com.worklight.MyBankApp" version="1.0"> <worklightSettings include="false"/> <security> <encryptWebResources enabled="false"/> <testWebResourcesChecksum enabled="false" ignoreFileExtensions="png, jpg, jpeg, gif, mp4, mp3"/> </security> </iphone> - Add the applicationId attribute to the iPhone or iPad element in application-descriptor.xml.
The applicationId value must match the value of the application id property, which we can find in the worklight.plist file. For example:
- <iphone bundleId="com.worklight.MyBankApp" applicationId="MyBankApp" version="1.0">
If we decide to change the value of the application ID, ensure that you change it both in application-descriptor.xml and in the worklight.plist file.
- In addition, for a native iOS app, in the XCode project, under Build Settings > Linking > Other Linker Flags, add the -ObjC flag.
- Specify the bundleId attribute of the application exactly as you defined it in the Apple Developer portal:
- For Android
-
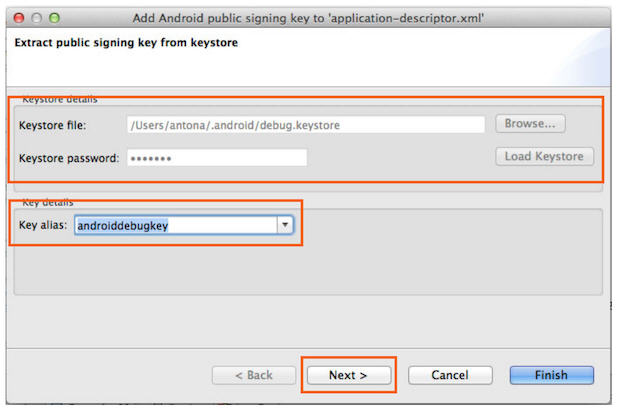
- Extract the public signing key of the certificate used to sign the application bundle (.apk file).
MobileFirst Studio provides tools to simplify this process.
- If we are building the application for distribution (production), we must extract the public key from the certificate that you are using to sign the production-ready application.
- If we are building the application in a development environment, we can use the public key from a default development certificate supplied by Android. We can find the development certificate in a keystore under {user-home}/.android/debug.keystore.
We can either extract the public key manually or use a wizard provided by MobileFirst Studio. If we use the wizard...
- Right-click the Android environment and select Extract
public signing key.
- Specify the location and password of the keystore file and click Load
Keystore. The default password for debug.keystore is android.
- Select key alias and click Next.
The public key is displayed on a window:
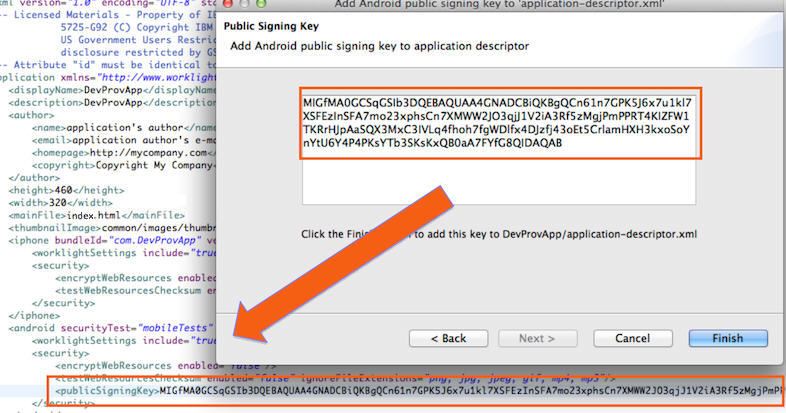
When you click Finish, the public key is automatically pasted into the relevant section of application-descriptor.xml.
- If we are building the application for distribution (production), we must extract the public key from the certificate that you are using to sign the production-ready application.
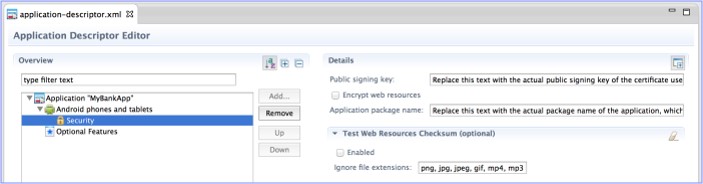
- Add the application package name to application-descriptor.xml in either of the following ways:
- In the Application Descriptor editor (accessible from the design
view), in the Application package name field, add the value of the package attribute of the <manifest> element in the AndroidManifest.xml file.
- Use the preferred text editor to edit application-descriptor.xml directly. For example:
<android securityTest="customTests" version="1.0">
    <worklightSettings include="false"/>
    <security>
        <encryptWebResources enabled="false"/>
        <testWebResourcesChecksum enabled="false" ignoreFileExtensions="png, jpg, jpeg, gif, mp4, mp3"/>
        <publicSigningKey>my-very-long-public-key</publicSigningKey>
        <packageName>com.myPackageName</packageName>
    </security>
</android>
If we decide to change the application package name, ensure that you change it both in application-descriptor.xml and in the AndroidManifest.xml file.
- In the Application Descriptor editor (accessible from the design
view), in the Application package name field, add the value of the package attribute of the <manifest> element in the AndroidManifest.xml file.
- Extract the public signing key of the certificate used to sign the application bundle (.apk file).
- For Windows Phone 8
-
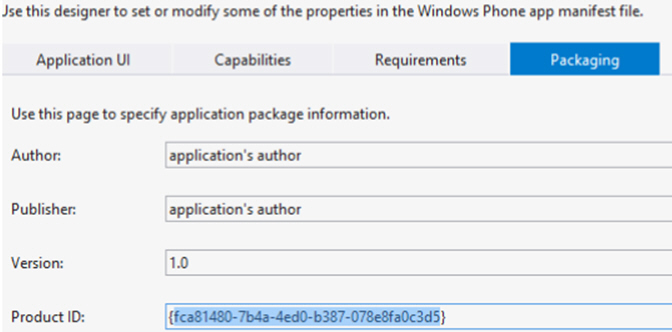
- Add the productId element to the security element defined in application-descriptor.xml.
The productId value is mentioned in Properties/WMAppManifest.xml:
- Add the applicationId element to the security element defined in application-descriptor.xml.
The applicationId value must match the value of the wlAppId property, which we can find in the wlclient.properties file. For example:
<windowsPhone8 version="1.0">
  <uuid>89836575-5405-4fa7-94b2-45f300201a1c</uuid>
  <security>
    <applicationId>HelloWorklight</applicationId>
    <productId>fca81480-7b4a-4ed0-b387-078e8fa0c3d5</productId>
  </security>
</windowsPhone8>
For more information about the security element, see The application descriptor.
- Add the productId element to the security element defined in application-descriptor.xml.
The productId value is mentioned in Properties/WMAppManifest.xml:
- After we have updated the required elements, rebuild and redeploy the application to MobileFirst Server.
Controlling application authenticity from operations console
Through the operations console , we can enable or disable the application authenticity realm at run time. This feature is useful for development and QA environments. We can set one of the following modes:
- Enabled, blocking: The application authenticity check is enabled. If the application fails the check, it is not served
by MobileFirst Server.
- Enabled, serving: The application authenticity check is enabled. If the application fails the check, it is still
served by MobileFirst Server.
- Disabled: The application authenticity check is disabled.
Parent topic: MobileFirst security framework