Configure access control
In this scenario, we can set up your MQIPT to only accept connections from specific clients by using the Java Security Manager to add security checks on the MQIPT listener port.
Before starting
- Before you start to use this scenario, make sure that we have completed the prerequisite tasks listed in Getting started with IBM MQ Internet Pass-Thru.
About this task

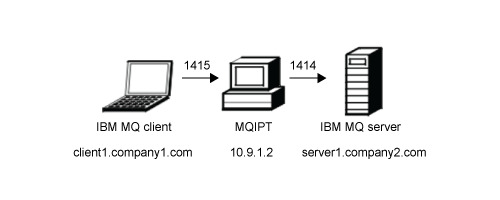
This diagram shows the connection from the IBM MQ client (called client1.company1.com on port 1415) through MQIPT to the IBM MQ server (called server1.company2.com on port 1414).
Procedure
To configure access control, complete the following steps:
-
Set up MQIPT:
-
Copy the sample Java Security Manager policy to the
MQIPT home directory by entering the following command
at a command prompt:
copy C:\mqipt\samples\mqiptSample.policy C:\mqiptHome\mqipt.policy
-
Start the Policy Tool utility by using the following command:
C:\mqipt\java\jre\bin\policytool
- Click File > Open then select C:\mqiptHome\mqipt.policy..
-
Click Edit Policy Entry then change CodeBase
from:
file:/C:/Program Files/IBM/IBM MQ Internet Pass-Thru/lib/com.ibm.mq.ipt.jar
to:file:/C:/mqipt/lib/com.ibm.mq.ipt.jar
-
Change the file permissions for the IBM MQ Internet Pass-Thru,
errors and logs directories from:
C:\Program Files\IBM\IBM MQ Internet Pass-Thru
to:C:\mqiptHome
-
Change the other file permissions from:
C:\Program Files\IBM\IBM MQ Internet Pass-Thru
to:C:\mqipt
-
Click Add Permission
Complete the fields as follows:
Permission: java.net.SocketPermission
Target: client1.company1.com:1024-
Actions: accept, listen, resolve - Click File > Save to save the changes to the policy file.
-
Edit mqipt.conf.
- Add the following two properties to the [global] section:
SecurityManager=true
SecurityManagerPolicy=C:\mqiptHome\mqipt.policy
- Add the following route definition:
[route]
ListenerPort=1415
Destination=server1.company2.com
DestinationPort=1414
- Add the following two properties to the [global] section:
-
Copy the sample Java Security Manager policy to the
MQIPT home directory by entering the following command
at a command prompt:
-
Start MQIPT:
Open a command prompt and enter the following:
C:\mqipt\bin\mqipt C:\mqiptHome -n ipt1
where C:\mqiptHome indicates the location of the MQIPT configuration file, mqipt.conf, and ipt1 is the name to be given to the instance of MQIPT. The following messages indicate that MQIPT has started successfully:5724-H72 (C) Copyright IBM Corp. 2000, 2020 All Rights Reserved MQCPI001 IBM MQ Internet Pass-Thru V9.2.0.0 starting MQCPI004 Reading configuration information from mqipt.conf MQCPI152 MQIPT name is ipt1 MQCPI055 Setting the java.security.policy to C:\mqiptHome\mqipt.policy MQCPI053 Starting the Java Security Manager MQCPI021 Password checking has been enabled on the command port MQCPI011 The path C:\mqiptHome\logs will be used to store the log files MQCPI006 Route 1415 has started and will forward messages to : MQCPI034 ....server1.company2.com(1414) MQCPI035 ....using MQ protocol MQCPI078 Route 1415 ready for connection requests
- At a command prompt on the IBM MQ client
system, enter the following commands:
- Set the MQSERVER environment variable:
SET MQSERVER=MQIPT.CONN.CHANNEL/tcp/10.9.1.2(1415)
- Put a message:
amqsputc MQIPT.LOCAL.QUEUE MQIPT.QM1
Hello world
Press Enter twice after typing the message string. - Get the message:
amqsgetc MQIPT.LOCAL.QUEUE MQIPT.QM1
The message, "Hello world" is returned.
- Set the MQSERVER environment variable:
Parent topic: Getting started with IBM MQ Internet Pass-Thru