Configure the JNDI namespace and administered objects
Define an initial context for the JNDI namespace in IBM MQ Explorer, then, in the namespace, define the administered objects that the sample application can use.
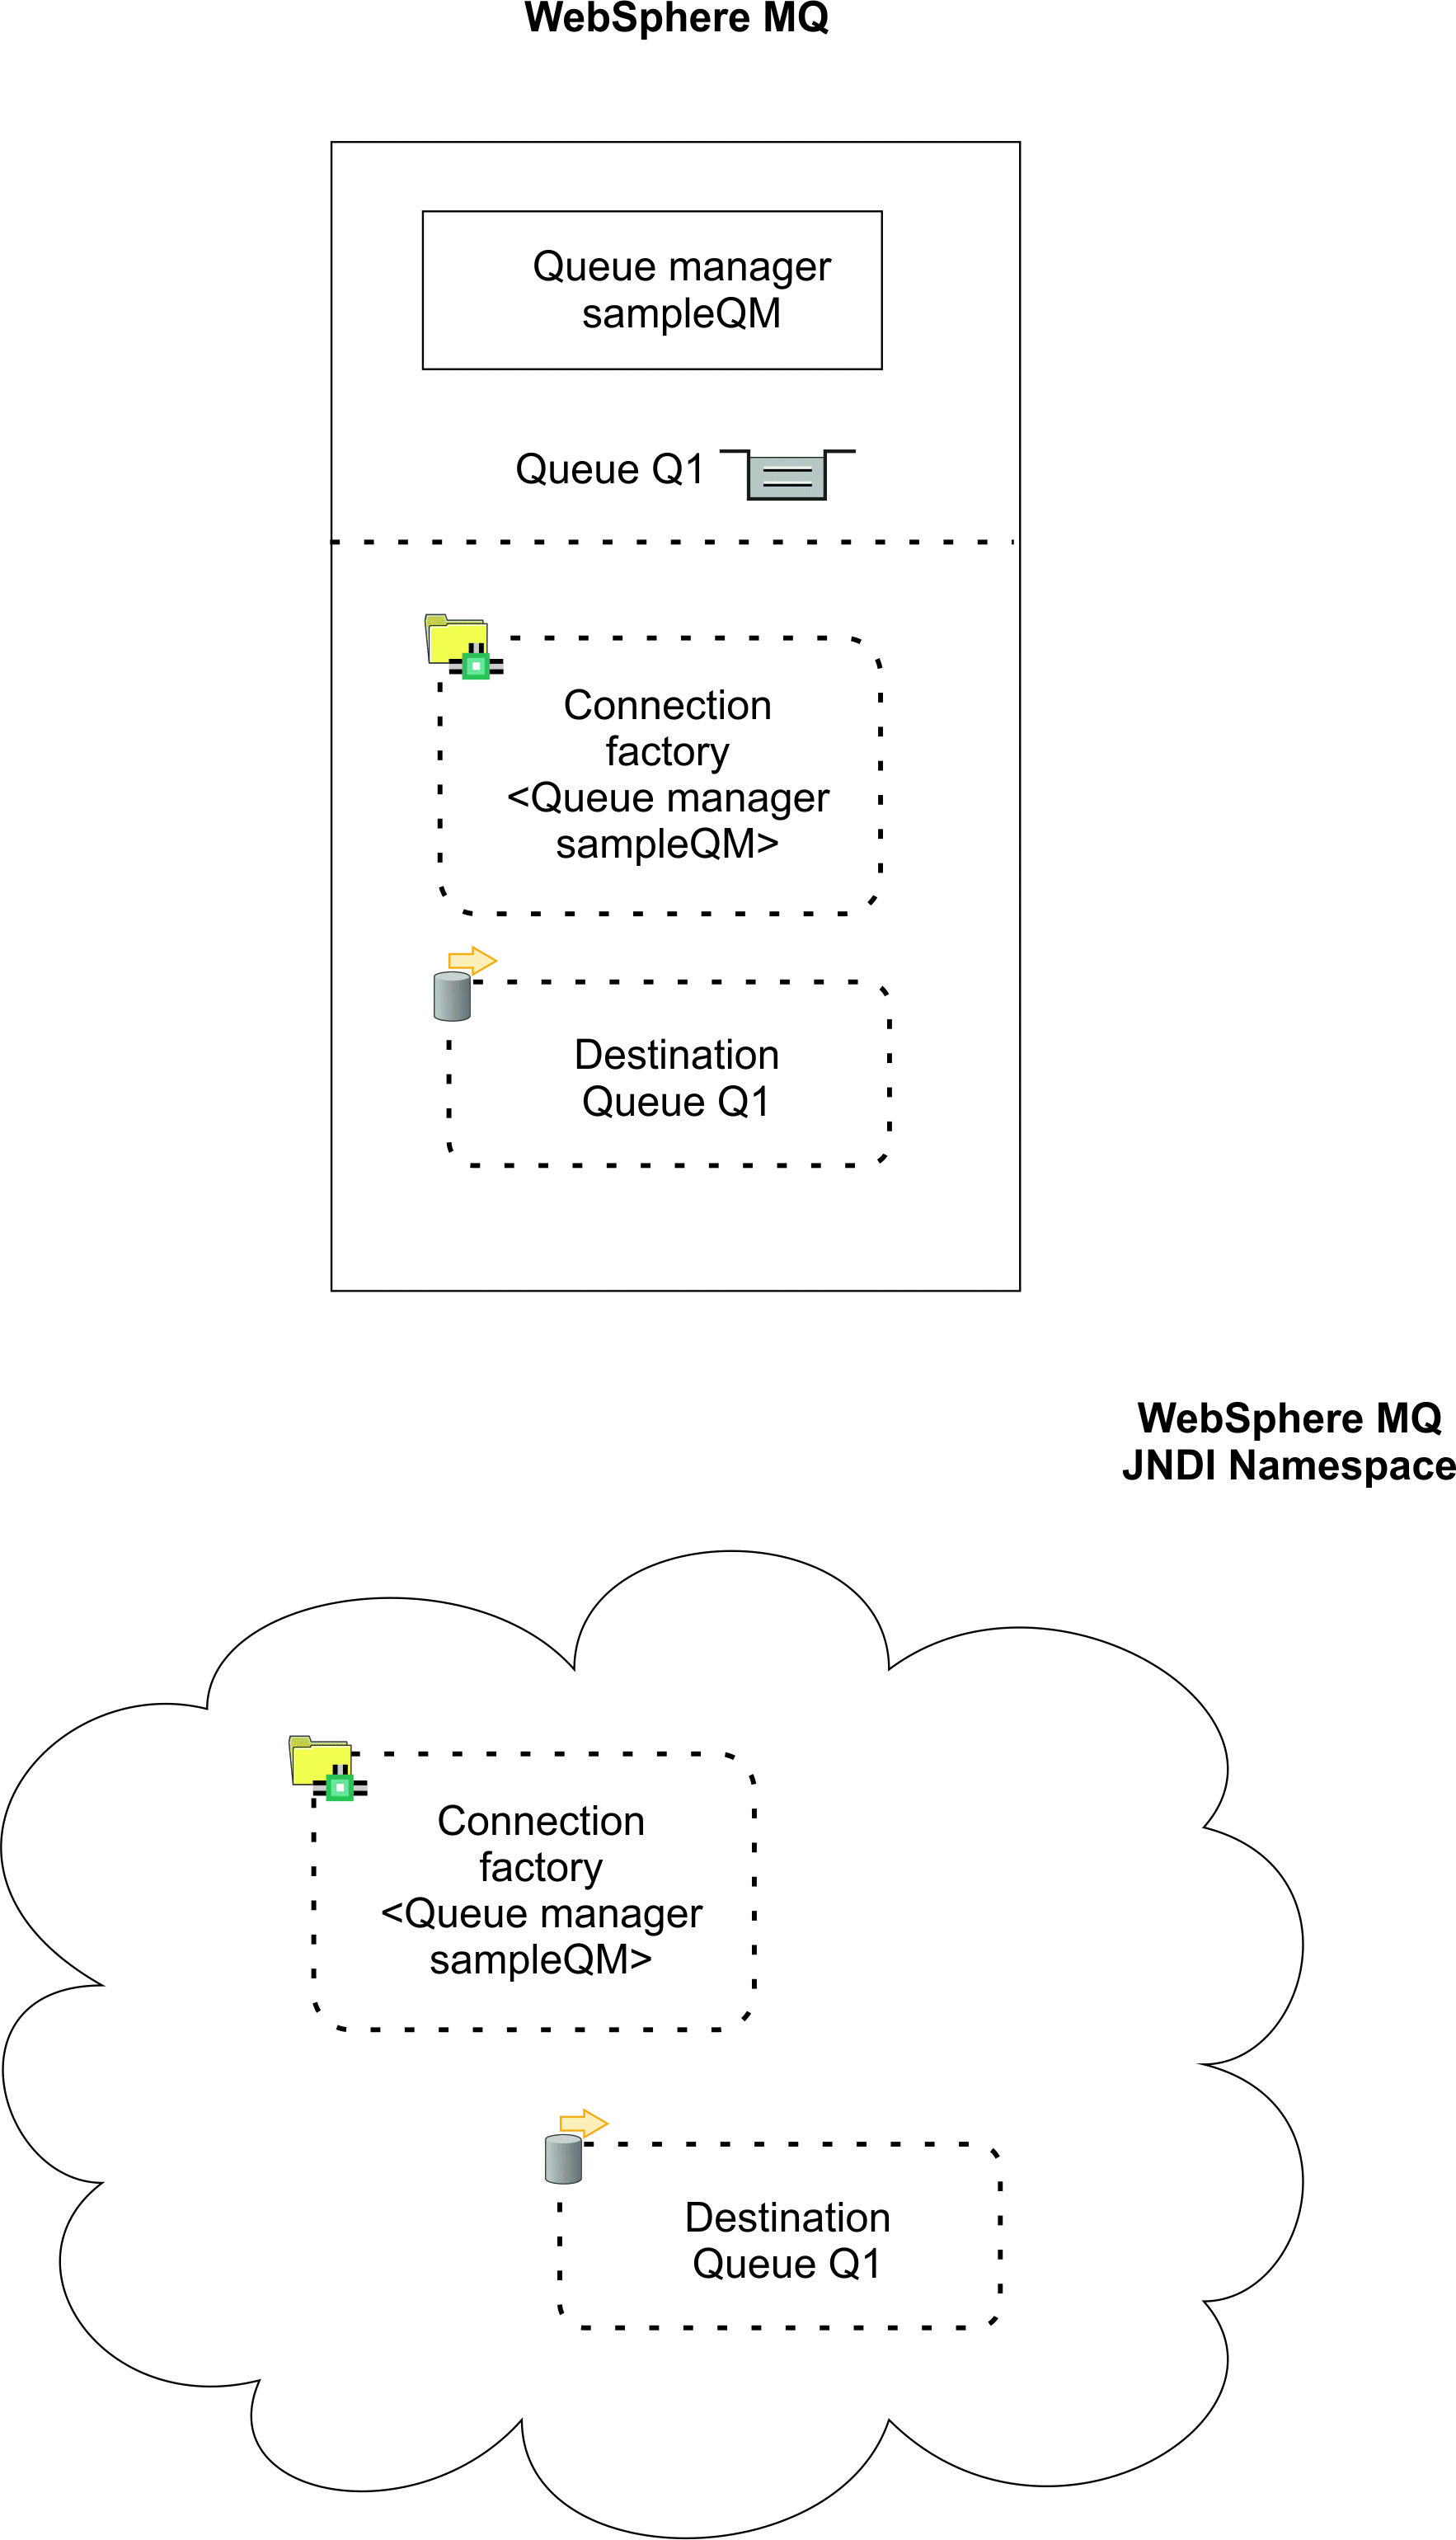
In this task, you create the following objects in IBM MQ.
- A JNDI namespace located in a local file system. A file system is used, because it is the
simplest JNDI mechanism for a sample scenario.
The JNDI namespace can be on a file system, Lightweight Directory Access Protocol (LDAP) server, or on another JNDI implementation. If you want to use a JNDI namespace on an LDAP server or another JNDI implementation, you must configure the JNDI namespace and modify the sample application to reference the JNDI namespace, as required by the implementation.
- Administered objects in the JNDI namespace. The JMS application can look up the administered objects to connect to IBM MQ and access IBM MQ destinations with which to send or receive messages.
Procedure
- Start IBM MQ Explorer, if it is not already started, by clicking Start > All Programs > IBM MQ > IBM MQ Explorer. If IBM MQ Explorer is running and displaying the Welcome page, close the Welcome page to start administering IBM MQ objects.
-
Create a queue manager to use for the sample application.
- Right click Queue Managers and select New > Queue Manager.... The Create Queue Manager wizard starts.
-
In the Queue manager name field type
sampleQM.
We can choose a different name for the queue manager, but you must
remember to use it in later configuration steps, in place of sampleQM. Note: The name must have no more 48 characters, from the following set:
- Uppercase or lowercase characters (A-Z a-z)
- Numeric characters (0-9)
- Period (.)
- Forward slash (/)
- Underscore (_)
- Percent sign (%)
- In the Dead-letter queue field type SYSTEM.DEAD.LETTER.QUEUE. This field is the name of the dead-letter queue that is automatically created when you create the queue manager. A dead-letter queue stores messages that cannot be delivered to their correct destination, for example because the queue is full. All queue managers should have an associated dead-letter queue.
- Leave the other fields empty and click Finish, or if that button is disabled, click Next. The Finish button is disabled if the port number conflicts with an existing queue manager, for example the queue manager that is created as part of the default configuration. You must continue through the wizard to change the default port number.
- If you clicked Next, continue to accept the defaults and click Next on each page until you get to the final page of the wizard, when the Finish button becomes available. Change the specified port number, for example to 1415, and click Finish.
-
Add an initial context for the JNDI namespace then connect IBM MQ Explorer to that context
Before using IBM MQ Explorer to
create and configure JMS administered objects, you
must add an initial context to define the root of the JNDI namespace in which the administered
objects are stored.
Whenever you want to use IBM MQ Explorer to create or manage administered objects in the JNDI namespace, you must connect IBM MQ Explorer to the initial context of the JNDI namespace.
-
In the IBM MQ Explorer - Navigator
pane, right-click JMS
Administered Objects, then select Add Initial Context....
This action displays the
Connection details
page. -
Under
Where is the JNDI namespace located?
, select the File system check box. -
In the Bindings directory field, type
C:\JNDI-Directory.
This value matches the JNDI namespace location specified in the sample
JMS application. If you must specify a different
JNDI directory, you must modify the application to match.
If the directory does not exist on your system the window displays the message
Specified location does not exist or is not readable . Click
Browse... to open a file system window, navigate to Local Disk
(C:), then click Make New Folder to create the
JNDI-Directory folder. Click OK.
Click Next.
-
On the User preferences page, leave the default settings.
- Context nickname: The location of the JNDI namespace will be used as the nickname to display the initial context in IBM MQ Explorer.
- Connect immediately on finish: This option connects IBM MQ Explorer to the JNDI namespace when you finish creating the initial context, so that we can create administered objects immediately.
- Automatically reconnect to context on startup: This option is not selected, because usually we do not need IBM MQ Explorer to automatically reconnect to the initial context every time that you close and reopen IBM MQ Explorer.
Click Finish to create and display the initial context.
-
In the IBM MQ Explorer - Navigator
pane, right-click JMS
Administered Objects, then select Add Initial Context....
This action displays the
-
Create a connection factory administered object.
A connection factory administered object defines a set of standard
configuration properties for connections. An application uses a connection factory to create a
connection to IBM MQ.
- In the IBM MQ Explorer - Navigator pane, expand JMS Administered Objects, then expand the initial context, labeled file:/C:/JNDI-Directory/.
- Right-click Connection Factories, then select New > Connection Factory.... This action displays the New Connection Factory wizard
-
In the Name field, type myCF
The sample JMS application
contains code that looks up a connection factory with the name myCF. If you
must use a different name, you must modify the application to match.
IBM MQ is used for the messaging provider, because the sample application uses point-to-point messaging.
Click Next.
- Leave the type of connection factory as Connection Factory, because this option is the most flexible for general JMS use. A domain-independent connection factory enables JMS applications to use both point-to-point messaging and publish/subscribe messaging, especially if you want the JMS application to perform both types of messaging under the same transaction. If a JMS application is intended to use only point-to-point messaging or only publish/subscribe messaging, we can select the specific messaging domain when you create the connection factory and a domain-specific (queue or topic) connection factory is created.
-
Leave the support for XA transactions as cleared.
The sample application does not use XA-compliant transactions.
IBM MQ JMS supports XA-compliant transactions in bindings
mode. If you want the sample application to use XA-compliant transactions, you must modify the
sample application.
Click Next.
-
Leave the transport as Bindings.
The sample JMS application
that uses the connection factory runs on the same computer as the queue manager, so can use Bindings
mode transport. This option means that the JMS
application connects directly to the queue manager, and offers a performance advantage over the
alternative client mode.
Click Next, then Next again.
- On the Change properties page, select Connection from the menu on the left, then in the Connection pane select sampleQM as the Base queue manager. The base queue manager is the queue manager that the application will connect to. Leave this value blank if you want the application to be able to connect to more than one queue manager.
- Click Finish. IBM MQ displays a dialog window to show that the object was created successfully. Click OK to close the dialog window.
-
Create a destination administered object.
A destination administered object identifies the IBM MQ queue that applications send messages to, or from which an
application receives messages, or both. An application looks up the destination in the JNDI
namespace to create a connection to the IBM MQ queue.
In publish/subscribe messaging, the destination identifies a topic
rather than a queue.
- In the IBM MQ Explorer - Navigator pane, expand JMS Administered Objects, then expand the initial context, labeled file:/C:/JNDI-Directory/.
- Right-click Destinations, then select New > Destination.... The New Destination wizard is displayed.
- In the Name field, type myQueue. Leave the Type as Queue. The sample JMS application contains code that looks up a destination with the name myQueue. The sample JMS application uses point-to-point messaging, so requires a destination of type queue. Destinations of type topic are used for publish/subscribe messaging.
-
Select the Start wizard to create a matching MQ Queue check box.
The destination object needs a matching IBM MQ queue, and it is convenient to use IBM MQ Explorer to create both together. When you complete the
New Destination wizard, the Create an MQ Queue wizard
opens, with many of the destination details mapped to the IBM MQ queue.
Click Next.
Click Next again.
-
On the
Change properties
page, click Select... next to Queue manager. Select the sampleQM queue manager that you created earlier then click OK. -
Specify Q1 as the name of the IBM MQ queue.
We can choose a different name for the queue, but you must remember to
use it in later configuration steps, in place of Q1. Note: The name must have no more 48 characters, from the following set:
- Uppercase or lowercase characters (A-Z a-z)
- Numeric characters (0-9)
- Period (.)
- Forward slash (/)
- Underscore (_)
- Percent sign (%)
-
Click Finish.
The Create an MQ Queue wizard starts.
If the wizard does not start, you might not have selected the Start wizard to create a matching MQ Queue check box in an earlier step. In the IBM MQ Explorer - Navigator pane, expand the sampleQM queue manager, right click Queues, then select New > Local Queue....
-
Create a matching IBM MQ queue.
The destination administered object created earlier represents an IBM MQ queue. This queue is where the JMS messages are stored.
- Click Next to accept the sampleQM queue manager that you specified earlier.
- Click Next.
- Click Finish to create the IBM MQ queue using the information from the destination administered object that you created earlier. IBM MQ displays a dialog window with the message that the object was created successfully.
Results
You have now created the IBM MQ objects that are required to use the sample JMS application.
What to do next
You are now ready to verify that we have configured IBM MQ correctly for use with the sample application as described in Configure the JNDI namespace and administered objects.