WebSphere eXtreme Scale Scenarios
- Use WXS as a dynamic cache provider
- Configure an enterprise data grid
- Secure the data grid
- Use OSGi to develop WXS plug-ins
- Use JCA to connect transactional applications to WXS clients
- Configure HTTP session failover in the Liberty profile
- Run grid servers in the Liberty profile using Eclipse tools
Scenario: Use WXS as a dynamic cache provider
WebSphere Application Server (WAS) provides a Dynamic Cache service that is available to deployed Java EE applications. This service is used to cache data such as output from servlet, JSP or commands, as well as object data progamatically specified within an enterprise application using the DistributedMap APIs.
Initially, the only provider for the Dynamic Cache service was the default dynamic cache provider built into WAS. Today customers can also specify WebSphere eXtreme Scale (WXS) to be the cache provider for any given cache instance. This enables applications that use the Dynamic Cache service, to use the features and performance capabilities of WXS.
Dynamic cache APIs include...
- Command caching
- Servlet caching
- Web Services caching
- POJO caching

We can install and configure the dynamic cache provider.
The available features in WXS significantly increase the distributed capabilities of the Dynamic Cache service beyond what is offered by the default dynamic cache provider and data replication service. With WXS, we can create caches that are truly distributed between multiple servers, rather than just replicated and synchronized between the servers. Also, WXS caches are transactional and highly available, ensuring that each server sees the same contents for the dynamic cache service. WXS offers a higher quality of service for cache replication provided via DRS.
However, these advantages do not mean that the WXS dynamic cache provider is the right choice for every application.
Decision tree for migrating existing dynamic cache applications

Decision tree for choosing a cache provider for new applications

Feature comparison
| Cache features | Default provider | WXS provider | WXS API |
|---|---|---|---|
| Local, in-memory caching | Yes | via Near-cache capability | via Near-cache capability |
| Distributed caching | via DRS | Yes | Yes |
| Linearly scalable | No | Yes | Yes |
| Reliable replication (synchronous) | No | Yes | Yes |
| Disk overflow | Yes | N/A | N/A |
| Eviction | LRU/TTL/heap-based | LRU/TTL (per partition) | LRU/TTL (per partition) |
| Invalidation | Yes | Yes | Yes |
| Relationships | Dependency / template ID relationships | Yes | No (other relationships are possible) |
| Non-key lookups | No | No | via Query and index |
| Back-end integration | No | No | via Loaders |
| Transactional | No | Yes | Yes |
| Key-based storage | Yes | Yes | Yes |
| Events and listeners | Yes | No | Yes |
| WAS integration | Single cell only | Multiple cell | Cell independent |
| Java SE support | No | Yes | Yes |
| Monitoring and statistics | Yes | Yes | Yes |
| Security | Yes | Yes | Yes |
A WXS distributed cache can only store entries where the key and the value both implement the java.io.Serializable interface.
Remote topology
A dynamic cache service created with WXS as the provider can be deployed in a remote topology, which eliminates the need for a disk cache. All of the cache data is stored outside of WAS processes.
WXS supports standalone container processes for cache data. These container processes have a lower overhead than a WAS process and are also not limited to using a particular JVM. For example, the data for a dynamic cache service being accessed by a 32-bit WAS process could be located in a WXS container process running on a 64-bit JVM. This allows users to use the increased memory capacity of 64-bit processes for caching, without incurring the additional overhead of 64-bit for application server processes.

The local, embedded, and embedded-partitioned topology types are deprecated.
Dynamic cache engine vs. eXtreme Scale functional differences
Users should not notice a functional difference between the two caches except that the WXS backed caches do not support disk offload or statistics and operations related to the size of the cache in memory.
There will be no appreciable difference in the results returned by most Dynamic Cache API calls, regardless of whether the customer is using the default dynamic cache provider or the eXtreme Scale cache provider. For some operations we cannot emulate the behavior of the dynamic cache engine using eXtreme Scale.
Dynamic cache statistics
Statistical data for a WXS dynamic cache can be retrieved using the eXtreme Scale monitoring tooling.
MBean calls
The WXS dynamic cache provider does not support disk caching. Any MBean calls relating to disk caching will not work.
Dynamic cache replication policy mapping
The eXtreme Scale dynamic cache provider's remote topology supports a replication policy that most closely matches the SHARED_PULL and SHARED_PUSH_PULL policy (using the terminology used by the default WAS dynamic cache provider). In a WXS dynamic cache, the distributed state of the cache is completely consistent between all the servers.
Global index invalidation
Use a global index to improve invalidation efficiency in large partitioned environments; for example, more than 40 partitions. Without the global index feature, the dynamic cache template and dependency invalidation processing must send remote agent requests to all partitions, which results in slower performance. When configuring a global index, invalidation agents are sent only to applicable partitions that contain cache entries related to the Template or Dependency ID. The potential performance improvement will be greater in environments with large numbers of partitions configured. We can configure a global index using the Dependency ID and Template ID indexes, which are available in the example dynamic cache objectGrid descriptor XML files.
Security
When a cache is running in a remote topology, it is possible for a standalone WXS client to connect to the cache and affect the contents of the dynamic cache instance. It is therefore important WXS servers containing the dynamic cache instances reside in an internal network, behind what is typically known as the network DMZ.
Near cache
A dynamic cache instance can be configured to use a near cache, which resides locally within the application server JVM, and contains a subset of the remote dynamic cache instance data. Configure the near cache instance using...
-
dynacache-nearCache-ObjectGrid.xml
Plan environment capacity
To plan capacity, determine size of initial and projected data set size.
Configure an Enterprise Data Grid in a stand-alone environment for dynamic caching
To configure and start an enterprise grid for dynamic caching, copy and modify the deployment and objectGrid descriptor files below. For installations with WAS, files are located in...
-
was_root/optionalLibraries/ObjectGrid/dynacache/etc
For installations in a stand-alone environment, files are located in...
-
wxs_install_root/ObjectGrid/dynacache/etc
- dynacache-remote-deployment.xml
- Deployment descriptor file for starting a container server for dynamic caching. Can be used as-is. Elements include...
mapSet
mapThe name attribute in mapSet, and the defined value for map ref do not directly correspond to the dynamic cache instance name configured for WAS and are typically not changed. If, however, these values are changed, corresponding custom properties must be added to the configuration of the dynamic cache instance. numberOfPartitions Number of partitions maxAsyncReplicas Set to OPTIMISTIC or NONE to trigger near cache processing. If high availability is important, set to PESSIMISTIC. numInitialContainers Set to the number of containers included in the initial startup of the enterprise data grid. For placement and distribution of partitions throughout the data grid.
- /dynacache-remote-objectgrid.xml
- ObjectGrid descriptor file used to start a container server for dynamic caching. Configured to run with the XIO using XDF. In addition, the Dependency ID and Template ID indexes are configured to use a Global Index, which improves invalidation performance. Can be used as-is. Elements include...
objectGrid name
backingMap nameThe name attributes in the objectGrid and backingMap elements do not directly correspond to the dynamic cache instance name configured for WAS cache instance and typically do not need to be changed. If, however, these attributes are changed, then the corresponding custom properties must be added to the configuration of the dynamic cache instance. copyMode Set this attribute to COPY_TO_BYTES. This value enables XDF when the XIO transport type is used. Changing to some other copyMode will disable XDF and will require that you uncomment the ObjectTransformer plugin bean. lockStrategy Set this attribute to PESSIMISTIC. Setting this to OPTIMISTIC or NONE will trigger near cache processing and must be accompanied with properties from the dynamic-nearcache-objectgrid.xml. backingMapPluginCollections Required. The child elements Evictor plug-in and MapIndex plug-in are both required for dynamic caching and must not be removed. GlobalIndexEnabled Both the DEPENDENCY_ID_INDEX and TEMPLATE_INDEX contain a GlobalIndexEnabled property set to true. Setting this value to false will disable the global index feature for these indexes. Recommended to leave these global indexes enabled unless we are running with a small number of total partitions, for example, less than 40. objectTransformer Since this objectGrid descriptor file is intended to run in XDF, it has been commented out. To disable XDF (by changing the copyMode value) then uncomment this plug-in.
- dynacache-nearCache-ObjectGrid.xml
- ObjectGrid descriptor file for starting grid container servers for dynamic caching when a near-cache is desired. Configured to run with the XIO using XDF. The Dependency ID and Template indexes are configured to use a Global Index. The dynamic caching near cache capability requires the use of the XIO transport type.
- Elements...
objectGrid name
backingMap nameThese values in this file do not directly correspond to the dynamic cache instance name configured for the WAS's cache instance and typically do not need to be changed. If, however, these values are changed, then corresponding custom properties must be added to the configuration of the dynamic cache instance. lockStrategy Set to OPTIMISTIC or NONE to enable a near cache . No other lockingStrategy supports a near cache . nearCacheInvalidationEnabled Set to true to enable a dynamic caching near cache . This feature uses pub-sub to flow invalidations from the far cache to the near cache instances, keeping them in-sync. nearCacheLastAccessTTLSyncEnabled Set to true to enable a dynamic caching near cache . This feature uses pub-sub to flow TTL evictions from the far cache to the near cache instances, keeping them in -sync. copyMode This backingMap property is set to COPY_TO_BYTES. This value enables XDF when the XIO transport type is used. Changing to some other copyMode will disable XDF and will require that the ObjectTransformer plugin bean be uncommented. backingMapPluginCollections The MapIndexPlugins and Evictor are mandatory items for dynamic caching and must not be removed. GlobalIndexEnabled Both the DEPENDENCY_ID_INDEX and TEMPLATE_INDEX contain a GlobalIndexEnabled property set to true. Setting this value to false will disable the global indexfeature for these indexes. It is recommended to leave these global indexes enabled unless we are running with a small number of total partitions (< 40). ObjectTransformer Since this file is intended to run in XDF this plugin as been commented out. If XDF is to be disabled (via changing the copyMode) then this plugin must be uncommented.
- dynacache-legacy85-ObjectGrid.xml
- Recommended ObjectGrid descriptor file for starting a container server for dynamic caching when you have chosen a near-cache. Although this file can be used as-is, the following elements or attributes are occasionally changed or have significant importance:
objectGrid name and backingMap name These values in this file do not directly correspond to the dynamic cache instance name configured for the WAS's cache instance and typically do not need to be changed. If, however, these values are changed, then corresponding custom properties must be added to the configuration of the dynamic cache instance. copyMode This backingMap property is set to COPY_ON_READ_AND_COMMIT. This value should not be changed. lockStrategy This backingMap property is set to PESSIMISTIC. This value should not be changed. backingMapPluginCollections The MapIndexPlugins, Evictor, and Object Transformer are mandatory items for dynamic caching and must not be removed.
Configure an Enterprise Data Grid for dynamic caching using a Liberty profile
A Liberty profile server can host a data grid that caches data for applications that have dynamic cache enabled.
- Install the Liberty profile
- Create an application that uses dynamic cache.
The Liberty profile hosts the data grid which supports dynamic-cache-enabled applications. This means that the application runs on a traditional installation of WAS. For those applications to be cached by the eXtreme Scale runtime environment, configure WAS to use the catalog domain service and server properties that you specify in the Liberty profile.
- Enable the WXS dynamic cache feature in the Liberty profile server.xml file.
<featureManager> <feature>eXtremeScale.server-1.1</feature> <feature>eXtremeScale.dynacacheGrid-1.1</feature> </featureManager> - Optional: Set properties on the xsDynacacheGrid element in server.xml.
We can change any of the following properties. However, IBM recommends that you accept the default values.
- globalIndexDisabled
- Global index invalidation improves invalidation efficiency in a large, partitioned environment; for example, more than 40 partitions. Default: false
- objectGridName
- Name of the data grid. Default: DYNACACHE_REMOTE.
- ojectGridTxTimeout
- Amount of time in seconds that a transaction is allowed for completion. If a transaction does not complete in this amount of time, the transaction is marked for rollback and a TransactionTimeoutException exception results.
Default: 30 (in seconds)
- backingMapLockStrategy
- If the internal lock manager is used whenever a map entry is accessed by a transaction. Set this attribute to one of three values: OPTIMISTIC PESSIMISTIC, NONE.
Default: PESSIMISTIC
- backingMapCopyMode
- If a get operation of an entry in the BackingMap instance returns the actual value, a copy of the value, or a proxy for the value. If you use XDF so that both Java and .NET can access the same data grid, then the default and required copy mode is COPY_TO_BYTES. Otherwise, the copy mode, COPY_ON_READ_AND_COMMIT is used. Set the CopyMode attribute to one of five values:
- COPY_ON_READ_AND_COMMIT
- Default. Ensures that an application never has a reference to the value object that is in the BackingMap instance. Instead, the application is always working with a copy of the value that is in the BackingMap instance. (Optional)
- COPY_ON_READ
- Improve performance over the COPY_ON_READ_AND_COMMIT value by eliminating the copy that occurs when a transaction is committed. To preserve the integrity of the BackingMap data, the application commits to delete every reference to an entry after the transaction is committed. Setting this value results in an ObjectMap.get method returning a copy of the value instead of a reference to the value, which ensures changes that are made by the application to the value does not affect the BackingMap element until the transaction is committed.
- COPY_ON_WRITE
- Improve performance over the COPY_ON_READ_AND_COMMIT value by eliminating the copy that occurs when ObjectMap.get method is called for the first time by a transaction for a given key. Instead, the ObjectMap.get method returns a proxy to the value instead of a direct reference to the value object. The proxy ensures that a copy of the value is not made unless the application calls a set method on the value interface.
- NO_COPY
- Allow an application to never modify a value object that is obtained using an ObjectMap.get method in exchange for performance improvements. Set the value to NO_COPY for maps associated with EntityManager API entities.
- COPY_TO_BYTES
- Improve memory footprint for complex Object types and to improve performance when the copying of an Object relies on serialization to make the copy. If an Object is not Cloneable or a custom ObjectTransformer with an efficient copyValue method is not provided, the default copy mechanism is to serialize and inflate the object to make a copy. With the COPY_TO_BYTES setting, inflate is only performed during a read and serialize is only performed during commit.
Default: COPY_ON_READ_AND_COMMIT
- backingMapNearCacheEnabled
- Set true to enable the client local cache. To use a near cache, the lockStrategy attribute must be set to NONE or OPTIMISTIC.
Default: false
- mapSetNumberOfPartitions
- Number of partitions for the mapSet element.
Default: 47
- mapSetMinSyncReplicas
- Minimum number of synchronous replicas for each partition in the mapSet. Shards are not placed until the domain can support the minimum number of synchronous replicas. To support the minSyncReplicas value, you need one more container server than the minSyncReplicas value.
If the number of synchronous replicas falls below the minSyncReplicas value,
write transactions are no longer allowed for that partition.
Default: 0
- mapSetMaxSyncReplicas
- Maximum number of synchronous replicas for each partition in the mapSet. No other synchronous replicas are placed for a partition after a domain reaches this number of synchronous replicas for that specific partition. Adding container servers that can support this ObjectGrid can result in an increased number of synchronous replicas if your maxSyncReplicas value has not already been met.
Default: 0
- mapSetNumInitialContainers
- Number of container servers that are required before initial placement occurs for the shards in this mapSet element. This attribute can help save process and network bandwidth when bringing a data grid online from a cold startup.
Default: 1
- mapSetDevelopmentMode
- With this attribute, we can influence where a shard is placed in relation to its peer shards. When the developmentMode attribute is set to false, no two shards from the same partition are placed on the same computer. When the developmentMode attribute is set to true, shards from the same partition can be placed on the same machine. In either case, no two shards from the same partition are ever placed in the same container server.
Default: false
- mapSetReplicaReadEnabled
- If set true, read requests are distributed amongst a partition primary and its replicas. If the replicaReadEnabled attribute is false, read requests are routed to the primary only. Default: false
- Configure WAS to point to the Liberty profile.
We can connect WXS containers and dynamic-cache-enabled web applications to a catalog service domain running in another WAS cell or as stand-alone processes. Because remotely configured catalog servers do not automatically start in the cell, manually start any remotely configured catalog servers.
When you configure a remote catalog service domain, the domain name must match the domain name specified when you start the remote catalog servers. The default catalog service domain name for stand-alone catalog servers is false Domain. Specify a catalog service domain name with the startOgServer or startXsServer command -domain parameter, a server properties file, or with the embedded server API. Start each remote catalog server process in the remote domain with the same domain name.
Configure dynamic cache instances
The WebSphere Dynamic Cache Service supports the creation of both a default cache instance (baseCache) as well as additional servlet and object cache instances.
The default cache instance (baseCache) was initially the only dynamic cache instance supported by the WAS and is currently the out-of-box dynamic cache instance used WebSphere Commerce Suite. The additional servlet and object cache instances were added in later releases of the WAS and are configured in a separate "cache instance" section of the WebSphere Administrative Console.
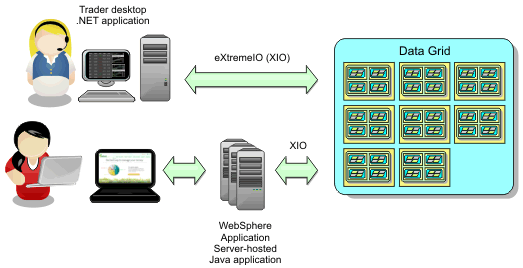
Scenario: Configure an enterprise data grid
Configure an enterprise data grid when we want both Java and .NET applications to connect to the same data grid.
- Install the product. Install both the server runtime and the clients. For clients, we can use both Java and .NET clients.
- If we are upgrading from a previous release, you must have all of your container and catalog servers at the same release level.
Enterprise data grid
Enterprise data grids use the eXtremeIO transport mechanism and a new serialization format. With the new transport and serialization format, we can connect both Java and .NET clients to the same data grid.
With the enterprise data grid, we can create multiple types of applications, written in different programming languages, to access the same objects in the data grid. In prior releases, data grid applications had to be written in the Java programming language only. With the enterprise data grid function, we can write .NET applications that can create, retrieve, update, and delete objects from the same data grid as the Java application.
Object updates across different applications
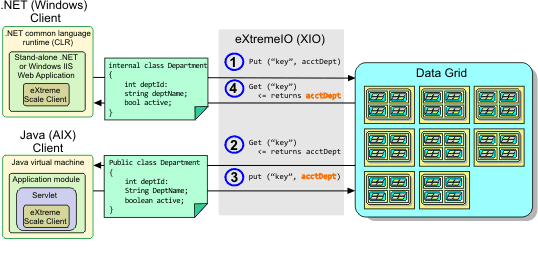
- The .NET client saves data in its format to the data grid.
- The data is stored in a universal format, so that when the Java client requests this data it can be converted to Java format.
- The Java client updates and re-saves the data.
- The .NET client accesses the updated data, during which the data is converted to .NET format.
Transport mechanism
XIO is a cross-platform transport protocol that replaces the Java-bound ORB. With the ORB, WXS is bound to Java native client applications. The XIO transport mechanism is specifically targeted for data caching, and enables client applications that are in different programming languages to connect to the data grid.
Serialization format
XDF is a cross-platform serialization format. XDF replaces Java serialization. Enabled on maps with a copyMode attribute value of COPY_TO_BYTES in the ObjectGrid descriptor XML file. With XDF, performance is faster and data is more compact. In addition, the introduction of XDF enables client applications that are in different programming languages to connect to the same data grid.
Configure IBM XIO
IBM XIO is a transport mechanism that replaces the ORB. To configure XIO, all of the catalog and container servers must be at the Version 8.6 release level. We can configure XIO for all the container servers in the catalog service domain by enabling XIO in the catalog servers. The container servers discover the transport type of the catalog server and use that transport type.
How you enable XIO depends on the type of servers we are using:
- Enable XIO on your stand-alone catalog servers.
XIO is enabled by default when you start the catalog server with the startXsServer command.
- Enable XIO on your servers running in WAS.
We can enable XIO on the catalog service domain in the WAS administrative console. Click...
-
System administration | WebSphere eXtreme Scale | Catalog service domains | catalog_service_domain | Enable IBM XIO communication
- Enable XIO on your servers that run in the Liberty profile.
To enable XIO in a Liberty profile server, set transport attribute to XIO in your server.xml file. For example, see the highlighted property in the following code example:
<featureManager>
  ...
  <feature>eXtremeScale.server-1.1</feature>
</featureManager>

<xsServer isCatalog="true" transport="XIO" listenerPort="2809" ... />
The server must be a catalog server, and therefore, isCatalog must be set to true when you configure XIO. The listenerPort setting is not required; however, XIO can recognize this port if you enable it. If you do not enable XIO, then the ORB is used on that port instead.
Next, run the start command to start your Liberty profile servers.
Use command-line arguments and server properties to configure XIO behavior. Optional: Update the server properties file for each container server in the configuration to enable XIO properties. After you decide on the properties to set, we can set the values in the server properties file or programmatically with the ServerProperties interface.
We can also use IBM eXtremeMemory to help you avoid garbage collection pauses, leading to more constant performance and predicable response times.
Configure data grids to use XDF
If we are using an enterprise data grid, enable XDF so that both Java and .NET can access the same data grid objects. Use XDF to serialize and store keys and values in the data grid in a language-independent format.
Enable IBM XIO in the environment.
Enable XDF to store serialized objects in a language independent manner. XDF is now the default serialization technology used when we are running XIO and have a map copy mode that is set to COPY_TO_BYTES. When you enable this feature, Java and C# objects can share data in the same data grid. We can set XDF mode for installations of WXS in a stand-alone environment and for installations of WXS within a WAS environment.
When you use XDF, you get the following benefits:
- Serialization of the data for sharing between Java, and C#/.NET applications.
- Indexing data on the server without requiring the user classes to be present, if field access is used.
- Automatic versioning of your classes so we can augment the class definitions when you add applications that require newer versions of the files. Older versions of the data can be used by taking advantage of the Mergable interface.
- Partitioning of the data with annotations in Java and C# to consistently partition from the application.
In the ObjectGrid descriptor XML file, set the CopyMode attribute to XDF in the backingMap element of the ObjectGrid descriptor XML file.
<backingMap name="Employee"
            lockStrategy="PESSIMISTIC"
            copyMode="COPY_TO_BYTES">
Develop applications that can share data.
Develop enterprise data grid applications
After you configure IBM eXtremeIO, we can write applications that access the enterprise data grid.
- Set up your development environment and view the API documentation.
- You must have existing Java or .NET applications that access the data grid.
Class evolution
XDF allows for class evolution. We can evolve the class definitions used in the data grid without affecting older applications that are using previous versions of the class. These older classes are accessing data in the same map as the new applications.
Overview
Class evolution is a further extension of the identification of classes and fields that determine whether two types are compatible enough to function together. Classes can function together when one of the classes has fewer fields than the other class. The following user scenarios are designed into the XDF implementation :
- Multiple versions of the same object class
- In this scenario, you have a map in a sales application used tracking customers. This map has two different interfaces. One interface is for the web purchases. The second interface is for the phone purchases. In version 2 of this sales application, you decide to give discounts to web shoppers based on their purchasing habits. This discount is stored with the Customer object. The phone sales employees are still using version 1 of the application, which is unaware of the new discount field in the web version. You want Customer objects from version 2 of the application to work with Customer objects that were created with the version 1 application and vice versa.
- Multiple versions of a different object class
- In this scenario, you have a sales application that is written in Java that keeps a map of Customer objects. You also have another application that is written in C# and is used to manage the inventory in the warehouse and ship goods to customers. These classes are currently compatible based on the names of the classes, fields, and types. In your Java sales application, we want to add an option to the Customer record to associate the sales person with a customer account. However, you do not want to update the warehouse application to store this field because it is not needed in the warehouse.
- Multiple incompatible versions of the same class
- In this scenario, your sales and inventory applications both contain a Customer object. The inventory application uses an ID field that is a string and the sales application uses an ID field that is an integer. These types are not compatible. As a result, the objects are probably not stored in the same map. The objects must be handled by the XDF serialization and treated as two distinct types. While this scenario is not really class evolution, it is a consideration that must be part of your overall application design.
Determination for evolution
XDF attempts to evolve a class when the class names match and the field names do not have conflicting types. Using the ClassAlias and FieldAlias annotations are useful when we are trying to match classes between C# and Java applications where the names of the classes or fields are slightly different. We can put these annotations on either the Java and C# application, or both. However, the lookup for the class in the Java application can be less efficient than defining the ClassAlias on the C# application.
The effect of missing fields in serialized data
The constructor of the class is not invoked during deserialization, so any missing fields have a default that is assigned to it based on the language. The application that is adding new fields must be able to detect the missing fields and react when an older version of class is retrieved.
Updating the data is the only way for older applications to keep the newer fields
An application might run a fetch operation and update the map with an older version of the class that is missing some fields in the serialized value from the client. The server then merges the values on the server and determines whether any fields in the original version are merged into the new record. If an application runs a fetch operation, and then removes and inserts an entry, the fields from the original value are lost.
Merging capabilities
Objects within an array or collection are not merged by XDF. It is not always clear whether an update to an array or collection is intended to change the elements of that array or the type. If a merge occurs based on positioning, when an entry in the array is moved, XDF might merge fields that are not intended to be associated. As a result, XDF does not attempt to merge the contents of arrays or collections. However, if you add an array in a newer version of a class definition, the array gets merged back into the previous version of the class.
Defining ClassAlias and FieldAlias annotations to correlate Java and .NET classes
Use ClassAlias and FieldAlias annotations to enable sharing of data grid data between your Java and .NET classes.
- You must have IBM eXtremeIO configured.
- Your copyMode attribute in your ObjectGrid descriptor XML file must be set to COPY_TO_BYTES.
You might consider using ClassAlias and FieldAlias annotations if you have an existing Java class and want to create a corresponding C# class. In this scenario, we can add the annotations to your C# class that include the Java class name.
Use ClassAlias and FieldAlias annotations to correlate objects between a Java class and a C# class.
@ClassAlias("Employee")
class com.company.department.Employee {

     @FieldAlias("id")
     int myId;

      String name;}
.NET example with ClassAlias and FieldAlias attributes
[ ClassAlias( "Employee") ]
class Com.MyCompany.Employee {

     [ FieldAlias("id") ]
      int identifier;

      string name;}
ClassAlias and FieldAlias annotations
Use ClassAlias and FieldAlias annotations to enable sharing of data grid data between classes. We can either share data between two Java classes or a Java and a .NET class.
If you define two classes with the same name and fields, the data grid data is automatically shared between the classes. For example, if you have a Customer1 class in your Java application, and a Customer1 class in your .NET application that has the same fields, the data is shared between the classes. This assumes that the class name also includes the class qualifier, which is also the package name in Java and namespace in C#. The package name and namespace are automatically shared because the namespace and package names match: See the following example, where both names are case insensitive:
Java:
package com.mycompany.app public class SampleClass {
int field1;
String field2;}

C#
namespace Com.MyCompany.App public class SampleClass {
int field1;
string field2;}
However, we can also correlate data between classes that have different names. To correlate data to be stored in the data grid between different class names, use ClassAlias or FieldAlias annotations.
Between two Java applications: We can define two different classes with different names in separate Java application environments. By marking the classes with the same ClassAlias annotation, and all fields and field types are matched between these two classes. The classes get correlated with the same class type ID even though they have the different class names. The same class type ID and the metadata can then be reused between the classes in the different Java application run times.
Between a Java application and a .NET application: Use similar annotations in your C# application to correlate the C# class with a Java class. The ClassAlias attributes that are defined for the class C# and fields are matched to a Java class with the same ClassAlias annotation.
Mapping keys to partitions with PartitionKey annotations
A PartitionKey alias is used to identify the fields or attributes on which a hash code calculation is run to determine the partition to which data is saved. The PartitionKey annotation is only valid on key attributes.
You must be using eXtreme Data Format.
You set a PartitionKey alias to ensure that multiple classes save data to the same partition. For example, if you set the PartitionKey value to be the departmentID key, employee records are collocated on the same partition. The PartionableKey interface is the existing Java interface and has precedence over the PartitionableKey annotation in C#.
- Define PartitionKey annotations on a field in a Java application.
 class Employee {
     int empId;

     @PartitionKey(order = 0)
     int deptId;

 }
We can set PartitionKey annotations on multiple keys, or we can set the PartitionKey alias on a class. -
 Define PartitionKey attributes on a field in a .NET application.
class Employee {
    int empId;

    [PartitionKey]
    int deptId;}
We can set also PartitionKey attributes on .NET classes.
Java and C# data type equivalents
When you develop enterprise data grid applications, data types between your Java and C# applications must be compatible.
| Java type | C# type |
|---|---|
| boolean | bool |
| java.lang.Boolean | bool? |
| byte | sbyte or byte |
| java.lang.Byte | sbyte? |
| short | short?, ushort |
| java.lang.Short | short?, ushort? |
| int | int, uint, ushort |
| java.lang.Integer | int?, uint? |
| long | long, ulong, uint |
| java.lang.Long | long?, ulong?, uint? |
| short or int | ushort |
| java.lang.Short or java.lang.Integer | ushort? |
| int or long | uint |
| java.lang.Integer or java.lang.Long | uint? |
| long or BigInteger | ulong |
| java.lang.Long or java.lang.BigInteger | ulong? |
| char, java.lang.Character | char |
| java.lang.Character | char? |
| float, java.lang.Float | float |
| java.lang.Foat | float? |
| double | double |
| java.lang.Double | double? |
| java.math.BigDecimal | decimal or decimal? |
| java.math.BigInteger | decimal, long or ulong? |
| java.lang.String | string |
| java.util.Date, java.util.Calendar | System.DateTime |
| java.util.Date(rounding), java.util.Calendar(rounding) | System.DateTime |
| java.util.ArrayList | System.Collections.ArrayList, System.Collections.Generic.List, System.Collections.SortedList? |
| java.util.HashMap | System.Collections.Generic.Dictionary, System.Collections.Hashtable |
| java.util.LinkedList | System.Collections.Generic.LinkedList |
| java.util.ArrayList, java.util.Vector | System.Collections.Generic.List |
| java.util.Stack | System.Collections.Generic.Stack |
| java.util.Vector | System.Collections.ArrayList? System.Collections.Generic.List? |
Starting stand-alone servers (XIO)
When running a stand-alone configuration, the environment is comprised of catalog servers, container servers, and client processes. WXS servers can also be embedded within existing Java applications using the embedded server API. You must manually configure and start these processes.
We can start WXS servers in an environment that does not have WAS installed.
Tune IBM XIO
Use XIO server properties to tune the behavior of the XIO transport in the data grid.
Server properties for tuning XIO
We can set the following properties in the server properties file:
- maxXIONetworkThreads
- Set the maximum number of threads to allocate in the eXtremeIO transport network thread pool. Default: 256
- minXIONetworkThreads
- Sets the minimum number of threads to allocate in the eXtremeIO transport network thread pool. Default: 1
- maxXIOWorkerThreads
- Set the maximum number of threads to allocate in the eXtremeIO transport request processing thread pool. Default: 256
- minXIOWorkerThreads
- Set the minimum number of threads to allocate in the eXtremeIO transport request processing thread pool.
Default: 1
- transport
-
Specifies the type of transport to use for all the servers in the catalog service domain. We can set the value to XIO or ORB.
When you use the startOgServer or startXsServer commands, you do not need to set this property. The script overrides this property. However, if you start servers with another method, the value of this property is used.
This property applies to the catalog service only.
If you have both the -transport parameter on the start script and the transport server property defined on a catalog server, the value of the -transport parameter is used.
- xioTimeout
- Set the timeout for server requests that are using the IBM XIO transport in seconds. The value can be set to any value greater than or equal to one second.
Default: 30 seconds
Scenario: Secure the data grid in eXtreme Scale
WXS data grids store information that is sensitive and must be protected.
- Install the product. Install both the server runtime and the clients. For clients, we can use both Java and .NET clients.
- If we are upgrading from a previous release, you must have all of your container and catalog servers at the same release level.
For a secure deployment, use several layers of protection for optimal security. The first element of protection is the use of firewalls to segment the network. The standard tiered model for web applications is comprised of web clients, a presentation tier of HTTP servers, an application tier comprised of application servers, a data tier, and a storage tier.
eXtreme Scale data grid servers are deployed as part of the data tier. Standard practice is to put the presentation layer servers in a demilitarized zone (DMZ) protected by one firewall, and to put the application, data, and storage tiers in network segments protected by additional firewalls. Do not deploy eXtreme Scale servers in a DMZ. eXtreme Scale servers must be protected as all elements of the data tier are, according to standard industry practice.
However, for optimal protection against security threats, use an in-depth defense mechanism, where a number of additional measures protect eXtreme Scale operation and the data that is stored in the data grid. These additional measures not only help in defending against external threats, but also prevent unauthorized data access by employees and contractors who might have access to network segments in which the eXtreme Scale servers reside.
Use the following end-to-end steps to configure security in WXS, whether you have stand-alone servers, the Liberty profile, the OSGi framework, or WAS installed in your environment:
Authenticating eXtreme Scale connections between servers
Connections between servers must be authenticated to prevent an unauthorized server from accessing grid data.
Authenticating eXtreme Scale server connections in stand-alone environments
Connections between eXtreme Scale servers must be authenticated to prevent an unauthorized server from accessing the data grid.
The following settings in the server.properties file determine how servers authenticate to one another:
- securityEnabled=true
- secureTokenManagerType=autoSecret
- authenticationSecret=OurGridServersExampleSecret
All of the eXtreme Scale servers in a domain, as well as all of the servers in any linked domains, must use the same values for these three properties in the server.properties file, or communication fails.
- Enable server to server authentication. Set the securityEnabled property to true; for example:
securityEnabled=true
The default value for this property is false. - Establish a secure server configuration.
The secureTokenManagerType is a property that you define in the Server Properties file.
One secureTokenManagerType that we can use for a secure configuration is autoSecret, which performs token encryption and signing using keys derived from the authenticationSecret property.
Secure tokens are used in server-to-server authentication and also for client single sign-on tokens. A value of none for secureTokenManagerType is not secure because this setting prevents the creation of encrypted tokens.
We can also specify a setting of secureTokenManagerType=default. However, this option requires that you set up of a key store and related artifacts.
- Specify a long string value for authenticationSecret (note: one word) that is difficult for others to guess. We can encode this value using the FilePasswordEncoder utility. Do not use the ObjectGridfalse Secret property, which is the value used in the sampleServer.properties file.
Results
When you start a stand-alone eXtreme Scale server, specify the name of the properties file is on the command line. By specifying the server properties file, the authentication properties that you added are loaded when the server starts.
Authenticating eXtreme Scale server connections in the Liberty profile
Connections between eXtreme Scale servers in the Liberty profile must be authenticated to prevent an unauthorized server from accessing the data grid.
The following settings in the server.properties file determine how servers authenticate to one another:
- securityEnabled=true
- secureTokenManagerType=autoSecret
- authenticationSecret=OurGridServersExampleSecret
All of the eXtreme Scale servers in a domain, as well as all of the servers in any linked domains, must use the same values for these properties in the server.properties file, or communication fails.
- Enable server to server authentication. Set the securityEnable property to true; for example:
securityEnabled=true
The default value for this property is false. - Establish a secure server configuration. One secureTokenManagerType that can be used for a secure configuration is autoSecret, which performs token encryption and signing using keys derived from the authenticationSecret. Secure tokens are used in server to server authentication and also for client single sign-on tokens. A value of none for secureTokenManagerType is not secure because this setting prevents the creation of encrypted tokens.
We can also specify a setting of secureTokenManagerType=default. However, this option requires that you set up of a keystore and related artifacts.
- Specify a long and encrypted authentication secret that is difficult for others to decipher. Do not use the ObjectGridfalse Secret,
which is the value used in the sampleServer.properties file.
- Configure server.xml using the same configuration that you might use for a stand-alone server configuration. In server.xml,
specify the file path to the properties file in a serverProps attribute inside the xsSever element. See the following example from server.xml:
<server>
...
<xsSever ... serverProps="/path/to/myServerProps.properties" ... />
</server>
Authenticating eXtreme Scale server connections in the OSGi framework
Connections between eXtreme Scale servers in the OSGi framework must be authenticated to prevent an unauthorized server from accessing the data grid.
Install the OSGi framework before you secure the data grid.
The following settings in the server.properties file determine how servers authenticate to one another:
- securityEnabled=true
- secureTokenManagerType=autoSecret
- authenticationSecret=OurGridServersExampleSecret
All of the eXtreme Scale servers in a domain, as well as all of the servers in any linked domains, must use the same values for these properties in the server.properties file, or communication fails.
- Enable server to server authentication. Set the securityEnabled property to true in the server properties file; for example:
securityEnabled=true
The default value for this property is false. - Establish a secure server configuration. One secureTokenManagerType that may be used for a secure configuration is autoSecret, which performs token encryption and signing using keys derived from the authenticationSecret. Secure tokens are used in server to server authentication and also for client single sign-on tokens. A value of none for secureTokenManagerType is not secure because this setting prevents the creation of encrypted tokens.
We can also specify a setting of secureTokenManagerType=default. However, this option requires that you set up of a key store and related artifacts.
- Specify a long, string value for the authenticationSecret element. This value should be difficult for others to guess. We can encode this value using the FilePasswordEncoder utility.
Do not use the ObjectGridfalse Secret element, which is the value used in the sampleServer.properties file.
- Reference the server properties file. Create a managed, service persistent identifier (PID) for the server properties file in the OSGi console, by running the following commands:
osgi> cm create com.ibm.websphere.xs.server osgi> cm put com.ibm.websphere.xs.server objectgrid.server.props /mypath/server.properties
Authenticating eXtreme Scale server connections in WAS
The eXtreme Scale servers running under WAS authenticate to one another in the same way as eXtreme Scale stand-alone servers.
Three settings in the server.properties file determine how servers authenticate to one another. All of the eXtreme Scale servers in a domain, as well as all of the servers in any linked domains, must use the same values for these three properties in the server.properties file, or communication fails.
- Create the server properties file, and enable server to server authentication. Using this sample server properties file, create a server properties file that contains the securityEnabled property, which is set to true; for example:
securityEnabled=true
The default value for this property is false. - Establish a secure server configuration. One secureTokenManagerType that we can use for a secure configuration is autoSecret, which performs token encryption and signing using keys derived from the authenticationSecret. Secure tokens are used in server to server authentication and also for client single sign-on tokens. A value of none for secureTokenManagerType is not secure because this setting prevents the creation of encrypted tokens.
We can also specify a setting of secureTokenManagerType=default. However, this option requires that you set up of a key store and related artifacts.
- Specify a long and encrypted authentication secret that is difficult for others to decipher. Do not use the ObjectGridfalse Secret,
which is the value used in the sampleServer.properties file.
- Configure a server properties file to secure the server. Configure this properties file using the WAS administration console WebSphere application servers > server_name > Java and Process Management > Process definition > JVM. Add the following generic JVM argument:
-Dobjectgrid.server.props=<server property file name>
Authenticating requests from clients to servers
You client applications must make secure requests across the network.
Authenticating client requests in stand-alone environments
Unless clients are authenticated, access to grid data and JMX management operations that control the grid are left unprotected. This is true even if SSL is enabled.
The authentication behavior that eXtreme Scale servers require of eXtreme Scale clients is determined by the credentialAuthentication=required setting in the server.properties file.
When credentialAuthentication is set to Required or Supported, more configuration is needed, as described in the following steps. These steps are described in more detail, with examples of the changes to the configuration files in Java SE security tutorial - Step 3 .
- Reference a security descriptor XML file in each catalog server.
When the catalog server is started in a stand-alone environment, we can point to this file using the -clusterSecurityFile parameter of the startXsServer or startOgServer command.
To enable security, this file must have securityEnabled=.true. in the security element. The security descriptor XML file must also contain a descriptor of the authenticator to use. WXS includes the LDAPAuthenticator, the KeyStoreLoginAuthenticator, and the WSTokenAuthenticator. We cannot use the WSTokenAuthenticator authenticator in the stand-alone environments. We can only use this authenticator when eXtreme Scale clients and servers are both running with WAS. Alternatively, we can develop custom authenticators and login modules, according to the interfaces described in the API documentation.
- Reference a JAAS configuration file in each catalog and container server using the -Djava.security.auth.login.config="path_name" JVM argument.
The JAAS configuration file specifies a LoginModule. Use the KeyStoreLoginModule with the KeyStoreLoginAuthenticator. Use the SimpleLDAPLoginModule with the LDAPAuthenticator.
- Configure the client to pass the credentials that are required for authentication. This is typically done by specifying values in a client properties file.
Authenticating client requests in the Liberty profile
Unless clients are authenticated, access to grid data and JMX management operations that control the grid are left unprotected. This is true even if SSL is enabled in the Liberty profile.
The authentication behavior that is required by eXtreme Scale clients is determined by the credentialAuthentication=required setting in the server.properties file, the KeyStoreLogin setting in the og_jaas.config JAAS configuration file, and the KeyStoreLoginAuthenticator setting in the security.xml file.
The server properties file is loaded by referring to it in server.xml, as described in Authenticating eXtreme Scale server connections in the Liberty profile . For security, this file must have credentialAuthentication=Required, just as in stand-alone deployments.
Each of the configuration files is loaded by each catalog server. Container servers use the JAAS configuration file and the security deployment descriptor files only.
Use one of the following methods to authenticate clients.
- Reference a security descriptor XML file in each catalog server.
When the catalog server is the Liberty profile, we can point to this file using the clusterSecurityURL= attribute in the server.xml file. See the following example, where objectGridSecurity.xml is the security descriptor XML file:
<server description="new server">
<!-- Enable features -->
<featureManager>
<feature>eXtremeScale.server-1.1</feature>
</featureManager>

<xsServer isCatalog="true"
serverProps="server.xs.props"
clusterSecurityURL="file://C:/wlp/usr/servers/objectGridSecurity.xml"
/>
</server>
To enable security, this file must have securityEnabled=.true. in the security element. The security descriptor XML file must also contain a descriptor of the authenticator to use. WXS includes the LDAPAuthenticator, the KeyStoreLoginAuthenticator, and the WSTokenAuthenticator.
- Reference a JAAS configuration file in each catalog and container server using the -Djava.security.auth.login.config="path_name" JVM argument in the jvm.options file.
Edit or create the jvm.options file in the wlp_installdir/usr/servers/<server_name> directory. If you need to create a jvm.options file at the server configuration level, you need to copy the version in...
-
wlp_install_root/etc/jvm.options
The jvm.options file has some options that are needed for eXtreme Scale to run in the Liberty profile.
When you create a jvm.options file at the server level and enter the JVM argument to reference the JAAS configuration file, your jvm.options files looks like this:
C:\wlp\usr\servers\simpCatalog>cat jvm.options -Dorg.osgi.framework.bootdelegation=com.ibm.wsspi.runtime -Djava.endorsed.dirs=C:\wlp\wxs\lib\endorsed -Djava.security.auth.login.config=C:\wlp\usr\servers\ogjaas.config
The JAAS configuration file specifies a LoginModule. Use the KeyStoreLoginModule with the KeyStoreLoginAuthenticator. Use the SimpleLDAPLoginModule with the LDAPAuthenticator.
- Configure the client to pass the credentials that are required for authentication. This is typically done by specifying values in a client properties file.
Authorize access to the data grid in the Liberty profile
Authenticating client requests in the OSGi framework
Unless clients are authenticated, access to grid data and JMX management operations that control the grid are left unprotected. This is true even if SSL is enabled in the OSGi framework.
Install the OSGi framework before you secure the data grid.
The authentication behavior that is required by eXtreme Scale clients is determined by the credentialAuthentication=required setting in the server.properties file, the KeyStoreLogin setting in the og_jaas.config JAAS configuration file, and the KeyStoreLoginAuthenticator setting in the security.xml file.
Use one of the following methods to authenticate clients.
- Reference a security descriptor XML file in each catalog server using -DclusterSecurityFile="path_name"
JVM argument.
Use this JVM argument on the OSGi command line when you start the catalog server.
To enable security, this file must have securityEnabled=.true. in the security element. The security descriptor XML file must also contain a descriptor of the authenticator to use. WXS includes the LDAPAuthenticator, the KeyStoreLoginAuthenticator, and the WSTokenAuthenticator. We cannot use the WSTokenAuthenticator authenticator in the stand-alone environments. We can only use this authenticator when eXtreme Scale clients and servers are both running with WAS. Alternatively, we can develop custom authenticators and login modules, according to the interfaces described in the API documentation.
- Reference a JAAS configuration file in each catalog and container server using the -Djava.security.auth.login.config="path_name" JVM
argument.
The JAAS configuration file specifies a LoginModule. Use the KeyStoreLoginModule with the KeyStoreLoginAuthenticator. Use the SimpleLDAPLoginModule with the LDAPAuthenticator.
- Configure the client to pass the credentials that are required for authentication. This is typically done by specifying values in a client properties file.
Authorize access to the data grid in the OSGi framework
Authenticating client requests in WAS
Requests that WAS receives from the eXtreme Scale data grid must be authenticated.
Authentication requirements for eXtreme Scale clients are determined by the settings in the server properties file. A sample server properties file is provided in...
-
was_root/optionalLibraries/ObjectGrid/properties/sampleServer.properties
Configure authentication for eXtreme Scale servers running under WAS using the following steps.
- Create the server properties file. Using this sample server properties file, create a server properties file that contains the following lines:
securityEnabled=true credentialAuthentication=Required
Unless the credentialAuthentication=Required property exists, the grid is not secure, and unauthenticated users can perform grid operations.
Restriction: We cannot specify the property, credentialAuthentication=Required, for the dynamic cache provider.
- Create the security descriptor XML file. When the property, credentialAuthentication, is set to Required or Supported,
specify a security descriptor XML file . See the following example:
<securityConfig xmlns:xsi="http://www.w3.org/2001/XMLSchema-instance"
 xsi:schemaLocation="http://ibm.com/ws/objectgrid/config/security ../objectGridSecurity.xsd"
 xmlns="http://ibm.com/ws/objectgrid/config/security">

 <security securityEnabled="true">
  <authenticator className="com.ibm.websphere.objectgrid.security.plugins.builtins.WSTokenAuthenticator">
  </authenticator>
 </security>
</securityConfig>
The security descriptor XML file specifies the authenticator to be used. When all eXtreme Scale clients and servers are running under WAS, we can use the WSTokenAuthenticator authenticator. Two other authenticators are shipped with WXS, the KeyStoreLoginAuthenticator and the LDAPLoginAuthenticator.
- Create the JAAS configuration, unless we are using the WSTokenAuthenticator authenticator.
- Point each catalog server at the server properties file using the following JVM arguments. Configure these properties using the WAS administration console Servers > all servers > server_name > Process definition > JVM-generic JVM
arguments. The following arguments are required:
-Dobjectgrid.server.props=<server property file name>
-Dobjectgrid.cluster.security.xml.url=file://<security descriptor XML file>
- Point each container server to the server properties file using this JVM argument:
-Dobjectgrid.server.props=<server property file name>
WXS clients must be configured to pass appropriate credentials. Complete this configuration using a client properties file . See the following example of the WSTokenAuthenticator authenticator:
securityEnabled=true credentialAuthentication=supported credentialGeneratorClass=com.ibm.websphere.security.plugins.builtins.WSTokenCredentialGenerator
A client must be configured to use this file. When the client is running under WAS. Configure the client with the following JVM argument:
-Dobjectgrid.client.props=<client properties file>
To secure the grid deployment, set application security and Java 2 Security for WAS servers that are hosting eXtreme Scale servers. Use the WAS administrative console security configuration panel to enable these settings.
Authorizing access to the data grid
Enforce access control so that authenticated identities can only perform operations for which they are specifically authorized.
Authorizing access to the data grid in stand-alone environments
Control which users have specific permissions to access the data grid through the policy file.
Even if a client is authenticated, that might not be enough to protect data grid access. If you use the KeyStoreLoginAuthenticator, usually you only define a few identities, and all of the identities might have full access to the data grid. In this case, authorization might not be necessary. However, if LDAP authentication is used, there might be many identities in the LDAP server that must not be granted access to grid data or operations.
- Enable access control for the data grid. Specify securityEnabled=.true. in the ObjectGrid.xml file for the deployed data grid.
Specify this setting for each grid you define. After you configure this setting, no reads or writes are run on data grid entries except for identities that have been granted permissions in a policy file.
- Create a policy file. See the following example policy file:
grant codebase "http://www.ibm.com/com/ibm/ws/objectgrid/security/PrivilegedAction"
    principal javax.security.auth.x500.X500Principal "CN=cashier,O=acme,OU=OGSample" {
    permission com.ibm.websphere.objectgrid.security.MapPermission "accounting.*", "read";};

grant codebase "http://www.ibm.com/com/ibm/ws/objectgrid/security/PrivilegedAction"
    principal javax.security.auth.x500.X500Principal "CN=manager,O=acme,OU=OGSample" {
    permission com.ibm.websphere.objectgrid.security.MapPermission "accounting.*", "all";};
Policy files can grant various permissions, depending on the authorization of the user. - Configure each container server to load this policy file. We can complete this configuration by starting the container with the following JVM argument:
-Djava.security.policy=<policy file>
This policy file is also used in controlling administrative access to data grid servers. When you use this policy file to control administrative access, the policy file must contain MBeanPermission entries, and must be loaded by catalog servers and container servers.
Authorize access for administrative operations in stand-alone environments
Authorizing access to the data grid in the Liberty profile
Control which users have specific permissions to access the data grid in the Liberty profile through the policy file.
Even if a client is authenticated, that might not be enough to protect data grid access. If you use the KeyStoreLoginAuthenticator property, usually you define only a few identities, and all of the identities might have full access to the grid. In which case, authorization might not be necessary. Alternatively, if LDAP authentication is used, there might be many identities in the LDAP server that should not be granted access to grid data or operations.
- Enable access control for the data grid. Specify securityEnabled=.true. in the ObjectGrid.xml file for the deployed data grid.
Specify this setting for each grid you define. After you configure this setting, no reads or writes are run on data grid entries except for identities that have been granted permissions in a policy file.
- Create a policy file. See the following example policy file:
grant codebase "http://www.ibm.com/com/ibm/ws/objectgrid/security/PrivilegedAction"
    principal javax.security.auth.x500.X500Principal "CN=cashier,O=acme,OU=OGSample" {
    permission com.ibm.websphere.objectgrid.security.MapPermission "accounting.*", "read";};

grant codebase "http://www.ibm.com/com/ibm/ws/objectgrid/security/PrivilegedAction"
    principal javax.security.auth.x500.X500Principal "CN=manager,O=acme,OU=OGSample" {
    permission com.ibm.websphere.objectgrid.security.MapPermission "accounting.*", "all";};
Policy files can grant various permissions, depending on the authorization of the user. - Configure each container server to load this policy file. We can complete this configuration by adding the following JVM argument to the jvm.options file in the wlp_installdir/usr/servers/<server_name> directory:
- >
-Djava.security.policy=<policy file>
This policy file is also used in controlling administrative access to data grid servers. When you use this policy file to control administrative access, the policy file must contain MBeanPermission entries, and must be loaded by catalog servers and container servers.
If you need to create a jvm.options file at the server configuration level, you need to copy the version in...
-
wlp_install_root/etc/jvm.options
Authorize access for administrative operations in the Liberty profile
Authorizing access to the data grid in the OSGi framework
Control which users have specific permissions to access the data grid in the OSGi framework through the policy file.
Install the OSGi framework before you secure the data grid.
Even if a client is authenticated, that might not be enough to protect data grid access. If you use the KeyStoreLoginAuthenticator property, usually you only define a few identities, and all of the identities might have full access to the grid. In which case, authorization may not be necessary. Alternatively, if LDAP authentication is used, there might be many identities in the LDAP server that should not be granted access to grid data or operations.
- Enable access control for the data grid. Specify securityEnabled=.true. in the ObjectGrid.xml file for the deployed data grid.
Specify this setting for each grid you define. After you configure this setting, no reads or writes are run on data grid entries except for identities that have been granted permissions in a policy file.
- Create a policy file. Add the following lines of code to the security policy file to give AllPermission to the osgi.jar file for the deployed data grid.
grant codeBase "file:/opt/OSGI2/plugins/org.eclipse.osgi_3.7.1.R37x_v20110808-1106.jar" {
  permission java.security.AllPermission;};
Specify this code for each grid you define. After you configure this setting, no reads or writes are run on data grid entries except for identities that have been specifically granted permissions in a policy file. Policy files can grant various permissions, depending on the authorization of the user.
The policy file resembles the following example:
Remember: The policy file also typically contains MapPermission entries, as documented in Java SE security tutorial - Step 5 .
grant codeBase "file:${objectgrid.home}/lib/*" { permission java.security.AllPermission;}; grant principal javax.security.auth.x500.X500Principal "CN=manager,O=acme,OU=OGSample" { permission javax.management.MBeanPermission "*", "getAttribute,setAttribute,invoke,queryNames";}; - Configure each container server to load this policy file.
We can complete this configuration by starting the container with the following JVM argument:
-Djava.security.policy=<policy file>
This policy file is also used in controlling administrative access to data grid servers. When you use this policy file to control administrative access, the policy file must contain MBeanPermission entries, and must be loaded by catalog servers and container servers.
Authorizing access to the data grid in WAS
Control which users have specific permissions to access the data grid in WAS deployments in the same way that you control access to the data grid in stand-alone deployments.
Even if a client is authenticated, that might not be enough to protect data grid access. If you use the KeyStoreLoginAuthenticator, usually you only define a few identities, and all of the identities might have full access to the data grid. In this case, authorization might not be necessary. However, if LDAP authentication is used, there might be many identities in the LDAP server that must not be granted access to grid data or operations.
It is not necessary to specify MBeanPermissions for WAS deployments of eXtreme Scale servers because JMX access is controlled by the WAS, itself.
- Enable access control for the data grid. Specify securityEnabled=.true. in the ObjectGrid.xml file for the deployed data grid.
Specify this setting for each grid you define. After you configure this setting, no reads or writes are run on data grid entries except for identities that have been granted permissions in a policy file.
- Create a policy file. Policy files can grant various permissions,
depending on the authorization of the user.
- Configure each container server to load this policy file. We can specify the policy file in the Generic JVM arguments of the application server where the container runs.
-Djava.security.policy=<policy file>
Authorize access for administrative operations in WAS
Authorizing access for special administrative operations
Require special authorization for users to perform administrative operations on the data grid.
Authorizing access for administrative operations in stand-alone environments
Most data grid deployers restrict administrative access to only a subset of the users who can access grid data.
Run the catalog servers and container servers using the Java security manager, which requires a policy file.
The policy file is specified by passing the -Djava.security.policy=<policy_file> JVM argument.
The Java security manager is started by specifying the JVM argument, -Djava.security.manager, when the eXtreme Scale server is started. Specify this argument for both container and catalog servers.
The policy file resembles the following example:
Remember: The policy file also typically contains MapPermission entries, as documented in Java SE security tutorial - Step 5 .
grant codeBase "file:${objectgrid.home}/lib/*"
{
permission java.security.AllPermission;
};

grant principal javax.security.auth.x500.X500Principal "CN=manager,O=acme,OU=OGSample"
{
permission javax.management.MBeanPermission "*", "getAttribute,setAttribute,invoke,queryNames";
};
In this example, only the manager principal is authorized for administrative operations with the xscmd command. We can add other lines as necessary to give additional principals MBean permissions.
Enter the following command:
startOgServer.sh <arguments>
    -jvmargs
    -Djava.security.auth.login.config=jaas.config
    -Djava.security.manager
    -Djava.security.policy="auth.policy"
    -Dobjectgrid.home=$OBJECTGRID_HOME
startXsServer.sh <arguments>
    -jvmargs
    -Djava.security.auth.login.config=jaas.config
    -Djava.security.manager
    -Djava.security.policy="auth.policy"
    -Dobjectgrid.home=$OBJECTGRID_HOME

startOgServer.bat <arguments>
    -jvmargs
    -Djava.security.auth.login.config=jaas.config
    -Djava.security.manager
    -Djava.security.policy="auth.policy"
    -Dobjectgrid.home=%OBJECTGRID_HOME%
startXsServer.bat <arguments> -jvmargs
    -Djava.security.auth.login.config=jaas.config
    -Djava.security.manager
    -Djava.security.policy="auth.policy"
    -Dobjectgrid.home=%OBJECTGRID_HOME%
Secure data that flows between eXtreme Scale servers in stand-alone environments with SSL encryption
Authorizing access for administrative operations in the Liberty profile
Through administrative security, we can authorize users to access the data grid in the Liberty profile.
Most data grid deployers restrict administrative access to only a subset of the users who can access grid data.
- Run the Java security manager, and specify a policy file that grants MBeanPermissions, to restrict administrative access when eXtreme Scale servers are running in the Liberty profile. This approach is the same as in stand-alone deployments. Enter the following lines to the jvm.options file for each Liberty profile server running a WXS catalog or container server.
-Djava.security.manager -Djava.security.policy="policy file"
- Configure the policy file to grant the Liberty profile and the eXtreme Scale code all permissions. This configuration allows the Liberty profile and the eXtreme Scale to work with the security manager. Add the following lines to the jvm.options file that is at the server level:
grant codeBase "file:${objectgrid.home}/lib/*" {
permission java.security.AllPermission;};
Securing data that flows between eXtreme Scale and the Liberty profile with SSL encryption
Authorizing access for administrative operations in the OSGi framework
Through administrative security, we can authorize users to access the data grid in the OSGi framework.
Install the OSGi framework before you secure the data grid.
Most data grid deployers restrict administrative access to only a subset of the users who can access grid data.
- Run the catalog servers and container servers using the Java security manager,
which requires a policy file.
The policy file is specified by passing the -Djava.security.policy=<policy_file> JVM argument.
The Java security manager is started by specifying the JVM argument, -Djava.security.manager, when the eXtreme Scale server is started. Specify this argument for both container and catalog servers.
The policy file resembles the following example:
Remember: The policy file also typically contains MapPermission entries, as documented in Java SE security tutorial - Step 5 .
grant codeBase "file:${objectgrid.home}/lib/*" {
permission java.security.AllPermission;};

grant principal javax.security.auth.x500.X500Principal "CN=manager,O=acme,OU=OGSample" {
permission javax.management.MBeanPermission "*", "getAttribute,setAttribute,invoke,queryNames";};
In this example, only the manager principal is authorized for administrative operations with the xscmd command. We can add other lines as necessary to give additional principals MBean permissions.
- Start the catalog and server containers by specifying the previous JVM arguments on the command line; for example:
/opt/XS86/java/jre/bin/java -DclusterSecurityFile=/og/security/secFiles_SA/objectGridSecurity.xml -Djava.security.auth.login.config=/og/security/secFiles_SA/ogjaas.config -Djava.security.manager -Djava.security.policy=/og/security/secFiles_SA/og_auth.policy -Dobjectgrid.home=/opt/XS860/ObjectGrid -jar org.eclipse.osgi_3.7.1.R37x_v20110808-1106.jar -console
Secure data that flows between eXtreme Scale and the OSGi framework with SSL encryption
Authorizing access for administrative operations in WAS
Through administrative security, only WAS administrators can perform eXtreme Scale administrative operations.
Authorization for administrative access works differently in WAS deployments than in stand-alone environments. Only WAS users that are WAS administrators can perform eXtreme Scale administrative operations.
You do not need to specify MbeanPermissions in the policy file.
Enable administrative security in WAS. In the administrative console, click...
-
Security | Global Security
To restrict application access to local resources.
-
Enable administrative security | Java 2 security
Secure data that flows between eXtreme Scale and WAS with SSL encryption
Securing data that flows between eXtreme Scale clients and servers with SSL encryption
Protect communication between WXS clients and servers with SSL encryption.
Securing data that flows between eXtreme Scale servers in stand-alone environments with SSL encryption
Configure SSL properties and JMX ports to secure sensitive information that flows between servers over the network.
When a data grid is deployed, the sensitive information it contains flows over the network. Also, the credentials that data grid clients use to authenticate to the data grid flow over the network.
To protect data and credentials as they flow, use transport-level encryption using SSL to secure deployments.
The security of SSL depends on protecting the keystores and the truststores, so that only authorized users have access to the keystores and truststores. After you enable SSL encryption, specify a JMXConnectorPort and a JMXServicePort value in the server properties file to have SSL protection for JMX traffic.
The transport between the JMX client and server can be secured with transport layer security (TLS) or SSL. If the transportType of catalog server or container server is set to SSL_Required or SSL_Supported, then use SSL to connect to the JMX server.
- Specify SSL in the server properties file. Set the transportType property to SSL-Required;
for example:
transportType=SSL-Required
- Specify SSL properties in the server properties file.
alias=serverprivate contextProvider=IBMJSSE2
protocol=SSL
keyStoreType=JKS
keyStore=etc/test/security/key.jks keyStorePassword=serverpw trustStoreType=JKS
trustStore=etc/test/security/trust.jks trustStorePassword=public clientAuthentication=false
Configure the truststore, truststore type, and truststore password. It is not necessary to specify a keystore, keystore type, and key store password for the client. The alias, keystore, keystore password, and keystore type are not needed on the client unless the server SSL properties includes clientAuthentication=true. Rarely used.The client truststore must trust the server certificate. When the server certificate is self signed, as in the tutorial, that certificate must be imported into the client trust store. When the server certificate is issued by a local certificate authority, the signer certificate for that certificate authority must be imported into the client truststore.
- Specify SSL in the client properties file when SSL is required. Set the transportType property to SSL-Required or SSL-Supported; for example:
transportType=SSL-Required
- Specify SSL properties in the client properties file. For example, we can specify the following properties:
alias=clientprivate contextProvider=IBMJSSE2 protocol=SSL keyStoreType=JKS keyStore=etc/test/security/client.private keyStorePassword={xor}PDM2OjErLyg\= trustStoreType=JKS trustStore=etc/test/security/server.public trustStorePassword={xor}Lyo9MzY8 - Set the JMX service port. Use the -JMXServicePort option on the startOgServer or startXsServer script.
The default value for the JMX service port on catalog servers is 1099. You must use a different port number for each JVM in the configuration. To use JMX/RMI, explicitly specify the-JMXServicePort option and port number, even to use the default port value.
- Set the JMX connector port.
Use the -JMXConnectorPort option on the startOgServer or startXsServer script.
Setting the JMX service port is required when we want to display container server information from the catalog server. For example, the port is required when we are using the xscmd -c showMapSizes command. Set the JMX connector port to avoid ephemeral port creation.
Securing data that flows between eXtreme Scale and the Liberty profile with SSL encryption
Configure SSL properties and JMX ports to secure sensitive information that flows between WXS and the Liberty profile.
When a data grid is deployed, the sensitive information it contains flows over the network. Also, the credentials that data grid clients use to authenticate to the data grid flow over the network.
To protect data and credentials as they flow, use transport-level encryption using SSL to secure deployments.
The security of SSL depends on protecting the keystores and the truststores, so that only authorized users have access to the keystores and truststores. After you enable SSL encryption, specify a JMXConnectorPort and a JMXServicePort value in the server properties file to have SSL protection for JMX traffic.
The transport between the JMX client and server can be secured with transport layer security (TLS) or SSL. If the transportType of catalog server or container server is set to SSL_Required or SSL_Supported, then use SSL to connect to the JMX server.
- Specify SSL in the server properties file. Set the transportType property to SSL-Required;
for example:
transportType=SSL-Required
- Specify SSL properties in the server properties file.
alias=serverprivate contextProvider=IBMJSSE2
protocol=SSL
keyStoreType=JKS
keyStore=etc/test/security/key.jks keyStorePassword=serverpw trustStoreType=JKS
trustStore=etc/test/security/trust.jks trustStorePassword=public clientAuthentication=false
Configure the truststore, truststore type, and truststore password. It is not necessary to specify a keystore, keystore type, and key store password for the client. The alias, keystore, keystore password, and keystore type are not needed on the client unless the server SSL properties includes clientAuthentication=true. Rarely used.The client truststore must trust the server certificate. When the server certificate is self signed, as in the tutorial, that certificate must be imported into the client trust store. When the server certificate is issued by a local certificate authority, the signer certificate for that certificate authority must be imported into the client truststore.
- Specify SSL in the client properties file when SSL is required. Set the transportType property to SSL-Required or SSL-Supported; for example:
transportType=SSL-Required
- Specify SSL properties in the client properties file. For example, we can specify the following properties:
alias=clientprivate contextProvider=IBMJSSE2
protocol=SSL
keyStoreType=JKS
keyStore=etc/test/security/client.private keyStorePassword={xor}PDM2OjErLyg\=
trustStoreType=JKS
trustStore=etc/test/security/server.public trustStorePassword={xor}Lyo9MzY8
Specify the client properties file in the jvm.options file; for example:
-Dobjectgrid.client.props="D:\IDEs\wxsEnvi\wlp\usr\servers\sessionAppServer\objectGridClient.properties"
Remove the double quotation marks if we are using Linux operating systems. - Set the JMX service port in the server properties file.
The default value for the JMX service port on catalog servers is 1099. You must use a different port number for each JVM in the configuration. To use JMX/RMI, explicitly specify therver JMXServicePort option and port number, even to use the default port value.
- Set the JMX connector port in the server properties file.
Setting the JMX service port is required when we want to display container server information from the catalog server. For example, the port is required when we are using the xscmd -c showMapSizes command. Set the JMX connector port to avoid ephemeral port creation.
Securing data that flows between eXtreme Scale and the OSGi framework with SSL encryption
Configure SSL properties and JMX ports to secure sensitive information that flows between WXS and the OSGi framework.
Install the OSGi framework before you secure the data grid.
When a data grid is deployed, the sensitive information it contains flows over the network. Also, the credentials that data grid clients use to authenticate to the data grid flow over the network.
To protect data and credentials as they flow, use transport-level encryption using SSL to secure deployments.
The security of SSL depends on protecting the keystores and the truststores, so that only authorized users have access to the keystores and truststores. After you enable SSL encryption, specify a JMXConnectorPort and a JMXServicePort value in the server properties file to have SSL protection for JMX traffic.
The transport between the JMX client and server can be secured with transport layer security (TLS) or SSL. If the transportType of catalog server or container server is set to SSL_Required or SSL_Supported, then use SSL to connect to the JMX server.
- Specify SSL in the server properties file. Set the transportType property to SSL-Required;
for example:
transportType=SSL-Required
- To use SSL, you need to configure the truststore, truststore type, and truststore password on the MBean client with -D system properties;
for example:
-Djavax.net.ssl.trustStore=TRUST_STORE_LOCATION
-Djavax.net.ssl.trustStorePassword=TRUST_STORE_PASSWORD
-Djavax.net.ssl.trustStoreType=TRUST_STORE_TYPE
If you use com.ibm.websphere.ssl.protocol.SSLSocketFactory as your SSL socket factory in your java_homejre/lib/security/java.security file, then use the following properties:-Dcom.ibm.ssl.trustStore=TRUST_STORE_LOCATION -Dcom.ibm.ssl.trustStorePassword=TRUST_STORE_PASSWORD -Dcom.ibm.ssl.trustStoreType=TRUST_STORE_TYPE
- Set the JMX service port in the server properties file.
The default value for the JMX service port on catalog servers is 1099. You must use a different port number for each JVM in the configuration. To use JMX/RMI, explicitly specify theJMXServicePort option and port number, even to use the default port value.
- Set the JMX connector port in the server properties file.
Setting the JMX service port is required when we want to display container server information from the catalog server. For example, the port is required when we are using the xscmd c showMapSizes command. Set the JMX connector port to avoid ephemeral port creation.
- Specify the SSL port on the OSGi framework command line using the following JVM argument:
-Dcom.ibm.CSI.SSL.Port=7602
Securing data that flows between eXtreme Scale and WAS with SSL encryption
WXS uses the SSL configuration in WAS .
To ensure that you have SSL protection for all data grid traffic that passes over the network, configure global security, configure CSIv2 inbound and outbound security in the WAS administrative console, and configure the SSL certificate and key management.
- Configure WAS global security. For more information about configuring global security, see Global security settings .
- Configure CSIv2 inbound security. In the WAS administrative console,
click Security > Global Security > RMI/IIOP Security > CSIv2 inbound communications. Click SSL-Required.
- Configure CSIv2 outbound security. In the WAS administrative console,
click Security > Global Security > RMI/IIOP Security > CSIv2 inbound communications. CSIv2 outbound communications must be SSL-Supported or SSL-Required.
- Configure the SSL certificate and key management in WAS. When running only a WXS client in a WAS instance and the eXtreme Scale data grid servers are stand-alone. Ensure that the keystore and truststore certificate information is included in the keystore and truststore files specified in the server properties file used to start your stand-alone catalog and containers serves.
When the client, catalog and container servers are all running in WAS processes, they use the WAS security configuration for the client-to-servers communication.
However, when multiple catalog servers are configured and running in a WAS process the catalog-to-catalog communication has its own proprietary transport paths that cannot be managed by the WAS Common Secure Interoperability Protocol Version 2 (CSIV2) transport settings. Therefore, configure the SSL properties in the server properties file for each catalog server.
Storing security artifacts in WAS
Storing security artifacts for authorized users
Key stores, passwords, shared secrets, and properties files must be stored in a directory that can only be accessed by authorized users.
Storing security artifacts in stand-alone environments
Protect secure passwords to prevent access from unauthorized users.
The FilePasswordEncoder utility is included with WXS client to encode passwords in eXtreme Scale configuration files. The FilePasswordEncoder utility encodes passwords; however, it is possible to recover the passwords used to access the file. Therefore, you must protect the file system on which the client properties, the server properties, and the keystores and truststores are kept, so that only authorized users have access.
Run the FilePasswordEncoder.bat|sh command to encode this property using an exclusive or (xor) algorithm.to provide a measure of protection for passwords.
Run the FilePasswordEncoder utility on the client.properties file and the server.properties file; for example:
./FilePasswordEncoder.sh <server properties file>
./FilePasswordEncoder.sh <client properties file>
A sophisticated user can recover encoded passwords. These passwords are not encrypted because the eXtreme Scale code must be able to recover them to run. Therefore, ensure that only authorized persons can access the files where these passwords are stored. Start secure servers in a stand-alone environment
Storing security artifacts in the Liberty profile
Protect secure passwords to prevent access from unauthorized eXtreme Scale users in the Liberty profile.
The FilePasswordEncoder utility is included with WXS client to encode passwords in eXtreme Scale configuration files.
- Run the Liberty profile securityUtility.bat|sh command to encode this property using an exclusive or (xor) algorithm.to provide a measure of protection for passwords. Be aware that a sophisticated user can recover encoded passwords. These passwords are not encrypted because the eXtreme Scale code must be able to recover them to run. Therefore, ensure that only authorized persons can access the files where these passwords are stored.
- Limit access to keystore files and truststore files by protecting access to the file system where they are stored.
Storing security artifacts in the OSGi framework
Protect secure passwords to prevent access from unauthorized users in the OSGi framework.
Install the OSGi framework before you secure the data grid.
The FilePasswordEncoder utility is included with WXS client to encode passwords in eXtreme Scale configuration files.
- Run the FilePasswordEncoder.bat|sh command to encode this property using an exclusive or (xor) algorithm.to provide a measure of protection for passwords. Be aware that a sophisticated user can recover encoded passwords. These passwords are not encrypted because the eXtreme Scale code must be able to recover them to run. Therefore, ensure that only authorized persons can access the files where these passwords are stored.
- Limit access to keystore files and truststore files by protecting access to the file system where they are stored.
Storing security artifacts in WAS
Protect secure passwords to prevent access from unauthorized users in WAS deployments.
Passwords and the authenticationSecret in the server properties and client properties files must be encoded.
Invoke the PropFilePasswordEncoder to encode passwords and the authentication secret.
-
was_root/bin/PropFilePasswordEncoder.sh
...for example...
-
./PropFilePasswordEncoder <properties_file> <property_to_encode>
Properties that should be encoded include the keyStorePassword, trustStorePassword, credentialGeneratorProps, and authenticationSecret. Even when these properties are encoded, it is possible to recover the original values. The file system on which the properties files, key stores, and trust stores are kept must be protected, so only authorized users can access them.
Starting secure servers in a stand-alone environment
To start secure stand-alone servers, you pass the proper configuration files by specifying parameters on the startOgServer or startXsServer command.
Deprecated: The startOgServer and stopOgServer commands start servers that use the ORB transport mechanism. The ORB is deprecated, but we can continue using these scripts if you were using the ORB in a previous release. The IBM XIO transport mechanism replaces the ORB. Use the startXsServer and stopXsServer scripts to start and stop servers that use the XIO transport.
- Start secure container servers.
Starting a secure container server requires the following security configuration file:
- Server property file: The server property file configures the security properties specific to the server.
Location of this configuration file by providing the following argument to the startOgServer or startXsServer script:
- -serverProps
- Location of the server property file, which contains the server-specific security properties. The file name specified for this property is in plain file path format, such as ../security/server.properties.
Enter the following lines when we run the startOgServer command or startXsServer command:
startOgServer.sh <arguments> -jvmargs
    -Djava.security.auth.login.config=jaas.config
    -Djava.security.manager
    -Djava.security.policy="auth.policy"
    -Dobjectgrid.home=$OBJECTGRID_HOME
startXsServer.sh <arguments>
    -jvmargs
    -Djava.security.auth.login.config=jaas.config
    -Djava.security.manager
    -Djava.security.policy="auth.policy"
    -Dobjectgrid.home=$OBJECTGRID_HOME
startOgServer.bat <arguments> -jvmargs -Djava.security.auth.login.config=jaas.config -Djava.security.manager -Djava.security.policy="auth.policy" -Dobjectgrid.home=%OBJECTGRID_HOME%startXsServer.bat <arguments> -jvmargs -Djava.security.auth.login.config=jaas.config -Djava.security.manager -Djava.security.policy="auth.policy" -Dobjectgrid.home=%OBJECTGRID_HOME%
- Start secure catalog servers.
To start a secure catalog service, you must have the following configuration files:
- Security descriptor XML file: The security descriptor XML file describes the security properties common to all servers, including catalog servers and container servers. One property example is the authenticator configuration which represents the user registry and authentication mechanism.
- Server property file: The server property file configures the security properties that are specific to the server.
Specify the location of these configuration files by providing the following arguments to the startOgServer or startXsServer script:
- -clusterSecurityFile and -clusterSecurityUrl
- These arguments specify the location of the Security descriptor XML file. Use the -clusterSecurityFile parameter to specify a local file, or the -clusterSecurityUrl parameter to specify the URL of the objectGridSecurity.xml file.
- -serverProps
- Location of the server property file, which contains the server-specific security properties. The file name specified for this property is in plain file path format, such as c:/tmp/og/catalogserver.props.
Start and stop secure servers in the Liberty profile
Use the start command to start secure servers in the Liberty profile
Use this task to start eXtreme Scale servers with the Liberty profile server command. The wlp/bin directory contains a script called server to help control the server process. The following syntax for this command is supported:
server <task> [server] [options]
- Start eXtreme Scale servers. When we run the start command, the server is launched as a background process. Use the following example to start the server:
bin/server start server_name bin/server.bat start server_name
- Stop eXtreme Scale servers; for example: When we run the stop command, the running server is stopped. Use the following example to stop the server:
bin/server stop server_name bin/server.bat stop server_name
Start and stop secure servers in the OSGi framework
To start secure stand-alone servers in the Eclipse Equinox OSGi framework, pass the proper configuration files by specifying parameters from the command line.
Install the OSGi framework before you secure the data grid.
- Start the OSGi console.
- Pass in the authorization configuration, the security policy file, and the SSL port from the command line. See the following example:
java -Djava.security.auth.login.config=/og/security/secFiles_SA/ogjaas.config -Djava.security.manager -Djava.security.policy=/og/security/secFiles_SA/og_auth.policy -Dobjectgrid.home=/opt/XS860/ObjectGrid -Dcom.ibm.CSI.SSL.Port=7602 -jar org.eclipse.osgi_3.7.1.R37x_v20110808-1106.jar -console
- Start the catalog server. Specify the following lines of code from the command line:
- cm create com.ibm.websphere.xs.server - cm put com.ibm.websphere.xs.server clusterSecurityFile /og/security/secFiles_SA/objectGridSecurity.xml
- cm put com.ibm.websphere.xs.server objectgrid.server.props /opt/OSGI2/load/secServer.properties
The catalog server is started based on the properties that are set in the ObjectGrid security XML file and the security server properties file. - Start the container server. Specify the following lines of code from the command line:
cm createf com.ibm.websphere.xs.container cm put com.ibm.websphere.xs.container-1347819831596-0 objectgridFile /opt/OSGI2/load/objectgridSec.xml cm put com.ibm.websphere.xs.container-1347819831596-0 deploymentPolicyFile /opt/OSGI2/load/deployment.xml
The container server is started based on the properties that are set in the ObjectGrid descriptor XML file and the deployment policy descriptor XML file. - Stop secure servers in the OSGi framework. After a WXS server bundle is started and the eXtreme Scale server is initialized, it cannot be restarted. The Eclipse Equinox process must be restarted to restart a WXS server.
Use eXtreme Scale support for Spring namespace to configure eXtreme Scale container servers in a Blueprint XML file. When the server and container XML elements are added to the Blueprint XML file, the eXtreme Scale namespace handler automatically starts a container server using the parameters that are defined in the Blueprint XML file when the bundle is started. The handle stops the container when the bundle is stopped.
Starting secure servers in WAS
To start secure servers in WAS, specify the security configuration files in the generic Java virtual machine (JVM) arguments.
- Associate WXS catalog servers with WebSphere application servers using the administrative console. In the administrative console, click System Administration > WXS > Catalog Service Domains.
- Associate WXS container servers with particular WebSphere application servers by deploying an EAR file that contains the required XML descriptors for the data grid.
- Specify JVM arguments that point to configuration files to make the catalog and container servers secure.
In addition, specify securityEnabled="true" in the objectgrid xml file for each data grid. After you specify the JVM arguments and enable security in the data grids, we can start the servers or clusters that act as eXtreme Scale catalog servers or container servers.
- Start catalog and containers servers with the WAS administrative console, or use the WAS command line.
Stopping secure servers
Stopping secure servers
Stopping secure catalog servers or container servers requires one security configuration file.
- Stop a secure catalog server or container server in stand-alone deployments. In stand-alone environments, stop WXS catalog and container servers using the teardown function of the xscmd command, or using the stopXsServer or stopOgServer commands.
Restrict access to these operations to authorized administrators only, as described in the section Authorizing access for administrative operations in stand-alone environments . When authentication or SSL is used, the stopXsServer and stopOgServer commands require that a client properties file be passed as a parameter. The content of the client properties file is described in Authenticating client requests in stand-alone environments and Securing data that flows between eXtreme Scale servers in stand-alone environments with SSL encryption .
- Use the WAS administrative console to stop eXtreme Scale server that run with WAS. WAS administrative security should be configured to restrict access for starting and stopping servers to authorized administrators, as described in Authorizing access for administrative operations in WAS .
Scenario: Use OSGi to develop and run eXtreme Scale plug-ins
Use these scenarios to complete common tasks in an OSGi environment. For example, the OSGi framework is ideal for starting servers and clients in an OSGi container, which allows us to dynamically add and update WXS plug-ins to the runtime environment.
Read the OSGi framework overview topic to learn more about OSGi support and the benefits that it can offer.
The following scenarios are about building and running dynamic plug-ins, which allows us to dynamically install, start, stop, modify, and uninstall plug-ins. You might also complete another likely scenario, which allows us to use the OSGi framework without dynamic capabilities. We can still package the applications as bundles, which are defined by and communicated through services. These service-based bundles offer multiple benefits, which include more efficient development and deployment capabilities.
Scenario goals
After completing this scenario, you will know how to complete the goals:
- Build eXtreme Scale dynamic plug-ins to use in an OSGi environment.
- Run eXtreme Scale containers in an OSGi environment without dynamic capabilities.
Building OSGi applications with the Blueprint Container specification
 OSGi Bundle Activator API documentation
OSGi framework overview
OSGi defines a dynamic module system for Java.. The OSGi service platform has a layered architecture, and is designed to run on various standard Java profiles. We can start WXS servers and clients in an OSGi container.
Benefits of running applications in the OSGi container
WXS OSGi support allows us to deploy the product in the Eclipse Equinox OSGi framework. Previously, if we wanted to update the plug-ins used by eXtreme Scale, you had to restart the JVM to apply the new versions of the plug-ins. With the dynamic update capability that the OSGi framework provides, now we can update the plug-in classes without restarting the JVM. These plug-ins are exported by user bundles as services. WXS accesses the service or services by looking them up the OSGi registry.
eXtreme Scale containers can be configured to start more easily and dynamically using either the OSGi configuration admin service or with OSGi Blueprint. To deploy a new data grid with its placement strategy, we can do so by creating an OSGi configuration or by deploying a bundle with WXS descriptor XML files. With OSGi support, application bundles containing eXtreme Scale configuration data can be installed, started, stopped, updated, and uninstalled without restarting the whole system. With this capability, we can upgrade the application without disrupting the data grid.
Plug-in beans and services can be configured with custom shard scopes, allowing sophisticated integration options with other services running in the data grid. Each plug-in can use OSGi Blueprint rankings to verify that every instance of the plug-in is activated is at the correct version. An OSGi-managed bean (MBean) and xscmd utility are provided, which allow you to query the eXtreme Scale plug-in OSGi services and their rankings.
This capability allows administrators to quickly recognize potential configuration and administration errors and upgrade the plug-in service rankings in use by eXtreme Scale .
OSGi bundles
To interact with and deploy plug-ins in the OSGi framework, use bundles. In the OSGi service platform, a bundle is a JAR file that contains Java code, resources, and a manifest that describes the bundle and its dependencies. The bundle is the unit of deployment for an application. The eXtreme Scale product supports the following bundle types:
- Server bundle
- objectgrid.jar
Installed with the eXtreme Scale stand-alone server installation and is required for running eXtreme Scale servers and can also be used for running eXtreme Scale clients, or local, in-memory caches.
The bundle ID for the objectgrid.jar file is com.ibm.websphere.xs.server_<version>, where the version is in the format: <Version>.<Release>.<Modification>. For example, the server bundle for eXtreme Scale version 7.1.1 is com.ibm.websphere.xs.server_7.1.1.
- Client bundle
- ogclient.jar
Installed with the eXtreme Scale stand-alone and client installations and is used to run eXtreme Scale clients or local, in-memory caches. The bundle ID for the ogclient.jar file is com.ibm.websphere.xs.client_version, where the version is in the format: <Version>.<Release>.<Modification>. For example, the client bundle for eXtreme Scale version 7.1.1 is com.ibm.websphere.xs.client_7.1.1.
Limitations
We cannot restart the eXtreme Scale bundle because we cannot restart the ORB or XIO. To restart the eXtreme Scale server, restart the OSGi framework.
Installing the Eclipse Equinox OSGi framework with Eclipse Gemini for clients and servers
To deploy WXS in the OSGi framework, then set up the Eclipse Equinox Environment.
The task requires that you download and install the Blueprint framework, which allows us to later configure JavaBeans and expose them as services. The use of services is important because we can expose plug-ins as OSGi services so they can be used by the eXtreme Scale run time environment. The product supports two blueprint containers within the Eclipse Equinox core OSGi framework: Eclipse Gemini and Apache Aries. Use this procedure to set up the Eclipse Gemini container.
- Download Eclipse Equinox SDK Version 3.6.1 or later from the Eclipse website . Create a directory for the Equinox framework, for example: /opt/equinox. These instructions refer to this directory as equinox_root. Extract the compressed file in the equinox_root directory.
- Download the gemini-blueprint incubation 1.0.0 compressed file from the Eclipse website . Extract the file contents into a temporary directory, and copy the following extracted files to the equinox_root/plugins directory:
dist/gemini-blueprint-core-1.0.0.jar dist/gemini-blueprint-extender-1.0.0.jar dist/gemini-blueprint-io-1.0.0.jar
Depending on the location where you download the compressed Blueprint file, the extracted files might have the extension, RELEASE.jar, much like the Spring framework JAR files in the next step. You must verify that the file names match the file references in the config.ini file.
- Download the Spring Framework Version 3.0.5 from the following SpringSource web page: http://www.springsource.com/download/community . Extract it into a temporary directory, and copy the following extracted files to the directory...
-
equinox_root/plugins
org.springframework.aop-3.0.5.RELEASE.jar org.springframework.asm-3.0.5.RELEASE.jar org.springframework.beans-3.0.5.RELEASE.jar org.springframework.context-3.0.5.RELEASE.jar org.springframework.core-3.0.5.RELEASE.jar org.springframework.expression-3.0.5.RELEASE.jar
- Download the AOP Alliance Java archive (JAR) file from the SpringSource web page . Copy the com.springsource.org.aopalliance-1.0.0.jar to the directory...
-
equinox_root/plugins
- Download the Apache commons logging 1.1.1 JAR file from the SpringSource web page . Copy the com.springsource.org.apache.commons.logging-1.1.1.jar file to the directory...
-
equinox_root/plugins
- Download the Luminis OSGi Configuration Admin command-line client. Use this JAR file bundle to manage OSGi administrative configurations. Copy the net.luminis.cmc-0.2.5.jar to the equinox_root/plugins directory.
- Download the Apache Felix file installation Version 3.0.2
bundle from the following web page: http://felix.apache.org/site/index.html . Copy the org.apache.felix.fileinstall-3.0.2.jar file to...
-
equinox_root/plugins
- Create a configuration directory inside...
-
equinox_root/plugins
For example:
-
mkdir equinox_root/plugins/configuration
- Create the following config.ini file in...
-
equinox_root/plugins/configuration
...replacing equinox_root with the absolute path to your equinox_root directory and removing all trailing spaces after the backslash on each line. Include a blank line at the end of the file; for example:
osgi.noShutdown=true osgi.java.profile.bootdelegation=none org.osgi.framework.bootdelegation=none eclipse.ignoreApp=true osgi.bundles=\
org.eclipse.osgi.services_3.2.100.v20100503.jar@1:start, \
org.eclipse.osgi.util_3.2.100.v20100503.jar@1:start, \
org.eclipse.equinox.cm_1.0.200.v20100520.jar@1:start, \
com.springsource.org.apache.commons.logging-1.1.1.jar@1:start, \
com.springsource.org.aopalliance-1.0.0.jar@1:start, \
org.springframework.aop-3.0.5.RELEASE.jar@1:start, \
org.springframework.asm-3.0.5.RELEASE.jar@1:start, \
org.springframework.beans-3.0.5.RELEASE.jar@1:start, \
org.springframework.context-3.0.5.RELEASE.jar@1:start, \
org.springframework.core-3.0.5.RELEASE.jar@1:start, \
org.springframework.expression-3.0.5.RELEASE.jar@1:start, \
org.apache.felix.fileinstall-3.0.2.jar@1:start, \
net.luminis.cmc-0.2.5.jar@1:start, \
gemini-blueprint-core-1.0.0.jar@1:start, \
gemini-blueprint-extender-1.0.0.jar@1:start, \
gemini-blueprint-io-1.0.0.jar@1:start
If you have already set up the environment, we can clean up the Equinox plug-in repository by removing the following directory:
-
equinox_root\plugins\configuration\org.eclipse.osgi
- Run the following commands to start equinox console.
If we are running a different version of Equinox, then your JAR file name is different from the one in the following example:
java -jar plugins\org.eclipse.osgi_3.6.1.R36x_v20100806.jar -console
Installing eXtreme Scale bundles
WXS includes bundles that can be installed into an Eclipse Equinox OSGi framework. These bundles are required to start eXtreme Scale servers or use eXtreme Scale clients in OSGi. We can install the eXtreme Scale bundles using the Equinox console or using the config.ini configuration file.
This task assumes installed the following products:
- Eclipse Equinox OSGi framework
- eXtreme Scale stand-alone client or server
eXtreme Scale includes two bundles. Only one of the following bundles is required in an OSGi framework:
- objectgrid.jar
- The server bundle is the objectgrid.jar file and is installed with the eXtreme Scale stand-alone server installation and is required for running eXtreme Scale servers and can also be used for running eXtreme Scale clients, or local, in-memory caches. The bundle ID for the objectgrid.jar file is com.ibm.websphere.xs.server_<version>, where the version is in the format: <Version>.<Release>.<Modification>. For example, the server bundle for this release is com.ibm.websphere.xs.server_8.5.0.
- ogclient.jar
- The ogclient.jar bundle is installed with the eXtreme Scale stand-alone and client installations and is used to run eXtreme Scale clients or local, in-memory caches. The bundle ID for ogclient.jar file is com.ibm.websphere.xs.client_<version>, where the version is in the format: <Version>_<Release>_<Modification. For example, the client bundle for this release is com.ibm.websphere.xs.server_8.5.0.
Install the eXtreme Scale client or server bundle into the Eclipse Equinox OSGi framework using the Equinox console
Procedure
- Start the Eclipse Equinox framework with the console enabled; for example:
java_home/bin/java -jar <equinox_root>/plugins/org.eclipse.osgi_3.6.1.R36x_v20100806.jar -console
- Install the eXtreme Scale client or server bundle in the Equinox console:
- osgi> install file:///<path to bundle>
- Equinox displays the bundle ID for the newly installed bundle:
- Bundle id is 25
- Start the bundle in the Equinox console, where <id> is the bundle ID assigned when the bundle was installed:
osgi> start <id>
- Retrieve the service status in the Equinox console to verify that the bundle has started; for example:
- osgi> ss
- 25 ACTIVE com.ibm.websphere.xs.server_8.5.0
Install the eXtreme Scale client or server bundle into the Eclipse Equinox OSGi framework using the config.ini file
Procedure
- Copy the eXtreme Scale client or server (objectgrid.jar or ogclient.jar) bundle from...
-
<wxs_install_root>/ObjectGrid/lib
...to the Eclipse Equinox plug-ins directory; for example:
-
<equinox_root>/plugins
- Edit the Eclipse Equinox config.ini configuration file, and add the bundle to the osgi.bundles property; for example:
osgi.bundles=\
org.eclipse.osgi.services_3.2.100.v20100503.jar@1:start, \
org.eclipse.osgi.util_3.2.100.v20100503.jar@1:start, \
org.eclipse.equinox.cm_1.0.200.v20100520.jar@1:start, \
objectgrid.jar@1:start
Verify that a blank line exists after the last bundle name. Each bundle is separated by a comma.
- Start the Eclipse Equinox framework with the console enabled;
for example:
java_homebin/java -jar <equinox_root>/plugins/org.eclipse.osgi_3.6.1.R36x_v20100806.jar -console
- Retrieve the service status in the Equinox console to verify that the bundle has started:
- osgi> ss
- 25 ACTIVE com.ibm.websphere.xs.server_8.5.0
The eXtreme Scale server or client bundle is installed and started in your Eclipse Equinox OSGi framework.
Run eXtreme Scale containers with non-dynamic plug-ins in an OSGi environment
If you do not need to use the dynamic capability of an OSGi environment, we can still take advantage of tighter coupling, declarative packaging, and service dependencies that the OSGi framework offers.
- Develop the application using WXS APIs and plug-ins.
- Package the application in one or more OSGi bundles with the appropriate import or export dependencies that are declared in one or more bundle manifests. Ensure that all classes or packages that are required for the plug-ins, agents, data objects, and so on, are exported.
With dynamic plug-ins, we can upgrade your plug-ins without stopping the grid. To use this capability, the original and new plug-ins must be compatible. If you do not need to update plug-ins, or can afford to stop the grid to upgrade them, then you may not need the complexity of dynamic plug-ins. However, there are still good reasons to run your eXtreme Scale application in an OSGi environment. These reasons include the tighter coupling, declarative package, service dependencies, and so on.
One concern with hosting the grid or client in an OSGi environment without using dynamic plug-ins (more specifically, without declaring the plug-ins using OSGi services) is how the eXtreme Scale bundle loads the plug-in classes. The eXtreme Scale bundle relies on OSGi services to load plug-in classes, which allows the bundle to invoke object methods on classes in other bundles without directly importing the packages of those classes.
When the plug-ins are not made available via OSGi services, the eXtreme Scale bundle must be able to load the plug-in classes directly. Rather than modifying the manifest of the eXtreme Scale bundle to import user classes and packages, create a bundle fragment that adds the necessary package imports. The fragment can also import the classes needed for other non-plug-in user classes, such as data objects and agent classes.
- Create an OSGi fragment that uses the eXtreme Scale bundle (client or server, depending on the intended deployment environment) as its host.
The fragment declares dependencies (Import-Package) on all of the packages that one or more plug-ins must load. For example, if we are installing a serializer plug-in whose classes reside in the com.mycompany.myapp.serializers package and depends on classes in the com.mycompany.myapp.common package,
then your fragment META-INF/MANIFEST.MF file resembles the following example:
Bundle-ManifestVersion: 2
Bundle-Name: Plug-in fragment for XS serializers
Bundle-SymbolicName: com.mycompany.myapp.myfragment; singleton:=true
Bundle-Version: 1.0.0
Fragment-Host: com.ibm.websphere.xs.server; bundle-version=7.1.1
Manifest-Version: 1.0
Import-Package: com.mycompany.myapp.serializers,
 com.mycompany.myapp.common
.
This manifest must be packaged in a fragment JAR file, which in this example is com.mycompany.myapp.myfragment_1.0.0.jar. - Deploy both the newly created fragment, the eXtreme Scale bundle, and application bundles to your OSGi environment. Now, start the bundles.
Results
We can now test and run the application in h3 OSGi environment without using OSGi services to load user classes, such as plug-ins and agents.
Administer eXtreme Scale servers and applications in an h3 environment
Use this topic to install the WXS server bundle, an optional fragment that allows loading of the application bundles and non-dynamic user classes, such as plug-ins, agents, data objects, and so on.
- Install and start a supported OSGi framework. Currently Equinox is the only supported OSGi implementation. If the application uses Blueprint, make sure to install and start a supported Blueprint implementation. Apache Aries and Eclipse Gemini are both supported.
- Open the OSGi console.
- Install
the eXtreme Scale server
bundle. You must know the file URL of the bundle JAR
file. For example:
osgi> install file:///home/user1/myOsgiEnv/plugins/objectgrid.jar
Bundle id is 41

osgi>
The eXtreme Scale bundle is now installed, but not yet resolved. - If
the eXtreme Scale server
must load user classes directly, rather than using dynamic plug-ins
exposed via OSGi services, then also install a user-developed
fragment that either provides those classes or imports them. If
we are using dynamic plug-ins and not using agents, we can skip
this step. Here is an example of how to install a custom fragment:
osgi> install file:///home/user1/myOsgiEnv/plugins/myFragment.jar
Bundle id is 42

osgi> ss

Framework is launched.

id State       Bundle
...
41 INSTALLED   com.ibm.websphere.xs.server_7.1.1
42 INSTALLED   com.mycompany.myfragment_1.0.0

osgi>
Now the eXtreme Scale server bundle and the custom fragment that attaches to the bundle are both installed. - Start the eXtreme Scale server
bundle; for example:
osgi> start 41 osgi> ss Framework is launched. id State Bundle ... 41 ACTIVE com.ibm.websphere.xs.server_7.1.1 Fragments=42 42 RESOLVED com.mycompany.myfragment_1.0.0 Master=41 osgi> - Now install and start all user application bundles using the same previously mentioned commands. To start a grid on this server, the server and container definition must be declared using Blueprint, or the application must start the server and container programmatically from a bundle activator or some other mechanism.
Results
The eXtreme Scale server bundle and application are deployed, started, and ready to accept work.
Building and running eXtreme Scale dynamic plug-ins for use in an OSGi environment
All eXtreme Scale plug-ins can be configured for an OSGi environment. The primary benefit of dynamic plug-ins is that they allow you to upgrade them without shutting down the grid. This allows us to evolve an application without restarting the grid container processes.
WXS OSGi support allows us to deploy the product in an OSGi framework, such as Eclipse Equinox. Previously, if we wanted to update the plug-ins used by eXtreme Scale, you had to restart the JVM to apply the new versions of the plug-ins. With the dynamic plug-in support provided by eXtreme Scale and the ability to update bundles that the OSGi framework provides, we can now update the plug-in classes without restarting the JVM. These plug-ins are exported by bundles as services. WXS accesses the service by looking up the OSGi registry. In the OSGi service platform, a bundle is a JAR file that contains Java code, resources, and a manifest that describes the bundle and its dependencies. The bundle is the unit of deployment for an application.
Building eXtreme Scale dynamic plug-ins
WXS includes ObjectGrid and BackingMap plug-ins.
These plug-ins are implemented in Java and are configured using the ObjectGrid descriptor XML file. To create a dynamic plug-in that can be dynamically upgraded, they need to be aware of ObjectGrid and BackingMap life cycle events because they might need to complete some actions during an update. Enhancing a plug-in bundle with life cycle callback methods, event listeners, or both allows the plug-in to complete those actions at the appropriate times.
This topic assumes that you have built the appropriate plug-in.
All eXtreme Scale plug-ins apply to either a BackingMap or ObjectGrid instance. Many plug-ins also interact with other plug-ins. For example, a Loader and TransactionCallback plug-in work together to properly interact with a database transaction and the various database JDBC calls. Some plug-ins might also need to cache configuration data from other plug-ins to improve performance.
The BackingMapLifecycleListener and ObjectGridLifecycleListener plug-ins provide life cycle operations for the respective BackingMap and ObjectGrid instances. This process allows plug-ins to be notified when the parent BackingMap or ObjectGrid and their respective plug-ins might be changed. BackingMap plug-ins implement the BackingMapLifecyleListener interface, and ObjectGrid plug-ins implement the ObjectGridLifecycleListener interface. These plug-ins are automatically invoked when the life cycle of the parent BackingMap or ObjectGrid changes.
We can expect to enhance bundles using the life cycle methods or event listeners in the following common tasks:
- Start and stop resources, such as threads or messaging subscribers.
- Specifying that a notification occur when peer plug-ins have been updated, allowing direct access to the plug-in and detecting any changes.
Whenever you access another plug-in directly, access that plug-in through the OSGi container to ensure that all parts of the system reference the correct plug-in. If, for example, some component in the application directly references, or caches, an instance of a plug-in, it will maintain its reference to that version of the plug-in, even after that plug-in has been dynamically updated. This behavior can cause application-related problems as well as memory leaks. Therefore, write code that depends on dynamic plug-ins that obtain its reference using OSGi, getService() semantics. If the application must cache one or more plug-ins, it listens for life cycle events using ObjectGridLifecycleListener and BackingMapLifecycleListener interfaces. The application must also be able to refresh its cache when necessary, in a thread safe manner.
All eXtreme Scale plug-ins used with OSGi must also implement the respective BackingMapPlugin or ObjectGridPlugin interfaces.
New plug-ins such as the MapSerializerPlugin interface enforce this practice. These interfaces provide the eXtreme Scale runtime environment and OSGi a consistent interface for injecting state into the plug-in and controlling its life cycle.
Use this task to specify that a notification occurs when peer plug-ins are updated, you might create a listener factory that produces a listener instance.
- Update the ObjectGrid plug-in class to implement the ObjectGridPlugin interface. This interface includes methods that allow eXtreme Scale to initialize, set
the ObjectGrid instance and destroy the plug-in. See the following code example:
package com.mycompany; import com.ibm.websphere.objectgrid.plugins.ObjectGridPlugin; ... public class MyTranCallback implements TransactionCallback, ObjectGridPlugin { private ObjectGrid og = null; private enum State { NEW, INITIALIZED, DESTROYED } private State state = State.NEW; public void setObjectGrid(ObjectGrid grid) { this.og = grid; } public ObjectGrid getObjectGrid() { return this.og; } void initialize() { // Handle any plug-in initialization here. This is called by // eXtreme Scale, and not the OSGi bean manager. state = State.INITIALIZED; } boolean isInitialized() { return state == State.INITIALIZED; } public void destroy() { // Destroy the plug-in and release any resources. // This can be callsed by the OSGi Bean Manager or by eXtreme Scale. state = State.DESTROYED; } public boolean isDestroyed() { return state == State.DESTROYED; }} - Update the ObjectGrid plug-in class to implement the ObjectGridLifecycleListener interface.
See the following code example:
package com.mycompany; import com.ibm.websphere.objectgrid.plugins.ObjectGridLifecycleListener; import com.ibm.websphere.objectgrid.plugins.ObjectGridLifecycleListener.LifecycleEvent; ... public class MyTranCallback implements TransactionCallback, ObjectGridPlugin, ObjectGridLifecycleListener{ public void objectGridStateChanged(LifecycleEvent event) { switch(event.getState()) { case NEW: case DESTROYED: case DESTROYING: case INITIALIZING: break; case INITIALIZED: // Lookup a Loader or MapSerializerPlugin using // OSGi or directly from the ObjectGrid instance. lookupOtherPlugins() break; case STARTING: case PRELOAD: break; case ONLINE: if (event.isWritable()) { startupProcessingForPrimary(); } else { startupProcessingForReplica(); } break; case QUIESCE: if (event.isWritable()) { quiesceProcessingForPrimary(); } else { quiesceProcessingForReplica(); } break; case OFFLINE: shutdownShardComponents(); break; } } ... } - Update a BackingMap plug-in. Update the BackingMap
plug-in class to implement the BackingMap plu-in
interface. This interface includes methods that allow eXtreme Scale to initialize, set the BackingMap instance, and destroy the plug-in. See the following code example:
package com.mycompany; import com.ibm.websphere.objectgrid.plugins.BackingMapPlugin; ... public class MyLoader implements Loader, BackingMapPlugin { private BackingMap bmap = null; private enum State { NEW, INITIALIZED, DESTROYED } private State state = State.NEW; public void setBackingMap(BackingMap map) { this.bmap = map; } public BackingMap getBackingMap() { return this.bmap; } void initialize() { // Handle any plug-in initialization here. This is called by // eXtreme Scale, and not the OSGi bean manager. state = State.INITIALIZED; } boolean isInitialized() { return state == State.INITIALIZED; } public void destroy() { // Destroy the plug-in and release any resources. This // can be callsed by the OSGi Bean Manager or by eXtreme Scale. state = State.DESTROYED; } public boolean isDestroyed() { return state == State.DESTROYED; }} - Update the BackingMap plug-in class to implement the BackingMapLifecycleListener interface. See the following code example:
package com.mycompany;

      import com.ibm.websphere.objectgrid.plugins.BackingMapLifecycleListener;
      import com.ibm.websphere.objectgrid.plugins.BackingMapLifecycleListener.LifecycleEvent;
      ...

      public class MyLoader implements Loader, ObjectGridPlugin, ObjectGridLifecycleListener{
          ...
          public void backingMapStateChanged(LifecycleEvent event) {
              switch(event.getState()) {
              case NEW:
              case DESTROYED:
              case DESTROYING:
              case INITIALIZING:
                  break;
              case INITIALIZED:
                  // Lookup a MapSerializerPlugin using
                  // OSGi or directly from the ObjectGrid instance.
                  lookupOtherPlugins()
                  break;
              case STARTING:
              case PRELOAD:
                  break;
              case ONLINE:
                  if (event.isWritable()) {
                      startupProcessingForPrimary();
                  } else {
                      startupProcessingForReplica();
                  }
                  break;
              case QUIESCE:
                  if (event.isWritable()) {
                      quiesceProcessingForPrimary();
                  } else {
                      quiesceProcessingForReplica();
                  }
                  break;
              case OFFLINE:
                  shutdownShardComponents();
                  break;
              }
          }
          ...
      }
Results
By implementing the ObjectGridPlugin or BackingMapPlugin interface, eXtreme Scale can control the life cycle of your plug-in at the right times.
By implementing the ObjectGridLifecycleListener or BackingMapLifecycleListener interface, the plug-in is automatically registered as a listener of the associated ObjectGrid or BackingMap life cycle events. The INITIALIZING event is used to signal that all of the ObjectGrid and BackingMap plug-ins have been initialized and are available for lookup and use. The ONLINE event is used to signal that the ObjectGrid is online and ready to start processing events.
Configure eXtreme Scale plug-ins with OSGi Blueprint
All eXtreme Scale ObjectGrid and BackingMap plug-ins can be defined as OSGi beans and services using the OSGi Blueprint Service available with Eclipse Gemini or Apache Aries.
Before we can configure your plug-ins as OSGi services, you must first package your plug-ins in an OSGi bundle, and understand the fundamental principles of the required plug-ins. The bundle must import the WXS server or client packages and other dependent packages required by the plug-ins, or create a bundle dependency on the eXtreme Scale server or client bundles This topic describes how to configure the Blueprint XML to create plug-in beans and expose them as OSGi services for eXtreme Scale to use.
Beans and services are defined in a Blueprint XML file, and the Blueprint container discovers, creates, and wires the beans together and exposes them as services. The process makes the beans available to other OSGi bundles, including the eXtreme Scale server and client bundles.
When creating custom plug-in services for use with WXS, the bundle that is to host the plug-ins, must be configured to use Blueprint. In addition, a Blueprint XML file must be created and stored within the bundle.
Read about building OSGi applications with the Blueprint Container specification for a general understanding of the specification.
- Create a Blueprint XML file. We can name the file anything. However, you must include the blueprint namespace:
<?xml version="1.0" encoding="UTF-8"?>
<blueprint xmlns="http://www.osgi.org/xmlns/blueprint/v1.0.0">
...
</blueprint>
- Create bean definitions
in the Blueprint XML file for each eXtreme Scale plug-in.
Beans are defined using the <bean> element and can be wired to other bean references and can include initialization parameters.
When defining a bean, use the correct scope. Blueprint supports the singleton and prototype scopes. eXtreme Scale also supports a custom shard scope.
Define most eXtreme Scale plug-ins as prototype or shard-scoped beans, since all of the beans must be unique for each ObjectGrid shard or BackingMap instance it is associated with. Shard-scoped beans can be useful when using the beans in other contexts to allow retrieving the correct instance.
To define a prototype-scoped bean, use the scope="prototype" attribute on the bean:
<bean class="com.mycompany.MyBean" scope="prototype">
...
</bean>
To define a shard-scoped bean, you must add the objectgrid namespace to the XML schema, and use the scope="objectgrid:shard" attribute on the bean:
<?xml version="1.0" encoding="UTF-8"?> <blueprint xmlns="http://www.osgi.org/xmlns/blueprint/v1.0.0" xmlns:objectgrid="http://www.ibm.com/schema/objectgrid" xsi:schemaLocation="http://www.ibm.com/schema/objectgrid http://www.ibm.com/schema/objectgrid/objectgrid.xsd"> <bean class="com.mycompany.MyBean" scope="objectgrid:shard"> ... </bean> ... - Create PluginServiceFactory bean definitions for each plug-in bean. All eXtreme Scale beans must have a PluginServiceFactory bean defined so that the correct bean scope can be applied. eXtreme Scale includes a BlueprintServiceFactory that we can use. It includes two properties that must be set. You must set the blueprintContainer property to the blueprintContainer reference, and the beanId property must be set to the bean identifier name. When eXtreme Scale looks up the service to instantiate the appropriate beans, the server looks up the bean component instance using the Blueprint container.
bean id="myPluginBeanFactory" class="com.ibm.websphere.objectgrid.plugins.osgi.BluePrintServiceFactory"> <property name="blueprintContainer" ref="blueprintContainer" /> <property name="beanId" value="myPluginBean" /> </bean> - Create a service manager
for each PluginServiceFactory bean. Each service manager exposes the PluginServiceFactory bean,
using the <service> element. The service element
identifies the name to expose to OSGi, the reference to the PluginServiceFactory bean,
the interface to expose, and the ranking of the service. eXtreme Scale uses the service
manager ranking to perform service upgrades when the eXtreme Scale grid is active.
If the ranking is not specified, the OSGi framework assumes a ranking of 0. Read about updating service rankings for more information.
Blueprint includes several options for configuring service managers. To define a simple service manager for a PluginServiceFactory bean, create a <service> element for each PluginServiceFactory bean:
<service ref="myPluginBeanFactory" interface="com.ibm.websphere.objectgrid.plugins.osgi.PluginServiceFactory" ranking="1"> </service> - Store the Blueprint
XML file in the plug-ins bundle. The Blueprint XML file must be stored in the OSGI-INF/blueprint directory
for the Blueprint container to be discovered.
To store the Blueprint XML file in a different directory, specify the following Bundle-Blueprint manifest header:
Bundle-Blueprint: OSGI-INF/blueprint.xml
Results
The eXtreme Scale plug-ins are now configured to be exposed in an OSGi Blueprint container, In addition, the ObjectGrid descriptor XML file is configured to reference the plug-ins using the OSGi Blueprint service.
Installing and starting OSGi-enabled plug-ins
In this task, you install the dynamic plug-in bundle into the OSGi framework. Then, you start the plug-in.
This topic assumes that the following tasks have been completed:
- The eXtreme Scale server or client bundle has been installed into the Eclipse Equinox OSGi framework.
- One or more dynamic BackingMap or ObjectGrid plug-ins have been implemented.
- The dynamic plug-ins have been packaged as OSGi services in OSGi bundles.
This task describes how to install the bundle using the Eclipse Equinox console. The bundle can be installed using several different methods, including modifying the config.ini configuration file. Products that embed Eclipse Equinox include alternative methods for managing bundles. For more information on how to add bundles in the config.ini file in Eclipse Equinox, see the Eclipse runtime options .
OSGi allows bundles to be started that have duplicate services. WXS uses the latest service ranking. When starting multiple OSGi frameworks in a WXS data grid, make sure that the correct service rankings are started on each server. Failure to do so causes the grid to be started with a mixture of different versions.
To see which versions are in-use by the data grid, use the xscmd utility to check the current and available rankings.
Install the plug-in bundle into the Eclipse Equinox OSGi framework using the OSGi console.
- Start the Eclipse Equinox framework with the console enabled;
for example:
- <java_home>/bin/java -jar <equinox_root>/plugins/org.eclipse.osgi_3.6.1.R36x_v20100806.jar -console
- Install the plug-in bundle in the Equinox console.
- osgi> install file:///<path to bundle>
Equinox displays the bundle ID for the newly installed bundle:
- Bundle id is 17
- Enter the following line to start the bundle in the Equinox
console, where <id> is the bundle ID assigned
when the bundle was installed:
- osgi> start <id>
- Retrieve the service status in the Equinox console to verify that the bundle has started:
- osgi> ss
When the bundle has started successfully, the bundle displays the ACTIVE state; for example:
- 17 ACTIVE com.mycompany.plugin.bundle_VRM
Install the plug-in bundle into the Eclipse Equonix OSGi framework using the config.ini file.
- Copy the plug-in bundle into the Eclipse Equinox plug-ins directory; for example:
- <equinox_root>/plugins
- Edit the Eclipse Equinox config.ini configuration file, and add the bundle to the osgi.bundles property; for example:
osgi.bundles=\
org.eclipse.osgi.services_3.2.100.v20100503.jar@1:start, \
org.eclipse.osgi.util_3.2.100.v20100503.jar@1:start, \
org.eclipse.equinox.cm_1.0.200.v20100520.jar@1:start, \
com.mycompany.plugin.bundle_VRM.jar@1:start
Verify there is a blank line after the last bundle name. Each bundle is separated by a comma.
- Start the Eclipse Equinox framework with the console enabled;
for example:
<java_home>/bin/java -jar <equinox_root>/plugins/org.eclipse.osgi_3.6.1.R36x_v20100806.jar -console
- Retrieve the service status in the Equinox console to verify
that the bundle has started; for example:
osgi> ss
When the bundle has started successfully, the bundle displays the ACTIVE state; for example:
17 ACTIVE com.mycompany.plugin.bundle_VRM
Results
The plug-in bundle is now installed and started.
The eXtreme Scale container or client can now be started.
Run eXtreme Scale containers with dynamic plug-ins in an OSGi environment
If the application is hosted in the Eclipse Equinox OSGi framework with Eclipse Gemini or Apache Aries, then we can use this task to help you install and configure your WXS application in OSGi.
Before you start this task, be sure to complete the following tasks:
With dynamic plug-ins, we can dynamically upgrade the plug-in while the grid is still active. This allows us to update an application without restarting the grid container processes.
Configure OSGi-enabled plug-ins using the ObjectGrid descriptor XML file
In this task, you add existing OSGi services to a descriptor XML file so that WXS containers can recognize and load the OSGi-enabled plug-ins correctly.
To configure your plug-ins, be sure to:
- Create your package, and enable dynamic plug-ins for OSGi deployment.
- Have the names of the OSGi services that represent your plug-ins available.
You have created an OSGi service to wrap your plug-in. Now, these services must be defined in the objectgrid.xml file so that eXtreme Scale containers can load and configure the plug-in or plug-ins successfully.
- Any grid-specific plug-ins, such as TransactionCallback,
must be specified under the objectGrid element. See the following example from the objectgrid.xml file:
<?xml version="1.0" encoding="UTF-8"?>

<objectGridConfig xmlns:xsi="http://www.w3.org/2001/XMLSchema-instance"
    xsi:schemaLocation="http://ibm.com/ws/objectgrid/config ../objectGrid.xsd"
    xmlns="http://ibm.com/ws/objectgrid/config">

    <objectGrids>
        <objectGrid name="MyGrid" txTimeout="60">
            <bean id="myTranCallback" osgiService="myTranCallbackFactory"/>
            ...
        </objectGrid>
        ...
    </objectGrids>
    ...
/objectGridConfig>
The osgiService attribute value must match the ref attribute value specified in the blueprint XML file, where the service was defined for myTranCallback PluginServiceFactory.
- Any map-specific plug-ins, such
as loaders or serializers,
for example, must be specified in the backingMapPluginCollections element
and referenced from the backingMap element. See the following example from the objectgrid.xml file:
<?xml version="1.0" encoding="UTF-8"?>

objectGridConfig xmlns:xsi="http://www.w3.org/2001/XMLSchema-instance"
    xsi:schemaLocation="http://ibm.com/ws/objectgrid/config ../objectGrid.xsd"
    xmlns="http://ibm.com/ws/objectgrid/config">
    <objectGrids>
        <objectGrid name="MyGrid" txTimeout="60">
            <backingMap name="MyMap1" lockStrategy="PESSIMISTIC"
                copyMode="COPY_TO_BYTES" nullValuesSupported="false"
                pluginCollectionRef="myPluginCollectionRef1"/>
            <backingMap name="MyMap2" lockStrategy="PESSIMISTIC"
                copyMode="COPY_TO_BYTES" nullValuesSupported="false"
                pluginCollectionRef="myPluginCollectionRef2"/>
            ...
        </objectGrid>
        ...
    </objectGrids>
    ...
    <backingMapPluginCollections>
        <backingMapPluginCollection id="myPluginCollectionRef1">
            <bean id="MapSerializerPlugin" osgiService="mySerializerFactory"/>
        </backingMapPluginCollection>
        <backingMapPluginCollection id="myPluginCollectionRef2">
            <bean id="MapSerializerPlugin" osgiService="myOtherSerializerFactory"/>
            <bean id="Loader" osgiService="myLoader"/>
        </backingMapPluginCollection>
        ...
    </backingMapPluginCollections>
    ...
</objectGridConfig>
Results
The objectgrid.xml file in this example tells eXtreme Scale to create a grid called MyGrid with two maps, MyMap1 and MyMap2. The MyMap1 map uses the serializer wrapped by the OSGi service, mySerializerFactory. The MyMap2 map uses a serializer from the OSGi service, myOtherSerializerFactory, and a loader from the OSGi service, myLoader.
Building OSGi applications with the Blueprint Container specification
OSGi Bundle Activator API documentation
Starting eXtreme Scale servers using the Eclipse Equinox OSGi framework
WXS container servers can be started in an Eclipse Equinox OSGi framework using several methods.
Before we can start a WXS container, you must have completed the following tasks:
- The WXS server bundle must be installed into Eclipse Equinox.
- Your application must be packaged as an OSGi bundle.
- Your WXS plug-ins (if any) must be packaged as an OSGi bundle. They can be bundled in the same bundle as the application or as separate bundles.
- If container servers are using IBM eXtremeMemory, first configure the native libraries.
This task describes how to start a WXS container server in an Eclipse Equinox OSGi framework. Use any of the following methods to start container servers using the Eclipse Equinox implementation:
- OSGi Blueprint service
We can include all configuration and metadata in an OSGi bundle. See the following image to understand the Eclipse Equinox process for this method:
Figure 1. Eclipse Equinox process for including all configuration and metadata in an OSGi bundle
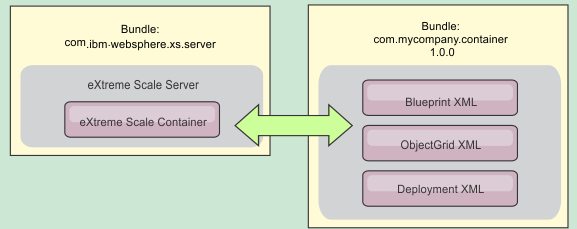
- OSGi Configuration Admin service
We can specify configuration and metadata outside of an OSGi bundle. See the following image to understand the Eclipse Equinox process for this method:
Figure 2. Eclipse Equinox process for specify configuration and metadata outside of an OSGi bundle
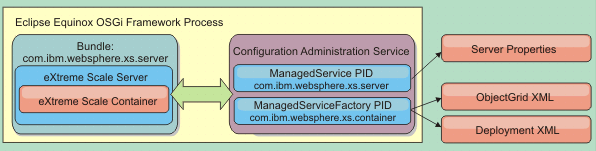
- Programmatically
Supports customized configuration solutions.
In each case, a WXS server singleton is configured and one or more containers are configured.
The eXtreme Scale server bundle, objectgrid.jar, includes all of the required libraries to start and run a WXS grid container in an OSGi framework. The server runtime environment communicates with user-supplied plug-ins and data objects using the OSGi service manager.
After a WXS server bundle is started and the eXtreme Scale server is initialized, it cannot be restarted . The Eclipse Equinox process must be restarted to restart a WXS server.
Use eXtreme Scale support for Spring namespace to configure eXtreme Scale container servers in a Blueprint XML file. When the server and container XML elements are added to the Blueprint XML file, the eXtreme Scale namespace handler automatically starts a container server using the parameters that are defined in the Blueprint XML file when the bundle is started. The handle stops the container when the bundle is stopped.
To configure eXtreme Scale container servers with Blueprint XML, complete the following steps:
- Start a WXS container server using OSGi blueprint.
- >Create a container bundle.
- Install the container bundle into the Eclipse Equinox OSGi framework.
- Start the container bundle.
- Start a WXS container server using OSGi configuration admin.
- Configure the server and container using config admin .
- When the eXtreme Scale server bundle is started, or the persistent identifiers are created with config admin, the server and container automatically start.
- Start a WXS container server using the ServerFactory API. See the server API documentation .
- Create an OSGi bundle activator class, and use the eXtreme Scale ServerFactory API to start a server.
Run eXtreme Scale containers with non-dynamic plug-ins in an OSGi environment
Administer OSGi-enabled services using the xscmd utility
Use the xscmd utility to complete administrator tasks, such as viewing services and their rankings that are being used by each container, and updating the runtime environment to use new versions of the bundles.
With the Eclipse Equinox OSGi framework, we can install multiple versions of the same bundle, and we can update those bundles during run time. WXS is a distributed environment that runs the container servers in many OSGi framework instances.
Administrators are responsible for manually copying, installing, and starting bundles into the OSGi framework. eXtreme Scale includes an OSGi ServiceTrackerCustomizer to track any services that have been identified as eXtreme Scale plug-ins in the ObjectGrid descriptor XML file. Use the xscmd utility to validate which version of the plug-in is used, which versions are available to be used, and to perform bundle upgrades.
eXtreme Scale uses the service ranking number to identify the version of each service. When two or more services are loaded with the same reference, eXtreme Scale automatically uses the service with the highest ranking.
- Run the osgiCurrent command, and verify that each eXtreme Scale server is using the correct plug-in service ranking.
Since eXtreme Scale automatically chooses the service reference with the highest ranking, it is possible that the data grid may start with multiple rankings of a plug-in service.
If the command detects a mismatch of rankings or if it is unable to find a service, a non-zero error level is set. If the command completed successfully then the error level is set to 0.
The following example shows the output of the osgiCurrent command when two plug-ins are installed in the same grid on four servers. The loaderPlugin plug-in is using ranking 1, and the txCallbackPlugin is using ranking 2.
OSGi Service Name Current Ranking ObjectGrid Name MapSet Name Server Name
----------------- --------------- --------------- ----------- -----------
loaderPlugin      1               MyGrid          MapSetA     server1
loaderPlugin      1               MyGrid          MapSetA     server2
loaderPlugin      1               MyGrid          MapSetA     server3
loaderPlugin      1               MyGrid          MapSetA     server4
txCallbackPlugin  2               MyGrid          MapSetA     server1
txCallbackPlugin  2               MyGrid          MapSetA     server2
txCallbackPlugin  2               MyGrid          MapSetA     server3
txCallbackPlugin  2               MyGrid          MapSetA     server4
The following example shows the output of the osgiCurrent command when server2 was started with a newer ranking of the loaderPlugin:
OSGi Service Name Current Ranking ObjectGrid Name MapSet Name Server Name
----------------- --------------- --------------- ----------- -----------
loaderPlugin      1               MyGrid          MapSetA     server1
loaderPlugin      2               MyGrid          MapSetA     server2
loaderPlugin      1               MyGrid          MapSetA     server3
loaderPlugin      1               MyGrid          MapSetA     server4
txCallbackPlugin  2               MyGrid          MapSetA     server1
txCallbackPlugin  2               MyGrid          MapSetA     server2
txCallbackPlugin  2               MyGrid          MapSetA     server3
txCallbackPlugin  2               MyGrid          MapSetA     server4
- Run the osgiAll command to verify
that
the plug-in services have been correctly started on each eXtreme Scale container server.
When bundles start that contain services that an ObjectGrid configuration is referencing, the eXtreme Scale runtime environment automatically tracks the plug-in, but does not immediately use it.
The osgiAll command shows which plug-ins are available for each server.
When run without any parameters, all services are shown for all grids and servers. Additional filters, including the -serviceName <service_name> filter can be specified to limit the output to a single service or a subset of the data grid.
The following example shows the output of the osgiAll command when two plug-ins are started on two servers. The loaderPlugin has both rankings 1 and 2 started and the txCallbackPlugin has ranking 1 started. The summary message at the end of the output confirms that both servers see the same service rankings:
Server: server1
   OSGi Service Name   Available Rankings
   -----------------   ------------------
   loaderPlugin        1, 2
   txCallbackPlugin    1

Server: server2
   OSGi Service Name   Available Rankings
   -----------------   ------------------
   loaderPlugin        1, 2
   txCallbackPlugin    1

Summary - All servers have the same service rankings.
The following example shows the output of the osgiAll command when the bundle that includes the loaderPlugin with ranking 1 is stopped on server1. The summary message at the bottom of the output confirms that server1 is now missing the loaderPlugin with ranking 1:
Server: server1
   OSGi Service Name   Available Rankings
   -----------------   ------------------
   loaderPlugin        2
   txCallbackPlugin    1

Server: server2
   OSGi Service Name   Available Rankings
   -----------------   ------------------
   loaderPlugin        1, 2
   txCallbackPlugin    1

Summary - The following servers are missing service rankings:
   Server  OSGi Service Name Missing Rankings
   ------  ----------------- ----------------
   server1 loaderPlugin      1
The following example shows the output if the service name is specified with the -sn argument, but the service does not exist:
Server: server2
   OSGi Service Name Available Rankings
   ----------------- ------------------
   invalidPlugin     No service found

Server: server1
   OSGi Service Name Available Rankings
   ----------------- ------------------
   invalidPlugin     No service found

Summary - All servers have the same service rankings.
- Run the osgiCheck command to check sets of plug-in services and rankings to see if they are available.
The osgiCheck command accepts one or more sets of service rankings in the form: -serviceRankings <service name>;<ranking>[,<serviceName>;<ranking>]
When the rankings are all available, the method returns with an error level of 0. If one or more rankings are not available, a non-zero error level is set. A table of all of the servers that do not include the specified service rankings is displayed. Additional filters can be used to limit the service check to a subset of the available servers in the eXtreme Scale domain.
If the specified ranking or service is absent, the following message is displayed:
Server  OSGi Service Unavailable Rankings
------  ------------ --------------------
server1 loaderPlugin 3
server2 loaderPlugin 3
- Run
the osgiUpdate command to update
the ranking of one or more plug-ins for all servers in a single ObjectGrid and MapSet in a single operation.
The command accepts one or more sets of service rankings in the form: -serviceRankings <service name>;<ranking>[,<serviceName>;<ranking>] -g <grid name> -ms <mapset name>
With this command, we can complete the following operations:
- Verify that the specified services are available for updating on each of the servers.
- Change the state of the grid to offline using the StateManager interface. See Managing ObjectGrid availability for more information. This process quiesces the grid and waits until any running transactions have completed and prevents any new transactions from starting. This process also signals any ObjectGridLifecycleListener and BackingMapLifecycleListener plug-ins to discontinue any transactional activity. See Plug-ins for providing event listeners for information about event listener plug-ins.
- Update each eXtreme Scale container running in an OSGi framework to use the new service versions.
- Changes the state of the grid to online, allowing transactions to continue.
The update process is idempotent so that if a client fails to complete any one task, it results in the operation being rolled back. If a client is unable to perform the rollback or is interrupted during the update process, the same command can be issued again, and it continues at the appropriate step.
If the client is unable to continue, and the process is restarted from another client, use the -force option to allow the client to perform the update. The osgiUpdate command prevents multiple clients from updating the same map set concurrently.
Configure servers with OSGi Blueprint
We can configure WXS container servers using an OSGi blueprint XML file, allowing simplified packaging and development of self-contained server bundles.
This topic assumes that the following tasks have been completed:
- The Eclipse Equinox OSGi framework has been installed and started with either the Eclipse Gemini or Apache Aries blueprint container.
- The eXtreme Scale server bundle has been installed and started.
- The eXtreme Scale dynamic plug-ins bundle has been created.
- The eXtreme Scale ObjectGrid descriptor XML file and deployment policy XML file have been created.
This task describes how to configure a WXS server with a container using a blueprint XML file. The result of the procedure is a container bundle. When the container bundle is started, the eXtreme Scale server bundle will track the bundle, parse the server XML and start a server and container.
A container bundle can optionally be combined with the application and eXtreme Scale plug-ins when dynamic plug-in updates are not required or the plug-ins do not support dynamic updating.
- Create a Blueprint XML file with the objectgrid namespace
included. We can name the file anything. However, it must
include the blueprint namespace:
<?xml version="1.0" encoding="UTF-8"?> <blueprint xmlns="http://www.osgi.org/xmlns/blueprint/v1.0.0" xmlns:xsi="http://www.w3.org/2001/XMLSchema-instance xmlns:objectgrid="http://www.ibm.com/schema/objectgrid" xsi:schemaLocation="http://www.ibm.com/schema/objectgrid http://www.ibm.com/schema/objectgrid/objectgrid.xsd"> ... </blueprint> - Add the XML definition
for the eXtreme Scale server
with the appropriate
server properties. See the Spring descriptor XML file for details on all available configuration properties. See the following example of the XML definition:
<objectgrid:server id="xsServer" tracespec="ObjectGridOSGi=all=enabled"
tracefile="logs/osgi/wxsserver/trace.log" jmxport="1199" listenerPort="2909">
<objectgrid:catalog host="catserver1.mycompany.com" port="2809" />
<objectgrid:catalog host="catserver2.mycompany.com" port="2809" />
</objectgrid:server>
- Add the XML definition for the eXtreme Scale container with the reference to the server definition and the ObjectGrid descriptor XML
and ObjectGrid deployment XML files embedded in the bundle; for example:
<objectgrid:container id="container" objectgridxml="/META-INF/objectGrid.xml" deploymentxml="/META-INF/objectGridDeployment.xml" server="xsServer" /> - Store
the Blueprint XML file in the container bundle. The Blueprint
XML must be stored in the OSGI-INF/blueprint directory
for the Blueprint container to be found.
To store the Blueprint XML in a different directory, specify the Bundle-Blueprint manifest header; for example:
Bundle-Blueprint: OSGI-INF/blueprint.xml
- Package the files into a single bundle
JAR file. See
the following example of a bundle directory hierarchy:
MyBundle.jar
    /META-INF/manifest.mf
    /META-INF/objectGrid.xml
    /META-INF/objectGridDeployment.xml
    /OSGI-INF/blueprint/blueprint.xml
Results
A WXS container bundle is now created and can be installed in Eclipse Equinox. When the container bundle is started, the eXtreme Scale server runtime environment in the eXtreme Scale server bundle, will automatically start the singleton eXtreme Scale server using the parameters defined in the bundle, and starts a container server. The bundle can be stopped and started, which results in the container stopping and starting. The server is a singleton and does not stop when the bundle is started the first time.
Scenario: Use JCA to connect transactional applications to WXS clients
The following scenario is about connecting clients to applications that participate in transactions.
Read the Transaction processing in the Java EE applications overview topic to learn more about transaction support.
The Java EE Connector Architecture (JCA) provides support for clients that are using Java Transaction API (JTA). Through JTA, client management is simplified and accomplished using Java Platform, Enterprise Edition (Java EE). The JCA specification also supports resource adapters that we can use to connect applications to WXS clients. A resource adapter is a system-level software driver that a Java application uses to connect to an enterprise information system (EIS). A resource adapter plugs into an application server and provides connectivity between the EIS, the application server, and the enterprise application. WXS provides it own resource adapter, which we can install without any required configuration.
As with previous versions of the product, we can use transactions to process a single unit of work to the data grid. With the support of JCA, when you commit those transactions we can enlist resources for that transaction in one-phase commit, which has the following benefits:
- Simplified eXtreme Scale application development. Previously, developers coordinated eXtreme Scale transactions with resources, such as enterprise beans, servlets, and web containers. Because no rollback mechanism existed, developers had no simple way to recover failures.
- Tighter integration exists with WAS, which includes last participant support to enlist in global transactions if necessary.
Scenario goals
After completing this scenario, you will know how to complete the following goals:
- Use Java Transaction API (JTA) support to develop application components that use transactions.
- Connect the applications with WXS clients.
Transaction processing in Java EE applications
WXS provides its own resource adapter that we can use to connect applications to the data grid and process local transactions.
Through support from the eXtreme Scale resource adapter, Java Platform, Enterprise Edition (Java EE) applications can look up eXtreme Scale client connections and demarcate local transactions using Java EE local transactions or using the eXtreme Scale APIs. When the resource adapter is configured, we can complete the following actions with your Java EE applications:
- Look up or inject eXtreme Scale resource adapter connection factories within a Java EE application component.
- Obtain standard connection handles to the eXtreme Scale client and share them between application components using Java EE conventions.
- Demarcate eXtreme Scale transactions using either the javax.resource.cci.LocalTransaction API or the com.ibm.websphere.objectgrid.Session interface.
- Use the entire eXtreme Scale client API, such as the ObjectMap API and EntityManager API.
The following additional capabilities are available with WAS:
- Enlist eXtreme Scale connections with a global transaction as a last participant with other two-phase commit resources. The eXtreme Scale resource adapter provides local transaction support, with a single-phase commit resource. With WAS, the applications can enlist one, single-phase commit resource into a global transaction through last participant support.
- Automatic resource adapter installation when the profile is augmented.
- Automatic security principal propagation.
Administrator responsibilities
The eXtreme Scale resource adapter is installed into the Java EE application server or embedded with the application. After you install the resource adapter, the administrator creates one or more resource adapter connection factories for each catalog service domain and optionally each data grid instance. The connection factory identifies the properties that are required to communicate with the data grid.
Applications reference the connection factory, which establishes the connection to the remote data grid. Each connection factory hosts a single eXtreme Scale client connection that is reused for all application components.
Because the eXtreme Scale client connection might include a near cache, applications must not share a connection. A connection factory must exist for a single application instance to avoid problems sharing objects between applications.
The connection factory hosts a WXS client connection, which is shared between all referencing application components. Use a managed bean (MBean) to access information about the client connection or to reset the connection when it is no longer needed.
Application developer responsibilities
An application developer creates resource references for managed connection factories in the application deployment descriptor or with annotations. Each resource reference includes a local reference for the eXtreme Scale connection factory, as well as the resource-sharing scope.
Enabling resource sharing is important because it allows the local transaction to be shared between application components.
Applications can inject the connection factory into the Java EE application component, or it can look up the connection factory using JNDI. The connection factory is used to obtain connection handles to the eXtreme Scale client connection.
The eXtreme Scale client connection is managed independently from the resource adapter connection and is established on first use, and reused for all subsequent connections.
After finding the connection, the application retrieves a WXS session reference. With the eXtreme Scale session reference, the application can use the entire eXtreme Scale client APIs and features.
We can demarcate transactions in one of the following ways:
- Use the com.ibm.websphere.objectgrid.Session transaction demarcation methods.
- Use the javax.resource.cci.LocalTransaction local transaction.
- Use a global transaction, when you use WAS with last participant support enabled. When you select this approach for demarcation,
you must:
- Use an application-managed global transaction with the javax.transaction.UserTransaction.
- Use a container-managed transaction.
Application deployer responsibilities
The application deployer binds the local reference to the resource adapter connection factory that the application developer defines to the resource adapter connection factories that the administrator defines. The application deployer must assign the correct connection factory type and scope to the application and ensure that the connection factory is not shared between applications to avoid Java object sharing. The application deployer is also responsible for configuring and mapping other appropriate configuration information that is common to all connection factories.
Unshareable and shareable connections
Transaction type and connection behavior
Install a WXS resource adapter
The WXS resource adapter is JCA 1.5 compatible and can be installed on a J2EE 1.5 1.6 or later, or on an application server such as WAS.
The resource adapter is in the wxsra.rar resource adapter archive (RAR) file, which is available in all installations of eXtreme Scale. The RAR file is in the following directories:
- For WAS installations: wxs_install_root/optionalLibraries/ObjectGrid
- For stand-alone installations: wxs_install_root/ObjectGrid/lib directory
The resource adapter is coupled with the eXtreme Scale runtime environment. It requires the eXtreme Scale runtime JAR files in the correct classpath. In general, we can upgrade the eXtreme Scale runtime environment without updating the resource adapter. Upgrading the eXtreme Scale runtime environment also upgrades the resource adapter runtime environment. The resource adapter supports version 8.5 and up to two versions later of the eXtreme Scale runtime environment. Later versions of the resource adapter might require later versions of the eXtreme Scale runtime environment as they become available.
The wxsra.rar file requires one of the eXtreme Scale client runtime JAR files to operate.
We can install the eXtreme Scale resource adapter using several options that allow for flexible deployment scenarios.
The resource adapter can be embedded with the Java Platform, Enterprise Edition (Java EE) application, or it can be installed as a stand-alone RAR file that is shared between applications.
Embedding the resource adapter with the application simplifies deployment because connection factories are only created within the scope of the application and cannot be shared between applications. With the resource adapter embedded in the application, we can also embed the cache objects and ObjectGrid client plug-in classes within the application. Embedding the resource adapter also protects the application from inadvertently sharing cache objects between applications, which can result in java.lang.ClassCastException exceptions.
By installing the wxsra.rar file as a stand-alone resource adapter, we can create resource manager connection factories at the node scope. This option is useful in the following situations:
- When it is not practical to embed the wxsra.rar file inside the application
- When the version of eXtreme Scale is not known at build time
- When we want to share a WXS client connection with multiple applications
In multiple versions of WebSphere Application Server, up to Version 8.0.2, we cannot install the eXtreme Scale resource adapter in an application EAR file and in the stand-alone server simultaneously. The result, when you use the EAR file that also has the RAR file installed, is that the application experiences an exception, such as ClassCastException: com.ibm.websphere.xs.ra.XSConnectionFactory incompatible with com.ibm.websphere.xs.ra.XSConnectionFactory. The following example WebSphere Application Server message and call stack for this error are displayed when a servlet encounters this exception:
SRVE0068E: An exception was thrown by one of the service methods of the servlet [ClientServlet]
in application [JTASampleClientEAR]. Exception created : [java.lang.ClassCastException:
com.ibm.websphere.xs.ra.XSConnectionFactory incompatible with com.ibm.websphere.xs.ra.XSConnectionFactory
at com.ibm.websphere.xs.sample.jtasample.WXSClientServlet.connectClient(WXSClientServlet.java:484)
at com.ibm.websphere.xs.sample.jtasample.WXSClientServlet.doGet(WXSClientServlet.java:200)
at javax.servlet.http.HttpServlet.service(HttpServlet.java:575)
at javax.servlet.http.HttpServlet.service(HttpServlet.java:668)
at com.ibm.ws.webcontainer.servlet.ServletWrapper.service(ServletWrapper.java:1214)
at com.ibm.ws.webcontainer.servlet.ServletWrapper.handleRequest(ServletWrapper.java:774)
at com.ibm.ws.webcontainer.servlet.ServletWrapper.handleRequest(ServletWrapper.java:456)
- Install an embedded eXtreme Scale resource adapter. the application EAR file, the resource adapter must have access to the eXtreme Scale runtime libraries.
For applications that run in WAS, the following choices and subsequent actions are available:
Option Description If eXtreme Scale is integrated with the WebSphere Application Server node The runtime library files are already available in the system classpath, and no other action is required. If eXtreme Scale is not integrated with the WebSphere Application Server node Include the wsogclient.jar file in the wxsra.rar classpath. For applications that do not run in WAS, the client runtime library file, ogclient.jar, or the server runtime library file, objectgrid.jar, must be in the classpath of the RAR file.
- Install a stand-alone eXtreme Scale resource adapter. a stand-alone resource adapter, it must have access to the eXtreme Scale runtime libraries.
For applications that run in WebSphere Application Server, the following choices and subsequent actions are available:
Option Description If eXtreme Scale is integrated with the WAS node The runtime library files are already available in the system classpath, and no other action is required. If eXtreme Scale is not integrated with the WebSphere Application Server node Include the wsogclient.jar file in the wxsra.rar classpath. For applications that do not run in WAS, the client runtime library file, ogclient.jar, or the server runtime library file, objectgrid.jar, must be in the classpath of the RAR file.
- Give the resource adapter access to any shared classes. All ObjectGrid plug-in classes and the applications that use them must share a class loader. Since the resource adapter is shared by multiple applications, all classes must be accessible by the same class loader. We can create this access by using a shared library between all applications that interact with the resource adapter.
Now installed the eXtreme Scale resource adapter, we can configure connection factories so that your Java EE applications can connect to a remote eXtreme Scale data grid.
Installing a resource adapter archive
Installing resource adapters embedded within applications
Configure eXtreme Scale connection factories
A WXS connection factory allows Java EE applications to connect to a remote WXS data grid. Use custom properties to configure resource adapters.
Before you create the connection factories, you must install the resource adapter.
After you install the resource adapter, we can create one or more resource adapter connection factories that represent eXtreme Scale client connections to remote data grids. Complete the following steps to configure a resource adapter connection factory and use it within an application.
We can create a WXS connection factory at the node scope for stand-alone resource adapters or within the application for embedded resource adapters. See the related topics for information about how to create connection factories in WAS.
- Use the WAS administrative console to create a WXS connection factory that represents a WXS client connection. See Configuring Java EE Connector connection factories in the administrative console. After you specify properties for the connection factory in the General Properties panel, you must click Apply for the Custom properties link to become active.
- Click Custom properties in the administrative console. Set the following custom properties to configure the client connection to the remote data grid.
Property Name Type Description ConnectionName String (Optional) The name of the eXtreme Scale client connection. The ConnectionName helps identify the connection when exposed as a managed bean. This property is optional. If not specified, the ConnectionName is undefined.
CatalogServiceEndpoints String (Optional) The catalog service domain end points in the format: <host>:<port>[,<host><port>]. This property is required if the catalog service domain is not set.
CatalogServiceDomain String (Optional) The catalog service domain name that is defined in WAS. This property is required if the CatalogServiceEndpoints property is not set.
ObjectGridName String (Optional) The name of the data grid that this connection factory connects to. If not specified, then the application must supply the name when obtaining the connection from the connection factory. ObjectGridURL String (Optional) The URL of the client data grid, override XML file. This property is not valid if the ObjectGridResource is also specified. ObjectGridResource String The resource path of the client data grid, override XML file. This property is optional and invalid if ObjectGridURL is also specified. ClientPropertiesURL String (Optional) The URL of the client properties file. This property is not valid if the ClientPropertiesResource is also specified. ClientPropertiesResource String (Optional) The resource path of the client properties file. This property is not valid if the ClientPropertiesURL is also specified. WAS also allows other configuration options for adjusting connection pools and managing security. See the related information for links to WAS Information Center topics.
Create a WXS connection factory reference in the application.
Configuring connection factories for resource adapters within applications
Configuring Java EE Connector connection factories in the administrative console
Configuring new J2C connection factories using wsadmin scripting
J2C connection factories collection
Connection factory JNDI name practices
Configure Eclipse environments to use eXtreme Scale connection factories
The eXtreme Scale resource adapter includes custom connection factories. To use these interfaces in your eXtreme Scale Java Platform, Enterprise Edition (Java EE) applications, you must import the wxsra.rar file into your workspace and link it to the application project.
- Install Rational Application Developer Version 7 or later or Eclipse Java EE IDE for Web Developers Version 1.4 or later.
- A server runtime environment must be configured.
- Import the wxsra.rar file into your project by selecting File > Import. The Import window is displayed.
- Select Java EE > RAR
file. The Connector Import window is displayed.
- To specify the connector file, click Browse to locate the wxsra.rar file. The wxsra.rar file is installed when you install a resource adapter. We can find the resource adapter archive (RAR) file in the following location:
- For WAS installations: wxs_install_root/optionalLibraries/ObjectGrid
- For stand-alone installations: wxs_install_root/ObjectGrid/lib directory
- Create a name for the new connector project in the Connector project field. Use wxsra, which is the default name.
- Choose a Target runtime, which references a Java EE server runtime environment.
- Optionally select Add project to EAR to embed the RAR into an existing EAR project.
Results
The RAR file is now imported into your Eclipse workspace.
We can reference the RAR project from your other Java EE projects using the following steps:
- Right click on the project and click Properties.
- Select Java Build Path.
- Select the Projects tab.
- Click Add.
- Select the wxsra connector project, and click OK.
- Click OK again to close the Properties window.
The eXtreme Scale resource adapter classes are now in the classpath.
Configure applications to connect with WXS
Applications use a WXS connection factory to create connection handles to a WXS client connection.
We can configure resource adapter connection factory references using this task.
Create a Java EE application component, such as an EJB container or servlet.
Create a javax.resource.cci.ConnectionFactory resource reference in the application component. Resource references are declared in the deployment descriptor by the application provider. The connection factory represents a WXS client connection that can be used to communicate with one or more named data grids that are available in the catalog service domain.
Unshareable and shareable connections
Creating or changing a resource reference
Securing J2C client connections
Use the Java 2 Connector (J2C) architecture to secure connections between WXS clients and the applications.
Applications reference the connection factory, which establishes the connection to the remote data grid. Each connection factory hosts a single eXtreme Scale client connection that is reused for all application components.
Since the eXtreme Scale client connection might include a near cache, it is important that applications do not share a connection. A connection factory must exist for a single application instance to avoid problems sharing objects between applications.
We can set the credential generator with the API or in the client properties file. In the client properties file, the securityEnabled and credentialGenerator properties are used.
In the following example, some lines of code are continued on the next line for publication purposes.
securityEnabled=true credentialGeneratorClass=com.ibm.websphere.objectgrid.security.plugins.builtins.
     UserPasswordCredentialGenerator credentialGeneratorProps=operator XXXXXX
The credential generator and credential in the client properties file are used for the eXtreme Scale connect operation and the default J2C credentials. Therefore, the credentials specified with the API are used at J2C connect time for the J2C connection. However, if no credentials are specified at J2C connect time, then the credential generator in the client properties file is used.
- Set up secure access where the J2C connection represents the eXtreme Scale client. Use the ClientPropertiesResource connection factory property or the ClientPropertiesURL connection factory property to configure client authentication.
If we are using WXS with WAS, then specify the client properties on the catalog service domain configuration. When the connection factory references the domain, it automatically uses this configuration.
- Configure the client security properties to use the connection factory that references the appropriate credential generator object for eXtreme Scale. These properties are also compatible with WXS server security. For example, use the WSTokenCredentialGenerator credential generator for WebSphere credentials when eXtreme Scale is installed with WAS. Alternatively, use the UserPasswordCredentialGenerator credential generator when we run the eXtreme Scale in a stand-alone environment.
In the following example, credentials are passed programmatically using the API call instead of using the configuration in the client properties:
XSConnectionSpec spec = new XSConnectionSpec(); spec.setCredentialGenerator(new UserPasswordCredentialGenerator("operator", "xxxxxx")); Connection conn = connectionFactory.getConnection(spec); - (Optional) Disable the near cache, if required.
All J2C connections from a single connection factory share a single near cache. Grid entry permissions and map permissions are validated on the server, but not on the near cache . When an application uses multiple credentials to create J2C connections, and the configuration uses specific permissions for grid entries and maps for those credentials, then disable the near cache . Disable the near cache using the connection factory property, ObjectGridResource or ObjectGridURL.
- (Optional) Set security policy settings, if required.
If the J2EE application contains the embedded eXtreme Scale resource adapter archive (RAR) file configuration, you might be required to set additional security policy settings in the security policy file for the application. For example, these policies are required:
permission com.ibm.websphere.security.WebSphereRuntimePermission "accessRuntimeClasses";
permission java.lang.RuntimePermission "accessDeclaredMembers";
permission javax.management.MBeanTrustPermission "register";
permission java.lang.RuntimePermission "getClassLoader";
Additionally, any property or resource files used by connection factories require file or other permissions, such as permission java.io.FilePermission "filePath";. For WAS, the policy file is...
-
META-INF/was.policy
...and it is located in the J2EE EAR file.
Results
The client security properties that you configured on the catalog service domain are used as default values. The values that you specify override any properties that are defined in the client.properties files.
Use eXtreme Scale data access APIs to develop client components to use transactions.
Develop eXtreme Scale client components to use transactions
The WXS resource adapter provides client connection management and local transaction support. With this support, Java Platform, Enterprise Edition (Java EE) applications can look up eXtreme Scale client connections and demarcate local transactions with Java EE local transactions or the eXtreme Scale APIs.
Create a WXS connection factory resource reference.
There are several options for working with WXS data access APIs.
In all cases, the eXtreme Scale connection factory must be injected into the application component, or looked up in JNDI. After the connection factory is looked up, we can demarcate transactions and create connections to access the eXtreme Scale APIs.
We can optionally cast the javax.resource.cci.ConnectionFactory instance to a com.ibm.websphere.xs.ra.XSConnectionFactory that provides additional options for retrieving connection handles.
The resulting connection handles must be cast to the com.ibm.websphere.xs.ra.XSConnection interface, which provides the getSession method.
The getSession method returns a com.ibm.websphere.objectgrid.Session object handle that allows applications to use any of the eXtreme Scale data access APIs, such as the ObjectMap API and EntityManager API.
The Session handle and any derived objects are valid for the life of the XSConnection handle.
The following procedures can be used to demarcate eXtreme Scale transactions. We cannot mix each of the procedures. For example, we cannot mix global transaction demarcation and local transaction demarcation in the same application component context.
- Use autocommit, local transactions. Use the following steps to automatically commit data access operations or operations that do not support an active transaction:
- Retrieve a com.ibm.websphere.xs.ra.XSConnection connection outside of the context of a global transaction.
- Retrieve and use the com.ibm.websphere.objectgrid.Session session to interact with the data grid.
- Invoke any data access operation that supports autocommit transactions.
- Close the connection.
- Use an ObjectGrid session to demarcate a local transaction. Use the following steps to demarcate an ObjectGrid transaction using the Session object:
- Retrieve a com.ibm.websphere.xs.ra.XSConnection connection.
- Retrieve the com.ibm.websphere.objectgrid.Session session.
- Use the Session.begin() method to start the transaction.
- Use the session to interact with the data grid.
- Use the Session.commit() or rollback() methods to end the transaction.
- Close the connection.
- Use a javax.resource.cci.LocalTransction transaction to demarcate a local transaction. Use the following steps to demarcate an ObjectGrid transaction using the javax.resource.cci.LocalTransaction interface:
- Retrieve a com.ibm.websphere.xs.ra.XSConnection connection.
- Retrieve the javax.resource.cci.LocalTransaction transaction using the XSConnection.getLocalTransaction() method.
- Use the LocalTransaction.begin() method to start the transaction.
- Retrieve and use the com.ibm.websphere.objectgrid.Session session to interact with the data grid.
- Use the LocalTransaction.commit() or rollback() methods to end the transaction.
- Close the connection.
- Enlist the connection in a global transaction. This procedure also applies to container-managed transactions:
- Begin the global transaction through the javax.transaction.UserTransaction interface or with a container-managed transaction.
- Retrieve a com.ibm.websphere.xs.ra.XSConnection connection.
- Retrieve and use the com.ibm.websphere.objectgrid.Session session.
- Close the connection.
- Commit or roll back the global transaction.
- Configure a connection to write multiple partitions in a transaction. Use the following steps to demarcate an ObjectGrid transaction using the Session object:
- Create a new com.ibm.websphere.xs.ra.XSConnectionSpec object.
- Call the XSConnectionSpec method and the setMultiPartitionSupportEnabled method with an argument of true.
- Retrieve the com.ibm.websphere.xs.ra.XSConnection connection to pass the XSConnectionSpec to the ConnectionFactory.getConnection method.
- Retrieve and use the com.ibm.websphere.objectgrid.Session session.
Example
See the following code example, which demonstrates the previous steps for demarcating eXtreme Scale transactions.
    // (C) Copyright IBM Corp. 2001, 2012.
    // All Rights Reserved. Licensed Materials - Property of IBM.
    package com.ibm.ws.xs.ra.test.ee;

    import javax.naming.InitialContext;
    import javax.resource.cci.Connection;
    import javax.resource.cci.ConnectionFactory;
    import javax.resource.cci.LocalTransaction;
    import javax.transaction.Status;
    import javax.transaction.UserTransaction;

    import junit.framework.TestCase;

    import com.ibm.websphere.objectgrid.ObjectMap;
    import com.ibm.websphere.objectgrid.Session;
    import com.ibm.websphere.xs.ra.XSConnection;

    /**
    * This sample requires that it runs in a J2EE context in your
    * application server. For example, using the JUnitEE framework servlet.
    *
    * The code in these test methods would typically reside in your own servlet,
    * EJB, or other web component.
    *
    * The sample depends on a configured WXS connection     * factory registered at of JNDI Name of "eis/embedded/wxscf" that defines
    * a connection to a grid containing a Map with the name "Map1".
    *
    * The sample does a direct lookup of the JNDI name and does not require
    * resource injection.
    */
    public class DocSampleTests extends TestCase {
        public final static String CF_JNDI_NAME = "eis/embedded/wxscf";
        public final static String MAP_NAME = "Map1";

        Long                key = null;
        Long                value = null;
        InitialContext      ctx = null;
        ConnectionFactory   cf = null;

        public DocSampleTests() {
        }
        public DocSampleTests(String name) {
            super(name);
        }
        protected void setUp() throws Exception {
            ctx = new InitialContext();
            cf = (ConnectionFactory)ctx.lookup(CF_JNDI_NAME);
            key = System.nanoTime();
            value = System.nanoTime();
        }
        /**
         * This example runs when not in the context of a global transaction
         * and uses autocommit.
         */
        public void testLocalAutocommit() throws Exception {
            Connection conn = cf.getConnection();
            try {
                Session    session = ((XSConnection)conn).getSession();
                ObjectMap  map = session.getMap(MAP_NAME);
                map.insert(key, value); // Or various data access operations
            }
            finally {
                conn.close();
            }
        }

        /**
         * This example runs when not in the context of a global transaction
         * and demarcates the transaction using session.begin()/session.commit()
         */
        public void testLocalSessionTransaction() throws Exception {
            Session    session = null;
            Connection conn = cf.getConnection();
            try {
                session = ((XSConnection)conn).getSession();
                session.begin();
                ObjectMap  map = session.getMap(MAP_NAME);
                map.insert(key, value); // Or various data access operations
                session.commit();
            }
            finally {
                if (session != null && session.isTransactionActive()) {
                    try { session.rollback(); }
                    catch (Exception e) { e.printStackTrace(); }
                }
                conn.close();
            }
        }

        /**
         * This example uses the LocalTransaction interface to demarcate
         * transactions.
         */
        public void testLocalTranTransaction() throws Exception {
            LocalTransaction tx = null;
            Connection conn = cf.getConnection();
            try {
                tx = conn.getLocalTransaction();
                tx.begin();
                Session    session = ((XSConnection)conn).getSession();
                ObjectMap  map = session.getMap(MAP_NAME);
                map.insert(key, value); // Or various data access operations
                tx.commit(); tx = null;
            }
            finally {
                if (tx != null) {
                    try { tx.rollback(); }
                    catch (Exception e) { e.printStackTrace(); }
                }
                conn.close();
            }
        }

        /**
         * This example depends on an externally managed transaction,
         * the externally managed transaction might typically be present in
         * an EJB with its transaction attributes set to REQUIRED or REQUIRES_NEW.
         * NOTE: If there is NO global transaction active, this example runs in auto-commit
         *       mode because it doesn't verify a transaction exists.
         */
        public void testGlobalTransactionContainerManaged() throws Exception {
            Connection      conn = cf.getConnection();
            try {
                Session    session = ((XSConnection)conn).getSession();
                ObjectMap  map = session.getMap(MAP_NAME);
                map.insert(key, value); // Or various data access operations
            }
            catch (Throwable t) {
                t.printStackTrace();
                UserTransaction tx = (UserTransaction)ctx.lookup("java:comp/UserTransaction");
                if (tx.getStatus() != Status.STATUS_NO_TRANSACTION) {
                    tx.setRollbackOnly();
                }
            }
            finally {
                conn.close();
            }
        }

        /**
         * This example demonstrates starting a new global transaction using the
         * UserTransaction interface. Typically the container starts the global
         * transaction (for example in an EJB with a transaction attribute of
         * REQUIRES_NEW), but this sample will also start the global transaction
         * using the UserTransaction API if it is not currently active.
         */
        public void testGlobalTransactionTestManaged() throws Exception {
            boolean         started = false;
            UserTransaction tx = (UserTransaction)ctx.lookup("java:comp/UserTransaction");
            if (tx.getStatus() == Status.STATUS_NO_TRANSACTION) {
                tx.begin();
                started = true;
            }
            // else { called with an externally/container managed transaction }
            Connection      conn = null;
            try {
                conn = cf.getConnection(); // Get connection after the global tran starts
                Session    session = ((XSConnection)conn).getSession();
                ObjectMap  map = session.getMap(MAP_NAME);
                map.insert(key, value); // Or various data access operations
                if (started) {
                    tx.commit(); started = false; tx = null;
                }
            }
            finally {
                if (started) {
                    try { tx.rollback(); }
                    catch (Exception e) { e.printStackTrace(); }
                }
                if (conn != null) { conn.close(); }
            }
        }
 /**
         /**
         * This example demonstrates a multi-partition transaction.
         */

    public void testGlobalTransactionTestManagedMultiPartition() throws Exception {
      boolean started = false;
      XSConnectionSpec connSpec = new XSConnectionSpec();
      connSpec.setWriteToMultiplePartitions(true);
      UserTransaction tx = (UserTransaction)ctx.lookup("java:comp/UserTransaction");
      if (tx.getStatus() == Status.STATUS_NO_TRANSACTION) {
        tx.begin();
      started = true;
     }
    // else { called with an externally/container managed transaction }
      Connection conn = null;
         try {
      conn = cf.getConnection(connSpec); // Get connection after the global tran starts
      Session session = ((XSConnection)conn).getSession();
      ObjectMap map = session.getMap(MAP_NAME);
      map.insert(key, value); // Or various data access operations
      if (started) {
        tx.commit(); started = false; tx = null;
        }
      }
      finally {
       if (started) {
         try { tx.rollback(); }
         catch (Exception e) { e.printStackTrace(); }
       }
       if (conn != null) { conn.close(); }
      }
     }
. Developing components to use transactions
Administer J2C client connections
The WXS connection factory includes a WXS client connection that can be shared between applications and persisted through application restarts.
The client connection includes a management bean that provides connection status information and lifecycle management operations.
Maintain client connections. When the first connection is obtained from the XSConnectionFactory connection factory object, a WXS client connection is established to the remote data grid and the ObjectGridJ2CConnection MBean is created. The client connection is maintained for the life of the process. To end a client connection, invoke one of the following events::
- Stop the resource adapter. A resource adapter can be stopped, for example, when it is embedded in an application and the application is stopped.
- Invoke the resetConnection MBean operation on the ObjectGridJ2CConnection MBean. When the connection is reset, all connections are invalidated, transactions completed, and the ObjectGrid client connection is destroyed. Subsequent calls to the getConnection methods on the connection factory result in a new client connection.
WAS also provides additional management beans for managing J2C connections, monitoring connection pools, and performance.
Object grid J2C connection MBean API documentation
Scenario: Configure HTTP session failover in the Liberty profile
We can configure a web application server so that, when the web server receives an HTTP request for session replication, the request is forwarded to one or more servers that run in the Liberty profile.
To complete this task, you must install the Liberty profile.
The Liberty profile does not include session replication. However, if you use WXS with the Liberty profile, then we can replicate sessions. Therefore, if a server fails, then application users do not lose session data.
When you add the webApp feature to the server definition and configure the session manager, we can use session replication in your eXtreme Scale applications that run in the Liberty profile.
Enable the eXtreme Scale web feature in the Liberty profile
We can enable the web feature to use HTTP session failover in the Liberty profile.
 The web feature is deprecated.
Use
the webApp feature instead. When you add the webApp feature to the server definition and configure the session manager, we can use session
replication in your WXS applications that run in the Liberty profile.
The web feature is deprecated.
Use
the webApp feature instead. When you add the webApp feature to the server definition and configure the session manager, we can use session
replication in your WXS applications that run in the Liberty profile.
When you install the WebSphere Application Server Liberty profile, it does not include session replication. However, if you use WXS with the Liberty profile, then we can replicate sessions so that if a server goes down, the application users do not lose session data.
When you add the web feature to the server definition and configure the session manager, we can use session replication in your eXtreme Scale applications that run in the Liberty profile.
Define a web application to run in the Liberty profile .
Next, configure a web server plug-in to forward HTTP requests to multiple servers in the Liberty profile.
Enable the eXtreme Scale webGrid feature in the Liberty profile
Use the webGrid feature to automatically start a container to host the clients for HTTP session replication in the Liberty profile.
When you install the WAS Liberty profile, it does not include session replication. However, if you use WXS with the Liberty profile, then we can replicate sessions so that if a server goes down, the application users do not lose session data.
When you add the webGrid feature to the server definition and configure the session manager, we can use session replication in your eXtreme Scale applications that run in the Liberty profile.
Add the following webGrid feature to the Liberty profile server.xml file. The webGrid feature includes the client feature and the server feature. You likely want to separate your web applications from the data grids. For example, you have one Liberty profile server for your web applications and a different Liberty profile server for hosting the data grid.
<featureManager>
<feature>eXtremeScale_webGrid-1.1</feature>
</featureManager>
Results
Your web applications can now persist its session data in a WXS grid.
Example
The webGrid feature has meta type properties that we can set on the xsWebGrid element of server.xml. See the following example of a server.xml file, which contains the webGrid feature that you use when you connect to the data grid remotely.
<server description="Airport Entry eXtremeScale Getting Started Client Web Server">
<!--
Comments...
-->
<!-- Enable features -->
<featureManager>
<feature>eXtremeScale.webGrid-1.1</feature>
</featureManager>

<xsServer catalogServer="true"/>

<xsWebGrid objectGridName="session" catalogHostPort="remoteHost:2809" securityEnabled="false" />

</server>
Enable the eXtreme Scale webApp feature in the Liberty profile
A Liberty profile server can host a data grid that caches data for applications to replicate HTTP session data for fault tolerance.
When you install the WebSphere Application Server Liberty profile, it does not include session replication. However, if you use WXS with the Liberty profile, then we can replicate sessions so that if a server goes down, the application users do not lose session data.
When you add the webApp feature to the server definition and configure the session manager, we can use session replication in your eXtreme Scale applications that run in the Liberty profile.
Add the following webApp feature to the Liberty profile server.xml file. The webApp feature includes the client feature; however, it does not include the server feature. You likely want to separate your web applications from the data grids. For example, you have one Liberty profile server for your web applications and a different Liberty profile server for hosting the data grid.
<featureManager>
<feature>eXtremeScale_webapp-1.1</feature>
</featureManager>
Results
Your web applications can now persist its session data in a WXS grid.
Example
See the following example of a server.xml file, which contains the webApp feature that you use when you connect to the data grid remotely.
<server description="Airport Entry eXtremeScale Getting Started Client Web Server">
<!--
This sample program is provided AS IS and may be used, executed, copied and modified
without royalty payment by customer
(a) for its own instruction and study,
(b) to develop applications designed to run with an IBM WebSphere product,
either for customer's own internal use or for redistribution by customer, as part of such an
application, in customer's own products.
Licensed Materials - Property of IBM
5724-X67, 5655-V66 (C) COPYRIGHT International Business Machines Corp. 2012
-->
<!-- Enable features -->
<featureManager>
<feature>eXtremeScale.webapp-1.1</feature>
</featureManager>

<httpEndpoint id="defaultHttpEndpoint"
host="*"
httpPort="${default.http.port}"
httpsPort="${default.https.port}" />

<xsWebApp objectGridName="session" catalogHostPort="remoteHost:2809" securityEnabled="false" />

</server>
The webApp feature has meta type properties that we can set on the xsWebApp element of server.xml.
Configure a web server plug-in to forward requests to multiple servers in the Liberty profile
Use this task to configure the web server plug-in to distribute HTTP server requests between multiple servers in the Liberty profile.
Before you configure the web server plug-in to route HTTP requests to multiple server, enable the eXtreme Scale webApp feature in the Liberty profile
Configure the web server plug-in so that the web server receives an HTTP request for dynamic resources, the request is forwarded to multiple servers that run in the Liberty profile.
See Configuring the Liberty profile with a web server plug-in in the WAS Information Center to complete this task.
Next, merge the plugin-cfg.xml files from multiple application server cells. Also ensure that unique clone IDs exist for each application server that runs in the Liberty profile.
Merging plug-in configuration files for deployment to the application server plug-in
Generate plug-in configuration files after you configure a unique clone ID in the Liberty server.xml configuration file.
If we are generating and merging plug-in configuration files to configure HTTP session failover in a Liberty profile, then you must complete the following tasks:
Use the WAS administrative console to complete this task.
- Merge the plugin-cfg.xml files from multiple application server cells.
We can either manually merge the plugin-cfg.xml files or use the pluginCfgMerge tool to automatically merge the plugin-cfg.xml file from multiple application server profiles into a single output file. The pluginCfgMerge.bat and pluginCfgMerge.sh files are in the install_root/bin directory.
- Ensure that the cloneID value for each application server is unique.
Examine the cloneID value for each application server in the merged file to ensure that this value is unique for each application server. If the cloneID values in the merged file are not all unique, or if we are running with memory to memory session replication in peer to peer mode, use the administrative console to configure unique HTTP session cloneIDs.
To configure a unique HTTP session clone ID with the WebSphere Application Server administrative console, complete the following steps:
- Click...
-
Servers | Server Types | WebSphere application servers | server_name | Container Settings | Web Container Settings | Web container | Additional Properties | Custom properties | New
- Enter HttpSessionCloneId in the Name field, and enter a unique value for the server in the Value field. The unique value must be eight to nine alphanumeric characters in length. For example, test1234 is a valid cloneID value.
- Click Apply or OK.
- Click Save to save the configuration changes to the master configuration.
- Click...
- Copy the merged plugin-cfg.xml file to...
-
plugin_installation_root/config/web_server_name
...on the web server host.
- Ensure that you defined the correct operating system, file access permissions for the merged plugin-cfg.xml file. These file access permissions allow the HTTP server plug-in process to read the file.
Results
When you complete this task, you have one plug-in configuration file for multiple application server cells, and your eXtreme Scale applications that run in the Liberty profile are enabled for session replication.
Scenario: Run grid servers in the Liberty profile using Eclipse tools
Use Eclipse tools to run WXS servers in the WAS Liberty profile. The Eclipse tools offer a convenient way of running your servers in the same Eclipse environment where you develop, configure, and deploy your eXtreme Scale applications.
With the Eclipse tools, we can configure eXtreme Scale servers to run in the Liberty profile. If you complete this task manually, you add the supported Liberty features to server.xml. However, when you use the Eclipse tools, we can complete this task and other development tasks using Eclipse Java EE IDE for Web Developers, Version: Indigo Service Release 1.
Installing the Liberty profile developer tools for WXS
Eclipse provides a graphical user interface (GUI) that we can use to run WXS servers in the Liberty profile. To use this GUI, install WXS Version 8.5 Liberty profile tools.
We can install the tools using one of the following methods:
- Install from Eclipse Marketplace. Click...
-
Help | Eclipse Marketplace
- Install by dragging an Install icon to a running workbench. This option is only available for installing the developer tools on Eclipse IDE for Java EE Developers 3.7, or later.
Install IBM WAS V8.5 Liberty Profile Developer Tools to use IBM WXS V8.5 Liberty Profile Developer Tools. Therefore, the steps in this task include the installation of both developer tools.
- Install from Eclipse Marketplace.
- Start your Eclipse workbench.
- Click...
-
Help | Eclipse Marketplace
- In the Find field, type WebSphere.
- In the list of results, locate IBM WAS V8.5 Liberty Profile Developer Tools, and click Install.
- The Confirm Selected Features page opens. Continue with the installation procedure in the "Complete the installation procedure" step.
- Complete each of the previous steps to install IBM WXS V8.5 Liberty Profile Developer Tools.
- Complete the installation procedure.
- Expand the node for the tooling that you installed.
- Select IBM WAS V8.5 Liberty Profile Developer Tools or IBM WXS V8.5 Liberty Profile Developer Tools.
- Select any of the optional features to install. When finished, click Next.
Remember: To install any of the additional optional installation features, such as the WAS tools features for Version 8.5, 8.0, or 7.0, a separate set of installation instructions are available in the IBM WAS Developer Tools for Eclipse overview Version 8.5 topic in the WebSphere Application Server Information Center.
- On the Review Licenses page, review the license text.
- If you agree to the terms, click I accept the terms of the license agreement and then click Finish. The installation process starts.
- When the installation process completes, restart the workbench.
Set up your development environment within Eclipse
After you install the Liberty profile Eclipse tooling for WXS, configure your eXtreme Scale servers in the Liberty profile and generate an Eclipse project in which we can begin development tasks.
Configure eXtreme Scale in the Liberty profile using Eclipse tools
Configure your WXS servers to run in the WAS Liberty profile. Complete this task to configure eXtreme Scale servers with Eclipse tools.
You must define a Liberty profile server in Eclipse.
To complete this task, see Creating a Liberty profile server using developer tools .
Configure the eXtreme Scale server entails specifying the server properties and including those properties in the Liberty profile server.xml file in the wlp_home/usr/servers/your_server_name directory. This server definition is required to run eXtreme Scale in the Liberty profile.
This procedure also includes adding the configuration from the eXtreme Scale server properties file, xsServerConfig.xml, to server.xml.
- Generate the eXtreme Scale server properties file.
- Click...
-
File | New | Other | WebSphere eXteme Scale | Container server configuration file
- Click Next. The eXtreme Scale Server Configuration File window is displayed.
- Click Browse to specify where the Liberty profile is installed. Then, select the Liberty profile server definition for which we want to configure for your eXtreme Scale servers. Click Next. The General Server Configuration window is displayed.
- Complete the server configuration. Click Next.
The Container Server Configuration window is displayed.
- Complete the container server configuration. Click Next.
- If you included the catalog server configuration, then another window is displayed, where you specify the catalog server settings. Click Next. The Server Logging Configuration window is displayed.
- Complete the logging information pages, and click Next until the Security Configuration window is displayed.
- Optional: Specify the location of the objectGridSecurity.xml file, which describes the security properties that are common to all servers, including catalog servers and container servers. An example of the defined security properties is the authenticator configuration, which represents the user registry and authentication mechanism. The file name specified for this property must be in a URL format, such as...
-
file:///tmp/og/objectGridSecurity.xml
- Click Finish.
A configuration file is generated in the Liberty profile.
- Click...
- Include the configuration from the eXtreme Scale server properties file in server.xml.
- Open the Servers view in Eclipse.
- Expand Liberty Server to locate your server configuration XML file.
- Double-click the entry for your server configuration to open the file.
- Click Add, and select Include to add an include statement to server.xml. Click OK.
- Under Include Details, click Browse. The Browse for Include File window is displayed.
- Select xsServerConfig.xml, to include the server configuration settings that you created in step 1. Click OK.
The eXtreme Scale server configuration file, xsServerConfig.xml, is now included in the Liberty profile server.xml file. Now, we are ready to start the Liberty profile server, where your eXtreme Scale servers will run.
Create an OSGi bundle project for eXtreme Scale grid development
To use Eclipse as the development environment for your WXS servers in the Liberty profile, you must create an Eclipse project within the supported Open Services Gateway initiative (OSGi) framework.
- Create the OSGi bundle project in Eclipse.
- Click...
-
File | New | Project
The "Select a wizard" window is displayed.
- Expand the WXS folder, and select the Object grid project.
The "Object grid project" window is displayed.
- Click Add, and enter a backing map name to add the object grid map for which we want to complete development activities.
We can enter multiple maps on this page.
Click Next.
- Specify object grid parameters for each map that you entered. Click Next.
- Specify the deployment parameters, and click Finish.
The OSGi bundle project is created, and we can access eXtreme Scale APIs to complete development activities in the Liberty profile. The bundle includes the gridBlueprint.xml file. This file includes the location of the eXtreme Scale configuration files, objectGrid.xml and gridDeployment.xml. These configuration files include the map or maps that you created in the step c.
- Click...
- Export the bundle project, and place the bundle in the grids folder. Export the project to deploy eXtreme Scale applications in the Liberty profile. When you export the project, it is exported as a bundle Java archive (JAR) file to the Liberty_profile_Server_Definition/grids folder.
- Right-click the project that you just created, and select Export > OSGi Bundle or Fragment. The OSGi Application Export window is displayed.
- Specify where we want to export the bundle JAR file. Click Finish.
Migrate a WAS memory-to-memory replication or database session to use WXS session management
We can migrate any previously set memory-to-memory replication session or database session to use WXS session management.
- For session support for client applications running on WAS in the cluster, WXS must be installed on top of the WAS node deployments, including the dmgr node.
- A WXS grid environment, that consists of one or more catalog and container servers must be started.
- If the catalog servers within the catalog service domain have SSL enabled or we want to use SSL for a catalog service domain with SSL supported, then global security must be enabled in the WAS administrative console. You require SSL for a catalog server by setting the transportType attribute to SSL-Required in the Server properties file .
For more information, see Global security settings.
The steps in this scenario are for Version 8.5 of the WAS administrative console. WXS Version 8.6 is not supported on versions of WAS prior to Version 7.0.
Taking note of previous configuration settings in WAS administrative console
As part of migration to a WXS session, you should take note of your previous configuration settings in WAS administrative console. When migrating to a WXS session, the configuration settings have to reflect what you already had configured for your database or memory-to-memory session.
There are specific settings in WAS administrative console that you should take note of. You will need these values when updating the splicer.properties file. The steps in this procedure are for Version 8.5 of the WAS administrative console. WXS Version 8.6 is not supported on versions of WAS prior to Version 7.0.
- Start theWAS administrative console.
- If you have previously configured settings at the server level,
then go to:
- Servers > Server Types > WebSphere application servers
- In the Application servers area, select your server name
- In the Container Settings area, click Session management
- If you have previously configured settings at the application level, then go to:
- Applications > All applications.
- In the Application servers area, select the application name.
- In the Web Module Properties area, click Session management
- If you have previously configured settings at the server level,
then go to:
- In the General Properties, select the Allow Overflow checkbox.
- In the General Properties area,
take note of the WAS settings. You will need these values later to update the properties in the splicer.properties file.
Settings in the WAS administration console Properties to update in the splicer.properties file Enable cookies useCookies Enable URL rewriting useURLEncoding Maximum in-memory session count sessionTableSize - In the General Properties area,
if the Enable cookies checkbox is selected,
then click it and take note of the WAS settings. You will need these values later to update the properties in the splicer.properties file.
Settings in the WAS administration console Properties to update in the splicer.properties file Cookie domain cookieDomain Cookie path cookiePath - Click...
-
Session management | Additional Properties | Distributed environment settings
- In the Distributed Sessions area, change your previous database or memory-to-memory replication configuration to None.
- Click Custom Tuning Properties and take note of the WAS settings.
You will need these values later to update the properties in the splicer.properties file
Settings in the WAS administration console Properties to update in the splicer.properties file Write frequency replicationInterval Write contents fragmentedSession
Next, create the catalog service domain for a WXS session.
Create the catalog service domain for WXS session management
As part of migration to a WXS session, you must create a catalog service domain in WAS administrative console.
The steps in this procedure are for Version 8.5 of the WAS administrative console. WXS Version 8.6 is not supported on versions of WAS prior to Version 7.0. Create the catalog service domain for WXS in the WAS administrative console.
- Start theWAS administrative console.
- In the top menu, click System administration > WXS > Catalog service domains
If you do not see WXS, then your WAS profile has not been augmented for WXS.
- Click New.
- Specify a name for the catalog service in the Name box.
- In the Catalog Servers area, choose Remote Server and specify the location or the name of the remote server in the box.
- Specify a port number the Listener Port box.
- Click Apply or OK and save the configuration.
Next, use the previous configuration settings that you noted in the WAS administration console to associate either an application or an application server to WXS session management.
Configure WXS to use your previous configuration settings
Using your previous configuration settings that you noted in the WAS administration console, use these settings to associate either an application or an application server to WXS session management.
The steps in this procedure are for Version 8.5 of the WAS administrative console. WXS Version 8.6 is not supported on versions of WAS prior to Version 7.0.
- To configure an application so that it is associated with WXS session management,
follow these steps:
- Start theWAS administrative console.
- In the top menu, click Applications > All applications.
- In theWebSphere Enterprise Applications area, select application name.
- In the Web Module properties area, click Session management
- Click eXtreme Scale session management settings.
- If you do not see WXS, then your WAS profile has not been augmented for WXS.
- To configure an application for WXS in a stand-alone environment, follow these steps:
- In the Manage session persistence by list, select Remote eXtreme Scale data grid
- Select the catalog service domain you had created from the list.
- Click Browse to select the grid.
- Click Apply or OK and save the configuration.
- A new splicer.properties file is created for this application. The location of the splicer.properties file is the value of the a new property {application name},com.ibm.websphere.xs.sessionFilterProps. To locate the custom property, go to System administration> Cell and click Custom properties.
- Update the splicer.properties file with the values you obtained in Taking note of previous configuration settings in WAS administrative console .
- Restart the application server processes.
Change the splicer.properties at the Deployment Manager level so that the properties get synchronized to the node agent. If you update the splicer.properties at the node level, then the Deployment Manager will overwrite the splicer.properties file at the next synchronization. If you go back to database session management and then return to WXS session management, the splicer.properties file is recreated so any changes you made will be overridden. For a discussion on the file synchronization process from the Deployment Manager to the Notes and what gets changed, see System Management File Synchronization .
- To configure an application server so that it is associated with WXS session management, follow these steps:
- Start theWAS administrative console.
- In the top menu, click Servers > Server Types > WebSphere application servers.
- In the Application servers area, select your server name.
- In the Container Settings area, click Session management
- Click eXtreme Scale session management settings If you do not see WXS, then your WAS profile has not been augmented for WXS.
- To configure an application server for WXS in a stand-alone environment,
follow these steps:
- In the Manage session persistence by list, select Remote eXtreme Scale data grid
- Select the catalog service domain you had created from the list.
- Click Browse to select the grid.
- Click Apply or OK and save the configuration.
- A new splicer.properties file is created for this application. The location of the splicer.properties file is the value of the a new property com.ibm.websphere.xs.sessionFilterProps. To locate the custom property, go to Servers > Server Types > WebSphere application servers.
- In the Application servers area, select your server name.
- In the Server Infrastructure area, select Custom properties.
- Update the splicer.properties file with the values you obtained in Taking note of previous configuration settings in WAS administrative console .
- Restart the application server processes.
Change the splicer.properties at the Deployment Manager level so that the properties get synchronized to the node agent. If you update the splicer.properties at the node level, then the Deployment Manager will overwrite the splicer.properties file at the next synchronization.
If you go back to database session management and then return to WXS session management, the splicer.properties file is recreated so any changes you made will be overridden. For a discussion on the file synchronization process from the Deployment Manager to the Notes and what gets changed, see System Management File Synchronization .
Additional information
- Dynamic cache Redbook
- Dynamic cache documentation
- DRS documentation