Roadmap: Multiple clusters
Before starting, read Plan for multiple clusters.
See also: Multiple Dynamic Clusters in a Single Cell WP8001 plus CF07, WAS855 and JDK1.7
Topology example
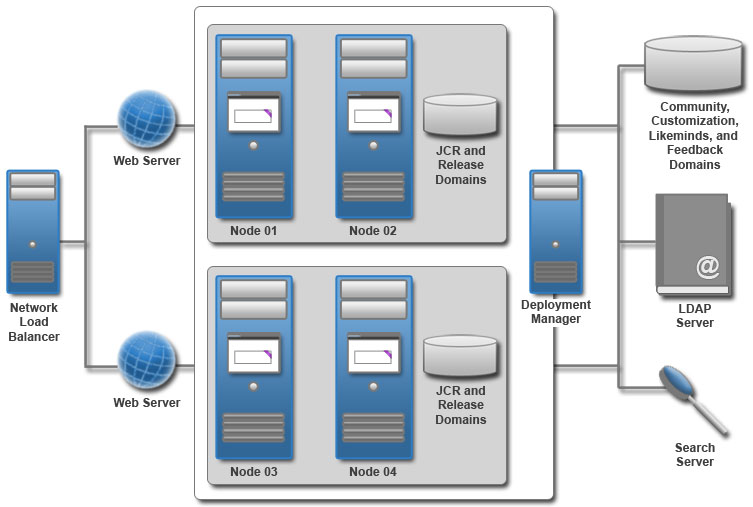
This example depicts two clusters sharing a cell and a dmgr. Each cluster hast their own JCR and Release database domains. The clusters share a common database server with Community, Customization, Likeminds, and Feedback database domains. The clusters also share an LDAP server and a remote search server. There is a search collection for each cluster, but the collections are co-located on a single server. A network load balancer directs incoming traffic between the two web servers. Each cluster has a web server. However, a single on-demand router might be used instead.
Pre-install
Gather information and software before you install WebSphere Portal.
- Check requirements
- Get the software.
- Install web server.
- Prepare a database server.
- Prepare a user registry.
- Install portal
Create cluster A
- Log on to verify portal is working:
- http://hostname.example.com:10039/wps/portal
- Access the Configuration Wizard
- http://your_server:10200/ibm/wizard
- Log on with the cw_profile ID.
The wizard user interface might not be available in all languages. If the language is not currently supported, we might see the English version.
- Select...
-
Set Up a Cluster | Database Transfer
The Database Transfer configuration option...
- Assigns users and permissions
- Creates databases
- Obtains support for database collation
- Transfers the database
Record database settings for use when creating Portal B, which will have the same number of data sources, with identical names, to the cluster A data sources. This applies to both shared and non-shared domains. All domains must use the same names. For example, if cluster A uses data sources...
- relDS
- comDS
- custDS
- jcrDS
- fbkDS
- lmDS
...then cluster B must also use six data sources with the same names.
Cluster B cannot be configured to use a single data source. An enterprise application shared between clusters contains only a single binding to a single data source name. An application cannot contain a binding to multiple data source names. If the data source names are the same, and the user ID and password are the same, the extra aliases are not required. The binding in the application resolves to the data source for both clusters because the name is the same, and the user ID and password is the same.
- Save the configuration settings.
- Choose one of the following options:
- Click Download Files to run the steps remotely.
- Click Run All Steps to run the steps locally.
- Verify portal is working .
- Select...
-
Set Up a Cluster | Create a dmgr
- Provide information about the environment.
- Save the configuration settings.
- Choose one of the following options:
- Click Download Files to run the steps remotely.
- Click Run All Steps to run the steps locally.
- Verify portal is working.
- Select...
-
Set Up a Cluster | Create a Cluster
- Provide information about the environment.
- Save the configuration settings.
- Choose one of the following options:
- Click Download Files to run the steps remotely.
- Click Run All Steps to run the steps locally.
- Verify portal is working.
- Set Up a Cluster | Enable Federated Security.
If we set...
-
Use Administrator IDs stored in the LDAP user registry
...to yes, the WAS and portal user IDs and passwords are changed to the LDAP user ID and password. If we do not want to change both user IDs and passwords to match the LDAP user ID and password, set this value to no. After configuring the LDAP user registry, we can manually change the user IDs and passwords.
The Enable Federated Security option modifies wimconfig.xml. Make a backup copy of this file before running ConfigEngine tasks.
- WP_PROFILE/config/cells/CellName/wim/config/wimconfig.xml
- Provide information about the environment.
- Save the configuration settings.
- Choose one of the following options:
- Click Download Files to run the steps remotely.
- Click Run All Steps to run the steps locally.
- Verify portal is working.
- Install WebSphere Portal on the additional node.
For additional nodes, we need only install the portal product binary files. On the Features screen of the Installation Manager, ensure that...
-
Portal Server Profile
...is NOT selected.
- Set Up a Cluster | Create an Additional Cluster Node.
For a vertical cluster, manual instructions are available...
- Provide information about the environment.
- Save the configuration settings.
- Choose one of the following options:
- Click Download Files to run the steps remotely.
- Click Run All Steps to run the steps locally.
- Verify portal is working.
Configure portal B
- Install WebSphere Portal.
- Verify portal is working
- http://hostname.example.com:10039/wps/portal
- Access the Configuration Wizard
-
http://your_server:10200/ibm/wizard
- Log on with the cw_profile ID.
- Select...
-
Set Up a Stand-alone Server | Database Transfer
- Provide information about the environment.
Maintain the same number of data sources with identical names to the cluster A data sources. Therefore, the data source bindings in the applications can be resolved on every cluster. If we share databases across the clusters, this statement refers to both the shared and non-shared domains. All domains must use the same names.
- Save the configuration settings.
- Choose one of the following options:
- Click Download Files to run the steps remotely.
- Click Run All Steps to run the steps locally.
- Verify portal is working.
- Select...
-
Set Up a Stand-alone Server | Enable Federated Security
If we set Use Administrator IDs stored in the LDAP user registry to yes, the WAS and portal user IDs and passwords are changed to the LDAP user ID and password. If we do not want to change both user IDs and passwords to match the LDAP user ID and password, set this value to no. After configuring the LDAP user registry, we can manually change the user IDs and passwords.
- Provide information about the environment.
- Save the configuration settings.
- Click Download Files to run the steps remotely. Click Run All Steps to run the steps locally.
- Log on to verify portal is working .
Configure the multiple cluster
- Optional: Complete the following steps on the primary node of cluster A:
Use the same database user ID and password for each identically named domain or data source. It allows the existing JAAS Authentication Aliases to be functional. If a unique database user ID and password are required, more manual configuration is required to create and map JAAS Authentication Aliases for each data source.
- Create the JAAS Authentication Aliases:
-
cd WP_PROFILE/ConfigEngine.
./ConfigEngine.sh create-alias-multiple-cluster -DauthDomainList=release,jcr -DWasPassword=dmgr_passwordWhere authDomainList is set to a list of domains that use unique database user ID and passwords. The domain properties are set correctly in the wkplc_dbdomain.properties file, including user ID and password.
- Optional: If necessary, upgrade Portal B to the current fix pack.
- Create an inventory list of Portal B enterprise applications and portlets, open a command prompt on Portal B and run...
-
cd WP_PROFILE/ConfigEngine.
./ConfigEngine.sh mapped-app-list-create -DWasPassword=foo - Federate Portal B:
-
cd WP_PROFILE/bin
./addNode.sh dmgr_host dmgr_soap_port -includeapps -username wasadmin -password passwordIf the WAS administrator user ID and password are different from the dmgr values, add the following parameters to the addNode task:
- -localusername local_was_admin_user
- -localpassword local_was_admin_password
If the addNode task fails for any reason, complete the following steps before rerunning the task:
- Remove the node if the AddNode task succeeded in creating the node.
- If the items exist, log on to the dmgr and complete the following steps:
- Remove the WebSphere_Portal server definition.
- Remove the WebSphere Portal JDBC Provider.
- Stop the WebSphere_Portal server on the primary node of cluster B.
- Set the following parameters in wkplc.properties:
We can add these parameters (particularly passwords) directly to any task. However, we might want to temporarily add them to the properties file.
WasSoapPort Port used for remote connections to dmgr. WasRemoteHostName Host used for remote connections to dmgr. WasUserid dmgr administrator user ID. WasPassword dmgr administrator password. PortalAdminPwd WebSphere Portal administrator password. ClusterName Verify a value is set. PrimaryNode true - Determine which applications from the inventory list are no longer mapped to Portal B, then use the application profiles in the cell to restore mappings...
- ./ConfigEngine.sh map-apps-to-server -DWasPassword=foo
Wait 30 minutes after running this task to allow all EAR files to expand before proceeding to the next step.
- Ensure database parameters are correctly set, including passwords, in wkplc_comp.properties and wkplc_dbtype.properties on Portal B.
- Run the following task on Portal B:
- ./ConfigEngine.sh cluster-node-config-post-federation -DWasPassword=foo
- The WebSphere Portal node is federated. It uses the dmgr cell and its user registry.
If the admin ID and group name are different between WebSphere Portal and dmgr, choose one of the following options:
- Add the existing admin ID and group to the Deployment Manager security configuration
- To change the values in the WebSphere Portal configuration to match the dmgr values:
- Start the WebSphere_Portal server.
- Verify the required portal admin ID and group ID are defined in the dmgr user registry.
- Run the following task:
- ./ConfigEngine.sh wp-change-portal-admin-user -DWasPassword=foo -DnewAdminId=newadminid -DnewAdminPw=newpassword -DnewAdminGroupId=newadmingroupid
Where:
- WasPassword is set to the administrative password for the dmgr cell
- newAdminId is set to the fully qualified distinguished name (DN) of the WebSphere Portal admin ID in the cell
- newAdminGroupId is set to the fully qualified DN of the group for the WebSphere Portal admin ID in the cell
If the value for newAdminGroupId contains a space; for example Software Group, open wkplc.properties. Add the values for newAdminId, newAdminPw, and newAdminGroupId. Save the changes and then run the wp-change-portal-admin-user task.
- WasPassword is set to the administrative password for the dmgr cell
- After the task completes, stop the WebSphere_Portal server.
- Add the existing admin ID and group to the Deployment Manager security configuration
- Complete the following steps from the WAS console on Portal B:
- Log on to WAS console.
- Click...
-
System Administration | Node Agents
- Check the box next to the required node agent and then click Restart.
- Log on to WAS console.
- Stop and restart the dmgr.
- Stop and restart the WebSphere_Portal server on Portal B.
- Restart the WebSphere_Portal server on cluster A. Verify that cluster A is functionally intact; check pages and portlets. Verify that Portal B is functionally intact; check the pages and portlets that you deployed into Portal B before it was federated. Any discrepancies or errors must be corrected before continuing.
If Portal B has an administrative ID other than wpsadmin, the server is not functional. It is functional after the cluster is complete and the administrative ID is configured to match the security settings.
- Choose one of the following options to define a cluster with Portal B as the basis:
- To define a static cluster run...
- ./ConfigEngine.sh cluster-node-config-cluster-setup -DWasPassword=dmgr_password
..then Configure the cluster to use an external web server.
- To define a dynamic cluster...
- Log on to the dmgr console and create a node group...
-
System administration | Node groups | New
Set node group name and description, then save changes to the master configuration.
- Add members to the node group:
-
System administration | Node groups | node_group | Additional Properties | Node group members | Add | primary_node | Add
- Create a dynamic cluster in the node group:
-
Servers | Clusters | Dynamic clusters | New | WebSphere Application Server | Next
Select...
-
Automatically define cluster members with rules
Set cluster name in the Dynamic cluster name text box.
Click Next.
Set the same value provided for the ClusterName parameter in wkplc.properties of the primary node.
- Remove all default membership policies and then click Subexpression builder.
- Enter the following information in the Subexpression builder window:
- Select and from the Logical operator menu.
- Select Nodegroup from the Select operand menu.
- Select Equals (=) from the Operator menu.
- Type the node group name created in the previous step in the Value text box.
- Click Generate subexpression.
- Click Append.
- Click Preview membership to verify that all nodes included in the node group display and then click Next.
- Click Create the cluster member using an existing server as a template and then select the primary node WebSphere_Portal server.
- Click Next.
- Specify the dynamic cluster properties for the minimum and maximum number of server instances.
- Review the summary page to verify the actions and then click Finish.
- To create the dynamic cluster:
- ./ConfigEngine.sh cluster-node-config-dynamic-cluster-setup -DWasPassword=dmgr_password
- Log on to the dmgr console and create a node group...
- To define a static cluster run...
- Access WCM content through an external web server
- Log on to the dmgr console and select...
-
Environment | WebSphere Variables
- From the Scope menu, select the Node=nodename, Server=servername option.
- Update WCM_HOST with the host name used to access the portal server through the web server or On Demand Router.
- Update WCM_PORT with the port number used to access the portal server through the web server or On Demand Router.
- Update WCM_HOST and WCM_PORT for each additional portal application server that exists in the cluster.
- Synchronize the node with the dmgr.
- System Administration -> Nodes.
- Select the node to synchronize from the list.
- Full Resynchronize.
- Save the changes and then restart the dmgr, the node agents, and WebSphere_Portal servers.
- Log on to the dmgr console and select...
- Install any additional nodes for cluster B. Then, federate them as secondary nodes, and define them as cluster members on these nodes.
We can add more nodes to a static or dynamic cluster. We can also add more vertical cluster members to an existing node in a static or dynamic cluster to provide vertical scaling.
- Restart the WebSphere_Portal server on cluster A and cluster B.
- After setting up the multiple clusters, ensure a balanced workload and failover support.
- Update the web server configuration to enable user requests to be routed to the new cluster.
- Update the database configuration to share database domains between clusters.
- Update the web server configuration to enable user requests to be routed to the new cluster.
- If we entered passwords in any of the properties files when creating the cluster, remove them for security purposes.
Results
Deployment of cluster B is complete. It is now an independent cluster from cluster A, which means that cluster B can have its own configuration, set of user portlets, and target community. Any applications that are common between cluster A and cluster B are most likely infrastructure or related to administration. Preserve commonality and correct maintenance levels.Configure the web server
Move the web server plug-in from the WAS to the web server.
Tune the servers in the environment
WebSphere Portal is not tuned for a production environment after installation and deployment. Your database needs tuning for improved performance. We can organize the database now or soon after you finish the configuration. We need to tune and maintain the database on a regular basis.
- Run the performance tuning tool to complete an initial tuning of the servers.
- Check the tuning guide for more instructions.
Configure a remote search service
- Use the Installation Manager to install the remote search service.
- If we use single-sign on, prepare the security for the remote search service.
- Configure the security between portal and the remote search server.
- Set the search user ID.
- Configure the remote search service.
- Configure the seedlist servlet.