Roadmap: Portal farm
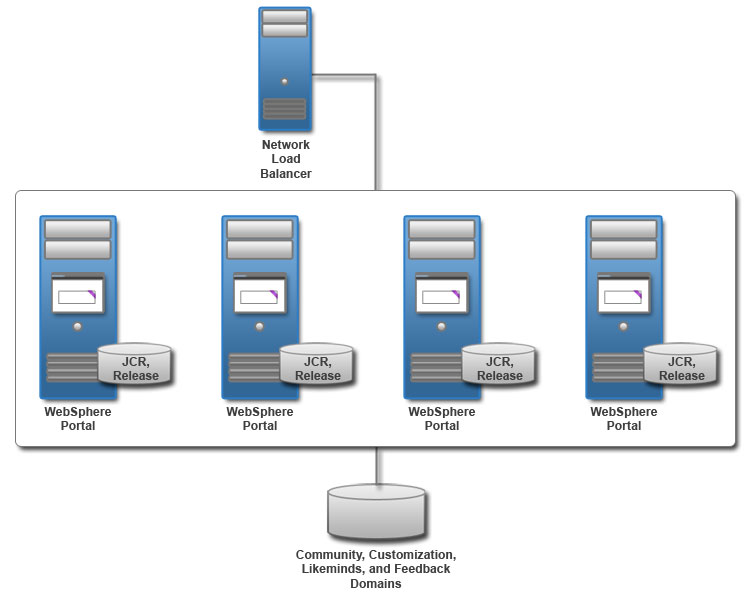
Farms are series of identically configured, stand-alone server instances. The number of servers can be increased or decreased without having to worry about cluster configurations or inter-server awareness.
Configure the web server plug-in after transfering the database.
The topology includes a network load balancer to direct incoming traffic to the farm. Each stand-alone server has a database for JCR and Release domains. The JCR and Release domain cannot be shared between portal servers in a farm. The Community, Customization, Likeminds, and Feedback portal database domains can be shared.

Prepare for the installation process
Gather information and software before installing.
Prerequisites
Use existing prerequisite software installations. Verify the existing version is supported. If it is not, upgrade to the appropriate version. Otherwise, install a web server, database server, and user registry server. Typically the database and user registry servers are already installed and configured. However, there might be specific configuration steps required to integrate them with the portal server.
- Install web server.
- Prepare a database server.
- Prepare a user registry.
- Install the Exceptional Digital Experience
- Prepare the operating system
- Install installation manager
- Run the installation program.
Set up a stand-alone server
Start the configuration wizard to set up your stand-alone server. First, transfer the database. The Database Transfer configuration option in the Configuration Wizard assigns users and permissions, creates databases, obtains support for database collation, and transfers the database. After transferring the database, enable the federated LDAP user registry.
- Log on to verify portal is working:
-
http://hostname.example.com:10039/wps/portal
- Access the Configuration Wizard...
-
http://your_server:10200/ibm/wizard
- Log on with the cw_profile ID.
The wizard user interface might not be available in all languages. If the language is not currently supported, we might see the English version.
- Select...
-
Set Up a Stand-alone Server | Database Transfer
- Provide information about the environment.
- Save the configuration settings.
- Choose one of the following options:
- Click Download Files to run the steps remotely.
- Click Run All Steps to run the steps locally.
- Log on to verify portal is working server.
- Select...
-
Set Up a Stand-alone Server | Enable Federated Security
If we set Use Administrator IDs stored in the LDAP user registry to yes, the WAS and portal user IDs and passwords are changed to the LDAP user ID and password. If we do not want to change both user IDs and passwords to match the LDAP user ID and password, set this value to no. After configuring the LDAP user registry, we can manually change the user IDs and passwords.
The Enable Federated Security option modifies wimconfig.xml. Make a backup copy of this file before running ConfigEngine tasks.
- WP_PROFILE/config/cells/CellName/wim/config/wimconfig.xml
- Provide information about the environment.
- Save the configuration settings.
- Choose one of the following options:
- Click Download Files to run the steps remotely.
- Click Run All Steps to run the steps locally.
- Log on to verify portal is working server.
- Configure the web server
- Run the performance tuning tool to complete an initial tuning of the servers.
- Check the tuning guide for more instructions.
- There are two supported portal farm configurations we can choose when setting up the portal farm.
- Configure a farm instance with unique installations.
- Configure a farm instance with a shared configuration.
- Use a web server to handle load balancing across the portal farm.
- Configure remote and/or JCR search...