Reserve a Cloud session
Reserving a Cloud session ensures Cloud resources are available for a test. Besides, the startup time of the Cloud Load Generators is provisioned by Neotys to have the Load Generators ready at the time specified.
To reserve a Cloud session, you need to sign in to the Online Cloud Console. See Access the Neotys Cloud Platform from the Online Cloud Console.
In the Load Generators menu, the Reserve a Cloud session command must be selected to display the first page of the reservation process.
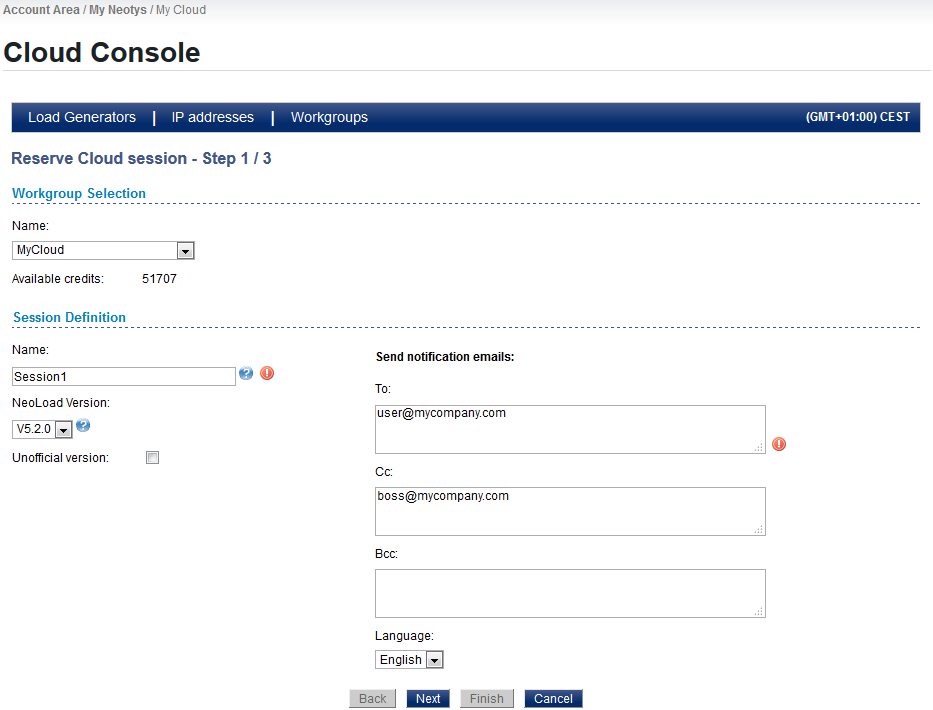
Reserve Cloud session - Step 1/3

The Workgroup selection section defines which workgroup account is used for the session:
- Name is a drop-down list of the workgroups which the connected user belongs to.
- Available shows the remaining balance of the selected workgroup in Cloud credits or VUHs according to the payment mode selected for the workgroup.
The Session definition section describes the session:
- Name is the mandatory label of the session.
- NeoLoad Version is the version of the NeoLoad Controller which is used to start the test with the Cloud Load Generators.
When the NeoLoad Controller is patched with a hotfix, the Unofficial version option must be selected and the Build Number must be specified.
The version of the NeoLoad Controller is available with Help > About NeoLoad in the Controller.
VUHs are available for purchase from NeoLoad version 5.2.4 and later.
The Send notification emails section makes it possible to set automated emails to To, Cc, and Bcc people about the Cloud session in the selected Language:
- when the session is started
- 30 minutes before the end of the session
- a few minutes before the end of the session
- when the session is over
- if a problem occurs on the session
- when a reserved Cloud session is created, modified, or canceled
- Tip: Useful and important notes are displayed when the mouse is moved over the information and warning icons in the page.
A click on Next displays the second screen to reserve a session:
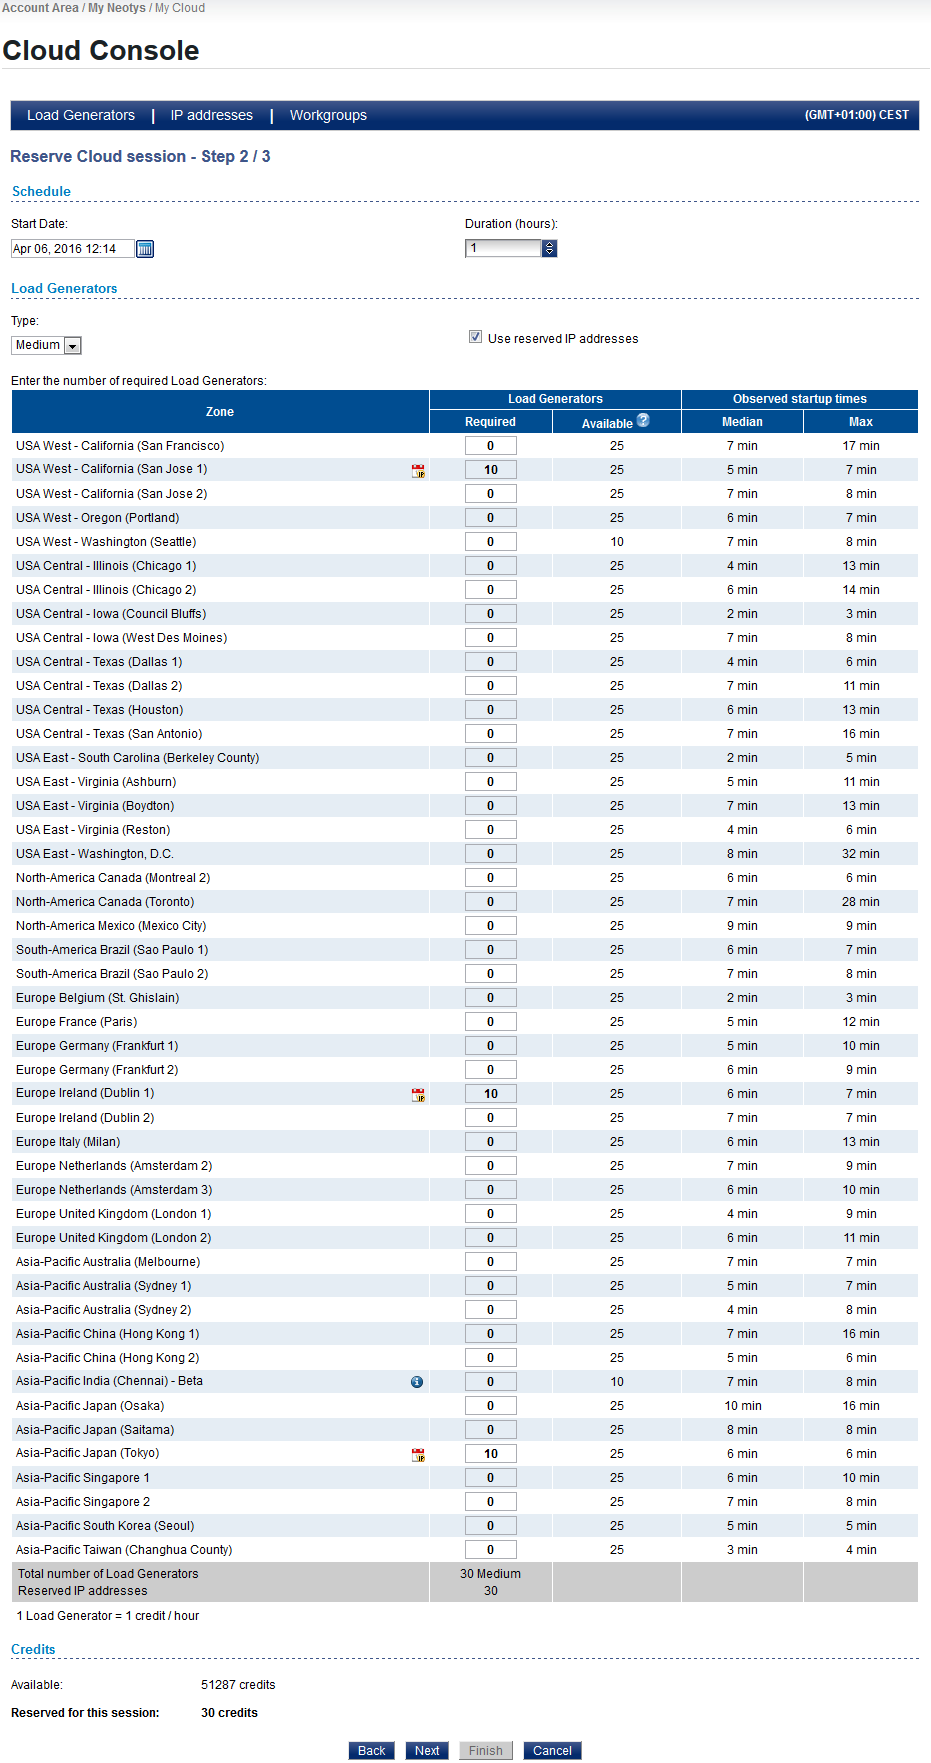
Reserve Cloud session - Step 2/3

The page is divided between:
- The Schedule section
- The Load Generators section
- The Cost section
The Schedule section is used to set the duration of the session:
- Start date is the day and time when the Cloud Load Generators must be up and running. A click on the calendar icon makes it possible to select a date and the time before clicking on Apply. For information purposes, the time zone is stated in the upper right corner of the page.
- Duration is the length in hours of the session.
The Load Generators section is different if you are paying with Cloud credits or VUHs:
- If you are paying with Cloud credits, you need to choose the type, location, and number of Cloud Load Generators.
- If you are paying with VUH, you need to choose the location, and number of Virtual Users.
- Type is the dimension of the Cloud Load Generators:
- Medium Load Generators rely on two cores and 800 MB of allocated memory. One medium Load Generator requires one Cloud credit per hour.
- Large Load Generators rely on four cores and 6 GB of allocated memory. One large Load Generator requires two Cloud credits per hour.
The characteristics of the medium and large Load Generators may differ with the zone used.
- The Use reserved IP addresses option is selected by default in case IP addresses have been reserved for the session. It is still possible to uncheck it if different IP addresses are to be used for this Cloud session.
- The table lists the worldwide Cloud zones available. For every Zone:
- In the Zone column, if one or several IP addresses have been reserved in that zone, a calendar icon is displayed. On mouse over the applicable zone, a tooltip gives the number of IP addresses reserved.
- If you are paying with Cloud credits: In the Load Generators column, the Required field makes it possible to enter a number of Cloud Load Generators. The maximum number of Cloud Load Generators available is displayed in the Available column. By default, in most zones, a maximum number of 25 Cloud Load Generators can be started. For more Load Generators on a zone, contact your Neotys Account Manager.
- If you are paying with VUHs: In the Virtual Users column, the Required field makes it possible to enter a number of Virtual Users. The necessary number of Cloud Load Generators is automatically updated in the Required field of the Load Generators column.
- The Observed startup times column provides information about the time required by a Cloud Load Generator for a given zone before it is up and running. The statistics derive from experienced times recorded by Neotys. The Median measure is the most realistic startup time. The Max measure is the longest time a Neotys Cloud Platform user had to wait before the Load Generator was ready.
A session is made of either medium or large Load Generators. When necessary, distinct sessions can be created and used for a test.
- Tip: Moving the mouse over a zone displays a tooltip with additional information like the name of the Cloud provider, the minimum startup time observed, and the percentage of Cloud Load Generators in error on startup.
The Cost section shows the Available balance in Cloud credits or VUHs against the balance Reserved for this session according to the duration, type, zones, and number of Load Generators selected above. If credits or VUHs are missing for the Load Generators or Virtual Users selected, the information is displayed in red, and a link gives access to the Neotys Online Store to add more credits or VUHs on the fly.
A click on the Next button displays the last page of the reservation.
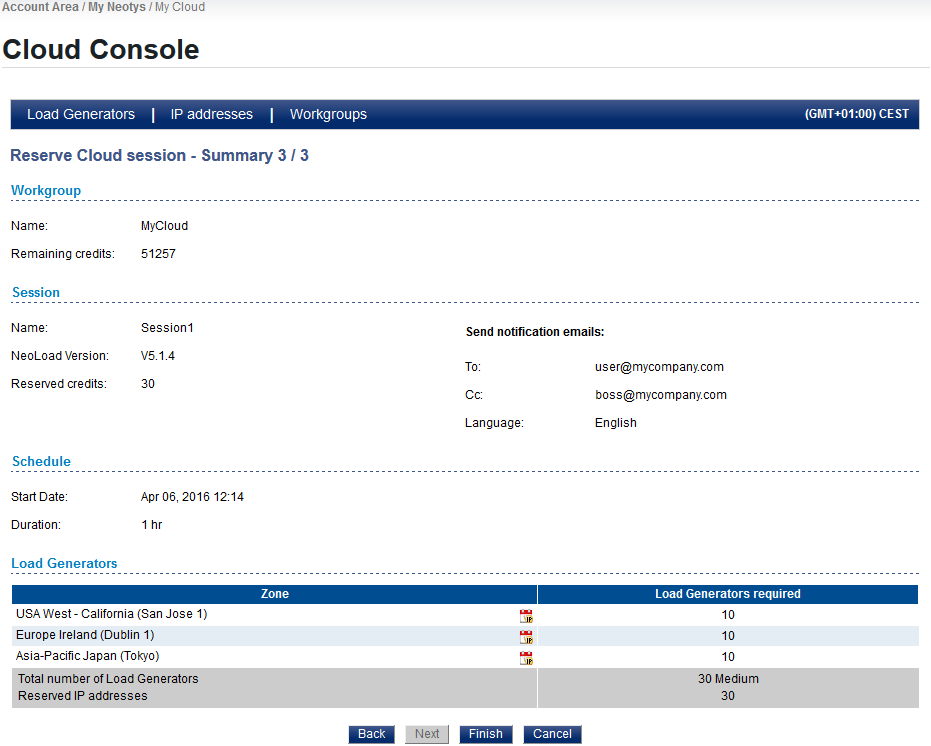
Reserve Cloud session - Step 3/3

This page provides a summary of the Cloud session to reserve. A click on the Back button makes it possible to modify the Cloud session.
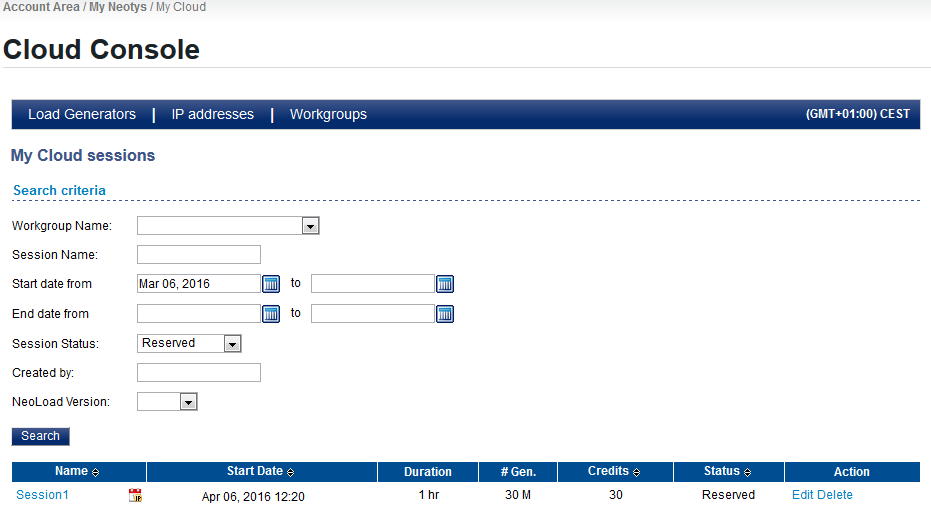
A click on Finish creates the Cloud session defined. The Cloud session is listed in the My Cloud sessions dashboard.

The Online Cloud Console can be closed with the Logout button.
The Cloud Load Generators will start at the time specified and can then be used as described in Use an existing or reserved Cloud session.
- To reserve a Cloud session
- Have your Cloud workgroup and credits/VUH ready through your Neotys Account Manager or the Neotys online store.
- Log in to the Online Cloud Console.
- Enter your E-mail and Password and click Sign-In.
- Choose Load Generators > Reserve a Cloud session.
- In the Reserve Cloud session first step:
- In Workgroup selection, select the Name of the Cloud workgroup you want to use for your Cloud session.
- In Session Definition:
- Enter the Name of the new Cloud session.
- Select the NeoLoad Version of your NeoLoad Controller.
If your Controller has been patched, click Unofficial version, and specify the Build Number.
To find the version and the build number, in the NeoLoad Controller, choose Help > About NeoLoad. - Enter the email addresses for the To, Cc, and Bcc Cloud notifications, and specify the email Language.
- Click Next.
- In the Reserve Cloud session second step:
- In Start Date, click on the calendar icon, define the day and time of your test, then click Apply.
- In Duration, select the number of hours for the session.
- Cloud credits only: In the Type drop-down list:
- Medium displays the list of Cloud Load Generators with two cores and 800 MB of allocated memory
- Large updates the list with the Cloud Load Generators with four cores and 6 GB of allocated memory
- If you have reserved IP addresses, the Use reserved IP addresses option is selected by default, unselect it if you want to use different IP addresses for this Cloud session.
- In the table displaying the Cloud Load Generators, select a Zone and enter the number of Cloud Load Generators or select a Zone and enter the number of Virtual Users. Click Next.
- In the Reserve Cloud session third step, check that the configuration of your session is correct.
- Click Finish.
- Back in the Cloud Console page, check that the reserved session is listed.
- Click Log out.
- If you have reserved and received the IP addresses of your Cloud Load Generators in advance, remember to authorize them in your firewalls before the test.