Configure WebSphere Commerce with WebSphere eXtreme Scale
This article provides a concise description of the changes necessary to move from a WebSphere Commerce configuration that uses the default dynamic cache implementation to one that uses a remote IBM WebSphere eXtreme Scale dynamic cache implementation.
See also:
- Product documentation
- Scalable, integrated solutions for elastic caching using WebSphere eXtreme Scale
- Resources
For our scenario WCS is running as a single server installation with the Madisons starter store archive published for testing. A standalone WXS image runs on the same host with one catalog server and two container servers. A remote topology was created for the cache store that indicates it is outside of the WCS JVMs. The data grid is running as a standalone WXS implementation, but it could have been configured to run within WebSphere Application Server images. For more complex configurations perform these identical steps on each of the WCS servers or clusters.
The WCS server is configured to use the WXS dynamic cache provider, which connects to the grid registered with the catalog server. The data grid is registered with the catalog server. AS WCS is already configured to use the dynamic cache, we need only to change the dynamic cache provider to gain the benefits of WXS.
The scenario described in this article was created with these product versions:
- WCS V7.0.0.2
- WebSphere Application Server V7.0.0.13
- WXS V7.1 plus cumulative fix 1
The following minimum product levels should support a similar environment, although there are some configuration differences:
- WCS V7.0.0.1 with WXS V7.1.0.1
- WCS V6.0.0.7 with WXS V7.0 iFix 4 (plus fix PM21272)
The example described here was implemented on a Linux server.
This article utilizes a simple configuration for clarity but an actual production environment is much different. For example, this article uses the default number of partitions set in dynacache-remote-deployment.xml, just one catalog server, and two container servers. In a production environment, when determining the number of partitions and container servers, consider...
- The maximum number of entries to be stored in your dynamic cache
- size of the records
- WXS replication policy
For number of WXS catalog servers to allocate consider system availability requirements.
Consider the network bandwidth between the various components of your environment. All WXS cache access will be via the network rather than using local cache. Ensure high bandwidth connectivity between the WCS servers and the WXS container servers to minimize network latency.
Perhaps the most important benefit is the elimination of duplicate cache instances and the required invalidation traffic that is necessary to keep them synchronized.
In a default dynamic cache implementation, a copy of the cache is maintained in each WCS server and invalidation processing is necessary to keep these caches in sync. In a large system, this can require a significant amount of memory and invalidation chatter. Each WCS server contains the same set of cached data. Depending upon the invalidation logic used, each server might not have a complete copy of the cache, but over time a steady state is typically reached as each server cache grows to contain nearly identical copies of the cache. Invalidation logic is necessary between the servers to synchronize the data.
This works well for small cache requirements and can support larger cache requirements using disk offload to enable a cache much larger than possible with a memory only cache. However, this model begins to break down as transaction volumes increase and additional servers are added to accommodate the increased traffic. The addition of servers means the addition of invalidation traffic. Similarly, growth in the cache brings increased disk demands that could require expensive SAN solutions. As scale increases, a saturation point is quickly reached with a bottleneck on the cache disk offload, the invalidation traffic, or both. Also as each new server is added, its cache must warm up which is an expensive operation placing additional stress on the system resources.
The figure below shows a similar scenario with a remote topology deployment of WXS elastic caching. There is a shared copy of the cache that can be utilized by all of the WCS servers. The invalidation traffic is eliminated between the WCS servers as they no longer have the responsibility to manage the cache. It is true that all access is via the network but this can be mitigated by several optimizations provided in WXS such as data compression. The elastic cache solution can be easily scaled by adding more JVMs to support even larger cache requirements. Resiliency is provided by both synchronous and asynchronous replication that can be configured to meet your particular needs.
A Commerce solution benefits from this shared, elastic cache in many other ways:
- There is no need for expensive SAN disk arrays for increased disk demands as with a typical disk offload.
- WXS runs on commodity boxes and the software makes them fully fault tolerant.
- WXS provides perfect linear scaling - just add another box to the grid.
- Each cache entry is generated only once - not once per server - saving CPU and disk I/O.
- Cache entries are invalidated only once per cluster rather than per server in the cluster and subsequently regenerated only once for all servers in the cluster to share, drastically cutting disk I/O and CPU requirements.
- As servers are added, cache warm-up is faster because of the shared cache.
That's a long list of benefits with very little downside and it can all be unleashed with just a few configuration changes.
Using the default dynamic cache provider
To look at default dynamic cache provider configuration...
- Start the dmgr console...
- In a browser, go to...
http://<hostname>:9060/ibm/console
Depending on your installation, the hostname and the console port could be different.
- Enter your application server administrative user ID and password (if required), and click Log in.
- In a browser, go to...
- To display a list of all application servers in the right panel.
Servers | Server Types | WebSphere application servers

- In the right panel, select server1 (or the server that you have used for your WCS installation) to view configuration details of this server.

- Expand...
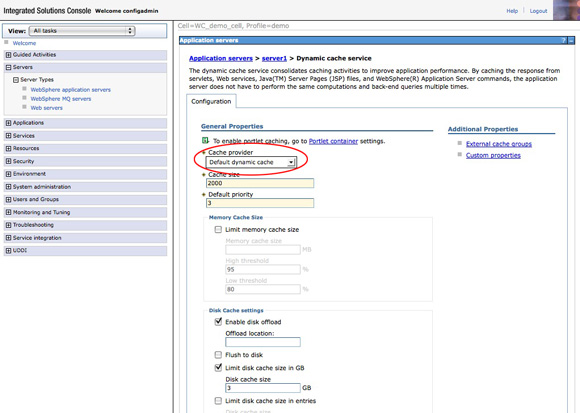
Container Services | Container Settings | Dynamic cache service
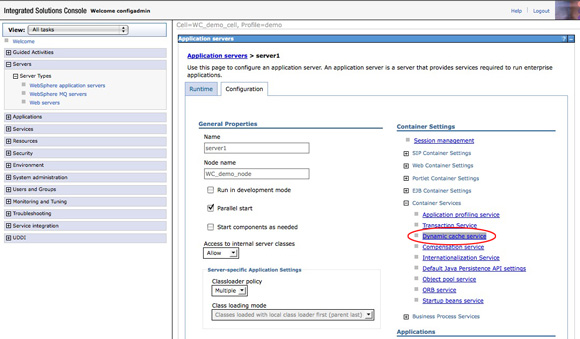
- This panel displays the current setting of the cache provider. Notice that the Cache provider is set to Default dynamic cache. If you have already augmented your application server profile with the WebSphere eXtreme scale client, you can click on the drop-down list and see the alternative choice of WXS.
- Click on server1 again, either by following steps 2 and 3 above or simply by clicking on server in the breadcrumb trail at the top of the right panel.

- From the server1 details panel, expand...
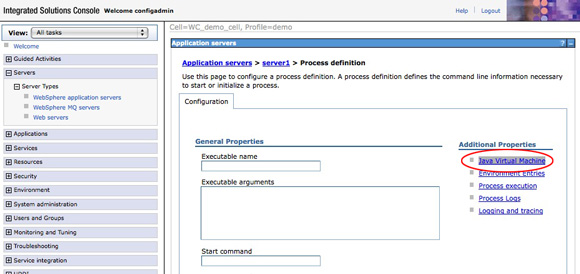
Server Infrastructure | Java and Process Management | Process definition

- Click on...
Java Virtual Machine | Additional Properties

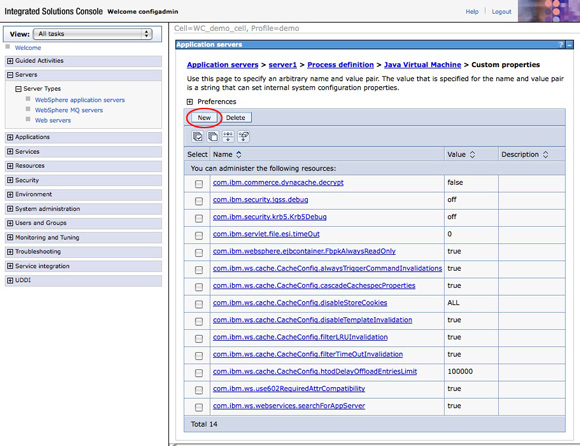
- Under Additional Properties, select Custom properties...

- Observe the set of properties defined that pertain to com.ibm.ws.cache*. These properties are used to configure the dynamic cache behavior. You will add additional properties to this collection as you configure the image to leverage WXS.

- You can administer WCS sites using the admin console...
http://<hostname>:port/adminconsole
For this example, the administration console is used to publish the Madisons store site sample. After the site is published, you can access it from any web browser using http://<hostname>/webapp/wcs/stores/Madisons/index.jsp to present the main store page...

As you click on some of the categories and images, you.ll see that Madisons is a very nice sample of a retail website and does a good job of demonstrating the capabilities of WCS. By clicking on various pages, products, and descriptions you are generating web content that is being saved in the dynamic cache for subsequent reference by you and other shoppers. (Be aware that the dynamic cache configuration has expiration logic built into the application using cachespec.xml files in the WARs. Many of the default values have a timeout of 5 minutes of being inactive. Therefore, even as you populate instances in the cache many of these instances will timeout after 5 minutes.)
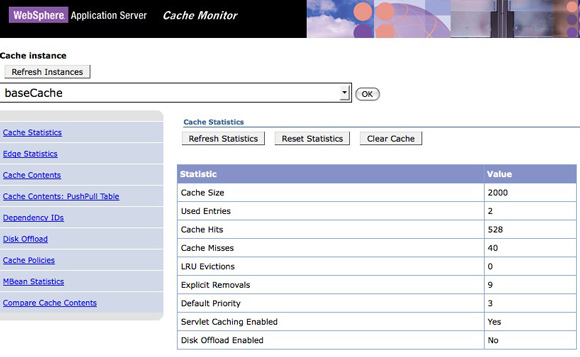
- After using the Madisons sample for some online browsing and shopping, take a look to see what is populated in the cache. You can do this using the Extended Cache Monitor, which is a technology preview that is an extension of the cache monitor supplied with WebSphere Application Server. The extensions enable it to better manage multiple dynamic cache providers. It also provides a selection of MBean statistics and enables you to view object cache contents.
Enter this URL into a web browser to access the Extended Cache Monitor (your port may be different depending upon your installation): http://<hostname>:9061/cachemonitor. You should see the initial cache monitor screen.
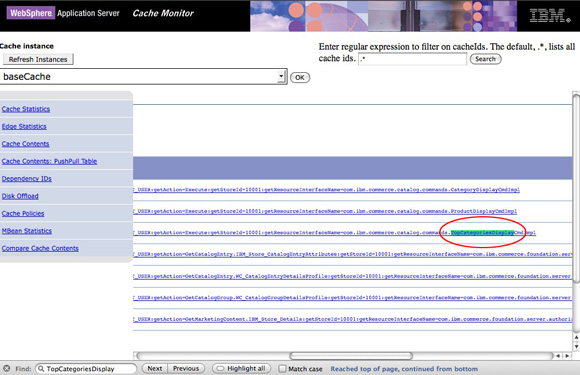
Immediately after some activity using the Madisons store sample, the cache monitor Cache Contents page should show some entries for the category displays that include -TopCategoriesDisplay. in the Cache ID.
This example uses WXS V7.1, which can be installed in either a new directory for a standalone deployment or it can be installed on top of a WebSphere Application Server cell for an integrated deployment. The scenario described here has WXS installed as a standalone deployment. The WebSphere eXtreme Scale client is also installed on the WCS deployment. The following high level steps were followed to install WXS for this exercise:
- Install WXS as a standalone product.
- Install the WXS client on the WCS deployment by running the installation again, selecting the WCS installation directory and the client install option. (You could alternatively decide to run the WXS catalog and container servers in the WebSphere Commerce installation image by skipping step 1 and selecting the server installation option pointing to the WCS directory This is the approach taken in the Redbook referred to earlier).
- Augment all WCS nodes with WXS using the WebSphere Application Server profile management tool.
Create the eXtreme Scale grid configuration
The configuration in this example uses a standalone WXS deployment. You can optionally run the catalog servers in the deployment manager, node agents, or application servers of a WebSphere Application Server cell. By default, the WXS catalog server will run in the deployment manager of the cell when WXS is installed into a WebSphere Application Server environment. Additional care must be taken in the WebSphere Application Server configuration to manage the appropriate node agents and servers. For simplicity, the catalog and container servers described here run as standalone processes. This is generally a good configuration and provides a fair degree of isolation for independent management. However, it is not universally the right choice for every user. Careful consideration must be given to the creation and placement of catalog and container servers in a production environment. For example, you would certainly want more than the single catalog server defined for this simple scenario. In a production environment, multiple catalog servers within a catalog server domain should be defined for resiliency.
- Start the catalog server
Every grid environment must have a catalog server. In this simplified environment, a single catalog server will be started as a standalone process. For this example, start a catalog server...
cd $WXS_HOME/ObjectGrid/bin
./startOgServer.sh catalog1 - Start the container servers
Once the catalog server is available, you can start the container servers to host the dynamic cache data in a WXS grid. For this example, start two standalone container servers. As with the catalog server, a production environment would be configured differently depending upon your particular needs. At a minimum, you should create at least three container servers for better distribution of the grid content.
WXS provides a set of files for the default configuration of the dynamic cache grid. You should copy these files to a new location, for example $CONFIG_HOME, and edit them as necessary.
In a standalone installation the files can be found in either...
$WXS_HOME/ObjectGrid/dynacache/etc directory
$WAS_HOME/optionalLibraries/ObjectGrid/dynacache/etcThe configuration consists of two files that define both the structure of the grid and the deployment characteristics of the grid for dynacache:
- dynacache-remote-objectgrid.xml provides the definition of the grid that is required by the WXS dynamic cache provider. You should not need to edit this file.
- dynacache-remote-deployment.xml provides the deployment characteristics of the grid. You should become familiar with the contents of this file and edit as necessary. See the Information Center for a description of the file contents.
In this sample, make two minor changes to the dynacache-remote-deployment.xml:
- numInitialContainers=.2. changed from the initial value of "1". This specifies that you will be running two containers and the data grid should not start until there are at least two container servers available. This will assure an even distribution of data for the partitions.
- developmentMode=.true. changed from the initial value of "false". The sample environment is running all containers on the same node. Normally, replicas will only be created on different nodes from the primary. You must set this for development mode to indicate that you would like replicas created even though the container servers are on the same node.
When running standalone container servers, these files are provided as parameters to the startOgServer command along with parameters to locate the catalog service. Use the following commands to start each of the container servers from within...
$WXS_HOME/ObjectGrid/bin
./startOgServer.sh container1 -objectGridFile $CONFIG_HOME/dynacache-remote-objectgrid.xml -deploymentPolicyFile $CONFIG_HOME/dynacache-remote-deployment.xml -catalogServiceEndPoints localhost:2809
./startOgServer.sh container2 -objectGridFile $CONFIG_HOME/dynacache-remote-objectgrid.xml -deploymentPolicyFile $CONFIG_HOME/dynacache-remote-deployment.xml -catalogServiceEndPoints localhost:2809
These updates create the environment...

See the Information Center for more information on starting a container service using the non-default catalog service endpoints or port.
- dynacache-remote-objectgrid.xml provides the definition of the grid that is required by the WXS dynamic cache provider. You should not need to edit this file.
After completing these steps, you now have a configuration initialized to host the dynamic cache data grid.
The next step is to configure the WCS application server to utilize the WXS dynamic cache provider that will connect to the catalog and container servers that you just defined. At a high level, this means change the WCS Server dynamic cache provider to be WXS, add some custom properties for the WCS server JVM, and create the WXS client catalog service domain to point to your catalog service.
- Configure the dynamic cache provider
- Start by selecting the WCS server in the WebSphere Integrated Solutions Console by selecting...
Servers | Server Types | WebSphere application servers | server1 | Container Settings | Container Services | Dynamic cache service

- Next, click on the Cache provider drop-down and select WXS

- Verify that the Enable cache replication option is checked...
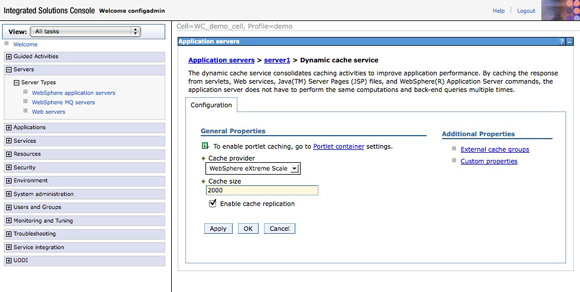
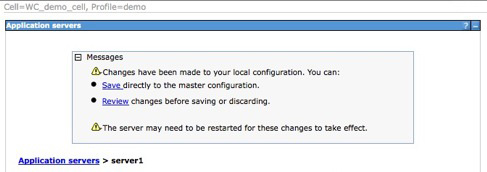
- Click OK and then save the changes to the master configuration
- Start by selecting the WCS server in the WebSphere Integrated Solutions Console by selecting...
- Add custom properties for WXS dynamic cache
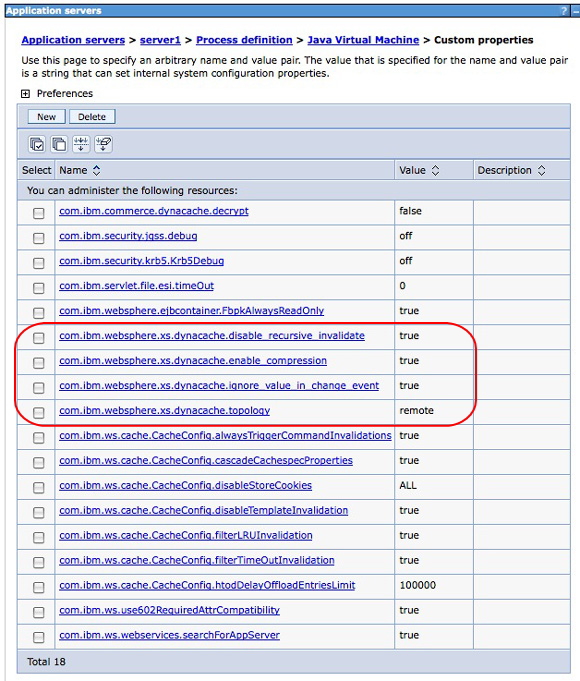
Next, you will add some necessary custom properties to the JVM for the WebSphere Commerce server. You will add four property key/value pairs.
- com.ibm.websphere.xs.dynacache.topology
This is the most important property set. Add it with a value of remote. This specifies the topology of the WebSphere eXtreme Scale dynamic cache that you are configuring for this server. You are using remote to signify that the cache data is stored outside of the WCS JVMs. Other potential values are local, embedded, and embedded_partitioned, depending upon the configuration desired.
- com.ibm.websphere.xs.dynacache.disable_recursive_invalidate
This is a performance recommendation to prevent recursive invalidations of dependency IDs. Set this to true.
- com.ibm.websphere.xs.dynacache.ignore_value_in_change_event
This is also a performance recommendation. Set the value to true to indicate that the cache value should not be de-serialized for a change event.
- com.ibm.websphere.xs.dynacache.enable_compression
This is another performance recommendation to compress the content of the dynamic cache. Setting the value to true will reduce the size of the data in the cache and reduce network traffic.
You will make these changes once again using the WebSphere Integrated Solutions Console.
- Select...
Servers | Server Types | WebSphere application servers | server1 | Server Infrastructure | Java and Process Management | Process definition...

- In the Process definition panel, select...
Java Virtual Machine | Additional Properties
- Select...
Additional Properties | Custom Properties

- You should now see the view of custom properties for this server...
- For each property in Table 1, click on New, enter the Name and Value of the property, and then click OK. You will notice a message to save the configuration. You can wait and do this just once after all of the properties have been added.
Property name Value com.ibm.websphere.xs.dynacache.topology remote com.ibm.websphere.xs.dynacache.disable_recursive_invalidate true com.ibm.websphere.xs.dynacache.ignore_value_in_change_event true com.ibm.websphere.xs.dynacache.enable_compression true - Save the new settings by clicking Save...

- New entries are created.
- com.ibm.websphere.xs.dynacache.topology
- Create catalog server domain for WXS catalog servers
The next step is to configure the WXS catalog service domain to reference your catalog servers. Once again, start with the Integrated Solutions Console in WebSphere Application Server.
- In the navigation panel, expand...
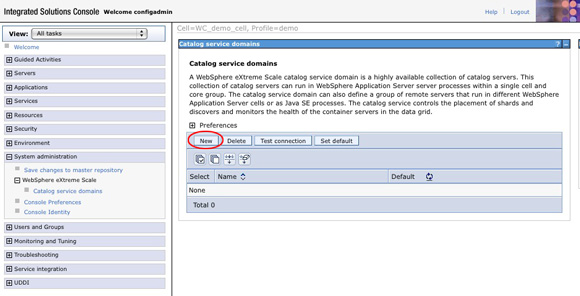
System administration | WXS | Catalog service domains
You need to create a new catalog service domain so click on New.
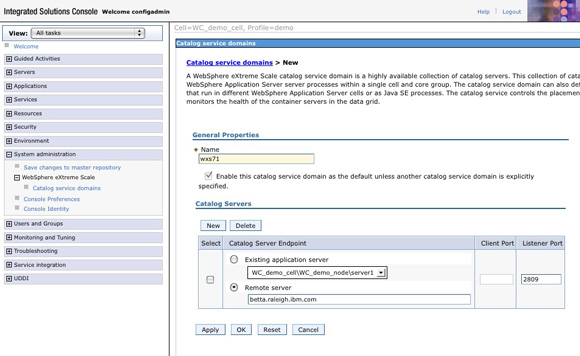
- Enter the Name you would like to use to reference this domain on the panel to create a new catalog service domain. The value wxs71 is used in this example. Because your catalog server is running outside of the WebSphere Application Server, select Remote Server, enter the Remote Server hostname for the catalog service, and enter the Listener Port of 2809 (this is the default; your port might be different). Also, validate that this domain is set as the default by selecting the check box below the Name field. Click OK to create the new domain.
- You can either test the connection or save your changes to the master configuration at this point. To save the changes first, click Save

- To validate your settings are correct, you can test the connection by selecting the domain that you just created and click Test connection
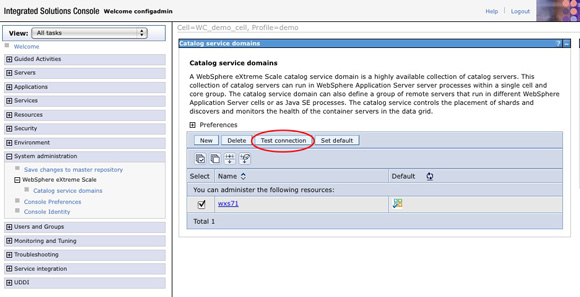
If everything is working correctly, you should see the message...

This concludes the steps for configuring WCS to use dynamic cache to leverage an external standalone WXS grid. Just one more administration step is necessary and you can test it out.
- In the navigation panel, expand...
- Recycle the WCS server
Before must recycling the WCS servers ensure that you have the necessary catalog server and container servers running for WXS. These should be running from the steps you took earlier.
Use whatever mechanism you prefer to restart the WCS Server. If you are running a single server environment, as in this example, restart the server via the command line:
$PROFILE_HOME/bin/.stopServer.sh server1
Enter the administrator ID and password if prompted. Next, start the server again...
$PROFILE_HOME/bin/.startServer.sh server1
When the server is active, all of the configuration changes will take effect and the server should connect to the data grid. If everything worked, you should see the messages displayed in Listing 1 in the SystemOut.log of your WCS server.
[3/2/11 9:45:05:503 EST] 00000000 CacheServiceI I DYNA1054I: Dynamic Cache (core cache) initialized successfully.
[3/2/11 9:45:05:519 EST] 00000000 ObjectCacheSe I DYNA1056I: Dynamic Cache (object cache) initialized successfully.
[3/2/11 9:45:05:531 EST] 00000000 CacheProvider I CWOBJ4500I: WebSphere eXtreme Scale Dynamic Cache provider is successfully initialized.
[3/2/11 9:45:06:454 EST] 00000000 ObjectGridImp I CWOBJ4700I: The map name IBM_DC_PARTITIONED_baseCache matched the regular expression of template map IBM_DC_PARTITIONED_.*. The IBM_DC_PARTITIONED_baseCache map has been created for ObjectGrid DYNACACHE_REMOTE.
[3/2/11 9:45:06:488 EST] 00000000 CacheProvider I CWOBJ4508I: The WebSphere eXtreme Scale provider has created a Dynamic Cache instance with name baseCache using topology remote.
Validate that WXS is being used for the dynamic cache
You can now validate that the configuration is working as intended. You can determine from the SystemOut.log whether things are configured properly and the WCS server is connected to the grid. However, it is always nice to see actual entries being added into the WXS grid to confirm that things are in fact working correctly.
Before you can see content in the data grid, do something to actually generate some content. This example uses the Madisons store sample. (See step 11 in the Using the default dynamic cache provider section for information on using the sample to drive content into the dynamic cache.) After the configuration steps and restarting the server, a portion of that content will now be stored in the data grid. You then must interact with the sample to get some content added to the dynamic cache and, therefore, added to the data grid.
Perhaps one of the easiest ways to get an idea of the content of the entries in the grid is using the xsadmin.sh or xsadmin.bat scripts provided with WebSphere eXtreme Scale. You can find these scripts in...
$WXS_HOME/ObjectGrid/bin
To view the sizes of the partitions in the grid...
./xsadmin.sh -mapsizes
In this configuration, this command yielded the following results (with some partition details removed to save space). (You must have performed some action to add content to the grid before you will see any output from the xsadmin.sh -mapsizes command. If you do not see similar output then you may have to revisit some of the configuration steps.)
/opt/WXS71/ObjectGrid/bin> ./xsadmin.sh -mapsizesThis Administrative Utility is provided as a sample only and is not to be considered a fully supported component of the WXS product Connecting to Catalog service at localhost:1099 ****Displaying Results for Grid - DYNACACHE_REMOTE, MapSet - DYNACACHE_REMOTE****** *** Listing Maps for container1 *** Map Name Partition Map Size Used Bytes (KB) Shard Type IBM_DC_PARTITIONED_baseCache 0 2 656 AsynchronousReplica IBM_DC_PARTITIONED_baseCache 1 2 656 Primary IBM_DC_PARTITIONED_baseCache 2 2 656 Primary IBM_DC_PARTITIONED_baseCache 3 3 2 AsynchronousReplica IBM_DC_PARTITIONED_baseCache 4 2 656 AsynchronousReplica IBM_DC_PARTITIONED_baseCache 5 3 2 Primary IBM_DC_PARTITIONED_baseCache 6 2 656 Primary ... IBM_DC_PARTITIONED_baseCache 41 3 3 AsynchronousReplica IBM_DC_PARTITIONED_baseCache 42 2 656 Primary IBM_DC_PARTITIONED_baseCache 43 2 656 Primary IBM_DC_PARTITIONED_baseCache 44 2 656 AsynchronousReplica IBM_DC_PARTITIONED_baseCache 45 2 656 Primary IBM_DC_PARTITIONED_baseCache 46 3 2 AsynchronousReplica Server Total: 105 (57KB) *** Listing Maps for container2 *** Map Name Partition Map Size Used Bytes (KB) Shard Type IBM_DC_PARTITIONED_baseCache 0 2 656 Primary IBM_DC_PARTITIONED_baseCache 1 2 656 AsynchronousReplica IBM_DC_PARTITIONED_baseCache 2 2 656 AsynchronousReplica IBM_DC_PARTITIONED_baseCache 3 3 2 Primary IBM_DC_PARTITIONED_baseCache 4 2 656 Primary IBM_DC_PARTITIONED_baseCache 5 3 2 AsynchronousReplica IBM_DC_PARTITIONED_baseCache 6 2 656 AsynchronousReplica ... IBM_DC_PARTITIONED_baseCache 41 3 3 Primary IBM_DC_PARTITIONED_baseCache 42 2 656 AsynchronousReplica IBM_DC_PARTITIONED_baseCache 43 2 656 AsynchronousReplica IBM_DC_PARTITIONED_baseCache 44 2 656 Primary IBM_DC_PARTITIONED_baseCache 45 2 656 AsynchronousReplica IBM_DC_PARTITIONED_baseCache 46 3 2 Primary Server Total: 105 (57KB) Total Domain Count: 210 (114KB) (The used bytes statistics are accurate only when you are using simple objects or the COPY_TO_BYTES copy mode.)
There are several things to note in the output above:
- You can see that the name of the grid and MapSet are both DYNACACHE_REMOTE. These are the default grid and MapSet names used by the WXS dynamic cache provider.
- The map name is IBM_DC_PARTITIONED_baseCache. This is the default map that is used for the base cache dynamic cache implementation.
- Both container servers are listed with an appropriate distribution of primary and asynchronous replicas.
- Partitions with map sizes greater than 2 contain dynamic cache specific content. Every partition will automatically include two entries used for management purposes as part of the dynamic cache implementation. Any additional entries represent application content in the dynamic cache.
- The xsadmin utility in WXS V7.1 (used in the sample) should consistently present entries in either bytes or kilobytes (KB). However, until all entries grow to a size greater than 1KB there is a mixture of byte and KB entries in the table. In the output above, the entries with a bytes used count of 656 represent 656 bytes while those with bytes used count of 2 or 3 represent kilobytes used. (As noted in the banner of the output, xsadmin is an unsupported utility, but hopefully there will be an iFix available soon to correct this issue.)
- The total server size is presented for each container server. This size is correctly calculated and displayed in KB.
Validation using the WXS web console
The recommended way to validate the dynamic cache content in the WebSphere eXtreme Scale data grid is to use the new WXS web console, available in V7.1. The console enables you to chart current and historical statistics for the grids in your environment. (See this video on how to configure and use the WXS web console for monitoring your grids.)
The WXS web console provides a number of nice features for viewing the content of and using a data grid. A few examples of these will be shown here and you can explore others on your own.
Access the web console from a browser...
https://<hostname>:7443/
The default userid ID and password are both admin until you change them. Follow the steps in the video and product documentation to create a domain.
After you have the console configured, click on the Monitor drop-down and then on Data Grid Domain Overview. As with the xsadmin.sh command, you can see the data grid listed for DYNACACHE_REMOTE once again in this view. You can also see that your data grid has received some content given the usage in this view. You have only used a small portion of your grid at the moment, but there are some entries in the grid to look at.
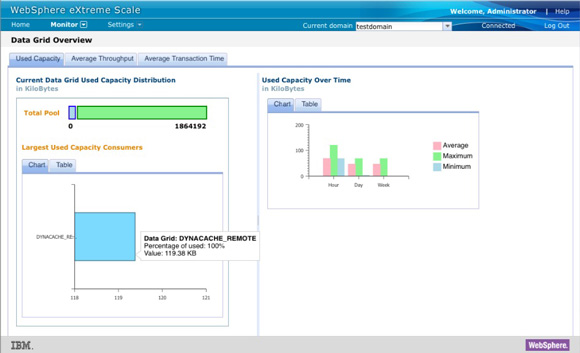
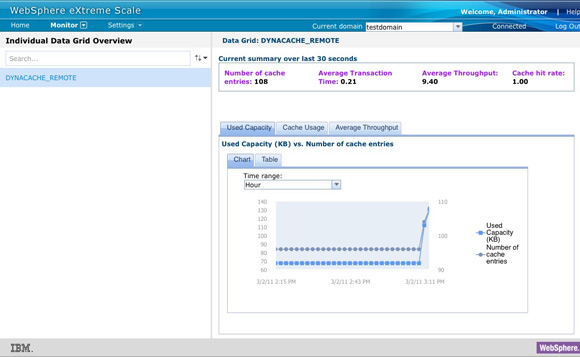
Now, click on Data Grid Overview, also under Monitor, to see items such as used capacity, cache usage, response time, and throughput summaries...
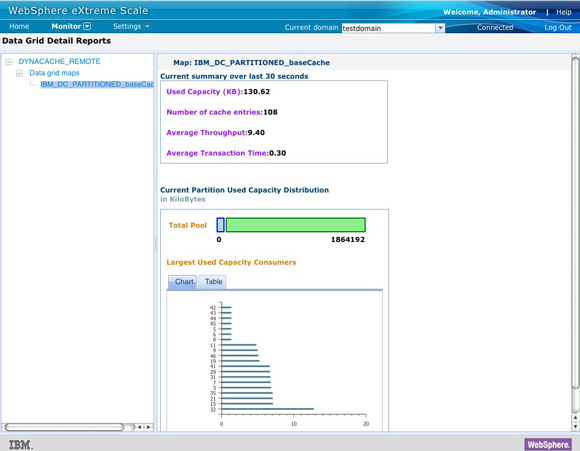
You can view the details for the data grid by selecting Data Grid Details from under Monitor and then clicking on the map used for the dynamic cache implementation, IBM_DC_PARTITIONED_basecache.
To display memory usage statistics for the current usage, as well as minimums and maximums over time, click on...
Server Overview | Monitor
