Tutorials > Sales Center > Customize the appearance of the IBM Sales Center
Create a new plug-in
In this step we will begin to implement the customization by creating a new plug-in to contain the customized assets.
You know the following information:
- The keys of the text strings that to replace: LogonDialog.instructions and LogonDialog.applicationTitle.
- The name and directory of the image that to replace: websphere_telesales.jpg in com.ibm.commerce.telesales.resources/icons/full/prod.
Procedure
- To create a new plug-in:
- Switch to the Package Explorer view
- Right-click New > Plug-in project.
- In the Project name field, enter logonLookAndFeelExtension.
- Select Create an OSGi bundle manifest for the plug-in and keep all other default values.
- Click Next.
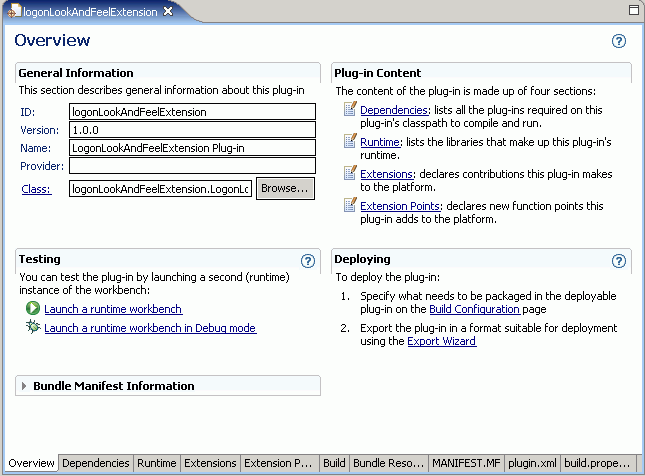
- Click Finish. The plug-in opens for editing as in the following screen capture:

- Switch to the Package Explorer view
- Create a new resource bundle
You need to replace the explanatory text on the logon dialog, as well as the title bar text. In the preceding steps, you determined that the text strings are represented by the LogonDialog.instructions and LogonDialog.applicationTitle keys.
You must now create a new resource bundle, within the own plug-in, with the new text strings. To create this resource bundle:
- Ensure you are using the Package Explorer view.
- Expand the logonLookAndFeelExtension project.
- Expand the src folder.
- Right-click the logonLookAndFeelExtension package and select New > File.
- In the File Name field, enter newLogonResources.properties and click Finish. The new resources file opens in an editor.
- In the new file, enter the following text: LogonDialog.instructions = To log on to the InStore Sales Representative Application, enter the user name and password. LogonDialog.applicationTitle = InStore Sales Representative Application
- Save the changes.
- Ensure you are using the Package Explorer view.
- Update the image
You have already determined the name of the file and the directory for the image you are going to replace. It is now time to create the directory within the own plug-in to include the image.
- Create the required directory within the plug-in,...
- In the Package Explorer view, right-click the logonLookAndFeelExtension project and select New > Folder.
- In the Folder Name field, enter icons and click Finish.
- Right-click the icons folder and select New > Folder.
- In the Folder Name field, enter full and click Finish.
- Right-click the full folder and select New > Folder.
- In the Folder Name field, enter prod and click Finish.
- In the Package Explorer view, right-click the logonLookAndFeelExtension project and select New > Folder.
- Now that you have the directory structure created, you can import the new graphic:
- With the newly created prod directory highlighted, right-click and select Import.
- Select File System as the import source and click Next.
- Click Browse to the directory where you installed the included resources ZIP file for this tutorial.
- Locate the NewLogo.jpg file
- Click Finish.
- With the newly created prod directory highlighted, right-click and select Import.
- Once the file is imported, right-click the NewLogo.jpg file and select Refactor > Rename.
- In the New name field, enter websphere_telesales.jpg and click OK.
You have now updated the image that the plug-in will use for the customization. Next we will update the manifest file for the plug-in.
- Create the required directory within the plug-in,...
- Update the plugin.xml file
To update the plugin.xml file to use the new properties file:
- If it is not open, open the plugin.xml file for editing:
- In the Package Explorer view, navigate to the logonLookAndFeelExtension plug-in project.
- In the logonLookAndFeelExtension project, double-click plugin.xml to open it for editing.
- In the Package Explorer view, navigate to the logonLookAndFeelExtension plug-in project.
- In the right pane, click the Dependencies tab.
- Click Add.
- From the plug-in list, select com.ibm.commerce.telesales.resources.
- Click OK and save the changes.
- Click the Extensions tab.
- Click Add.
- From the Available extension points list, select com.ibm.commerce.telesales.resources.images.
- Click Finish.
- Click Add.
- From the Available extension points list, select com.ibm.commerce.telesales.resources.resources.
- Click Finish.
- In the All Extensions list, right-click com.ibm.commerce.telesales.resources.resources and click New > resourceBundle.
- In the Extension Element Details pane, set the baseName value to logonLookAndFeelExtension.newLogonResources
- Save the changes.
- If it is not open, open the plugin.xml file for editing:
- Test the changes
Launch the IBM Sales Center client again (using Run > Run) and notice the different text and image in the logon dialog, as in the following screen capture:
