8.1.2 Base product installation
After downloading the DB2 Enterprise Server Edition v8.2 with the latest fix pack installation package or using the installation CD, follow the steps listed below to install the base product installation:
1.xxxx
Log into AIX as root. From the command line, run the db2 install:
root> ./db2setup
2.xxxx
From the Setup Launchpad, choose Installation Prerequisites from the panel on the left, read through the installation prerequisites and confirm that they are all satisfied. If so, close Installation Prerequisites.
3.xxxx
From the Setup Launchpad, choose Install Products from the left panel, select the DB2 UDB Enterprise Server Edition, and click Next.
4.xxxx
From the DB2 Setup Wizard, choose Accept from the software license agreement, and click Next.
5.xxxx
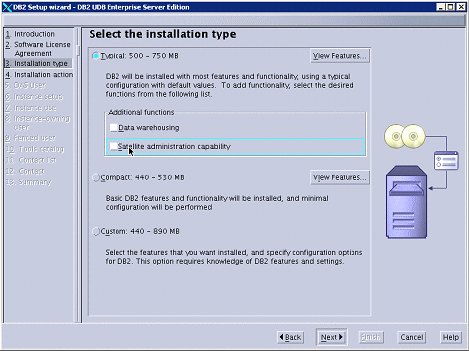
As in Figure 8-4, choose Typical from the Select the installation type panel, and choose the desired capabilities from the Additional Functions section. Click Next.

Figure 8-4 Select the installation type
6.xxxx
Choose Install DB2 UDB Enterprise Server Edition on this computer from the Select the installation action panel, and click Next.
7.xxxx
In Figure 8-5, select New User from the Set user information for the DB2 Administration Server panel. Leave the defaults and enter your password. Click Next.

Figure 8-5 Add user information for DB2 installation
8.xxxx
Select Create a DB2 instance - 64 bit from the Set up a DB2 instance panel.
9.xxxx
Select Single-partition instance from the Select how the instance will be used panel. Click Next.
10.xxxx
In Figure 8-6, select New User from the Set user information for the DB2 instance owner panel. Leave the defaults and enter your password. Click Next.

Figure 8-6 Set information for DB2 instance user
11.xxxx
As in Figure 8-7, select New User from the Set user information for the fenced user panel. Leave the defaults and enter your password. Click Next.

Figure 8-7 Set information for DB2 fenced user
12.xxxx
Select Use a local database from the Prepare the DB2 tools catalog panel.
13.xxxx
Keep the defaults on the Specify a local database to store the DB2 tools catalog panel and click Next.
14.xxxx
Select Local - Create a contract list on this system from the Set up the Administration contact list panel. Click Next.
15.xxxx
As in Figure 8-8, review your information for corrections on the Start copying files panel. Click Finish.

Figure 8-8 Review information before copying files
16.xxxx
Wait for the installation and instance creation to complete (Figure 8-9).

Figure 8-9 DB2 installation status
| xxxx |