(ZOS) Stopping an application server to manually update a high availability application
For manual application rollout, workload routing is controlled by stopping the application server on which the cluster member being updated resides. This results in a quiesce of that server. All existing requests already in the server are allowed to complete, but no new requests are accepted. Both the sysplex distributor and the WebSphere Application Server web server plug-in routes work away from the quiescing server. After all work has completed, we start the application update process on this server.
Determine which application servers are hosting the cluster members that need updating.
If we have a high availability application whose updates we want to manually control we can use this process or we can use the MVSâ„¢ Modify command to pause the listeners for the affected application servers. See the information about pausing an application server to manually update a high availability application.
To manually control application rollout and workload routing in a high availability environment:
Tasks
- Disable all forms of automatic synchronization, across
all nodes in the cell and save the changes. Perform one
of the following processes to complete this step:
- In the administrative console:
- Click System Administration > Node agents > node_agent_name > File Synchronization Service.
- Unselect the Automatic Synchronization and Startup Synchronization options.
- Select the Synchronize changes with nodes option.
- Click Save.
- Use wsadmin scripting to specify the following commands and then restart all affected node
agents:
set node NODE
set na_id [$AdminConfig getid /Node:$node/Server:nodeagent/]
set syncServ [$AdminConfig list ConfigSynchronizationService $na_id]
$AdminConfig modify $syncServ {{autoSynchEnabled false}}
$AdminConfig modify $syncServ {{synchOnServerStartup false}}
$AdminConfig save

set nodeSync [$AdminControl completeObjectName type=NodeSync,node=$node,*]
$AdminControl invoke $nodeSync sync
For a production environment, it is reasonable to always run the node agent with automatic synchronization disabled. However, it is advisable for startup synchronization to be enabled for the node agent so that it can acquire configuration updates that occur when the node agent is down. Startup Synchronization can remain enabled provided that you ensure that we will not restart the node agent manually, through automation, or through automatic restart manager during the application update process..
- In the administrative console:
- Update the application in the master configuration repository
on the deployment manager server. Perform one of the following processes to complete this step:
- In the administrative console:
- Click Applications > Enterprise Applications.
- Select the application we want to update.
- Complete the application update process.
- Save changes to the master configuration. DO NOT select the Synchronize changes with nodes option .
- Use wsadmin scripting to issue the following command:
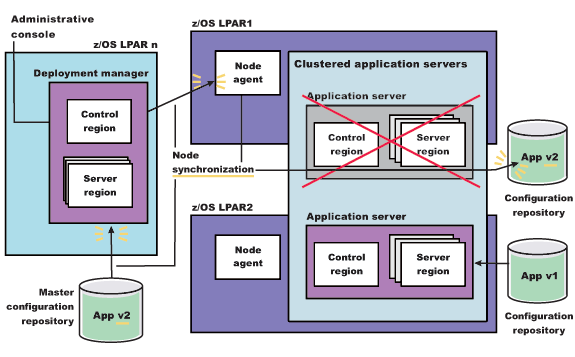
set app_loc /path/to/app
set app_options {application options ie: -appname app}
set options [list -update]  lappend options $app_options
$AdminApp install $app_loc $options
$AdminConfig save
At this point, we have the updated the version of the application (App v2 in the following figure) in your Master Configuration. However, the original version of the application (App v1 in the following figure) is still running in the cluster that has Cluster members on LPAR1 and LPAR2.
Figure 1. Install application update. This figure illustrates the first stage of an application update in a high availability environment.

- In the administrative console:
- Stop the Application Server on LPAR1 and manually synchronize
the node to the updated version of the application. This step may take time to complete because the server must wait for all currently assigned work items to complete before shutting down.
Perform one of the following processes to complete this step:
- In the administrative console:
- Click Servers > Server Types > WebSphere application servers.
- Select the cluster member we want to stop and update. This cluster member should be on LPAR1.
- Click STOP. The Cluster Stop method should not be used, because it will stop all Servers within the cluster and the application will no longer be available.
- Use wsadmin scripting: to issue the following commands:
set node NODE
set server SERVER
$AdminControl stopServer $server $node
- Issue the following command from the MVS Console:
STOP short_server
For example:STOP BBOS001
- In the administrative console:
- Synchronize the node. Perform one of the following processes to complete this step:
- In the administrative console:
- Click System Administration > Node agents.
- Select the node we want to synchronize> Full Resynchronize.
- Use wsadmin scripting to issue the following commands:
set node NODE
set nodeSync [$AdminControl completeObjectName type=NodeSync,node=$node,*]
$AdminControl invoke $nodeSync sync
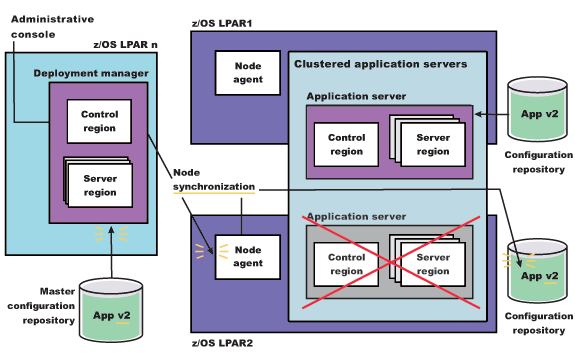
As illustrated in the following figure, the updated version of the application (App v2) now resides in the node on LPAR1.
Figure 2. Update the node on LPAR1. This figure illustrates the first stage of an application update in a high availability environment with two LPARs.
- In the administrative console:
- Restart the server on LPAR1. Perform one of the following processes to complete this step:
- In the administrative console:
- Click Servers > Server Types > WebSphere application servers.
- Select the server we want to start> START.
- Use wsadmin scripting to issue the following commands:
set node NODE
set server SERVER
$AdminControl startServer $server $node
- Issue the following command from the MVS Console:
START procname,JOBNAME=server_short_name.ENV=cell_short_name.node_short_name.server_short_name
For example:START BBO6ACR,JOBNAME=BBOS001,ENV=PLEX1.SY1.BBOS001
When this server comes back up, it will be running the new version of the application (App v2),
Figure 3. Restart the server on LPAR1. This figure illustrates the completion of the first stage of an application update in a high availability environment.
- In the administrative console:
- With the new version of the application running on LPAR1,
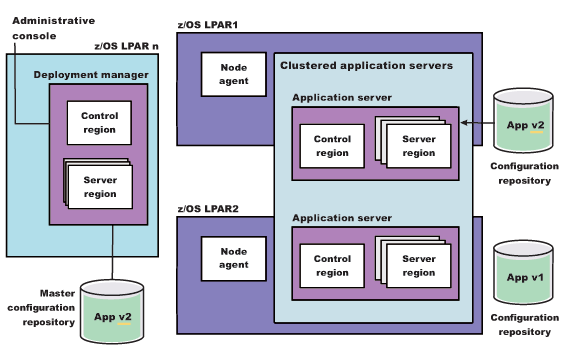
repeat the preceding three steps on the other LPARs in the cluster to update them with the new version of the application. The following figure illustrates what the configuration will look like
in a two LPAR cluster.
Figure 4. Update the node on LPAR2. This figure illustrates the second stage of an application update in a high availability environment.
The application update process is complete when the new version of the application is running on all of the cluster members in the cluster. The following figure illustrates what a two LPAR cluster will look like after you restart the server on LPAR2.
Figure 5. Restart server on LPAR2. This figure illustrates what a two LPAR cluster will look like after you restart the server on LPAR2.

Related: