WebSphere Security Hardening
Put the Web server in the DMZ without WebSphere Application Server
In a typical DMZ configuration, there is an outer firewall, the DMZ network containing as little as possible, and an inner firewall protecting the production internal network.
- Inbound network traffic from outside is terminated in the DMZ.
- Limit the type of traffic and number of open ports from the DMZ to the intranet.
- Harden components running in the DMZ. Follow the principle of least function and low complexity.
Place Web servers and secure proxy servers in the DMZ. Place WAS application servers inside the inner firewall. The only port that must be opened on the inner firewall is the HTTP(S) port for the target application servers.
Separate production network from intranet using firewalls
Separate production networks from internal network using firewalls.

Do not put the ODR in the DMZ
WAS V8.5 includes the on demand router (ODR), previously only available in WebSphere eXtreme Scale. Placement of the ODR in the DMZ is not supported.

The figure above shows the placement of the Java-based ODR server, and contrasts that with the on demand routing abilities available with the Application Optimization (AO) feature of IBM DataPower SOA Appliances. While the Java ODR is not to be placed in the DMZ, the DataPower SOA appliance is a hardened device suitable for placement in the DMZ.
Use HTTPS from the browser to the web server
HTTPS is encrypts passwords, user activities, session cookies, and LTPA security cookies.
Apply latest patches and fixes
Review latest fix packs for WAS.
Monitor the security bulletin site.
See WAS security.
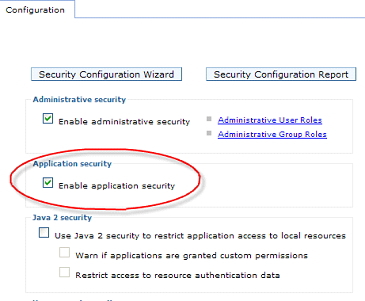
Enable application security
By default, WAS full profiles are defined with administrative security enabled. Administrative security encrypts WAS internal links between the deployment manager and the application servers, and traffic from the administrative clients (Web and command line) to the deployment manager.
To enable application security, go to the global security panel and select...
-
Enable application security
Enabling application security alone does not make applications secure. It merely makes it possible for applications to leverage security features provided by the application server (including Java EE security).
In a V8.5 Liberty profile, application security is enabled by including the appSecurity-1.0 element to the profile's server.xml file.
<featureManager>
     <feature>appSecurity-1.0</feature>
</featureManager>
Liberty profile: ldapRegistry vs quickStartSecurity vs. basicRegistry
To support developers who want to test that their application works with security, a quickStartSecurity registry can be used containing a single userid with a password. The basicRegistry permits multiple users and groups to be defined. Both these security registries are contained within server.xml.
Beyond testing environments, Liberty profiles should be configured to use the ldapRegistry feature.
Restrict access to WebSphere MQ messaging
WebSphere MQ by default does not perform any user authentication when using client/server mode. When we specify a user ID and password on the connection factory for WebSphere MQ, those values are ignored by WebSphere MQ.
One option is to implement a custom WMQ authentication plug-in on the WebSphere MQ server side to validate the user ID and password sent by WAS. A second, and likely simpler technique is to configure WebSphere MQ to use SSL with client authentication and then ensure that only the WAS server possesses acceptable certificates for connecting to WebSphere MQ.
To properly harden WebSphere MQ, substantial additional steps are required.
Harden the Web server and host
See Apache hardening information and Building Secure Servers with LINUX.
There are two ways that a Web server can be managed:
- Using a managed node requires that a node agent be placed on the Web server machine (which is typically in the DMZ) and that this agent be part of the WAS cell.
This is unacceptable from a security perspective and thus should not be used except in those rare cases where there is no need for a DMZ.
- Using an HTTP Server with an HTTP admin server.
The deployment manager sends administrative requests to the HTTP admin server running on the Web server host. While better than employing a Java-based node agent, many still consider this to be risky and prefer to have no administrative function in the DMZ.
Harden proxies
Secure proxies are typically not appropriate for proxying Web services traffic because they cannot block the types of threats that are possible when transmitting XML. To provide secure Web services, or any XML-based protocol, use an XML firewall such as WebSphere DataPower.
Certificate revocation
To revoke compromised certificates, we can use...
| Online Certificate Status Protocol (OCSP) | Requires setting additional system properties, as documented in the Java Certification Path API Programmer's Guide |
| Certificate Revocation List (CRL) | Found via a single end point or distribution point information embedded in the certificate. |
| Self Signed Certificates | To revoke, delete the corresponding signer. |
The Liberty profile does not support OCSP or Certificate Revocation List.
Certificate validation
Web servers validate certificates sent by web clients. The web server plug-in forwards certificate information from the Web server to the application server. The information forwarded is used to map certificates to a Java EE identity. Alas, the information is just a description of the certificate (information available in the public certificate). If an intruder can connect directly to the Web container, bypassing the Web server, the intruder could forge certificate information and trick the runtime, enabling them to become anyone. To block this vulnerability there are two cases to consider.
- To use certificates to authenticate to the Web server and then have those certificates be available to the Web container for authentication, authenticate the Web server to Web container link.
- To use certificates to authenticate directly to the Web container, configure the Web container to ignore certificate information in the HTTP headers. In this scenario, such information would always be a forgery. To do this, we must configure the "trusted" custom property on the Web container for each application server and set its value to false.

To configure the Liberty web container to ignore certificate headers from clients, include the webcontainer trust element to the profile's server.xml file...
- <webcontainer trusted='false'/>
To support certificate authentication to the Web server and the Web container, a custom TAI or application code will need to be developed to leverage IBM specific features that make it possible for code running in the Web container to determine if the certificate information available via the Java EE APIs is that of someone connecting directly to the Web container (and thus trustworthy) or derived from HTTP headers (in which case not inherently trustworthy).
Don't run samples in production
Samples bundled with WAS are not intended for use in a production environment. In particular, the snoop servlet can provide a lot of information about our system. The server1 application server by default contains the samples.
Protect configuration files and private keys
During development, maximum security is neither necessary nor productive. During production, we lock down WAS as much as possible.
Limit file system access to WAS's files by leveraging operating system file permissions. In general, almost no one should have read or write access to most of the WAS information. In particular, the WAS configuration files (<root>/config) contain configuration information as well as passwords.
Password encryption for WebSphere security files
We can configure our own custom password encoder to whatever protection we deem appropriate. To do this we implement the plugin interface...
-
com.ibm.wsspi.security.crypto.CustomPasswordEncryption
...and then specify two custom security properties in security.xml. We can also set these in PropFilePasswordEncoder.bat. The two properties are:
- com.ibm.wsspi.security.crypto.
customPasswordEncryptionClass - com.ibm.wsspi.security.crypto.
customPasswordEncryptionEnabled.
Encrypting these WAS passwords may not provide any meaningful protection over and above what is provided by encoding. If someone has access to the file containing the passwords, neither encoding nor encryption prevents someone for accessing the password. Anyone with file access to the encrypted password still has access to the raw password. That's because the key/certificate used for encryption must be stored on the file system so that the WAS process can decrypt the password and send it to wherever it is needed. Anyone with access to the file system has access to both the file with the (encrypted) passwords and the keys, which can then be used to decrypt the password.
Avoid incidental sharing of these keys. For example, do not use the same keys in production as in other environments. Many people will have access to development and test machines and their private keys. Guard the production keys carefully.
If we do not carefully control who has write access to the file system, a user can subvert the product security controls (such as auditing) by simply hand editing the configuration files.
Encrypt WAS to LDAP link
When using an LDAP registry, WAS verifies a user's password using the standard ldap_bind. This requires that WAS send the user's password to the LDAP server. If that request is not encrypted, a hacker could use a network sniffer to steal the passwords of users authenticating (including administrative passwords!). Most LDAP directories support LDAP over SSL, and WebSphere Application Server can be configured to use this.
- Create a new SSL configuration just for LDAP.
- On the LDAP user registry panel, check the option...
-
SSL enabled
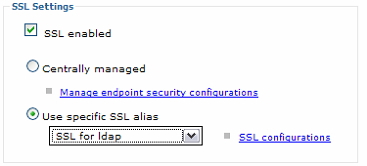
- Place the signing key for the LDAP server's certificate into the trust store.
To enable LDAP SSL for the Liberty profile, include elements in the server's server.xml...
<featureManager>
     <feature>ssl-1.0</feature>
</featureManager>

<ssl id="ldapSSLConfig"
     keyStoreRef="ldapTrustStore"
     trustStoreRef="ldapTrustStore"/>

<keyStore id="ldapTrustStore"
          location="ldapTrustStore.jks"
          type="JKS"
          password="123456" />

<ldapRegistry id="IBMDiretoryServerLDAP"
              realm="SampleLdapIDSRealm"
              host="host.domain.com"
              port="389"
              ignoreCase="true"
              baseDN="o=domain,c=us"
              ldapType="IBM Tivoli Directory Server"
              idsFilters="myidsfilters"
              sslEnabled="true"
              sslRef="ldapSSLConfig" />
Ensure LTPA encryption keys are changed periodically
WAS encrypts various user tokens (including the LTPA cookie) using what are known as the LTPA encryption keys. As with any cryptographic keys, these should be changed periodically. Depending on our WAS version and patch level, automatic key generation might be on or off by default; the more recent the version, the more likely it is off by default. To avoid possible outages, ensure that this feature is off.
LTPA keys are generated when security is enabled for a Liberty server for the first tie.
We should ensure that our LTPA keys are changed periodically. For full profiles, we can do this by either enabling the automatic LTPA key replacement, or we can manually regenerate the keys or via the commands...
-
AdminTask.generateKeyForKeySetGroup
For the Liberty profile, create a new profile, enable security, start the server, then copy the newly generated ${server.config.dir}/resources/security/ltpa.keys file.
Make sure that we consider the problems of LTPA keys becoming inconsistent:
- First, if some nodes in our cell are left down for extended periods of time (and the keys change twice), the nodes can lose the ability to communicate.
- Second, if our LTPA keys are shared with something else (such as another cell or WebSphere DataPower), then when the keys change, we'll need to update them everywhere -- typically causing an outage.
Therefore, plan to change our LTPA keys during a scheduled outage. Distribute the new keys to all nodes in the cell, and to all external systems/cells during this outage window.
Do not enable automatic LTPA key updates...

Manually generate new LTPA keys

Don't specify passwords on the command line
Once security is enabled, the WAS administrative tools require that we authenticate in order to function. The obvious way we would think to do this is to specify the user ID and password on the command line as parameters to the tools. Do not do this. This exposes our administrative password to anyone looking over our shoulder. And, on many operating systems, anyone that can see a list of processes can see the arguments on the command line. Also, previous commands are visible in the command history, including those password arguments. Instead, we should ensure that the administrative tools prompt for a user ID and password. Be aware that in all currently supported versions of WebSphere Application Server this is the default, so no explicit actions are needed to insure that this occurs.
If we find it annoying that the command line tools prompt graphically for a user ID and password, we can override this behavior and force the tools to use a simple text-based prompt. To do this, we must change the loginSource from prompt to stdin by editing the appropriate configuration file. By default, the administrative tools use SOAP and thus the soap.client.props file should be edited. If we are using RMI, edit sas.client.props. Look for the loginSource property in the appropriate file and change it to specify stdin.
This item does not apply to the Liberty profile in V8.5.
Salt the file-based Federated Repository registry
Users in a Federated Repository registry and the built-in file repository have their userids and passwords stored in...
-
cell_config_directory\fileregistry.xml
These passwords are one-way hashed, which means that we cannot derive the actual password from the hashed value. The hashes are computed with some cryptographic salt. In WAS V8.0 and 8.5 it is possible to specify the length of that salt and the hashing algorithm used. This file should be protected by OS-defined access control lists so only privileged OS users should be able to read the file. To prevent against password cracking attacks via rainbow tables, consider increasing the amount of salt or using a stronger hashing function.
This item does not apply to the Liberty profile in V8.5.
Use longer key lengths for generated certificates
In WAS V8.0 the default key length used for generated certificates changed from 1024 to 2048. The admin console supports choosing the key length. The supported key length range is 512-16384 (must be a multiple of 8).

This item does not apply to the Liberty profile in V8.5.
Create separate administrative user IDs
When security is configured (except for Liberty profiles), a single primary administrative ID is initially configured. This ID is effectively the equivalent of root in WAS and can perform any administrative operation. Ideally, this ID should not be used after initial configuration.
To specify additional users or groups that should be granted administrative authority, go to the system administration console Users (or Groups) section. Each individual person can authenticate as himself or herself when administering WAS. All administrative actions that result in changes to the configuration of WAS are audited by the deployment manager, including the identity of the principal that made the change. Use the auditing framework to provide detailed information on administrative actions. Audit records are more useful if each administrator has a separate identity.
The approach of giving individual administrators their own separate administrative access can be particularly handy in an environment where central administrators administer multiple WAS cells. We can configure all of these cells to share a common registry, and thus the administrators can use the same ID and password to administer each cell, while each cell has its own local "root" ID and password.
The primary administrative ID should not be confused with the security server ID, which is used for server to server communication. The server ID does not have to exist in the registry, or even have a password. By default, the server ID is only used for internal communication. We can specify a server ID and password if needed, however this is not recommended except when absolutely necessary, for example, when working with a mixed version cell (including V6.0 and earlier) or cross cell SSO with V6.0 or earlier
Leverage administrative roles
The full (non-Liberty) profiles of WAS allows for a variety of administrative roles depending on the version: Administrator, Operator, Monitor, Configurator, AdminSecurityManager, iscadmins, Deployer, Auditor. These roles make it possible to give individuals (and automated systems) access appropriate to their level of need. For example, we can give the less senior administrators just the ability to start and stop servers and the night operators just the ability the watch the system (monitor).
Three interesting roles:
| Monitor | Ability to monitor the system state; the state cannot be changed, nor can the configuration be altered. For example, if we develop monitoring scripts that check for system health and have to store the user ID and password locally with the script, use an ID with the monitor role. Even if the ID is compromised, little serious harm can result. |
| AdminSecurityManager | Ability to grant other users administrative roles. The Administrator role itself does not have that authority. Now, we can grant people various authorities (even Administrator authority) and still know that they cannot grant those authorities to others. |
| Auditor | Ability to configure the auditing system and nothing else. Administrators on the other hand can configure anything but the auditing system. This provides a clear separation of duties. An administrator can change the configuration, but cannot "wipe out" his tracks because he can't disable auditing. |
This item does not apply to the Liberty profile in V8.5. The Liberty profile has only a single Administrator security role to which multiple principals can be bound.
Encrypt Web server to Web container link
Even if we have chosen not to authenticate the link from the Web server to the Web container, we might want to consider encrypting it. The Web server plug-in transmits information from the Web server to the Web container over HTTP. If the request arrived at the Web server using HTTPS, the plug-in will forward the request on using HTTPS by default. If the request arrived over HTTP, HTTP will be used by the plug-in. These defaults are appropriate for most environments. There is, however, one possible exception.
In some environments, sensitive information is added to the request after it has arrived on the network. For example, some authenticating proxy servers (such as WebSEAL) augment requests with password information. Custom code in the Web server might do something similar. If that's the case, we should take extra steps to protect the traffic from the Web server to the Web container.
To force the use of HTTPS for all traffic from the plug-in, simply disable the HTTP transport from the Web container on every application server and then regenerate and deploy the plug-in. We must disable both the WCInboundDefault and the HttpQueueInboundDefault transport chains. Now, the plug-in can only use HTTPS and so it will use it for all traffic regardless of how the traffic arrived at the Web container.

To ensure HTTPS only to the Web container in the Liberty profile, include an httpEndpoint element in the server's server.xml that includes an httpsPort attribute, but does not include an httpPort attribute...
- <httpEndpoint id="defaultHttpEndpoint" host="localhost" httpsPort="9443" />
Encrypt WebSphere MQ messaging links
If we are using WebSphere MQ rather than the default messaging provider, we should of course use SSL to WebSphere MQ. See Related topics for more information on that. In WAS V7, WebSphere MQ client SSL configuration is a first class construct and can be done using the admin console much like other SSL configuration.
This item does not apply to the Liberty profile in V8.5.
Encrypt distribution and consistency services (DCS) transport link
Core groups rely on DCS, which uses a reliable multicast message (RMM) system for transport. RMM can use one of several wire transport technologies. Depending on our environment, sensitive information might be transmitted over DCS. For example, data in DynaCache and the security subject cache are transmitted using DCS. To ensure this, select a transport type of channel framework and DCS-Secure as channel chain for each core group
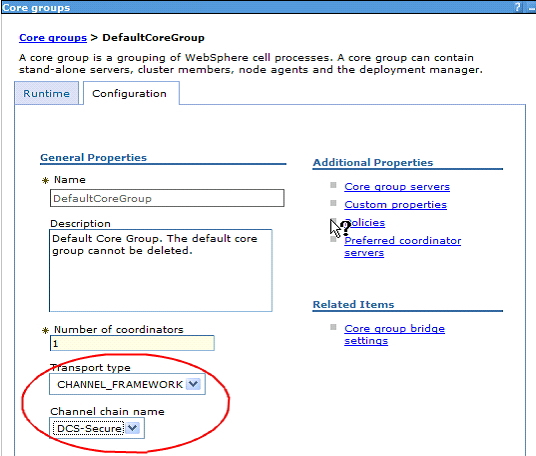
Be aware that DCS always authenticates messages when global security is enabled. Once the transport is encrypted, we then have a highly secure channel.
Once we have done this, all services that rely on DCS are now using an encrypted and authenticated transport. Those services are DynaCache, memory-to-memory session replication, core groups, Web services caching, and stateful session bean persistence.
Protect application server to database link
Just as with any other network link, confidential information can be written to or read from the database. Most databases support some form of network encryption and we should leverage it.
Here is an IBM DB2 example.
This item does not apply to the Liberty profile in V8.5.
Restrict cookies to HTTP only
If hackers are able to compromise a Web application by inserting malicious JavaScript into the browser (this is commonly known as cross-site scripting), then they can do any number of malicious actions and the application is essentially compromised. One of the many malicious things they can do is steal sensitive cookies such as the LTPA cookie. Most recent Web browsers support a concept known as HTTP Only cookies.
WAS provides two ways to ensure that the LTPA cookie is marked as HTTP Only. The first way is enabled by setting this security custom property to true:
-
com.ibm.ws.security.addHttpOnlyAttributeToCookies
This feature only protects the LTPA cookie with the HTTP Only flag. For a properly written application that leverages Java EE security and enables session security (discussed later), that should be sufficient.
A second feature, also shipped in fixpack 7.0.0.9, makes it possible to set the HTTP Only flag on arbitrary cookies. This feature is preferable to the first feature as it is more flexible and more complete. With this APAR, the cookies to protect are controlled by a Web container property, com.ibm.ws.webcontainer.httpOnlyCookies. That property is a comma separated listed of cookies to protect (with * indicating all cookies). In V7.0 (with 7.0.0.9 applied) this feature is disabled by default. To exploit it, we must explicitly set the property. In both versions 8.0 and 8.5 this attribute is enabled by default for the LtpaToken2, JSESSIONID, and WASReqUrl cookies, and no further action is required unless we want to apply it to other cookies. Be aware that users migrating from earlier versions might experience application breakage as a result of this change in default behavior.
By default, the LtpaToken2 (SSO), and the WASReqURL cookies are set to be HTTP only in the Liberty profile. To explicitly set this in the server's server.xml, include a webAppSecurity element that includes an httpOnlyCookies attribute...
- <webAppSecurity httpOnlyCookies='true' /><!- - This is the default- ->
By default, the HTTP session is also set to be HTTP only in the Liberty profile. To explicitly set this in the server's server.xml, include an httpSession element that includes an cookieHttpOnly attribute, such as that shown in the example in Listing 8.
Listing 8. Restricting HTTP Session cookies to HTTP only in Liberty
- cookieHttpOnly='true' /><!- - This is the default- ->
Caution: While these features may seem to be a solution for cross-site scripting, they are not. If a hacker can execute arbitrary code in our browser, he can do far more damage than just steal our cookies. They can actually see everything on the browser screen and capture every key stroke -- far more disturbing than stealing a cookie.
Train users to properly understand certificate warnings
When using SSL for communication, a key element of the secure exchange is validation of the server's certificate against the client trust store. Should the server present a certificate that is not trustworthy because the corresponding signer is not in the trust store, most clients (Web browsers, SSH, wsadmin, and so on) will prompt the user to decide what to do. These clients typically warn the user about the unknown certificate and present a fingerprint (typically SHA) for the certificate and ask should I trust this? Unfortunately, most users blindly click yes. That's a terrible decision. If we do this, we have no idea what server we are talking to. And, in the case of WebSphere Application Server administrative clients, the next thing we will do is send our administrative user ID and password to an unknown source.
Instead, administrators (and ideally end users) should examine the fingerprint information and determine if it is the correct fingerprint. The admin tools provide a way to see the fingerprint for certificates. Selecting a personal certificate in the admin console displays its fingerprint.
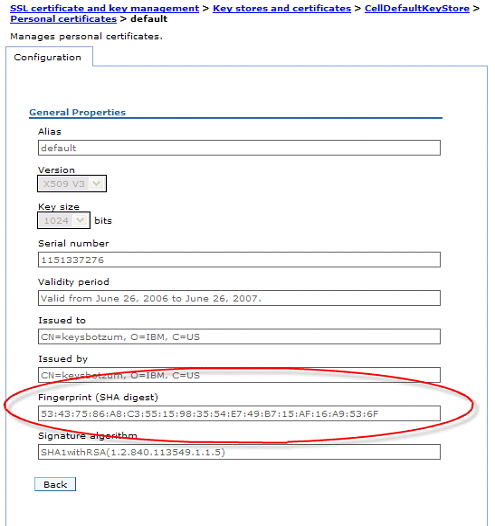
Users (particularly administrators) should be made aware of the fingerprint information and then, ideally, should validate it when prompted by a client, be it a Web browser or wsadmin.
Web server certificate warning, Part 1

Web server certificate warning, Part 2

wsadmin certificate warning...
./wsadmin.bat
*** SSL SIGNER EXCHANGE PROMPT ***
SSL signer from target host localhost is not found in trust store
	C:/IBM/WebSphere/AppServer/profiles/AppSrv02/etc/trust.p12
Here is the signer information (verify the digest value matches what
	is displayed at the server):
Subject DN:    CN=keysbotzum, O=IBM, C=US
Issuer DN:     CN=keysbotzum, O=IBM, C=US
Serial number: 1151337276
Expires:       Tue Jun 26 11:54:36 EDT 2007
SHA-1 Digest:  53:43:75:86:A8:C3:55:15:98:35:54:E7:49:B7:15:AF:16:A9:53:6F
MD5 Digest:    29:36:B1:9C:22:5A:36:AD:78:B3:7E:FD:D3:B1:B4:19
Add signer to the trust store now? (y/n)<
Even if we don't follow this advice, at least when we get this challenge the first time, import the certificate into the client trust store. If we get message again, find out why! The prompt should not happen again until the certificate is changed. If we get that prompt unexpectedly, something could be terribly wrong.
Limit size of HTTP data
A common Denial Of Service (DOS) attack is to send an application very large HTTP headers, a large number of HTTP headers, or a large request body. We strongly believe in defense in depth. Ideally, an intrusion detection system, a firewall, a WebSphere DataPower SOA Appliance, or even the web server in front of the application server should be protecting our WAS from these size-based HTTP attacks. There are also controls in WAS to protect itself from these kinds of attacks.
The default maximum size of any single HTTP header is 32768 bytes. This can be set to a different value.
The default maximum number of HTTP headers is 50. This can be set to a different limit.
Another common DOS attack is to send a request resulting in a long running GET request. The ServerIOTimeoutRetry property in the WebSphere Application Server Plug-in can limit the number of retries on any request. This can reduce the effect of such a long running request. See the Information Center for details.
If we wish to limit the maximum size of any request body, this can also be set. For details, see the Information Center
Carefully limit trusted signers
When using certificate authentication (client or server), we need to understand that each signer in the trust store represents a trusted provider of identity information (a certificate). We should trust as few signers as possible. Otherwise, it is possible that two signers might issue certificates that map to the same user identity. That would create a serious security hole in our architecture.
We should review the trust stores on the clients and servers and remove any signers which are not needed. By default, the trust stores contain far fewer trusted signers than in previous releases, in keeping with the goal of being secure by default. There are, however, still a few signer issues we might wish to address:
- In V7, the default cell trust store and CMS keyring files contain a WebSphere DataPower signing certificate, meaning that all DataPower machines can issue certificates that the application servers will trust. This should be removed for maximum security. Truststores and CMS keyring files created after recent fixpacks are installed are created without the DataPower signing certificate. We should check our truststore or keyring for this unneeded DataPower signing certificate and remove it if there.
- In V8.0 and V8.5, the DataPower signing certificate has been removed from generated truststores and CMS keyring files.
Hostname verification on outbound SSL connections
When an SSL client opens an SSL connection to an SSL server, the server sends its certificate to the client. The expectation is that the SSL server's certificate will contain the hostname in its common name. Some clients confirm the common name on the certificate presented matches the hostname in the URL (for example, web browsers perform this check). This is called hostname verification.
In certain situations, a failure of this verification can be indicative of an SSL man-in-the-middle attack:
- When the certificate is trusted because it is self-signed, hostname verification is not necessary. The SSL handshake would not pass unless the certificate presented was an exact match of the trusted certificate.
- When the certificate is trusted because it is issued by a trusted CA, then a MITM attacker could return its legitimate certificate issued by the same trusted CA in place of the real certificate. Assuming that the CA does not issue more than one certificate with the same CN, verification of the hostname could detect the MITM attacker.
To enable hostname verification, set security custom property...
-
com.ibm.ssl.performURLHostNameVerification=true
The hostname verification is performed as required by RFC 2818 Section 3.1 Server Identity...
- If the URI is specified as an IP address rather than a hostname, verification is performed using iPAddress subjectAltName in the certificate and must exactly match the IP in the URI.
- If the URI is specified using a given DNS name, verification is performed using the certificate's subjectAltName extension of type dNSName, if present. Otherwise, the (most specific) Common Name field in the Subject field of the certificate is used. Although the use of the Common Name is existing practice, it is deprecated and Certification Authorities are encouraged to use the dNSName instead.
Matching is performed using the matching rules specified by RFC2459. If more than one identity of a given type is present in the certificate (for example, more than one dNSName name, a match in any one of the set is considered acceptable.)
Considerations when this property is set:
- This property effects all URL based SSL traffic in the cell, including IIOP and WAS internal communications.
- During the creation of a WAS profile, we are permitted to configure the hostname of the node for the profile. We can override the value determined by the profile creation tool. Make sure it matches the hostname.
- If our system is multi-homed, with multiple hostnames, remember that only the single hostname of the SSL configuration's keystore's default certificate will be returned. It is possible to create a certificate with alternative hostnames; this is possible when acquiring the certificate from a CA.
In other words, while enabling this property can strengthen our security posture against man-in-the-middle attacks, our SSL certificates and hostname resolution must be impeccable. If it is not, our cell might no longer communicate over SSL because the internal communications might fail hostname verification.
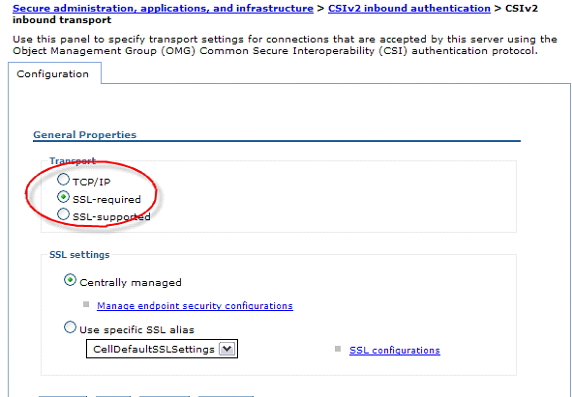
Enforce CSIv2 transport SSL use
(This item is addressed by default in V8, which is a change in behavior. As such, users migrating from earlier versions of WebSphere Application Server who had not enabled CSIv2 SSL should be aware that SSL authentication failures can result in V8 as a result.)
When WAS servers and clients communicate using CSIv2 IIOP, they negotiate the transport security. Whatever is acceptable to both parties is chosen. Generally, that is fine, but we should be aware of one potential weakness. WAS supports CSIv2 over SSL or clear text. By default, both parties will typically negotiate to use SSL, thus ensuring an encrypted communication channel. However, if either party in the negotiation requests clear text, then clear text will be used. We might not even realize our traffic is being sent in the clear! This might happen, for example, if a client was mis-configured. To guarantee that traffic is encrypted (and we should), it is safer to ensure that SSL is always used.
We can ensure that SSL is used for IIOP by indicating that it is required, and not optional, on the CSIv2 inbound transport panel. We should do the same for the CSIv2 Outbound Transport
This item does not apply to the Liberty profile in V8.5, since there is no support for EJBs or for CSIv2.
Port filtering
We can limit who can connect based upon network information. Most of the transports in WAS (with the exception of IIOP) leverage the Channel Framework, which in turn makes it possible to filter inbound traffic based on IP address or DNS name using an inclusion or exclusion list.

Note that IP address forgery is a fairly easy thing to do, and so relying on IP addresses for security is unwise. It is particularly unwise to filter based on IP address at the application layer. Firewalls and switches are better equipped to recognize when packets are coming from IP addresses that could not be valid. They can also check MAC addresses.
Disable unused ports
To minimize the attack surface for potential attacks, we disable unused ports.
-
Application servers | servername | Ports
Potential candidates...
| SAS_SSL_SERVERAUTH_LISTENER_ADDRESS | Used for compatibility with WAS V4 and earlier releases. This is the old IIOP security protocol. CSIv2 replaces it as of V5. |
| SIB_ENDPOINT_* | Used by the built-in messaging engine. If we aren't using messaging, then we don't need either. |
| SIB_MQ_* | Used by the messaging engine when connecting with WebSphere MQ. |
| SIP_* | Used by the SIP container. |
| WC_adminhost* | Used for administrative Web browser access. If our application server is not a deployment manager, we should disable these ports. Most application server Web containers are listening on two administrative ports even though there is no administrative application on those servers. This is because servers are usually created based on the server1 template that includes those ports. Disable or remove those ports from all of our application servers. |
| WC_defaulthost* | Default Web container listening ports. Not required if we have custom listener ports. |
Different ports require different techniques for disabling them depending on how they are implemented:
- The SAS_SSL_SERVERAUTH_LISTENER_ADDRESS can be taken out of service by selecting CSI as the active protocol on the global security panel. SAS is disabled by default in V7 although the port is still listed.
- The WC_* ports are all for the Web container. They can best be removed, modified, or disabled from the Web container transport chain configuration panel (Application servers > servername > Web container > transport chain). The only listening Web ports we need are those used by our applications.
- The SIB_* ports are not started unless the messaging engine is enabled, so no action is necessary for them.
- The SIP_* ports are not started unless SIP applications are started, so no action is necessary for them either.
Caution: Use extreme care when determining which ports to disable and when actually disabling them. Otherwise, we might inadvertently disable one of the administrative ports, which will leave we without a mechanism to administer the process -- short of deleting and recreating the process (for example, server) definition.
Disable password caching
When password based authentication occurs, the runtime caches the password as a one way hash for future validation. Since the hash is not reversible, there is no danger in the password being captured (even from a memory dump) but this cache does have implications. When future requests arrive that require authentication, and they use the same user ID and password combination, the cached password data (and user information) will be used. This means that if a user's password is changed in the registry, he will still be able to authenticate using the old password until the cache expires (10 minutes by default).
Some consider this to be a security vulnerability. We can disable password caching with the JVM level property setting of...
-
com.ibm.websphere.security.util.authCacheEnabled = BasicAuthDisabled
Once set, passwords will no longer be cached and all password authentications will result in a query of the registry. Keep in mind that this can have significant negative performance implications. For a protocol that is stateless and authenticates on every request (such as WS-security with UserNameTokens), this can generate heavy registry authentication traffic.
Enable security integration
To enable session security integration, in the WebSphere Integrated Solutions Console, click...
-
Servers | Server Types | WebSphere Application Servers | WebSphere Portal | Web Container Settings | Web Container | Session Management | Security Integration

By default, the Java Cryptography Extension (JCE) is shipped with restricted or limited strength ciphers. To use 192-bit and 256-bit Advanced Encryption Standard (AES) encryption algorithms, you must apply unlimited jurisdiction policy files.
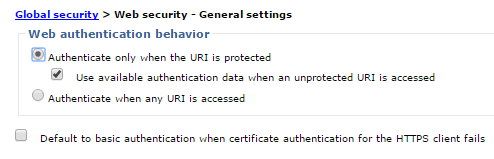
Use available authentication data for unprotected URIs
Enable WAS to create a security context on requests to unprotected URIs if valid credentials such as an LtpaToken or LtpaToken2 cookie are available on the request:
-
Security | Global Security | Web and SIP security | General Settings | Use available authentication data when an unprotected URI is accessed
Restrict cookies to HTTPS sessions
Go to...
-
Servers | Server types | WebSphere application servers | server_name | Session management | Enable cookies
...and enable "Restrict cookies to HTTPS sessions"

Firebug will show whether this is enabled via the isSecure data in the cookie.

After setting, connect to portal using the HTTPS protocol. Using HTTP protocol will throw permission exceptions when using portlets such as the WCM authoring portlet and the Manage Pages portlet.
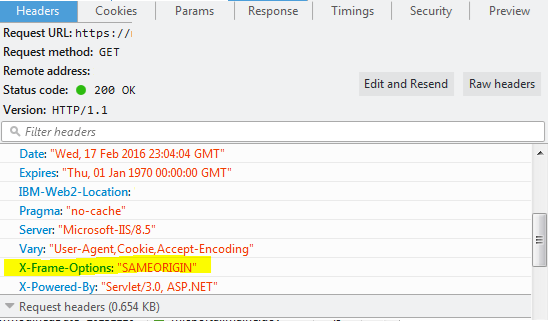
Set X-Frame-Options to SAMEORIGIN
To avoid clickjacking attacks, and ensure that content is not embedded into other sites, we disallow browsers from rendering pages in a <frame>, <iframe> or <object>.
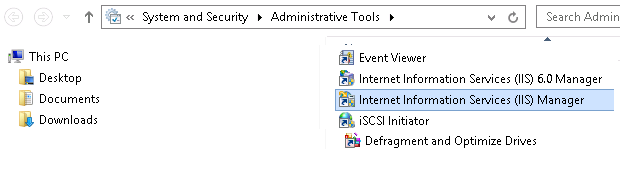
- On each IIS web server host, go to...
-
Control Panel | System and Security | Administrative Tools | Internet Information Services Manager
- From IIS Manager, select...
-
Sites | Default Web Site | HTTP Response Headers | Add

- Set...
Name X-Frame-Options Value SAMEORIGIN 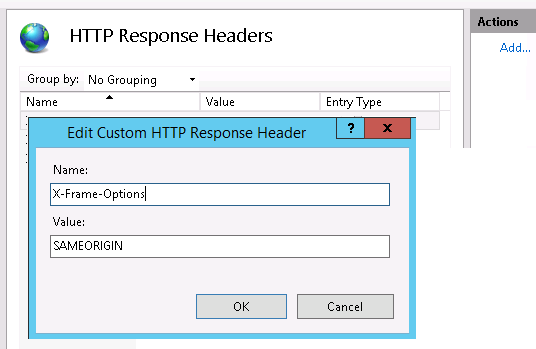
Once saved, changes are written to web.config...
<system.webServer> ... <httpProtocol> <customHeaders> <add name="X-Frame-Options" value="SAMEORIGIN" /> </customHeaders> </httpProtocol> ... </system.webServer> - Restart IIS to load change.
Open a 'cmd" prompt as an administrative user
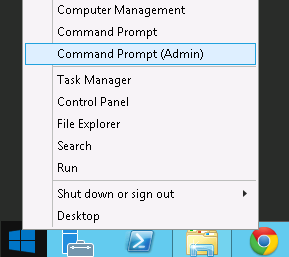
...and run...
-
iisreset
- Use Firebug to verify setting.
See also: Mitigating framesniffing with the X-Frame-Options header
Configure portal to run as a non-privileged account
- Create service account, for example, SERVICE-PORTAL, on local machine or domain.
- Set folder permissions for the new account.
- Right-click on the C:\IBM folder, and select...
-
Properties | Security Tab | Edit button Add
- Enter account name, then select Accept
- On return to the security tab, select...
-
Account | Access
- Grant Full Control and Inherit to all child files and directories

- Right-click on the C:\IBM folder, and select...
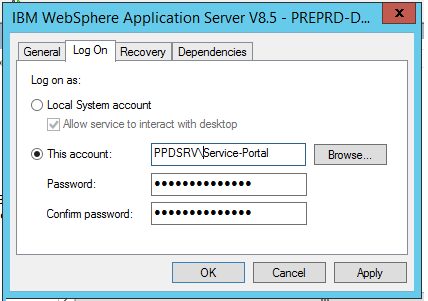
- Update Portal Windows services with service account and password
- Stop all IBM WAS services
For standalone services this will be the singled IBM Portal Windows service, for a cluster this will be the DMGR, search, node agent and the IBM Portal Windows Services
- DMGR Node Services

- Portal Node(s)

- DMGR Node Services
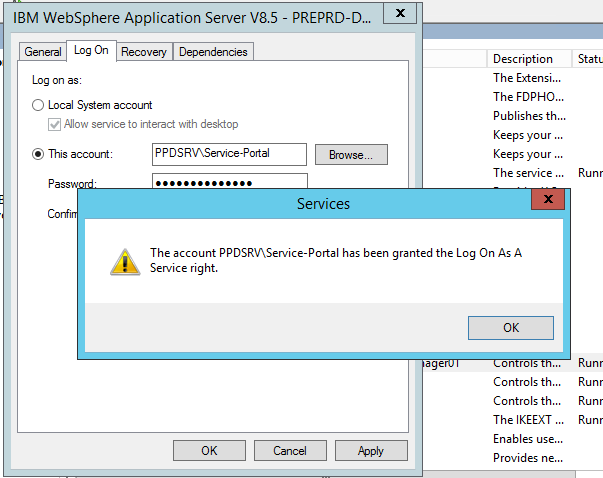
- In Service applet select the IBM service properties, the select "Log On" tab, and provide service account name and password. For the first service you will be prompted for allowing the account to run as a service, select okay.
- Provide service credentials
- Accept "Grant Log On As A Service" right
- Restart each service
- Stop all IBM WAS services
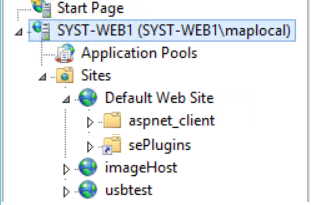
Block public internet access to administrative pages
Public internet requests go through load balancer, to web server, to portal. With this procedure we block access to administrative pages from the web server level. Direct requests to portal administrative pages will still be successful.- Log on to the Web server computer as an administrator.
- Install URLRewriteModule feature
To install Microsoft URL Rewrite Module 2.0 for IIS 7:
-
msiexec /I rewrite_amd64
To uninstall, right-click on rewrite_amd64, then choose uninstall
- Correct the load order of IIS modules
- Make a copy of applicationHost.config
- Edit applicationHost.config
-
notepad C:\Windows\System32\inetsrv\config\applicationHost.config
- Search for RewriteModule in the <GlobalModules> section, and move the line to be above the IsapiFilterModule module.
- Save the file.
- Restart IIS
- Open Internet Services Manager
-
Start | Settings | Control Panel | Administrative Tools | Internet Services Manager
- Go to the Server view
- Click...
-
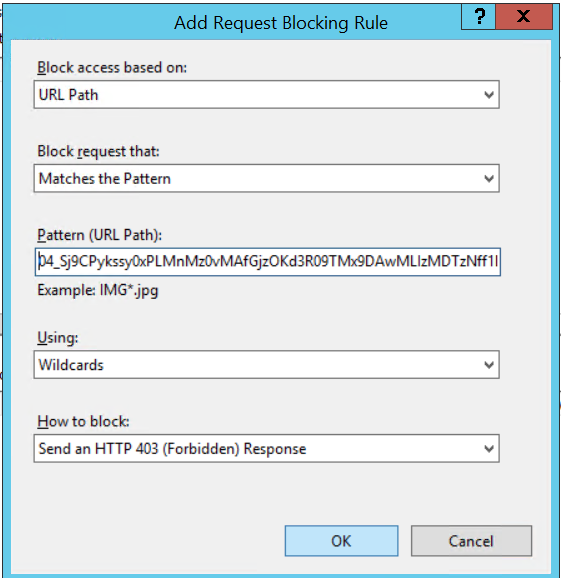
URL Rewrite icon | Actions | Add Rules | Inbound rules | Request blocking
- Examples of pages to block...
-
*/04_Sj9CPykssy0xPLMnMz0vMAfGjzOKd3R09TMx9DAwMLIzMDTzNff1DPXwCDN39zfQLsh0VAd7eW54!/*
*Administration*The first, obfuscated URL context, goes to an administrative page. This URL context is the same across all portal environments.
No IIS restart is required.
- Verify page is blocked. For example.
-
https://myhost:7443/Administration
https://myhost:7443/wps/portal/Administration

Prevent HTTP TRACE requests to the server
Perform the following to update request filtering to deny the verb for TRACE...
- Open Internet Information Services Manager...
-
Control Panel | System and Security | Administrative Tools
- Double-click Request Filtering.
- In the Request Filtering pane, click the HTTP verbs tab, and then click Deny Verb... in the Actions pane.
- In the Deny Verb dialog box, enter the HTTP verb to block, and then click OK.
To prevent HTTP TRACE requests to the server, enter "TRACE" in the dialog box.

Redirect IIS home requests to portal
Edit...
-
C:\inetpub\wwwroot\iisstart.htm
..and add the following after the <head> tag.
Prod...
<!-- Pleace this snippet right after opening the head tag to make it work properly -->

<!-- This code is licensed under GNU GPL v3 -->
<!-- We are allowed to freely copy, distribute and use this code, but removing author credit is strictly prohibited -->
<!-- Generated by http://insider.zone/tools/client-side-url-redirect-generator/ -->

<!-- REDIRECTING STARTS -->
<link rel="canonical" href="https://myportal.state.gov/wps/portal"/>
<noscript>
        <meta http-equiv="refresh" content="0;URL=https://myportal.state.gov/wps/portal">
</noscript>
<!--[if lt IE 9]><script type="text/javascript">var IE_fix=true;</script><![endif]-->
<script type="text/javascript">
        var url = "https://myportal.state.gov/wps/portal";
        if(typeof IE_fix != "undefined") // IE8 and lower fix to pass the http referer
        {
                document.write("redirecting..."); // Don't remove this line or appendChild() will fail because it is called before document.onload to make the redirect as fast as possible. Nobody will see this text, it is only a tech fix.
                var referLink = document.createElement("a");
                referLink.href = url;
                document.body.appendChild(referLink);
                referLink.click();
        }
        else { window.location.replace(url); } // All other browsers
</script>
<!-- Credit goes to http://insider.zone/ -->
<!-- REDIRECTING ENDS -->
Syst...
<!-- Pleace this snippet right after opening the head tag to make it work properly -->

<!-- This code is licensed under GNU GPL v3 -->
<!-- We are allowed to freely copy, distribute and use this code, but removing author credit is strictly prohibited -->
<!-- Generated by http://insider.zone/tools/client-side-url-redirect-generator/ -->

<!-- REDIRECTING STARTS -->
<link rel="canonical" href="https://myportalsupport.state.gov:7443/wps/portal"/>
<noscript>
        <meta http-equiv="refresh" content="0;URL=https://myportalsupport.state.gov:7443/wps/portal">
</noscript>
<!--[if lt IE 9]><script type="text/javascript">var IE_fix=true;</script><![endif]-->
<script type="text/javascript">
        var url = "https://myportalsupport.state.gov:7443/wps/portal";
        if(typeof IE_fix != "undefined") // IE8 and lower fix to pass the http referer
        {
                document.write("redirecting..."); // Don't remove this line or appendChild() will fail because it is called before document.onload to make the redirect as fast as possible. Nobody will see this text, it is only a tech fix.
                var referLink = document.createElement("a");
                referLink.href = url;
                document.body.appendChild(referLink);
                referLink.click();
        }
        else { window.location.replace(url); } // All other browsers
</script>
<!-- Credit goes to http://insider.zone/ -->
<!-- REDIRECTING ENDS -->
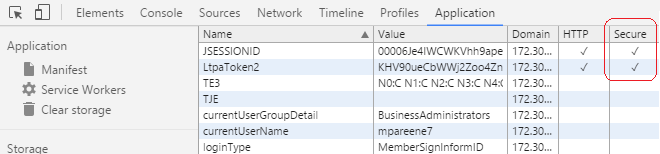
Secure LtpaToken2 cookie
Set secure flag for LtpaToken2 cookie...
- Enable...
- Security | Global Security | Web and Sip Security | Single Sign-On | Requires SSL

- Save changes. Sync nodes.
- Restart the DMGR, nodeagent(s) and Portal server(s).
- Chrome Devtools now shows LtpaToken2 as Secure...
To limit the HTTP Session cookie SSL only in the Liberty profile, include an httpSession element in the server's server.xml that includes the cookieSecure attribute...
- <httpSession cookieSecure='true'/>
IBMJCE setup
For each node, enable IBMJCE Random number generation algorithm...Edit...
-
C:\IBM\WebSphere\AppServer\java\jre\lib\security\java.security
Go to below section in the file...
-
security.provider.1=com.ibm.crypto.pkcs11impl.provider.IBMPKCS11Impl
security.provider.2=com.ibm.crypto.provider.IBMJCE
security.provider.3=com.ibm.jsse.IBMJSSEProvider
security.provider.4=com.ibm.jsse2.IBMJSSEProvider2
security.provider.5=com.ibm.security.jgss.IBMJGSSProvider
security.provider.6=com.ibm.security.cert.IBMCertPath
security.provider.7=com.ibm.security.cmskeystore.CMSProvider
security.provider.8=com.ibm.security.jgss.mech.spnego.IBMSPNEGO
security.provider.9=com.ibm.security.sasl.IBMSASL
security.provider.10=com.ibm.xml.crypto.IBMXMLCryptoProvider
security.provider.11=com.ibm.xml.enc.IBMXMLEncProvider
security.provider.12=org.apache.harmony.security.provider.PolicyProvider
...and add the second line, and change the line numbers starting from third line. After changes done this section should look like below.
-
security.provider.1=com.ibm.crypto.pkcs11impl.provider.IBMPKCS11Impl
security.provider.2=com.ibm.securerandom.provider.IBMSecureRandom
security.provider.3=com.ibm.crypto.provider.IBMJCE
security.provider.4=com.ibm.jsse.IBMJSSEProvider
security.provider.5=com.ibm.jsse2.IBMJSSEProvider2
security.provider.6=com.ibm.security.jgss.IBMJGSSProvider
security.provider.7=com.ibm.security.cert.IBMCertPath
security.provider.8=com.ibm.security.cmskeystore.CMSProvider
security.provider.9=com.ibm.security.jgss.mech.spnego.IBMSPNEGO
security.provider.10=com.ibm.security.sasl.IBMSASL
security.provider.11=com.ibm.xml.crypto.IBMXMLCryptoProvider
security.provider.12=com.ibm.xml.enc.IBMXMLEncProvider
security.provider.13=org.apache.harmony.security.provider.PolicyProvider
Restart the WebSphere Portal Server
Portal and IIS custom error pages
- Overview
- Set up error handling in Portal
- Customize the error page for WCM portlets
- Set up error handling in IIS
- Error Code Summary
Overview
This section describes adding custom error handling for a web application. We are configuring HTTP error code handling on both the portal and web server levels. URIs with an /wps portal root context, such as...
- https://myhost:10029/wps/business/foo
- https://myhost:10029/wps/test
...will be served a custom error page via from WAS. However, URIs that do not include portal root context, for example...
-
https://myhost:10029/test
...will be processed on the web server (IIS)..
Set up error handling in Portal
- Extract and backup wps.ear...
-
cd C:\IBM\WebSphere\wp_profile\bin
wsadmin.bat -user wpsadmin -password mypwd -c "$AdminApp export wps C:/scratch/wps.ear"
cd c:\scratch
copy wps.ear wps.ear.origIf you are deploying from a source to a target environment, you do not need to expand and edit wps.ear. Just copy exported ear to target system, then do import.
- Expand the wps.ear...
-
C:\IBM\WebSphere\wp_profile\bin\EARExpander.bat -ear wps.ear -operationDir c:/scratch/wps -operation expand -expansionFlags all
...and navigate to
-
c:/temp/wps/wps.war/WEB-INF/
- Edit both web.xml and web_merged.xml, and in each set...
<mime-mapping>
    <extension>png</extension>
<mime-type>image/png</mime-type>
</mime-mapping>
<error-page>
    <error-code>404</error-code>
    <location>/html/error404.html</location>
</error-page>
<error-page>
    <error-code>400</error-code>
    <location>/html/error400.html</location>
</error-page>
<error-page>
    <error-code>401</error-code>
    <location>/html/error401.html</location>
</error-page>
<error-page>
    <error-code>403</error-code>
    <location>/html/error403.html</location>
</error-page>
<error-page>
    <error-code>406</error-code>
    <location>/html/error406.html</location>
</error-page>
<error-page>
    <error-code>429</error-code>
    <location>/html/error429.html</location>
</error-page>
<error-page>
    <error-code>500</error-code>
    <location>/html/error500.html</location>
</error-page>
<error-page>
    <error-code>501</error-code>
    <location>/html/error501.html</location>
</error-page>
<error-page>
    <error-code>502</error-code>
    <location>/html/error502.html</location>
</error-page>
<error-page>
    <error-code>503</error-code>
    <location>/html/error503.html</location>
</error-page>
<error-page>
    <error-code>504</error-code>
    <location>/html/error504.html</location>
</error-page>
<error-page>
    <error-code>505</error-code>
    <location>/html/error505.html</location>
</error-page>
Portal 8 uses Servlet 2.5 specification, so we have to specify individual mapping for each required error code.
See also:
- Error Code Summary for a list of possible error codes.
- Specify mapping for each code mentioned in above table
- Create directory...
-
c:/scratch/wps/wps.war/html
...and navigate to that directory.
- For each HTTP error code, create and save files...
For example, error404.html contains...
<html>
    <script>
        window.location.href = "/wps/portal/error/error404";
    </script>
</html>
The java script code in each file redirects error page we will create in the portal hierarchy.
- Create static html pages for each http error code.
- Create a new label called "Error"...
Portal Administration | Manage Pages | Content Root | New Label
Then create WCM pages for each error code...
Portal Administration | Manage Pages | Content Root | Error | New Page

...and set...
Title error404 Unique Name e.error404 Friendly URL name error404 (should match redirection URL in error404.html) Theme MYSITE Base Theme Type of Page Static Content URI of Layout Template of HTML war:MySiteThemeStatic/themes/Portal8.0/layout-templates/MYSITE1Column/ 
- For each page, for User role, assign anonymous user permissions.


- For each error page, select...
-
Page Properties | Advanced Options | I want to set parameters
...and set...
Parameter Value Description topNav hide Hide page from direct navigation ibm.portal.sharing.scope.page resourceaggregation.profile profiles/profile_foo_full.json

- Create WCM content.
Go to...
-
Libraries | MYSITE_Content_en | Content | Error Pages | New
...and create content item for each httpd code
Example content properties...
Name: Error404 Display title: Error404 Description: 404 Error Page Text Type: Content Location: MYSITE_Content_en / Error Pages / Error404 Content Template: MYSITE_Design / AT_Rich_Text Mapped Presentation Templates: Workflow MYSITE_Design / Direct Workflow Verify anonymous user access to page...
Administrator Defined Workflow Defined Inheritance User None CN=WCMContentApprovers,OU=Roles,DC=MYSITE,DC=COM, [all users], cn=wcmcontentauthors,ou=roles,dc=wps,dc=com [all authenticated portal users], [anonymous portal user] Contributor None None WCMContentAuthors, WCMContentApprovers, WCMAdmins, WCMDesigners Editor None None None Manager None wpsadmin wpsadmin Approver None CN=WCMContentApprovers,OU=Roles,DC=MYSITE,DC=COM None - Configure pages
From Portal Administration, Manage Pages portlet, for each error page...
- Configure shared settings to point to WCM error content...
Content Type Content Item Content Behavior Select content and path Content MYSITE_Content_en / Error Pages / Error404 Alternate Presentation Template MYSITE_Design / PT_RichText 
- Pull up error page in browser. For example...
-
http://myhost:10039/wps/portal/error/error404
...and select...
-
Edit Mode

- Hover on the page name area, you will see 'Edit'. Click on edit. This will open page properties.

Important: Make sure you are editing the right page. The value for "Name" should equal your page.
- Click on the Advanced tab

- In the Page Layout template location, enter one of the below layout locations
- MYSITE Single Column Layout:
-
war:MySiteThemeStatic/themes/Portal8.0/layout-templates/MYSITE1Column/
- MYSITE 2 Column Layout:
-
war:MySiteThemeStatic/themes/Portal8.0/layout-templates/MYSITE2ColumnRight/
war:MySiteThemeStatic/themes/Portal8.0/layout-templates/MYSITE2ColumnLeft/
war:MySiteThemeStatic/themes/Portal8.0/layout-templates/MYSITE2Rows2ColumnLeft/ - MYSITE 3 Column Layout:
-
war:MySiteThemeStatic/themes/Portal8.0/layout-templates/MYSITE3Column/
- MYSITE Single Column Layout:
- Click on...
-
"Update Layout from Template"
Select C Base Theme and Full profiles.
-
Edit Mode
Select
-
Edit Page Layout
...and add a Web Content Viewer portlet...

- Configure shared settings to point to WCM error content...
- Deploy new wps.ear and test
- Collapse the changes made back into a new wps.ear file.
-
cd C:\scratch
C:\IBM\WebSphere\wp_profile\bin\EARExpander.bat -ear /scratch/wps.ear -operationDir /scratch/wps -operation collapse - Optional: Make a backup of configuration on dmgr and nodes
-
cd c:\IBM\WebSphere\wp_profile\bin
backupConfig WebSphereConfig_20151202.zip
startServer.bat WebSphere_PortalOn portal cluster node, run startNode.bat
- Deploy the updated wps.ear back to portal
-
cd C:\IBM\WebSphere\wp_profile\bin
wsadmin.bat -user wpsadmin -password mypwd -c "$AdminApp install C:/scratch/wps.ear {-update -appname wps -deployejb -deployejb.classpath C:/IBM/WebSphere/PortalServer/base/wp.base/shared/app/wp.base.jar}" - Restart portal
- Test...
-
https://myportalsupport.state.gov:7443/wps/test
- Collapse the changes made back into a new wps.ear file.
Customize the error page for WCM portlets
- Go to...
-
C:\IBM\WebSphere\wp_profile\installedApps\node_name\PA_WCMLRingPortJSR286.ear\ilwwcm-localrende.war\WEB-INF\jsp\html
- Rename error.jsp to error-backup.jsp
- Put Prolific's copy of error.jsp in place: error.jsp
- Log on to WAS admin console and restart application PA_WCMLRingPortJSR286.
For more information on error.jsp, contact Rajeev Sharma <rajeev.sharma@prolifics.com>
Set up error handling in IIS
Create custom error pages for the following HTTP codes 401, 401, 403, 404, 500, etc...
Copy custom error file to...
-
C:\inetpub\custerr\en-US
For example...
-
cd C:\inetpub\custerr\en-US
copy 404.htm 404_orig.htm
copy C:\Scratch\Error_Pages\error404page.html 404.htm
copy 401.htm 401_orig.htm
copy C:\Scratch\Error_Pages\error401page.html 401.htm
copy 403.htm 403_orig.htm
copy C:\Scratch\Error_Pages\error403page.html 403.htm
copy 405.htm 405_orig.htm
copy C:\Scratch\Error_Pages\error405page.html 405.htm
copy 500.htm 500_orig.htm
copy C:\Scratch\Error_Pages\error500page.html 500.htm
copy 501.htm 501_orig.htm
copy C:\Scratch\Error_Pages\error501page.html 501.htm
copy 502.htm 502_orig.htm
copy C:\Scratch\Error_Pages\error502page.html 502.htm
To test...
Syst...
-
https://myportalsupport.state.gov:7443/foo
https://myportalsupport.state.gov:7443/wps/foo
https://myportalsupport.state.gov:7443/wps/portal
https://myportalsupport.state.gov:7443/wps/portal/foo
https://myportalsupport.state.gov:7443/wps/portal/Business/foo
Prod
-
https://myportal.state.gov/foo
https://myportal.state.gov/wps/foo
https://myportal.state.gov/wps/portal
https://myportal.state.gov/wps/portal/foo
https://myportal.state.gov/wps/portal/Business/foo
Error pages are set in Internet Information Services (IIS) Manager, select...
-
Sites | Default Web Site | Error Pages

Do NOT edit any settings on this page.
If something goes wrong, review...
-
C:\inetpub\wwwroot\web.config
More info...
- Custom error pages for HTTP 4xx and HTTP 5xxx codes
- IIS 7.x - Configuring the WAS Web server plug-in to serve custom error pages
Error Code Summary
We need to support major codes which are relevant and may come in our portal. Note there are numerous other codes but they are not meaningful in context of our system.
| Code | Description | HTML Page |
|---|---|---|
| 404 | Page Not Found | error404.html |
| 400 | Bad Request | error400.html |
| 401 | Unauthorized | error401.html |
| 403 | Forbidden | error403.html |
| 405 | Method not allowed | error405.html |
| 429 | Too Many Requests | error429.html |
| 500 | Internal Server Error | error500.html |
| 501 | Not Implemented | error501.html |
| 502 | Bad Gateway | error502.html |
| 503 | Service Unavailable | error503.html |
| 504 | Gateway Timeout | error504.html |
| 505 | Http Version Not Supported | error505.html |
See Also
- Redirecting to a custom error page when HTTP 404 Not Found encountered on non-URL resources
- Customizing error pages in portal and WCM applications in a multi-site environment
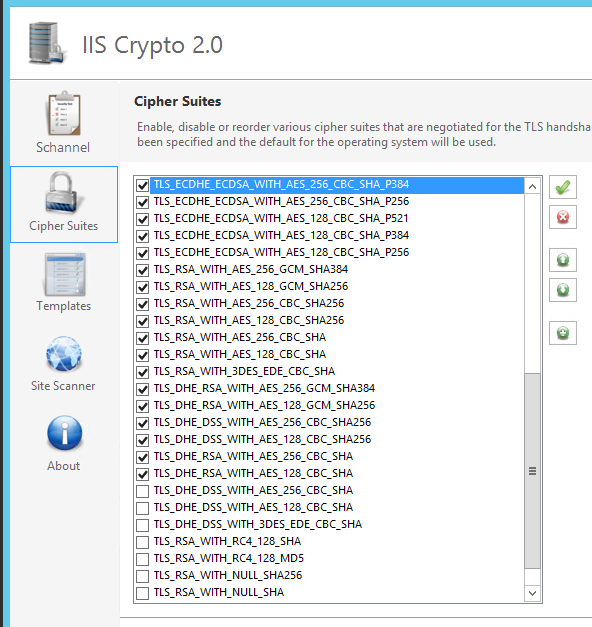
IIS web server: Protocol and cipher suites restrictions
This configuration is made to turn off deprecated encryption methods and cipher suites for Portal Webserver SChannel. Microsoft IIS uses SChannel for it's SSL encyption support.
Use IISCrypto to set SChannel settings. As a starting point select Best Practices and only enable the following settings.
Enabled protocols
-
TLS 1.2
Ciphers
-
AES 128
AES 256
Hashes
-
SHA
SHA 256
SHA 384
SHA 512

Select Cipher Suite tab page and deselect the following...
-
TLS_DHE_RSA_WITH_AES_256_CBC_SHA
TLS_DHE_RSA_WITH_AES_128_CBC_SHA
TLS_DHE_DSS_WITH_3DES_EDE_CBC_SHA
TLS_RSA_WITH_RC4_128_SHA
TLS_RSA_WITH_RC4_128_MD5
TLS_RSA_WITH_NULL_SHA256
TLS_RSA_WITH_NULL_SHA
SSL_CK_RC4_128_WITH_MD5
SSL_CK_DES_192_EDE3_CBC_WITH_MD5

WebSphere Application Server: Protocol and cipher suites restrictions
By default, the WAS Quality of Protection setting is SSL_TLS, which supports all handshake protocols except for SSLv2 on the server side. To harden, set the only supporred protocol to be TLS v1.2.
See also: How do I configure websphere application server SSL protocol to TLSv1.2 ONLY?

- Use backupconfig.sh to make a backup of WAS.
-
cd c:\IBM\WebSphere\wp_profile\bin
backupConfig.bat c:\scratch\backupConfig_20161213.zip
startServer.bat Websphere_Portal - Install Java 7
- Log on to the console and go to...
-
Security | SSL certificate and key management | Related Items | SSL configurations | NodedefaultSSLsetting | Quality of protection (QoP)
The above setting will apply to both inbound and outbound SSL Communication.
- On the Quality of protection (QoP) settings panel, select TLSv1.2 from the pull-down list in the box named Protocol.
- Click Apply and Save.
- Update ssl.client.props.
On each portal node, edit...
-
C:\IBM\WebSphere\wp_profile\properties\ssl.client.props
...and set...
-
com.ibm.ssl.protocol=TLSv1.2

Do the same on the dmgr for...
-
c:\IBM\WebSphere\AppServer\profiles\Dmgr01\properties\ssl.client.props
Update...
-
C:\IBM\WebSphere\AppServer\profiles\cw_profile\properties\ssl.client.props
C:\IBM\WebSphere\wp_profile\properties\ssl.client.props - On each web server node, update plugin-cfg.xml and set...
-
StrictSecurity="true"
If this is not done, we may receive GSK_ERROR_SOCKET_CLOSED (gsk rc = 420) errors.
- Restart the dmgr using stopManager/startManager
Stop nodes...
-
c:\IBM\WebSphere\wp_profile\bin\stopNode.bat -username -password
- Use stopServer to stop all application servers running on the nodes
- Synchronize nodes...
-
c:\IBM\WebSphere\wp_profile\bin\syncNode.bat dmgr_host soap_port
soap port is found from dmgr console under...
-
System Administration | Deployment manager | Ports | SOAP_CONNECTOR_ADDRESS
We must run syncNode.bat from the command-line on each federated node, otherwise the nodes will not synchronize in the administrative console.
- Start the node agent on each federated node...
-
c:\IBM\Websphere\wp_profile\bin\startNode.bat
- Check the Sync status of node from console, and then start the application server from console.
- Log back on to the QoP settings panel and set cipher suites to SHA384 and SHA256.
- Test using browsers
- Test using OpenSSL
- Test with sslscan.
Test TLS v1.2 using browsers
- Internet Explorer v8 and later, select...
-
Tools | Internet Options | Advanced tab | Security Use TLS 1.2 check box | OK
- Firefox version 24 and later...
- Open Firefox browser and enter about:config in the address bar.
- When prompted, click I'll be careful, I promise! and accept the warning.
- Search for security.tls.version.max.
- Double-click security.tls.version.max and change the value to 3.
A value of 1 supports TLS1.0. A value of 2 supports TLS1.0 and TLS1.1. A value of 3 supports TLS1.0, TLS1.1, and TLS1.2.
Test using OpenSSL
We can use openssl s_client connnect to WAS using SSL port like console SSL port or Application server ssl port
-
openssl s_client -connect webspherehostname:consolesslport -tls1_2
For Example...
-
openssl s_client -connect myportalsupport.state.gov:9443 -tls1_2
Once connected to the WAS system, the certificate chain is displayed in the command prompt and the handshake details.
Remove JREs left by Web server and plug-in installers
When we install IBM HTTP Server, the installer leaves behind a JRE. We can remove this JRE, as it provides functions that are not needed by the Web server or plug-in under normal conditions.
When we install the WAS HTTP Server plug-in using the IBM installer, it also leaves behind a JRE. As before, we should remove this post install.
Make a backup copy just in case for future use. For example, zip or tar the JRE, and replace it later when needed for by the update installer when applying fixes.
Only accept requests from known Web servers
The WAS Web server plug-in forwards requests from the Web server to the target application server. By default, if the traffic to the Web server is over HTTPS, then the plug-in will automatically use HTTPS when forwarding the request to an application server, thus protecting its confidentiality.
We can configure the application servers, which contain a small embedded HTTP listener, to only accept requests from known Web servers. This prevents various sneak attacks that bypass any security that might be in front of or in the Web server and creates a trusted network path.
To create a trusted network path from the Web server to the application server, we configure the application server Web container SSL configuration to use client authentication. Once we have ensured that client authentication is in use, we ensure that only trusted Web servers can contact the Web container. We either limit the parties that have access by applying the SSL tunnel trick or confirming the direct SSL peer. To apply the SSL tunnel trick, we'll need to:
- Create a key store and trust store for the Web container and a key store for the Web server plug-in.
- Delete from all key stores (including the trust store) all of the existing signing certificates. At this point, no key store can be used to validate any certificates. That's intentional.
- Create a self-signed certificate in the two key stores and export just the certificate (not the private key). Make sure we track when those certificates expire. Once the plug-in certificate expires, it will no longer be able to contact the Web container! Import the certificate exported from the Web container key store into the plug-in key store. Import the plug-in certificate into the Web container trust store. Now, each side contains only a single signing certificate. This means that each can be used to verify exactly one certificate -- the self-signed certificate created for the peer.
- Install the newly created key stores into the Web container and Web server plug-in.
Trust association interceptors
WAS TAIs recognize existing authentication information from a Web SSO proxy server, such as Tivoli Access Manager WebSEAL. A TAI extends the trust domain. WAS trusts the TAI and whatever the TAI trusts.
Trust relationships between WAS and WebSEAL...
| Password configuration | WebSEAL sends user ID and password to the application servers for the junction being configured. The user ID is in the iv-user header. The WebSEAL TAI validates the password against the registry. If the LoginId property is not set on the WebSEAL TAI properties, then the TAI will verify the user ID and password combination sent from WebSEAL and trust it if it is any valid user ID and password combination. This is not a secure configuration because this then implies that any person knowing any valid user ID and password combination can connect to WAS and assert any user's identity. By specifying the LoginId property, the WebSEAL TAI ignores the inbound user ID in the basic auth header, and verifies the LoginId and WebSEAL password combination. |
| Mutual SSL configuration | WebSEAL is configured to use SSL to communicate with WAS. The SSL configuration includes a client certificate whose private key is known only to WebSEAL. Configure the application server Web container to perform client certificate authentication. Alter the trust store to include only the client certificate that WebSEAL is using. This guarantees that requests to the application server Web container are coming only from WebSEAL, and not some intruder. Also remove the non-HTTPS transports from the Web container. Configure the WebSEAL TAI with mutualSSL=true in its properties. The TAI assumes the connection is secure and is using mutually authenticated SSL. |
Enable FIPS compliance or SP800-131 or Suite B compliance
There three cryptographic algorithms to choose from when performing encryption....
- SSL V2 (disabled by default)
- SSL V3
- TLS
The United State Government has defined standards with respect to computer security (Federal Information Processing Standards) that cover a number of areas. This standard was known as FIPS 140-2. As part of these standards, they specifically certify particular ciphers as being FIPS compliant and have also certified TLS (but not SSL V3).
The National Institute of Standards and Technology (NIST) has defined a new standard SP800-131 to replace the current FIPS 140-2. The National Security Agency (NSA) similarly developed a new standard called Suite B. These new standards further restrict the choice of ciphers that are used and require that TLS 1.2 be used; while FIPS 140-2 prohibited the use of SSL V3, SP800-131 prohibits the use of TLS 1.0 and TLS 1.1.
Users wishing to restrict their applications to use FIPS 140-2 compliant ciphers and TLS can either manually configure every endpoint, or simply enable FIPS compliance using the admin tools. Once FIPS is enabled, only FIPS compliant cryptography will be used.
Appendix
Overview
Attack types...
| Attack | Description |
|---|---|
| Network-based | Intruder has low-level access to network packets and attempt to harm the system by altering this traffic or discovering information from these packets. Encryption of WAS internal traffic is less important than encryption of traffic that travels "beyond" WAS. |
| Machine-based | The intruder has access to a host on which WAS is running. Goal is to limit the ability to damage the configuration or to see things that shouldn't be seen. |
| Application-based external | Intruder uses application-level protocols (HTTP, IIOP, JMX, Web services, and so on) to access the application, perhaps via a Web browser or some other client type, and uses this access in an attempt to circumvent the normal use of the application usage. The intruder is executing code from outside of the application itself. |
| Application-based internal | The intruder takes advantage of a rogue application that shares the same WAS infrastructure with valid applications. Mititgated using application isolation: |
SSL/TLS
We use the term "SSL" when referring to both SSL and TLS protocols. TLS is used by default if both sides of the connection support TLS.
SSL protects HTTP traffic, IIOP traffic, LDAP traffic, MQ traffic, JDBC traffic, messaging traffic over the SIBus between WebSphere messaging engines, J2C and SOAP traffic. SSL uses of public/private key pairs stored in key stores.
Keys are asymmetric: Information encrypted with the private key can be decrypted using the public key.
Signed certificates have a digital signature asserting that the party possessing the private key corresponds to the signed public key is the party identified by the key.
Validation includes...
- Ensuring that the issuer is trusted
- Checking that the certificate is not expired
- Checking that usage as defined in the certificate matches what it is being used for
- Checking if the certificate has been revoked
Self-signed certificates would need to be distribute manually to each client. It is easier to distribute just one CA certificate that signs many certificates; these CA certificates typically have a longer life, and client applications (such as browsers) typically automatically push out updates or replacements prior to expiry.
The downside to trusting all certificates issued by CAs is if there is a breach of a CA, there is a massive loss of trust.
When a client authenticates itself to a server, the process is similar, although the roles are reversed. In order for a server to authenticate a client the client must possess a private key and corresponding certificate, while the server must possess the corresponding signing certificate or a copy of the client's certificate.
SSL tunnels
Clients present a certificate which is validated by the server against the set of trusted certificate signers. Once validated, the SSL handshake completes. We limit the signers we trust on the server. With self-signed certificates, we can create a situation where there is only one signer: the self-signed certificate. This means that there is only one valid client side private key that can be used to connect to this SSL endpoint: the private key we generated when we created the self-signed certificate in the first place. This is how we can limit who can connect to a system over SSL -- even if the server side components don't provide authorization. Only trusted clients can connect over this transport.
WAS manages keys in key store and trust store files. A trust store is a key store that contains only trusted signers. We should place CA certificates and other signing certificates in a trust store. personal certificates with private keys should be stored in the key store.
Most of WAS uses the PKCS12 format. (WAS SSL configurations in fact support three modern key database formats: JKS, JCEKS, and PKCS12.) The IBM HTTP Server and the WAS Web server plug-in use an older key format known as the KDB format (or more correctly the CMS format). The two formats are similar in function but are incompatible in format. Therefore, we must be careful not to mix them up.
Infrastructure-based preventative measures
Protocols are:
- H = HTTP traffic
- Usage: Browser to Web server, Web server to app server, admin Web client.
- Firewall friendly.
- W= WAS internal communication
- Usage: Admin clients and WAS internal server admin traffic. WAS internal communication uses one of several protocols:
- RMI/IIOP or SOAP/HTTP: Admin client protocol is configurable.
- File transfer service (dmgr to node agent): Uses HTTP(S).
- Distributed Consistency Service (DCS): Uses private protocol. Used by memory to memory replication, stateful session EJBs, dynacache, and the high availability manager.
- SOAP/HTTP firewall friendly. DCS can be firewall friendly.
- Usage: Admin clients and WAS internal server admin traffic. WAS internal communication uses one of several protocols:
- I = RMI/IIOP communication
- Usage: EJB clients (standalone and Web container).
- Generally firewall hostile because of dynamic ports and embedded IP addresses (which can interfere with firewalls that perform Network Address Translation).
- M = SIB messaging protocol
- Usage: JMS client to messaging engine.
- Protocol: Proprietary.
- Firewall friendly as can fix ports used. Likely NAT firewall hostile.
- MQ = WebSphere MQ protocol
- Usage: MQ clients (true clients and application servers).
- Protocol: Proprietary.
- Firewall feasible (there are a number of ports to consider). Refer to WebSphere MQ support pac MA86.
- L = LDAP communication
- Usage: WAS verification of user information in registry.
- Protocol: TCP stream formatted as defined in LDAP RFC.
- Firewall friendly.
- J = JDBC database communication via vendor JDBC drivers
- Usage: Application JDBC access and WebSphere Application Server session DB access.
- Protocol: Network protocol is proprietary to each DB.
- Firewall aspects depend on database (generally firewall friendly).
- S = SOAP
- Usage: SOAP clients.
- Protocol: Generally SOAP/HTTP.
- Firewall friendly when SOAP/HTTP.
WAS V8.5 includes the on demand router (ODR), previously only available in IBM WebSphere Virtual Enterprise. The ODR introduces some new network links that must be considered. Moreover, Intelligent Management for web servers in WebSphere Application Server V8.5.5 adds a native HTTP server alternative to the ODR: the ODLlib and the ODRLib require ports to the deployment manager and node agents.
See also
- Overview and approach to security hardening
- Advanced security hardening in WebSphere Application Server V7, V8 and V8.5, Part 2: Advanced security considerations