Manage pages
Overview
- Open
- Navigate
- Create and delete pages
- Set page properties
- Reference existing pages
- Visibility rules for pages in the page hierarchy
- Behavior of derived pages in combination with locks and changing access permissions
Open
Log in to the portal as an administrator and go to...
Administration Portal | User Interface | Manage Pages
Navigate
To navigate, use either the Manage Pages or Site Map portlet.
Manage Pages displays a table showing the hierarchical structure of the portal. The table displays a list of nodes that belong to the selected branch in the tree. The parent nodes are displayed above the list as a breadcrumb trail.
- To view nodes at a higher level in the portal structure, select a node from the breadcrumb trail above the table.
- To view nodes at a lower level in the portal structure, select a node from the Title column in the table.
Site Map displays a list of the pages in the portal. We can edit the default settings to include portlets on the list. Each entry is a link to that page or portlet, and clicking on it will take you out of Site Map and to that page or portlet. If you click on a portlet, you will be linked to the page containing that portlet. The portlet window will be maximized. With the appropriate access, we can set the number of entries on each page. The default settings render only pages and list fifty entries at a time. The pages and portlets are displayed in a tree hierarchy. We can access this portlet from the portal menu.
Create and delete pages
Both administrators and users with appropriate access can create and delete pages. Users can only delete the pages they create or the pages for which they have at least Manager access.
- Administrators:
- Opening Manage Pages
- Navigating through the portal hierarchy under which you want to insert the new page.
- Click...
New PageWe can also create new labels and URLs.
- Users:
- Navigate to the page in the portal under which you want to insert the new page.
- Click New Page from the drop-down menu. To see the menu, place the mouse pointer anywhere on the current page.
Both of these tasks direct you to the Setting page properties portlet, for setting that page title and advanced options, and the Customizing pages portlet, for editing the layout and content of the page. When you are finished, the new page is automatically activated. More detailed information is provided for the help for each of these tasks.
- If a page is deleted, all child nodes are also deleted.
Set page properties
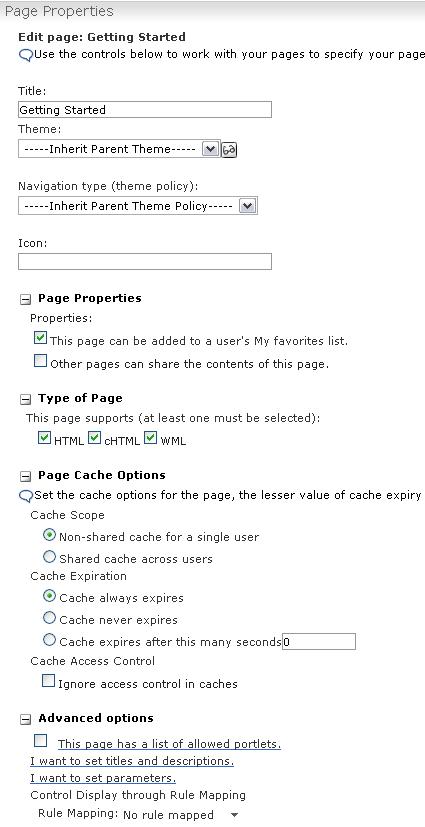
The Properties portlet is displayed when creating pages. Users can also set page properties by selecting Edit Page Properties from the drop-down menu available on the tab of a page or from Manage pages. The page title is required. It is recommended, but not mandatory, that you specify a unique name. WebSphere Portal uses the page name as an internal identifier for the page, and some administration portlets display it.
The following properties can be set through the properties portlet.
- Title
- Set the title of the page here.
- Theme
- Select a theme to determine the look of the page. Click on the Preview icon to see what the theme will look like.
- Navigation type
- Select the type of navigation you want the theme to use. This is also known as a theme policy.
- Icon
- To associate an icon with a page, enter the icon path.
- Bookmarks
- To allow users to bookmark a page in the portal, select...
This page can be added to a user's My favorites list- Page Properties
- To use a page as a reference for creating other pages, select:
Other pages can share the contents of this page
- To allow a page to be added to the Favorites list, select...
This page can be added to a user's My favorites list.
- Type of page
- Select one or more supported markups. The default markup for all pages is HTML. The user can set the page to support other markups, for example, Wireless Markup Language (WML) and Compact HTML (cHTML). A markup option is only available for selection if it is supported for the parent node.
- Page cache options
- This allows you to set the cache life of a page. Caching improves performance by keeping the page in the memory of the proxy server. Note that portlet cache settings can override page cache settings. For more details, refer to Tuning.
- Advanced options
- These are the advanced options that are available:
- Allowed portlets
- Use this setting to limit the list of portlets that a privileged user or Editor can add to the page in the Edit Layout and Content portlet. This setting does not have any effect on users that have manage permission on the page. We can set a list of allowed portlets only when editing an existing page. To designate a list of allowed portlets:
- Click...
This page has a list of allowed portletsAn empty list of restricted portlets is displayed.
- Click Add.
- Set the search properties and text and click Search. For example, to display all available portlets, select...
All available...from the drop-down list and click Search.
- Use the checkboxes to select portlets from the list. Click OK when you are finished making selections.
- Review list of restricted portlets and select OK when the list is complete.
- Titles and descriptions
- Use this option for changing the page title or description, or adding or changing titles and descriptions for different locales.
- Click...
I want to set titles and descriptionsA list is displayed of all titles that have been set for this page for each locale.
- Click the edit icon for each supported locale that you want to change.
- Enter the locale-specific title and description for the page.
- Click OK to return to the list of page titles.
- When you have finished editing each page title, click OK to return to Properties.
Some of the page titles might not appear correctly if the language preference uses DBCS characters. To correct the display of page titles, change the character set used by the language preference for HTML markup to UTF-8.
- Page parameters
- Use this option to view, add, delete, or modify page metadata, which is kept in parameter and value pairs. To modify the value of an existing parameter, or to create a new parameter, select...
I want to set parameters.- Control display through rule mapping
- Use Personalization rules to control whether a page is displayed in the navigation. This is managed by choosing a rule appropriate for the user attribute you want to enable to see the page. For example, we can choose a rule to hide the page from a certain user group. If Personalization is not installed or it is not enabled in the Properties settings, you will not see this option.
- Rule mapping
- A rule mapping is shown here, if applicable. For more information see the Attribute Based Administration section.
When you are finished setting page properties, click OK to save changes. When creating a new page, the Edit Layout portlet is displayed to allow you to edit the layout and content of the page. Otherwise, you are returned to the location in the portal from which you opened Properties.
Reference existing pages (Derived Pages)
When a page is created, it can be designated as a shared page. Other pages, called derived pages, can be created that inherit the original page's properties. For example:
- If content is locked on the page that is referenced, content is locked on all derived pages that reference that page.
- If a portlet is deleted from the page that is referenced, the portlet is deleted from all pages that reference that page, and all individual user settings for that portlet are lost.
Sharing content is not supported for private pages.
Referencing an existing page allows you to give administrative access to other users while maintaining the content and layout from the original page. Creating a derived page is equivalent to creating a new, specialized layer on the original page. The original page and the new layer are aggregated together at rendering time. The new layer is contained within and controlled by the original page. Therefore, to access the derived page, users must also have access to the original page.
Use the Setting page properties portlet to set up the original page to be shared.
- Open Manage Pages
- Locate the original page to be referenced.
- Click the Edit Page Properties icon.
- Expand the Page Properties field.
- Make sure Other pages can share the contents of this page is selected.
- Click OK.
A page can be set to reference an existing page only during page creation. To create and manage a derived page:
- While you are Creating and deleting pages, expand the Type of Page field.
- Select A page that uses content from a shared page.
You will only see this option if you have another page in the portal that has "other pages can share the contents of this page" enabled.
- Select the parent page from the drop-down list.
- When you are finished setting other page properties, click OK.
Changes made to the original parent page may be reflected to the derived pages that reference it. Layers can be created on other layers to create a chain of cascading pages, referred to as delegated page specialization. This process means that a root page can be created, and the top level administrator can decide the initial layout and content of the page. The next level administrator can then control and modify a specialized layer of this page, adding more content and layout. This process can continue down a chain of page managers and submanagers. Managers or submanagers in the chain only see their individual layer of the chain; however, they must have the User role for every layer above theirs in order to see the content of the previous layers. An end user is only able to see a layer of the page if appropriate access is given. Here are some examples to illustrate this concept.
John, the superadministrator, creates a page named Home and titles it Home. Brandy, a subadministrator, manages the next level of this page, named Home_operations, and determines what additional content should be added to the Home page for employees in the operations group. Nick, the next level administrator, manages the next level of the Home page, Home_operations_transportation, and determines the content that should be available on the Home page for employees in the transportation department. Nick, as the transportation page administrator, must have the Manager role for Home_operations_transportation so that he can make changes to this page that will affect all users, as well as the User role for Home_operations and the User role for Home; he must have the User role on every layer that combines to create the Home_operations_transportation level. Desi, an end user of the Home_operations_transportation page, must have the User role for Home_operations_transportation, and she must also have the User role for Home_operations and the User role for Home. When Desi, the end user logs on to the portal, she sees one Home page. This Home page will be an aggregation of all the layers associated with the root Home page.
Notes:
- If you delete a page that is referenced by another page, all pages that reference that page are deleted.
- The markup specified for the root page cannot be modified on derived pages. The whole derivation tree structure with all layers supports the markup that is specified on the root page.
- The ability to change the title and description of derived pages can be disabled in the portal configuration. using the allow.derived.titles.
Visibility rules for pages in the page hierarchy
Pages which share their content may or may not be viewable by other users. A page is visible if the user has permission for that page. The page and all pages above that page in the content hierarchy must support the markup requested by the users client. Finally, the page and all pages above it must be active, too. The complexity of page derivation concepts is hidden from normal users: "Base" pages are hidden if a specialization (a page which obtains parts of its layout from another page) is visible for that user. There is one exception to this rule: A page will not be hidden if the user has "manage" permission for that page.
- Rule 1:
A page with a visible specialization is hidden to all users that do not have "manage" permission for that page. Pages that are hidden will normally not be visible at all. There is one exception to this statement: There might be visible content below hidden pages. This content must be accessible to the user. This is why navigation nodes for normally hidden pages will be shown in the navigation hierarchy. There is no content associated with those pages, they will appear as labels.
- Rule 2:
A hidden page is shown as a label if there is visible content underneath it. Consider the visibility of the specialized pages. As the specialized page is using the content of its parent page(s), its visibility depends on the visibility of the parent pages. A derived page re-uses most of its attributes from the base page in the derivation hierarchy. Without that first page no layout can be calculated for a derived page.
- Rule 3:
Derived pages can only be rendered if the base page is accessible, active and supports the actual markup.
- Rule 4:
A page with several layers is assembled until an inactive layer is met. The page content will consist of the information from the hitherto processed layers.
Behavior of derived pages in combination with locks and changing access permissions
Altering locks in conjunction with access permissions on the parent pages may result in changes on derived pages depending on the complexity of the derivation structure. The following scenario describes the behavior of derived pages.
An administrator with the editor role creates a page with a two-column layout and places a portlet in each column. The blue arrows in the following figure indicate the child-to-parent relationship of the components of the page:
Two column layout

Then a user with an editor role creates an explicit derivation from this page (under Advanced Options, selects A page that uses content from a shared page ) and adds two portlets to the explicitly derived page, one portlet in each column as indicated in the following figure:
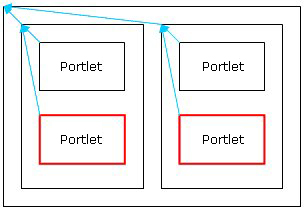
The red boxes around the two new controls indicate that these controls are on a new layer of the page. The original page content and the new layer together comprise the complete page.
The user with an editor role creates a third column next to the two existing columns and moves all portlets to the new column. The new column exists on the layer of the derived page (red box); whereas, the original portlets are moved into the column through additional information (green arrows) as indicated in the following figure:
Three column layout
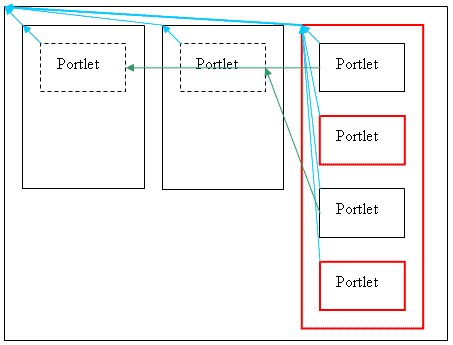
Rendering the explicitly derived page shows all four portlets arranged vertically as shown in the previous picture.
Next, the administrator locks all containers and portlets on the original page. This has no impact on the aggregated pages (original page and derived page). The administrator then removes the editor right from the user who created the derived page and assigns only privileged user permissions to that user.
If this privileged user navigates to the derived page, the following issues occur:
- The administrator set the locks on the original page, which enforces the layout of the original page for the derived page. Therefore, the information that causes the original portlets to be moved into the new column (the green arrows in the above figure) is deleted.
- Due to the locks, the additions on the extra layer of the derived page (red boxes) are suppressed. The privileged user sees the derived page exactly as the original page.
If the administrator reassigns editor permissions to the user for the derived page, the layout appears differently to the user from any of the stages of the derived page. The layer of additions to the derived page becomes visible again but the information about moving the original portlets has been deleted as indicated in the following figure:
Three column layout with missing information about moving the portlets
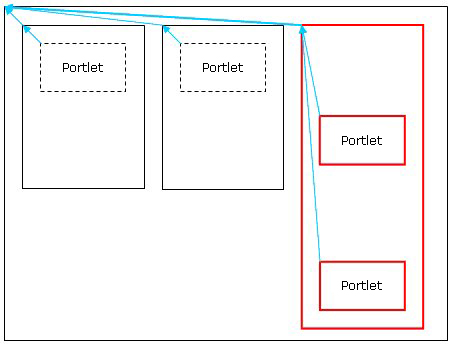
The same principle applies to other layer scenarios in similar ways. Movement information of elements from the original page is deleted; whereas, actions on the layer of the derived page; for example adding portlets, rows, or columns; may persist after reassigning permissions as described above.
Related information
- Users and groups
- Manage Access Control
- Working with portal navigation
- Language support
- Portal administration portlets
- Cooperative portlets
Parent topic:
Manage pages, layout, and content