Menu element design examples
- Simple menu design
- Vertical menu design
- Horizontal menu design
- Use a menu to display images
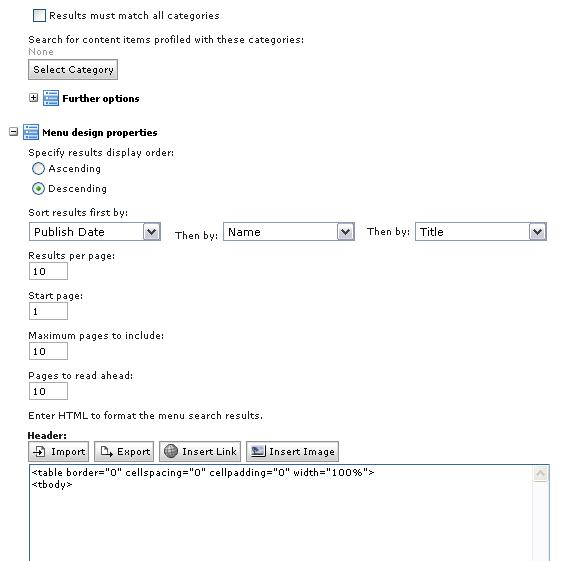
- Add a page navigation element to a menu design
- News Menu Example
Simple menu design
Menu components can be constructed using HTML and placeholder tags. This example shows the basic structure of the element design used by a menu to format the search data.
Each menu search result
<a href=" <placeholder tag="href" /> ">
Instead of a URL, use a href placeholder. <placeholder tag="name" /> </a><br>
Instead of text, insert a name placeholder. This will be repeated for every link returned by the search query defined in the menu element. We can also use a NameLink tag:
Each menu search result
<placeholder tag="namelink" /> <br>
This produces the same result as the above example.
Vertical menu design
<table>
<tr>
    <td> <a href=" <placeholder tag="href" /> ">
                   <placeholder tag="name" /> </a>
                   <br>
    </td>
</tr>
</table>
Header
<table> Table tag is used to open the table. Each menu search result
<tr><td> <a href=" <placeholder tag="href" /> "> Instead of a URL, insert a URL placeholder here. This is where the URL of the menu item will be inserted in the rendered menu. To have the menu display as a vertical list, a table row and table cell tag (<tr><td>) are added. <placeholder tag="name" /> </a><br> </td></tr> Instead of text, insert a name placeholder. This is where the title of the menu item will be inserted in the rendered menu. </td></tr> are added to close the cell and row. Footer
</table> Close the table.
Horizontal menu design
<table>
<tr>
    <td> <a href=" <placeholder tag="href" /> ">
                   <placeholder tag="name" /> </a>
                   <br>
    </td>
</tr>
</table>
Header
<table><tr> The table and table row tags are entered in the header section of the menu element form to open the table and row. Each menu search result
<td> <a href=" <placeholder tag="href" /> ">
Instead of a URL, insert a URL placeholder here. This is where the URL of the menu item will be inserted in the rendered menu. To have the menu display horizontally, a table cell tag (<td>) is added. <placeholder tag="name" /> </a><br> </td>
Instead of text, insert a name placeholder. This is where the title of the menu item will be inserted in the rendered menu. </td> is added to close the cell. Footer
</tr></table> These tags are entered in the footer section of the menu element form to close the table and row.
Use a menu to display images
To display images in a menu instead of text, replace the name placeholder with a reference to an Image element selected from content or site areas.
Each menu search result
<a href=" <placeholder tag="href" /> ">
Instead of a URL, use a href placeholder. This is where the URL of the menu item will be inserted in the rendered menu. <element type="sitearea" context="autofill" key="Image" /> </a></br>
Instead of a name placeholder (as in the previous example), insert an IWWCM ™ tag. The source type can either be content or site area. The context is autofill. In this example, the field being referenced is "Image". The site areas or content being returned must also contain an image element named "Image". The images you store in the site area or content can be different, but they must all have the same label.
Add a page navigation element to a menu design
To add navigation controls to a menu you add a reference to a page navigation element in either the footer or header.
<table>
<tr>
    <td> <a href=" <placeholder tag="href" /> ">
                   <placeholder tag="name" /> </a><br> </td>
</tr>
<tr>
    <td> <component name= "pagenav" /> </td>
</tr>
</table>
Header
<table> Table tag is used open the table. Each menu search result
<tr><td> <a href=" <placeholder tag="href" /> ">
Instead of a URL, insert a URL placeholder here. This is where the URL of the menu item will be inserted in the rendered menu. To have the menu display as a vertical list, a table row and table cell tag (<tr><td>) are added. <placeholder tag="name" /> </a><br> </td></tr>
Instead of text, insert a name placeholder. This is where the title of the menu item will be inserted in the rendered menu. </td></tr> are added to close the cell and row. Footer
<tr><td> <component name= "pagenav" /> </td></tr> </table>
Add a reference to a previously created page navigation element to add navigation features to a menu design. In this example, the page navigation element is referenced from a page navigation component called "pagenav".
News Menu Example


The AuthoringTool tag in the footer references an authoring tool that enables inline editing of the selected menu component.
<tr>
    <td align="left"
        width="100%"
        colspan="2"
        style="padding-top:8px;"
        nowrap>

    <table border="0"
           cellspacing="0"
           cellpadding="0"
           width="100%">
    <tr>
        <td align="left" nowrap>
            <AuthoringTool context="current"
                           name="Express Web Content/AddNewsTool"/>
        </td>
        <td align="right"
            width="100%"
            nowrap>

            <Component id="afc5970042ad275496c4978ed63b63a0:NC9FeHByZXNzIFdlYiBDb250ZW50L1BhZ2luZ0NvbnRyb2xz"
                       name="Express Web Content/PagingControls"/>
        </td>
    </tr>
    </table>
    </td>
</tr>
</tbody>
</table>
Parent Topic
Menu element