Tutorial: Composite applications
Overview
This section describes how portlet components can be prepared for communication in a portal environment.
- Create WSDL files defining the bits and pieces of component inter-communication
- Update the code to allow component communication to occur
- Create wires between components to control communication
Composite applications are generally referred to as cooperative portlets when used in the context of inter-portlet communications.
The declaration of data items is accomplished using a Web Services Definition Language (WSDL) file.
Based on design, one or more target portlets on a portal page can automatically react to changes from a source portlet when an event is received. Portlets that are targets of these events can react so that users are not required to make repetitive changes or actions in other portlets on the page thus providing a coordinated and consistent behavior between the portlets on the page while enhancing user experience. Cooperation between source and target portlets is facilitated by a WebSphere Portal runtime entity called the PropertyBroker. Portlets on a page can cooperate in this way even if they were developed independently, without awareness of other cooperative portlets.
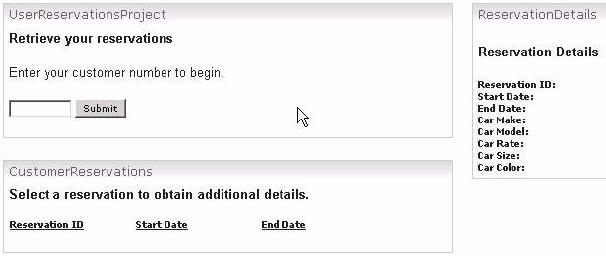
In this scenario, you will develop cooperative portlet components for the ITSO Car Rental sample application that will run within the WebSphere Portal environment. These portlet components will integrate, in the chapters to follow, into existing components of the ITSO Car Rental sample composite application. This scenario covers development, assembly, and deployment of these "wired" components to WebSphere Portal and consists of two views, a user view and an administor's view.
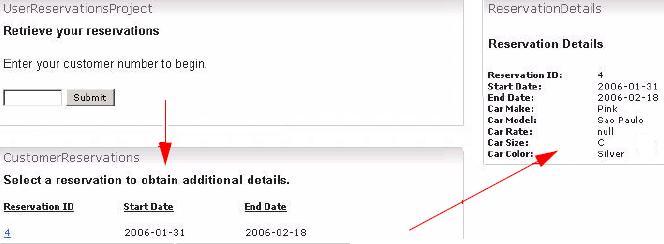
The cooperative portlet components communicate with each other via the property broker and will be developed using the JSR-168 portlet standard. Once, these components are developed and deployed to the WebSphere Portal environment, the general flow of this application from the user point of view will be executed as follows:
- The user enters a customer ID to be published to the property broker.
- Receive the customer ID from the property broker and generate a list of past reservations. When a one of these reservations is selected, the reservation ID is published to the property broker.
- The reservation ID is received from the property broker to show reservation details.
Create shells of portlet components
To create portlets using Rational Application Developer 7.0, have the Portal Tools plug-in installed and the development environment must be properly configured.
- Start...
Rational Application Developer | Start | Run | Programs | IBM Software Development Platform | IBM Rational Application Developer- For purposes of this development project, you are using c:\workspace as the workspace folder. If prompted, select the workspace location you will use and click OK.
- If not already open, switch to the J2EE perspective by clicking...
Window | Open Perspective | Other | J2EE- Create a new Portlet Project by selecting...
File | New | Project... | Portlet Project | NextIf you are prompted enable "Portal Development". Click OK.
- In the New Portlet Project window, enter the following values. If a parameter value is not provided below, keep the default setting.
Project name UserReservationsProject EAR membership Uncheck "Add project to an ear" Portlet API JSR 168 Portlet Create a portlet Uncheck this checkbox - Click Finish.

- If you are prompted to open the Web Perspective, click Yes.
- Right-click...
UserReservationsProject | New | Portlet- In the Portlet pane, enter Portlet name of CustomerIdentification and Portlet type as Basic Portlet. Click Next.
- Accept the default settings on the Portlet Setting pane and click Next.
- Unselect all options on the Action and Preferences pane and click Finish.
8. Repeat the previous steps for two additional portlets. Substitute the Portlet name with the following two portlet names.
- CustomerReservations
- ReservationDetails
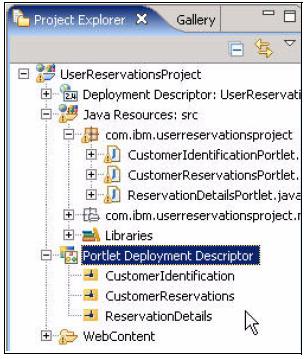
- Your Project Explorer pane should now contain all three portlets
Enable the wires
Now that the basic JSR-168 portlets are created, you will create the WSDL files that enable "wiring". Note that the wires themselves are not "attached" as this is a function handled by WebSphere Portal.
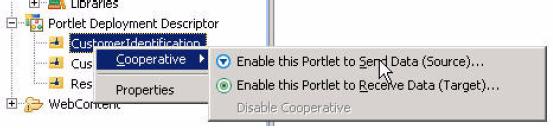
- Expand...
Portlet Deployment Descriptor | CustomerIdentification (right-click) | Cooperative | Enable this Portlet to Send Data (source)...
- From the wizard, enter the following details and leave other entries to their default settings.
Data Type URI http://userreservationsproject#CustID Java Type java.lang.String Action Parameter ACTION_NAME_PARAM Action Value CustIDAction Location Request attribute Property Name outputCustID - Next, enable the CustomerReservations portlet to receive data sent by the CustomerIdentification portlet. Enter the following details and leave other entires to their default settings.
Data Type URI http://userreservationsproject#CustID Java Type java.lang.String Action Parameter ACTION_NAME_PARAM Action Value CustIDAction Location Request parameter Property Name inputCustID - In addition to CustomerReservations being a consumer of information, it also acts as a publisher of data. CustomerReservations publishes the reservation ID to the ReservationDetails portlet. Enable the CustomerReservations portlet to send data. Enter the following details and leave other entires to their default settings.
Data Type URI http://userreservationsproject#ResID Java Type java.lang.String Action Parameter ACTION_NAME_PARAM Action Value ResIDAction Location Request attribute Property Name outputResID - Lastly, enable the ReservationDetails portlet to receive data sent by the CustomerIdentification portlet. Enter the following details and leave other entires to their default settings.
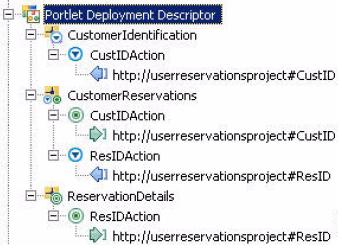
Data Type URI http://userreservationsproject#ResID Java Type java.lang.String Action Parameter ACTION_NAME_PARAM Action Value ResIDAction Location Request parameter Property Name inputResID - As a result of performing the above steps, three WSDL files have been generated by Rational Application Developers built-in tooling. These files have been placed into the folder...
/WebContent/wsdl...of the current project. No further modification to the WSDL files is necessary.
Examine the auto-generated WSDL files
In order to be truly neutral between components, declarations and actions have to be specific enough to guarantee proper transfer of data while remaining neutral to the transport layer. On the other hand, it also needs to be flexible enough to allow linking of components using a generic tool. Both issues have been addressed using Web Services Definition Language (WSDL) files. Based on the prior steps you have completed, three WSDL files were generated:
- CustomerIdentification.wsdl
- CustomerReservations.wsdl
- ReservationDetails.wsdl
Lets examine these files in closer detail to interpret the contents of the WSDL file.
CustomerIdentification.wsdl
In CustomerIdentification.wsdl, the following has been accomplished:
- Defined a data type called CustID of type string in the namespace of...
http://userreservationsproject...which has restrictions of xsd.string.
- Defined a message called...
CustIDAction_Response...that has one data item, CustID_Output, of type xsd.string.
- Defined a port type name...
CustomerIdentification_Service...that has an operation named CustomerIdentification and contains an output message of type CustIDAction_Response.
- Declared a binding called...
CustomerIdentification_Binding...of port type...
CustomerIdentification_Service...containing an operation of type CustomerIdentification. Here, an action is declared with name CustIDAction. For basic portlets, its type is standard. The action name parameter is ACTION_NAME_PARAM.
<?xml version="1.0" encoding="UTF-8"?>

<definitions xmlns="http://schemas.xmlsoap.org/wsdl/"
                 xmlns:portlet="http://www.ibm.com/wps/c2a"
                 xmlns:tns="http://userreservationsproject.CustomerIdentification/"
                 xmlns:tns0="http://userreservationsproject"
                 name="CustomerIdentification_Service"
                 targetNamespace="http://userreservationsproject.CustomerIdentification/">

    <types>
        <xsd:schema xmlns:xsd="http://www.w3.org/2001/XMLSchema"
                    targetNamespace="http://userreservationsproject">
            <xsd:simpleType name="CustID">
                <xsd:restriction base="xsd:string"/>
            </xsd:simpleType>
        </xsd:schema>
    </types>

    <message name="CustIDAction_Response">
        <part name="CustID_Output" type="tns0:CustID"/>
    </message>

    <portType name="CustomerIdentification_Service">
        <operation name="CustomerIdentification">
            <output message="tns:CustIDAction_Response"/>
        </operation>
    </portType>

    <binding name="CustomerIdentification_Binding"
             type="tns:CustomerIdentification_Service">

        <portlet:binding/>

        <operation name="CustomerIdentification">

            <portlet:action actionNameParameter="ACTION_NAME_PARAM"
                            caption="Action.Caption2"
                            name="CustIDAction" type="standard"/>

            <output>
                <portlet:param boundTo="request-attribute"
                              caption="Property.Caption2"
                              name="outputCustID" partname="CustID_Output"/>
            </output>

        </operation>
    </binding>
</definitions>
CustomerReservations.wsdl
In CustomerReservations.wsdl, the following has been accomplished:
- Defined a data type called CustID and ResID of type string in the namespace of...
http://userreservationsproject...where both CustID and ResID have restrictions of xsd.string.
- Defined a message, CustID_Request that has one data item, CustID_Input, of type xsd.string.
- Defined a message, ResIDAction_Response that has one data item, ResID_Output, of type xsd.string
- Defined a port type name...
CustomerReservations_Service...that has an operation named CustomerReservations and contains an input message, CustID_Request, and an output message, ResIDAction_Response.
- Declared a binding called...
CustomerReservations_Binding...of port type...
CustomerReservations_Service...containing an operation of type CustomerReservations. Here, an action is declared with name CustIDAction. For basic portlets, its type is standard. The action name parameter is ACTION_NAME_PARAM
<?xml version="1.0" encoding="UTF-8"?>
<definitions xmlns="http://schemas.xmlsoap.org/wsdl/"
             xmlns:portlet="http://www.ibm.com/wps/c2a"
             xmlns:tns="http://userreservationsproject.CustomerReservations/"
             xmlns:tns0="http://userreservationsproject"
             name="CustomerReservations_Service"
             targetNamespace="http://userreservationsproject.CustomerReservations/">

    <types>
        <xsd:schema xmlns:xsd="http://www.w3.org/2001/XMLSchema"
                    targetNamespace="http://userreservationsproject">

            <xsd:simpleType name="CustID">
                <xsd:restriction base="xsd:string"/>
            </xsd:simpleType>
            <xsd:simpleType name="ResID">
                <xsd:restriction base="xsd:string"/>
            </xsd:simpleType>

        </xsd:schema>
    </types>

    <message name="CustID_Request">
        <part name="CustID_Input" type="tns0:CustID"/>
    </message>

    <message name="ResIDAction_Response">
        <part name="ResID_Output" type="tns0:ResID"/>
    </message>

    <portType name="CustomerReservations_Service">

        <operation name="CustomerReservations">
            <input message="tns:CustID_Request"/>
        </operation>

        <operation name="CustomerReservations0">
            <output message="tns:ResIDAction_Response"/>
        </operation>

    </portType>

    <binding name="CustomerReservations_Binding"
             type="tns:CustomerReservations_Service">

        <portlet:binding/>

        <operation name="CustomerReservations">
            <portlet:action actionNameParameter="ACTION_NAME_PARAM"
                            caption="Action.Caption"
                            name="CustIDAction"
                            type="standard"/>
            <input>
                <portlet:param boundTo="request-parameter"
                               caption="Property.Caption"
                               name="inputCustID"
                               partname="CustID_Input"/>
            </input>

        </operation>

        <operation name="CustomerReservations">

            <portlet:action actionNameParameter="ACTION_NAME_PARAM"
                            caption="Action.Caption1"
                            name="ResIDAction"
                            type="standard"/>

            <output>

                <portlet:param boundTo="request-attribute"
                               caption="Property.Caption1"
                               name="outputResID"
                               partname="ResID_Output"/>
            </output>
        </operation>
    </binding>
</definitions>
ReservationDetails.wsdl
In ReservationDetails.wsdl, the following has been accomplished:
- Defined a data type called ResID of type string in the namespace of...
http://userreservationsproject...where ResID has a restriction of xsd.string.
- Defined a message...
ResID_Request...that has one data item...
ResID_Input...of type xsd.string.
- Defined a port type name...
ReservationDetails_Service...that has an operation named...
ReservationDetails...and contains an input message
ResID_Request- Declared a binding called...
ReservationDetails_Binding...of port type...
ReservationDetails_Service...containing an operation of type...
ReservationDetailsHere, an action is declared with name ResIDAction. For basic portlets, its type is standard. The action name parameter is ACTION_NAME_PARAM.
<?xml version="1.0" encoding="UTF-8"?>
<definitions xmlns="http://schemas.xmlsoap.org/wsdl/"
                 xmlns:portlet="http://www.ibm.com/wps/c2a"
                 xmlns:tns="http://userreservationsproject.ReservationDetails/"
                 xmlns:tns0="http://userreservationsproject"
                 name="ReservationDetails_Service"
                 targetNamespace="http://userreservationsproject.ReservationDetails/">


    <types>
        <xsd:schema xmlns:xsd="http://www.w3.org/2001/XMLSchema"
                    targetNamespace="http://userreservationsproject">
            <xsd:simpleType name="ResID">
                <xsd:restriction base="xsd:string"/>
            </xsd:simpleType>
        </xsd:schema>
    </types>

    <message name="ResID_Request">
        <part name="ResID_Input" type="tns0:ResID"/>
    </message>

    <portType name="ReservationDetails_Service">
        <operation name="ReservationDetails">
            <input message="tns:ResID_Request"/>
        </operation>
    </portType>

    <binding name="ReservationDetails_Binding" type="tns:ReservationDetails_Service">

        <portlet:binding/>

        <operation name="ReservationDetails">
            <portlet:action actionNameParameter="ACTION_NAME_PARAM"
                            caption="Action.Caption"
                            name="ResIDAction"
                            type="standard"/>
            <input>
            <portlet:param boundTo="request-parameter"
                           caption="Property.Caption"
                           name="inputResID"
                           partname="ResID_Input"/>
            </input>
        </operation>
    </binding>

</definitions>
Import support files - Database and HTML helper
Perform the following steps to import the helper files to the project.
- In the Java Resources: src folder, create a new package called...
com.ibm.userreservations.db- Right-click the newly created packaged and select Import.
- Expand...
General | File System | Next...and point the From Directory to the location where you downloaded the class...
DatabaseOperations.java- Select the DatabaseOperations.java file and click Finish.
Import support files - CSS helper
Perform the following steps to import the CSS file to the project.
- Select...
WebContent folder (right-click) | New | Folder | css folder (right-click) | Import | General | File System | Next...and point the From Directory to the location where you downloaded the itso.css stylesheet file.
- Select the itso.css file and click Finish.
Set and get the "wire" data
Next, you will perform operations necessary to set and get properties from the PropertyBroker.
- Add values to the CustomerIdentification portlet to send the appropriate value. To do this, create a file called....
/WebContent/_CustomerIdentification/jsp/html/CustomerIdentificationPortletView.jsp...and insert the code shown below...
... <link rel="stylesheet" href='<%= renderResponse.encodeURL(renderRequest.getContextPath() + "/css/itso.css") %>' type="text/css"> <div id="CarSelect"> <h3> Retrieve the reservations </h3> <p> Enter the customer number to begin. <p> <FORM method="POST" action="<portlet:actionURL/>"> <input name="ACTION_NAME_PARAM" value="CustIDAction" type="hidden" /> <input name="myCustIDTextbox" value="" type="text" size="5" maxlength="5" /> <input name="submit" value="Submit" type="submit" /> </FORM>- Save the file.
- Next, open the class...
CustomerIdentificationPortlet.java...in the package...
com.ibm.userreservationsproject- Add the code shown below into the processAction() method. Save and exit the file.
public void processAction(ActionRequest request, ActionResponse response) throws PortletException, java.io.IOException { String actionValue = request.getParameter("ACTION_NAME_PARAM"); if(actionValue != null && "CustIDAction".equals(actionValue)) { String formInputCustID = request.getParameter("myCustIDTextbox"); request.setAttribute("outputCustID", formInputCustID); } }- So far, you have enabled the portlet to communicate with the PropertyBroker. However, there is currently no logic to handle the logic on the target portlet.
Open the class...
CustomerReservationsPortlet.java...in the package...
com.ibm.userreservationsproject...and add the following code into the processAction(...) method.
public void processAction(ActionRequest request, ActionResponse response) throws PortletException, java.io.IOException { String actionValue = request.getParameter("ACTION_NAME_PARAM"); if(actionValue != null && "CustIDAction".equals(actionValue)) { custID = request.getParameter("inputCustID"); } else if(actionValue != null && "ResIDAction".equals(actionValue)) { String resID = request.getParameter("resID"); request.setAttribute("outputResID", resID); } }- In the same file,...
CustomerReservationsPortlet.java...add the following line of code to the doView(...) method.
public void doView(RenderRequest request, RenderResponse response) throws PortletException, IOException { // Set the MIME type for the render response response.setContentType(request.getResponseContentType()); //** Add parameter to the request object request.setAttribute("custID", custID); //** The following code creates the portlet view and is provided to //** save you time from writing HTML and database connection code //** utilized in this scenario. DatabaseOperations dbOps = new DatabaseOperations(); String reservationsTable = dbOps.getReservations(custID, response); request.setAttribute(.reservationsTable., reservationsTable); // Invoke the JSP to render PortletRequestDispatcher rd = getPortletContext().getRequestDispatcher(getJspFilePath(request, VIEW_JSP)); rd.include(request,response);- Once the file has been saved, you will notice an error stating...
custID cannot be resolvedTo resolve this, add the following class level String declaration as a class variable. Save the file and exit.
public class CustomerReservationsPortlet extends GenericPortlet { // JSP folder name public static final String JSP_FOLDER = "/_CustomerReservations/jsp/"; public static final String VIEW_JSP = "CustomerReservationsPortletView"; private String custID= new String(); ...- Create a form to create the reservations listing. Open...
/WebContent/_CustomerReservations/jsp/html/CustomerReservationsPortletView.jsp- Insert the code shown below into the file and save the file.
... <link rel="stylesheet" href='<%= renderResponse.encodeURL(renderRequest.getContextPath() + "/css/itso.css")%>' type="text/css"> <div id="CarSelect"> <p><h3> Retrieve the reservations</h3> <p> Enter the customer number to begin. <p><FORM method="POST" action="<portlet:actionURL/>"> <input name="ACTION_NAME_PARAM" value="CustIDAction" type="hidden" /> <input name="myCustIDTextbox" value="" type="text" size="10" maxlength="10" /> <input name="submit" value="Submit" type="submit" /> </FORM>- Enable the portlet to retrieve and process values from the PropertyBroker. Open the class...
ReservationDetailsPortlet.java...in the package...
com.ibm.userreservationsproject...and add the following code into the processAction(...) method.
public void processAction(ActionRequest request, ActionResponse response) throws PortletException, java.io.IOException { //** This code processes the "wired" reservation ID input String actionValue = request.getParameter("ACTION_NAME_PARAM"); if(actionValue != null && "ResIDAction".equals(actionValue)) { resID = request.getParameter("inputResID"); if (resID.length() > 0) { DatabaseOperations dbOps = new DatabaseOperations(); reservationDetailsTable = dbOps.getReservationDetails(resID); resID = ""; } } }- In the same file...
ReservationDetailsPortlet.java...add the following lines of code to the doView(...) method prior to the invocation of JSP rendering...
public void doView(RenderRequest request, RenderResponse response) throws PortletException, IOException { // Set the MIME type for the render response response.setContentType(request.getResponseContentType()); //** Add the parameter to the request object request.setAttribute("resID", resID); //** The following code creates the portlet view and is provided to //** save you time from writing HTML and database connection code //** utilized in this scenario. request.setAttribute("reservationDetailsTable", reservationDetailsTable); DatabaseOperations dbOps = new DatabaseOperations(); reservationDetailsTable = dbOps.getReservationDetails(resID); // Invoke the JSP to render PortletRequestDispatcher rd = getPortletContext().getRequestDispatcher(getJspFilePath(request, VIEW_JSP)); rd.include(request,response); }- Once the file has been saved, you will notice an errors stating...
resID cannot be resolvedTo resolve this, add the following String declaration as a class variable. Save the file and exit.
public class ReservationDetailsPortlet extends GenericPortlet { // JSP folder name public static final String JSP_FOLDER = "/_ReservationDetails/jsp/"; public static final String VIEW_JSP = "ReservationDetailsPortletView"; private String resID = new String(); private String reservationDetailsTable = ""; ... }- Create the output table for reservation details. Open...
/WebContent/_ReservationDetails/jsp/html/ReservationDetailsPortletView.jsp...and insert the code shown below...
...
<link rel="stylesheet"
      href='<%= renderResponse.encodeURL(renderRequest.getContextPath() + "/css/itso.css")%>
      type="text/css">

<div id="CarSelect">

<h3> Select a reservation to obtain additional details.</h3>

<% String reservationsTable = (String)renderRequest.getAttribute("reservationsTable"); %>

<%= reservationsTable %>
Export the application WAR file
- Export UserReservationsProject as a WAR file by right-clicking the project...
UserReservationsProject...and selecting...
Export | WAR file- When prompted to enter the destination, enter a destination where the WAR file is to be saved. For example...
c:\UserReservationsProject.war.- Leave other fields to their default setting and click Finish.
Install the application in WebSphere Portal
- Open a web browser and login the WebSphere Portal server using a user ID that has administrative priveleges.
- Install the UserReservationsProject portlet application....
Launch menu | Administration | Portlet Management | Web Modules | Install- From the Manage Web Modules portlet, left-click Browse... and navigate to the location where the UserReservationsProject.war file has been saved.
- Click Next and then Finish to complete the portlet application installation.
Assemble the application's wiring
- Navigate back to the portal Home page.
- Next, create an empty page. For the scenario, you have created a page named User Reservations under the Getting Started label.
- Add the three portlets to the User Reservations page and click Done.
- Refresh the page and the results appear
- Left-click the Page menu of UserReservations and select Edit Page Layout.

- Create the wire that provides the customer number to the CustomerReservations portlet. Enter the following settings and then click the + action button, and click Done.
Source portlet UserReservationsProject Sending outputCustID Property Target page Default value of User Reservations Target portlet CustomerReservations Receiving CustIDAction Action,inputCustID Property Wire Type Personal From the User Reservations page, enter customer number 1234 and click Submit. Notice that the CustomerReservations portlet has displayed a result. This is the result of the message being obtained by the WSDL of the customerReservations portlet and thus invoking the processAction(...) method of the CustomerReservations portlet.
- From the User Reservations page menu, select Edit Page Layout, navigate to the Wires page and enter the following settings. When the settings have been entered, left click the + action button, and click Done.
Source portlet CustomerReservations Sending outputResID Property Target page Default value of User Reservations Target portlet ReservationDetails Receiving ResIDAction Action,inputResID Property Wire Type Personal - When returned back to the User Reservations page, left-click Reservation ID 4 and notice the ReservationDetails portlet takes action and populates data based on the message received by the CustomerReservations portlet.

Work with Composite Applications
The above procedure illustrated how to develop, assembly, deploy and wire portlet components to WebSphere Portal. This section describes a new technology that has been incorporated into WebSphere Portal 6 to assemble components in a template and then instantiate them to create different applications.
Templates describe the application behavior: interaction between components, access control to components etc. The template is stored as an XML file in a template catalog to be available to the portal community. Templates can be defined as a series of pages, portlets, and points of variability. An application is an instance of a template, these instances run within an application runtime called composite application infrastructure (CAI). When an application is created there are points in the template that can be overridden with user-provided input to give the application a specific context, these are called the points-of-variability (PoVs).
PoV values are passed down to the components as parameters during composite application instantiation.
Create Templates
- Log into Portal Server as administrator
- Select...
Portal Launch menu | Templates | Template Library page | NewEnter the following values...
Template name User Reservations Category Composite Applications Description User Reservations Template Starting point Portal Blank Template

- Click OK.
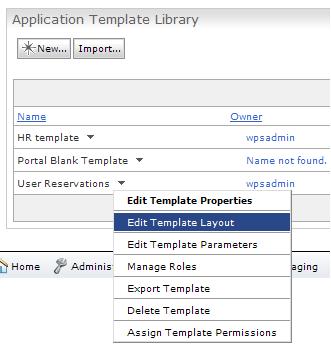
- From the Application Template Library select the arrow besides the newly created template to launch the context menu and click on Edit Template Layout.
- As you selected Portal Blank Template as starting point a page called Blank Page has been created. We can work with this page or create a new page by selecting New Page icon. Create a new one named User Reservations.

- Edit the User Reservations page, to place portlets on it, by clicking the pencil icon.
- In the Content tab of Page Layout screen click Add portlets and select the portlets us installed earlier.
- UserReservationsProject portlet on the top left column.
- CustomerReservations portlet on the bottom left column.
- ReservationDetails portlet on the right column.
- In the Appearance tab of page select No Skin Skin for all portlets.
- In the Wire tab of page establish wires as you did earlier.
- Click Done to return to the Application Layout page and click Save to save the template.
Manage roles
We can define roles in an application template to specify the levels of access that application members have when they work with instances of composite applications created from the template.
To manage roles in the template go to the Template Library page select the arrow besides the User Reservations Template and click on Manage Roles. You will see two roles created

We can modify these roles or create a new one clicking New. The New Role window appears
- We can choose to base the new role on an existing role.
- Application and Page Access Settings section.
All members of an application can view application pages regardless of their assigned roles. In this section we can add the following permission:
- Allow members of this role to edit the application and all pages of the application.
- Allow members of this role to manage the membership of the application.
- Components Access Settings section.
The access to the components that is controlled first by page access and then by levels of access that are defined for each component in this section. Drop down the boxes to select the level of access for each component.
Parent Topic
Overview: Composite Applications
Related concepts
Access rights
Multiple virtual portals
Resources