Trade 6.0.1
Overview
The IBM Trade Performance Benchmark Sample for WAS (called Trade 6 throughout this book) is the fourth generation of the WebSphere end-to-end benchmark and performance sample application. It is a stock trading application and allows us to buy and sell stock, to check our portfolio, register as a new user, and so on. We use DB2 UDB V8.2 as the backend database.The Trade benchmark is designed and developed to cover the significantly expanding programming model and performance technologies associated with WAS. This application provides a real-world workload, enabling performance research and verification test of the JavaTM 2 Platform, Enterprise Edition (J2EETM) 1.4 implementation in WAS, including key performance components and features. For details on how Trade 6 exploits all of these functions, read the document tradeTech.pdf which can be found inside the installation package.
Trade 6 demonstrates several new features in WebSphere V6. All Trade-versions are WebSphere-version dependent, so Trade 6 will only work with WAS V6.
Trade 6 is the sample application that is used for most chapters in this book.
Downloading and unpacking Trade 6
We can download the Trade 6.0.1 installation package from the following Web site:
http://www.ibm.com/software/webservers/appserv/was/performance.htmlAfter downloading the file tradeInstall.zip, unzip the package somewhere on the Deployment Manager machine. A directory called tradeinstall is created. This directory contains the Trade 6 files.
There are special configuration and installation scripts available so Trade 6 can be installed in a dynamic cluster. These scripts however do not come with the download package from the URL above. Instead, we can download it from the redbook repository.
Once we have downloaded the dynamic cluster installation scripts, create a new subdirectory called dynamic under the tradeinstall directory. Then extract the downloaded zip-file into the tradeinstall/dynamic directory.
The trade.jacl script allows us to either configure all necessary Trade 6 resources and then install Trade 6 automatically or we can use the configure option to only create the resources.
We used the second approach of configuring the resources first and installed the application later using the Administrative Console. We assume here that we have already created the node group and dynamic cluster that we want to run Trade 6 in.
Refer to the Readme.html file in the tradeinstall directory for additional information, for example, if we want to use an Oracle database instead of DB2.
Setting up the Trade 6 database
We are using DB2 UDB V8.2 and the default DB2 instance on the server (db2inst1).
Linux and UNIX users must add the following line to their.profile script for the account that is used to run WAS. This command reads the DB2 profile script allowing the application server to access DB2 native libraries.
. /home/db2inst1/sqllib/db2profileWe must log out and log back into the system for this setting to take affect.
- Copy the entire tradeinstall directory or at least the Table.ddl file from the Trade 6 install directory to the DB2 server.
- Set up a DB2 command shell and change to the directory where Table.ddl is found:
Linux and UNIX:
su - DB2_username.
For example:
su - db2inst1Windows:
db2cmd- Then execute the following DB2 commands to create the tradedb database:
db2 create db tradedb
db2 connect to tradedb
db2 -tvf Table.ddl
db2 disconnect all
db2 update db config for tradedb using logfilsiz 1000
db2 update db cfg for tradedb using maxappls 100
db2stop force
db2start
Creating Trade 6 resources
Use the trade.jacl file from the tradeinstall/dynamic directory to configure the Trade 6 resources in a dynamic cluster environment instead of the trade.jacl file that comes with the Trade 6 download (which is found in the tradeinstall directory).
- Open up an OS command prompt on the Deployment Manager machine and go to the tradeinstall/dynamic directory.
- Execute:
install_root/bin/wsadmin.sh -f trade.jacl configureNote that we can simply press Enter rather than entering a value if the default value is true for our environment - the default is indicated by [value] when executing the script. Two blank lines in the example below indicate where we used the default values.

/tradeinstall/dynamic # /usr/IBM /WebSphere/AppServer/profiles/dmgr1/bin/wsadmin.sh -f trade.jacl configure WASX7209I: Connected to process "dmgr" on node dmgr1 using SOAP connector; The type of process is: DeploymentManager WASX7303I: The following options are passed to the scripting environment and are available as argument that is stored in the argv variable: "[configure]" trade.jacl resource_scripts.jacl ------------------------------------------------ Trade Install/Configuration Script Operation: configure Silent: false ------------------------------------------------ Global security is (or will be) enabled (true|false) [false]: Is this a cluster installation (yes|no) [no]: yes Is this a dynamic cluster installation (yes|no) [no]: yes ------------------------------------------------- Collecting Dynamic Cluster InfoBefore proceeding, a node group must be created for the dynamic cluster, and at least one node must be a member of the node group. ------------------------------------------------- Has a node group been created for the dynamic cluster? (yes|no) [yes]: yes Please enter the node group name [TradeNodeGroup]: RedbookNodegroup1 Located Node node1 in nodegroup RedbookNodegroup1... Located Node node2 in nodegroup RedbookNodegroup1... Please enter the dynamic cluster name [TradeCluster]: RedbookCluster10 Server RedbookCluster10_node1 will be configured Server RedbookCluster10_node2 will be configured Dynamic Cluster information obtained... ------------------------------------------------ Collecting Database/Datasource Information ------------------------------------------------ Select the backend database type (db2|oracle) [db2]: NOTE: wsadmin requires ";" for delimiting the database driver path regardless of platform! Please enter the database driver path [/home/db2inst1/sqllib/java/db2jcc.jar;/home/db2inst1/sqllib/java/db2jcc_license_cu.jar]: Please enter the database name [tradedb]: Please enter the DB2 database hostname [localhost]: db Please enter the DB2 database port number [50000]: Please enter the database username [db2admin]: Enter_your_db_user Please enter the database password [password]: Enter_your_db_user_password ------------------------------------------------ Configuring Dynamic Cluster ------------------------------------------------ Creating Dynamic Cluster RedbookCluster10... RedbookCluster10 already exists! Saving... Enabling SIB Service on RedbookCluster10_node1... SIB Service enabled successfully! Enabling SIB Service on RedbookCluster10_node2... SIB Service enabled successfully! Enabling SIB Service on RedbookCluster10_node1_1... SIB Service enabled successfully! Enabling SIB Service on RedbookCluster10_node2_3... SIB Service enabled successfully! Enabling SIB Service on RedbookCluster10_node1_2... SIB Service enabled successfully! Enabling SIB Service on RedbookCluster10_node1_3... SIB Service enabled successfully! ------------------------------------------------ Dynamic Cluster Configuration Completed!!! ------------------------------------------------ ------------------------------------------------ Configuring JDBC/Datasource Resources Scope: xdcell(cells/xdcell|cell.xml#Cell_1) ------------------------------------------------ Creating JAAS AuthData TradeDataSourceAuthData... Alias Name: TradeDataSourceAuthData User: db2inst1 Password: db2inst1 TradeDataSourceAuthData created successfully! Creating JDBC Provider DB2 Universal JDBC Driver Provider (XA)... Provider Name: DB2 Universal JDBC Driver Provider (XA) Implementation Class: com.ibm.db2.jcc.DB2XADataSource XA enabled: true DB2 Universal JDBC Driver Provider (XA) created successfully! Creating DataSource TradeDataSource... Datasource Name: TradeDataSource JNDI Name: jdbc/TradeDataSource Statement Cache Size: 60 Database Name: tradedb JDBC Driver Type: 4 Hostname: db Port Number: 50000 Creating Datasource properties... Creating Connection Pool using defaults... Creating Connection Factory... TradeDataSource created successfully! Creating JDBC Provider DB2 Universal JDBC Driver Provider... Provider Name: DB2 Universal JDBC Driver Provider Implementation Class: com.ibm.db2.jcc.DB2ConnectionPoolDataSource XA enabled: false DB2 Universal JDBC Driver Provider created successfully! Creating DataSource MEDataSource... Datasource Name: MEDataSource JNDI Name: jdbc/MEDataSource Statement Cache Size: 60 Database Name: tradedb JDBC Driver Type: 4 Hostname: db Port Number: 50000 Creating Datasource properties... Creating Connection Pool using defaults... Creating Connection Factory... MEDataSource created successfully! ------------------------------------------------ JDBC Resource Configuration Completed!!! ------------------------------------------------ ------------------------------------------------ Configuring JMS Resources Scope: xdcell(cells/xdcell|cell.xml#Cell_1) ------------------------------------------------ Creating JAAS AuthData TradeOSUserIDAuthData... Alias Name: TradeOSUserIDAuthData User: LocalOSUserID Password: password TradeOSUserIDAuthData created successfully! RedbookCluster10 created successfully! Adding SIBus member RedbookCluster10... Default DataSource: false Datasource JNDI Name: jdbc/MEDataSource SIBus member added successfully! Creating SIB Messaging Engine... Bus Name: RedbookCluster10 Default DataSource: false Datasource JNDI Name: jdbc/MEDataSource Cluster Name: RedbookCluster10 created successfully! Creating OneOfNPolicy Policy for ME0... Alive Period(s): 30 Server Name: RedbookCluster10_node1 ME Name: RedbookCluster10.000-RedbookCluster10 Policy for ME0 created successfully! Modifying ME DataStore parameters... ME Name: RedbookCluster10.000-RedbookCluster10 AuthAlias: TradeDataSourceAuthData Schema Name: IBM ME0 RedbookCluster10.000-RedbookCluster10 data store modified successfully! Creating OneOfNPolicy Policy for ME1... Alive Period(s): 30 Server Name: RedbookCluster10_node2 ME Name: RedbookCluster10.001-RedbookCluster10 Policy for ME1 created successfully! Modifying ME DataStore parameters... ME Name: RedbookCluster10.001-RedbookCluster10 AuthAlias: TradeDataSourceAuthData Schema Name: IBM ME1 RedbookCluster10.001-RedbookCluster10 data store modified successfully! Creating SIB Destination TradeBrokerJSD... Destination Name: TradeBrokerJSD Destination Type: Queue Reliability: EXPRESS_NONPERSISTENT Cluster Name: RedbookCluster10 TradeBrokerJSD created successfully! Creating SIB Destination Trade.Topic.Space... Destination Name: Trade.Topic.Space Destination Type: TopicSpace Reliability: EXPRESS_NONPERSISTENT Trade.Topic.Space created successfully! Creating JMS Queue Connection Factory TradeBrokerQCF... Connection Factory Name: TradeBrokerQCF Connection Factory Type: Queue JNDI Name: jms/TradeBrokerQCF TradeBrokerQCF created successfully! Creating JMS Topic Connection Factory TradeStreamerTCF... Connection Factory Name: TradeStreamerTCF Connection Factory Type: Topic JNDI Name: jms/TradeStreamerTCF TradeStreamerTCF created successfully! Creating JMS Queue TradeBrokerQueue... Queue Name: TradeBrokerQueue JNDI Name: jms/TradeBrokerQueue SIB Destination: TradeBrokerJSD Delivery Mode: NonPersistent TradeBrokerQueue created successfully! Creating JMS Topic TradeStreamerTopic... Topic Name: TradeStreamerTopic JNDI Name: jms/TradeStreamerTopic Topic Space: Trade.Topic.Space Delivery Mode: NonPersistent TradeStreamerTopic created successfully! Creating MDB Activation Spec TradeBrokerMDB... MDB Activation Spec Name: TradeBrokerMDB JNDI Name: eis/TradeBrokerMDB JMS Destination JNDI Name: jms/TradeBrokerQueue Destination Type: javax.jms.Queue TradeBrokerMDB created successfully! Creating MDB Activation Spec TradeStreamerMDB... MDB Activation Spec Name: TradeStreamerMDB JNDI Name: eis/TradeStreamerMDB JMS Destination JNDI Name: jms/TradeStreamerTopic Destination Type: javax.jms.Topic TradeStreamerMDB created successfully! ------------------------------------------------ JMS Resource Configuration Completed!!! ------------------------------------------------ Saving... Saving config...

All necessary resources are created. Existing resources, such as the dynamic cluster and its members, are kept and not recreated.
Verify the JDBC provider connection
We noticed that in some cases the database user password is not transferred correctly to the J2EE Connector Architecture (J2C) authentication data entry that is created using the configuration script. Therefore IBM recommends to verify that the connection to the database works correctly. Follow these steps in the Administrative Console:
- Go to...
Resources | JDBC Providers- Change to cell scope by removing the Deployment Manager's name from the Node box and clicking Apply. You should now see at least the following two JDBC providers:
- DB2 Universal JDBC Driver Provider
- DB2 Universal JDBC Driver Provider (XA)
- Click...
DB2 Universal JDBC Driver Provider (XA) | Data sources | TradeDataSource | Test connection button- If the connection test fails, click...
TradeDataSource | J2EE Connector Architecture (J2C) authentication data entries | TradeDataSourceAuthDataEnter the password for our DB2 instance user then click OK. Save and synchronize with nodes.
- To test the connection once again, click the TradeDataSource link at the top of the panel then press the Test connection button.
The connection test should now succeed. If not, look at the Deployment Manager logs to further investigate our connection problem.
Installing Trade 6 using the Administrative Console
We are now ready to install the Trade 6 Enterprise Application Archive. We could install Trade 6 by using the script again (this time with the install option). Instead, we shall do it using the Administrative Console which enables us to make all necessary changes interactively.
- Log on to the Administrative Console and click Applications | Install New Application. The Preparing for the application installation window is displayed.
- First we have to specify the EAR/WAR/JAR module to upload and install. Select Browse to specify the location of the Trade.ear file from the local or remote file system, select it, and click Next to continue.
- On the next window we can define mappings and bindings. We do not need to change anything here, so click Next to accept all defaults.
- Click the Continue button on the Application Security Warnings window.
- The upcoming window shows the first step in the Install New Application process.
- On the Step 1 window (Select installation options), make sure the Deploy enterprise beans check box is selected. Please note that the Application Name Trade has been filled in automatically. Click Next.
There are two WebSphere Extended Deployment V6 specific fields on this panel: Application Edition and Edition Description - right underneath the Application name field. These are important if we want to install more than one version of the same application in our topology.
When installing another version of an application you'll also get a new step entitled Clone Existing Work Classes during the application installation.
- On the Step 2 window (Map modules to servers) change the mapping so that both the EJB module (TradeEJBs) and the Web module (TradeWeb) are mapped to our dynamic cluster. In our case this is RedbookCluster10. Click Next.
Attention: Do not map the Web module to the Web servers if we use ODRs for workload distribution. Mapping the application to the Web servers would overwrite the plugin-cfg.xml file that is copied from the ODR to the Web servers.

- On the Step 3 window (Provide options to perform the EJB Deploy) we should change the Database type to the version we are using (in our case to DB2UDB_V82 ).
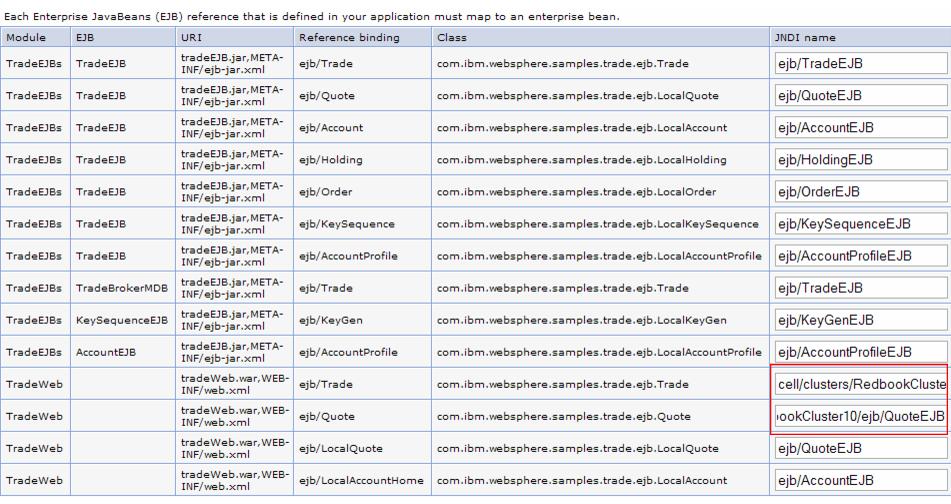
- Click Step 8 (Map EJB references to beans)
- Change the JNDI name of the ejb/Trade reference binding in the TradeWeb module to its fully qualified JNDI name:
cell/clusters/cluster_name/ejb/TradeEJBIn our environment, the correct fully qualified JNDI name is:
cell/clusters/RedbookCluster10/ejb/TradeEJB
- Change the JNDI name of ejb/Quote reference binding in the TradeWeb module to its fully qualified JNDI name, for example:
cell/clusters/RedbookCluster10/ejb/QuoteEJB
- Click the Summary step (this could be Step 11 or Step 12). Review the options and click Finish to perform the installation. This can take a few minutes.
- Finally, after the installation has completed, save our changes to the master configuration and synchronize with the nodes.
Using Trade 6
We are now ready to use Trade 6. Start the cluster hosting the application or the application if the cluster servers are already running.
Open the Trade 6 start page on one of our nodes using the following URL (the port number depends on our configuration):
http://host_name:9080/tradeFor example:
http://node1:9080/tradeIf this works, try to access Trade 6 through the ODRs:
http://odr_name/tradeWhen using Web servers in our environment, make sure that we can also access Trade 6 through the Web servers:
http://webserver_name/trade
Populating the Trade 6 database
Before we can start using the Trade 6 application, we first have to populate the database:
- Click the Configuration link on the left-hand side of the Trade 6 index page.
- In the Configuration utilities window, click (Re-)populate Trade Database. Wait until the database population has been completed. Before closing the window, review the default Trade 6 configuration and click the Update Config button.
- For performance reasons it is recommended to update DB2 statistics after populating the database. Run the following DB2 commands:
db2 connect to tradedb user db_user using password db2 reorgchk update statistics- Click the Go Trade! link on the left-hand side of the Trade 6 index page. We are forwarded to the Trade 6 login page. Click the Log in button and start to use Trade 6.
Additional information about configuring, installing, and removing Trade 6 can be found in 8.8, "Installing and configuring Trade 6" of IBM WebSphere V6 Scalability and Performance Handbook, SG24-6392.