Detecting Changes
Security Directory Integrator provides a number of features for detecting changes in input data. In addition to offering a set of Change Detection Connectors, you also have the option of enabling the Delta Engine for your Input source.
The Delta Engine takes snapshots of data as it's read and then compares these with snapshots taken during the previous run to determine what has changed. Those entries that are unchanged are skipped, and only modified entries are retrieved for processing in your EasyETL AssemblyLine.
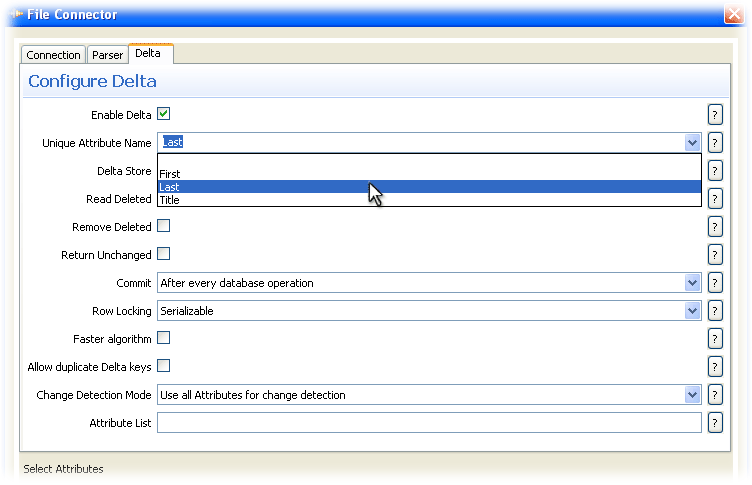
Press the Configure button for your Input
source and then select the Delta tab.
You must first enable the Delta Engine by selecting the check box
at the top of the con-figuration panel. Then use the drop-down to
select ‘First' as the Unique Attribute Name1.
There are several other parameters available here, some of which
make more sense when working in the standard SDI Workbench and not in EasyETL. For
example, al-though an EasyETL AL can detect and transfer new and modified
entries, it will not handle deleting a row from a database or entry
in a directory. However, it will write this infor-mation to an Output
target like a File Connector with the LDIF Parser. LDIF files can
contain change operation tags, and some systems support LDIF import.
We can learn more about the full Delta Handling features of SDI here:
http://www.tdi-users.org/twiki/pub/Integrator/HowTo/HowTo_SyncData_6.1.1070523.pdf
One change that you may wish to make is to the Commit parameter.
This controls when new and changed snapshots are committed to the SDI System Store database. By default
this is set to ‘After every database operation' and so occurs
during the read phase.
However, if we wish to ensure that a change has been successfully
transferred before committing the snapshot, set this drop-down to
‘On end of AL cycle' instead so that it happens after the Output
target has been updated.
In order for the Delta Engine to do its work it needs a baseline
snapshot set. You create this by running your ETL job the first time
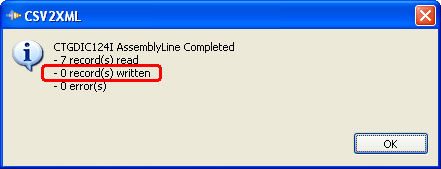
after Delta has been enabled. Once it has completed you will notice
that the popup reports twice as many writes occurring. This is because SDI also counts the snapshots being
written to the System Store, so you get two writes for every entry
processed.
Try running your EasyETL AssemblyLine again and you will see that no entries were written this time. The Delta Engine detected that input records were all unchanged and skipped them.
As a final test, bring up the input CSV file and change any of
the field values – except for ‘Last'2.
Save the change and then re-run your ETL job and you will see that only modified entries are processed.
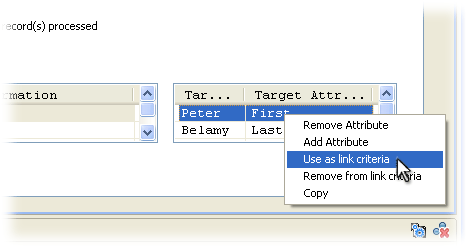
This is done by right-clicking on the Output Attribute
you want and selecting the Use as link criteria option.
Now when the Output Connector writes to the target, it first
searches for a record using the Link Criteria attribute specified.
If no match is found then a new entry is added. If the match was successful
then this record is updated.
It's as simple as that: your
ETL job has now been configured to provide ongoing synchronization
between your input source and output target.
Create command line
assets to run the ETL job
This brings up an Export Files dialog where to write this script/batch-file.
Note that it will be given the same name as the Project, so in the
case of this tutorial exercise running on Windows it will be called ‘CSV2XML.bat'.
Executing your EasyETL Project from the command line provides maximum
performance for the solution.
You will also get an XML file created
in the same location. This is called an SDI Config file
and contains the details of your EasyETL AssemblyLine that the SDI Server needs to run it. If you open
the generated script in a text editor you will see the one-liner needed
to start an SDI Server, point it
at a Config and then specify the AssemblyLine to run. All you need
to do now is set up a scheduled task or cronjob to periodically invoke
this script and your synchronization/migration service will be in
place.
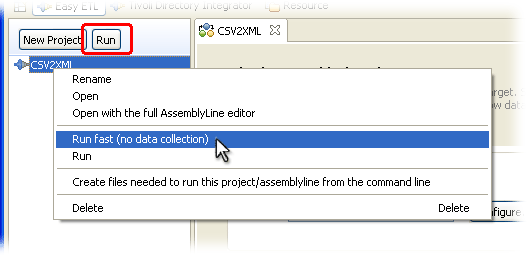
Although the Data Collector is a powerful tool, your ETL AssemblyLine
runs slower due to data collection and presentation on screen. If
instead you want your EasyETL AL to process as quickly as possible
then we can either select the Project and press the Run button at
the top of the Navigator, or right-click the Project and select the Run
fast… option.
Either option will open a console display where log messages
from the AssemblyLine will appear as your AL executes at top speed.
Note
that the Run option in the Project context
menu runs the ETL job with data collection.
Another powerful feature is the ability to control the contents
of your Input data set. This is available whenever your Input source
is a database or directory.
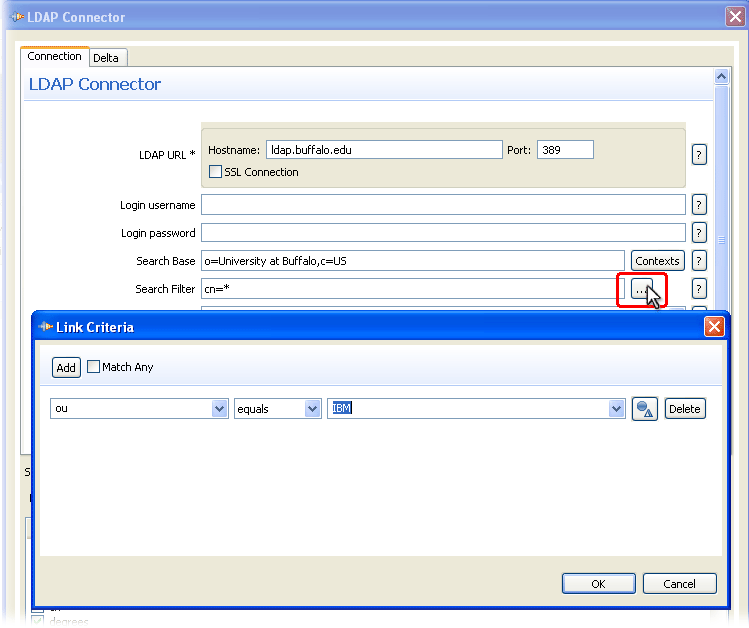
For example, select the ‘LDAP
Connector' for input and take a look at the configuration dialog for
this component. Next to the Search Filter parameter
is a button labeled with three dots (…). This opens up the Link Criteria
editor where we can define search rules that will be applied to build
the result set for this Connector to read.
This same feature is available for the Database and JDBC Connectors,
where you'll find the (...) button next to the Select parameter.
Although
we can enter the LDAP search syntax yourself directly in the search
parameter, this requires you to know the syntax for LDAP search filters
or JDBC Select statements. It is often simpler to express the selection
you want by using Link Criteria and letting the Connector deal with
the underlying syntax.
Opening your ETL Project in the full-featured SDI AssemblyLine editor lets you to
add custom logging and auditing, error handling, failover logic, auto-reconnect,
data augmentation (joins) and much more to your migration or synchronization
solution. You do this by right-clicking a Project and choosing the Open
with full AssemblyLine editor option. You'll still be
working in the EasyETL Workbench, but you will be able to reach additional
functionality available to the AssemblyLine.
If you find this
to your liking and are ready to take the plunge then switch to the Security Directory Integrator perspective (Windows > Open Perspective > Security Directory Integrator) and starting working in the
full SDI Workbench. Better yet
- now that you've mastered EasyETL, go back to Chapter 1 and start
digging into the full power of SDI.
1
As you may have deduced, the Delta Engine uses one of your input attributes
to uniquely identify snap-shots. If there is there is no unique value
available in the input data then we can specify multiple attributes
that will be concatenated together to from the snapshot id. You do
this by typing in the names of multiple attributes separated by a
plus symbol (+). For example: First + Last2 Since this is the attribute
used to identify snapshots, any change to its value for an entry will
cause it to appear as a new record to the Delta Engine.
Configure the output target for Updates
The
current setup works fine for output to a file. However, if you were
driving these changes to a directory, RDBMS or similar data store
then you will want to add new data as well as updating existing records.
In order for your EasyETL job to do this first select which
Output Attribute to use as the criteria for locating the record to
modify.
Command line assets for running and scheduling your
ETL job
Once your ETL AssemblyLine is ready for deployment
we can right-click on the Project in the Navigator and choose the Create
files needed… option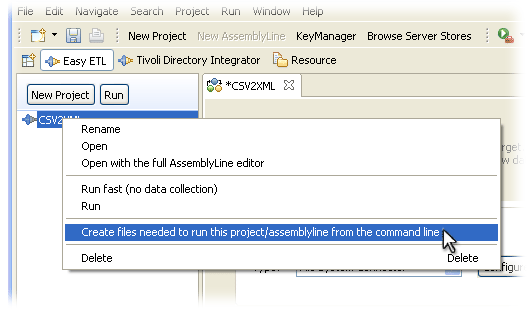
Additional options
Parent topic:
EasyETL Guide