Create deployment environments
This tuorial discusses automating the creation of deployment environments using the IBM Cloud CLI and Terraform. This tutorial may incur costs. See the Cost Estimator. This tutorial follows the DRY principle by implementing shell scripts to automate repetitive tasks like provisioning bare metal servers, databases, virtual machines, and clusters. We use scripts to configure user access and update the configuration. Multiple environments can be created with slight differences between them in capacity, networking, credentials, log verbosity.
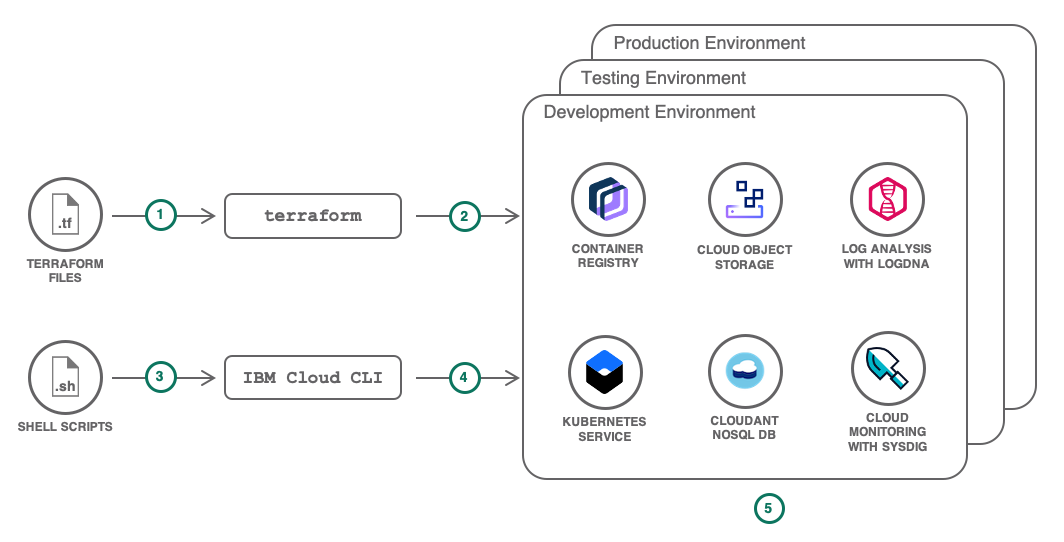
ibmcloud CLI and Terraform
Use the ibmcloud command line interface (CLI) to automate the creation and configuration of our cloud resources.
Use use the Terraform tool to codify APIs into declarative configuration files. We write what the infrastructure should look like, and Terraform creates the cloud resources. The IBM Cloud Provider for Terraform supports...
- Infrastructure as a Service (IaaS)
- bare metal
- virtual machine
- network services
- Container as a Service (CaaS)
- Kubernetes Service
- Kubernetes clusters
- Platform as a Service (PaaS)
- Cloud Foundry and services
- Functions as a Service (FaaS)
- Cloud Functions
Write scripts to automate the deployment
Store regular code in a source control management system, then create a continuous integration pipeline to automatically deploy changes.
This Git repository has configuration for setup of environments. We can clone the repository to follow the next sections detailing the content of the files.
- git clone https://github.com/IBM-Cloud/multiple-environments-as-code
The repository structure...
| Directory | Description |
|---|---|
| terraform | Home for the terraform files |
| terraform/global | terraform files to provision resources common to the three environments |
| terraform/per-environment | terraform files specific to a given environment |
| terraform/roles | terraform files to configure user policies |
Dev, Test, and Prod share a common organization and environment-specific resources. They will differ by the allocated capacity and the access rights. The terraform files reflect this with a global configuration to provision the Cloud Foundry organization and a per-environment configuration, using Terraform workspaces, to provision the environment-specific resources:

|
|
 >
>
Global Configuration
All environments share a common Cloud Foundry organization and each environment has its own space.
Under the terraform/global directory, we find the Terraform scripts to provision this organization. main.tf contains the definition for the organization:
   # create a new organization for the project
   resource "ibm_org" "organization" {
     name             = "${var.org_name}"
     managers         = "${var.org_managers}"
     users            = "${var.org_users}"
     auditors         = "${var.org_auditors}"
     billing_managers = "${var.org_billing_managers}"
   }
In this resource, all properties are configured through variables. In the next sections, we will learn how to set these variables.
To fully deploy the environments, we will use a mix of Terraform and the IBM Cloud CLI. Shell scripts written with the CLI may need to reference this organization or the account by name or ID. The global directory also includes outputs.tf which will produce a file containing this information as keys/values suitable to be reused in scripting:
   # generate a property file suitable for shell scripts with useful variables relating to the environment
   resource "local_file" "output" {
     content = <<EOF
ACCOUNT_GUID=${data.ibm_account.account.id}
ORG_GUID=${ibm_org.organization.id}
ORG_NAME=${var.org_name}
EOF

     filename = "../outputs/global.env"
   }
Individual Environments
There are different approaches to manage multiple environments with Terraform.
- Use modules to put together configurations by duplicating the terraform files (.tf) under separate directories, one directory per environment.
- Use workspaces to use the same terraform files with different environments. Environments will use the same definitions but with different configuration variables.
Each environment requires:
- Dedicated Cloud Foundry space
- Dedicated resource group
- Kubernetes cluster
- Database
- File storage
The Cloud Foundry space is linked to the organization created in the previous step. The environment terraform files need to reference this organization. This is where Terraform remote state will help. It allows the reference of an existing Terraform state in read-only mode. This is a useful construct to split our Terraform configuration in smaller pieces leaving the responsibility of individual pieces to different teams. backend.tf contains the definition of the global remote state used to find the organization created earlier:
data "terraform_remote_state" "global" {
      backend = "local"

      config {
        path = "${path.module}/../global/terraform.tfstate"
      }
   }
Once we can reference the organization, it is straightforward to create a space within this organization. main.tf contains the definition of the resources for the environment.
# a Cloud Foundry space per environment
   resource "ibm_space" "space" {
     name       = "${var.environment_name}"
     org        = "${data.terraform_remote_state.global.org_name}"
     managers   = "${var.space_managers}"
     auditors   = "${var.space_auditors}"
     developers = "${var.space_developers}"
   }
Notice how the organization name is referenced from the global remote state. The other properties are taken from configuration variables.
Next comes the resource group.
   # a resource group
   resource "ibm_resource_group" "group" {
    name     = "${var.environment_name}"
    quota_id = "${data.ibm_resource_quota.quota.id}"
}

   data "ibm_resource_quota" "quota" {
    name = "${var.resource_quota}"
}
The Kubernetes cluster is created in this resource group. The IBM Cloud provider has a Terraform resource to represent a cluster:
  # a cluster
  resource "ibm_container_cluster" "cluster" {
      name              = "${var.environment_name}-cluster"
      datacenter        = "${var.cluster_datacenter}"
      org_guid          = "${data.terraform_remote_state.global.org_guid}"
      space_guid        = "${ibm_space.space.id}"
      account_guid      = "${data.terraform_remote_state.global.account_guid}"
      hardware          = "${var.cluster_hardware}"
      machine_type      = "${var.cluster_machine_type}"
      public_vlan_id    = "${var.cluster_public_vlan_id}"
      private_vlan_id   = "${var.cluster_private_vlan_id}"
      resource_group_id = "${ibm_resource_group.group.id}"
}

resource "ibm_container_worker_pool" "cluster_workerpool" {
  worker_pool_name  = "${var.environment_name}-pool"
  machine_type      = "${var.cluster_machine_type}"
  cluster           = "${ibm_container_cluster.cluster.id}"
  size_per_zone     = "${var.worker_num}"
  hardware          = "${var.cluster_hardware}"
  resource_group_id = "${ibm_resource_group.group.id}"
}

resource "ibm_container_worker_pool_zone_attachment" "cluster_zone" {
  cluster           = "${ibm_container_cluster.cluster.id}"
  worker_pool       =  "${element(split("/",ibm_container_worker_pool.cluster_workerpool.id),1)}"
  zone              = "${var.cluster_datacenter}"
  public_vlan_id    = "${var.cluster_public_vlan_id}"
  private_vlan_id   = "${var.cluster_private_vlan_id}"
  resource_group_id = "${ibm_resource_group.group.id}"
}
Again most of the properties will be initialized from configuration variables. We can adjust the datacenter, the number of workers, the type of workers.
IAM-enabled services like IBM Cloud Object Storage and IBM Cloudant are also created as resources within the group:
# a database
resource "ibm_resource_instance" "database" {
    name              = "database"
    service           = "cloudantnosqldb"
    plan              = "${var.cloudantnosqldb_plan}"
    location          = "${var.cloudantnosqldb_location}"
    resource_group_id = "${ibm_resource_group.group.id}"
}
# a cloud object storage
resource "ibm_resource_instance" "objectstorage" {
    name              = "objectstorage"
    service           = "cloud-object-storage"
    plan              = "${var.cloudobjectstorage_plan}"
    location          = "${var.cloudobjectstorage_location}"
    resource_group_id = "${ibm_resource_group.group.id}"
}
Kubernetes bindings (secrets) can be added to retrieve the service credentials from the applications:
   # bind the cloudant service to the cluster
   resource "ibm_container_bind_service" "bind_database" {
      cluster_name_id             = "${ibm_container_cluster.cluster.id}"
        service_instance_name       = "${ibm_resource_instance.database.name}"
      namespace_id                = "default"
      account_guid                = "${data.terraform_remote_state.global.account_guid}"
      org_guid                    = "${data.terraform_remote_state.global.org_guid}"
      space_guid                  = "${ibm_space.space.id}"
      resource_group_id           = "${ibm_resource_group.group.id}"
}

   # bind the cloud object storage service to the cluster
   resource "ibm_container_bind_service" "bind_objectstorage" {
      cluster_name_id             = "${ibm_container_cluster.cluster.id}"
      space_guid                  = "${ibm_space.space.id}"
      service_instance_id         = "${ibm_resource_instance.objectstorage.name}"
      namespace_id                = "default"
      account_guid                = "${data.terraform_remote_state.global.account_guid}"
      org_guid                    = "${data.terraform_remote_state.global.org_guid}"
      space_guid                  = "${ibm_space.space.id}"
      resource_group_id           = "${ibm_resource_group.group.id}"
}
Step 3: Deploy this environment in your account
Install IBM Cloud CLI
- Follow these instructions to install the CLI
- Validate the installation by running:
- ibmcloud
Install Terraform and the IBM Cloud provider for Terraform
- Download and install Terraform for the system.
- Download the Terraform binary for the IBM Cloud provider. To setup Terraform with IBM Cloud provider, refer to this link
- Create a .terraformrc file in your home directory that points to the Terraform binary. In the following example, /opt/provider/terraform-provider-ibm is the route to the directory.
# ~/.terraformrc
providers {
  ibm = "/opt/provider/terraform-provider-ibm_VERSION"
}
Get the code
If we have not done it yet, clone the tutorial repository:
-
git clone https://github.com/IBM-Cloud/multiple-environments-as-code
Set Platform API key
-
If you don't already have one, obtain a Platform API key and save the API key for future reference.
If in later steps we plan on creating a new Cloud Foundry organization to host the deployment environments, make sure we are the owner of the account.
- Copy terraform/credentials.tfvars.tmpl to terraform/credentials.tfvars by running the below command
-
cp terraform/credentials.tfvars.tmpl terraform/credentials.tfvars
- Edit terraform/credentials.tfvars and set the value for ibmcloud_api_key to the Platform API key you obtained.
Create or reuse a Cloud Foundry organization
We can choose either to create a new organization or to reuse (import) an existing one. To create the parent organization of the three deployment environments, we need to be the account owner.
To create a new organization
- Change to the terraform/global directory
- Copy global.tfvars.tmpl to global.tfvars
cp global.tfvars.tmpl global.tfvars
-
Edit global.
- Set org_name to the organization name to create
- Set org_managers to a list of user IDs we want to grant the Manager role in the org - the user creating the org is automatically a manager and should not be added to the list
- Set org_users to a list of all users we want to invite into the org - users need to be added there if we want to configure their access in further steps
-
org_name = "a-new-organization"
org_managers = [ "user1@domain.com", "another-user@anotherdomain.com" ]
org_users = [ "user1@domain.com", "another-user@anotherdomain.com", "more-user@domain.com" ] - Initialize Terraform from the terraform/global folder
- terraform init
- Look at the Terraform plan
- terraform plan -var-file=../credentials.tfvars -var-file=global.tfvars
- Apply the changes
- terraform apply -var-file=../credentials.tfvars -var-file=global.tfvars
Once Terraform completes, it will have created:
- a new Cloud Foundry organization
- a global.env file under the outputs directory in your checkout. This file has environment variables you could reference in other scripts
- the terraform.tfstate file
This tutorial uses the local backend provider for Terraform state. Handy when discovering Terraform or working alone on a project, but when working in a team, or on larger infrastructure, Terraform also supports saving the state to a remote location. Given the Terraform state is critical to Terraform operations, it is recommended to use a remote, highly available, resilient storage for the Terraform state Refer to Terraform Backend Types for a list of available options. Some backends even support versioning and locking of Terraform states.
To reuse an organization we are managing
If we are not the account owner but you manage an organization in the account, we can also import an existing organization into Terraform. Make sure to be in the region where the Cloud Foundry org exists.
- Retrieve the organization GUID
-
ibmcloud iam org <org_name> --guid
- Change to the terraform/global directory
- Copy global.tfvars.tmpl to global.tfvars
-
cp global.tfvars.tmpl global.tfvars
- Initialize Terraform
-
terraform init
- After initializing Terraform, import the organization into the Terraform state
-
terraform import -var-file=../credentials.tfvars -var-file=global.tfvars ibm_org.organization <guid>
- Tune global.tfvars to match the existing organization name and structure. To keep the existing org managers and users, make sure to list them. Verify possible changes before applying them in the next step.
- Apply the changes
-
terraform apply -var-file=../credentials.tfvars -var-file=global.tfvars
Create per-environment space, cluster and services
This section will focus on the development environment. The steps will be the same for the other environments, only the values you pick for the variables will differ.
- Change to the terraform/per-environment folder of the checkout
- Copy the template tfvars file. There is one per environment:
-
cp development.tfvars.tmpl development.tfvars
cp testing.tfvars.tmpl testing.tfvars
cp production.tfvars.tmpl production.tfvars -
Edit development.
- Set environment_name to the name of the Cloud Foundry space we want to create
- Set space_developers to the list of developers for this space. Make sure to add your name to the list so that Terraform can provision services on your behalf.
- Set cluster_datacenter to the zone where we want to create the cluster. Find the available zones with:
-
ibmcloud ks zones
- Set the private (cluster_private_vlan_id) and public (cluster_public_vlan_id) VLANs for the cluster. Find the available VLANs for the zone with:
-
ibmcloud ks vlans --zone <zone>
-
Set the cluster_machine_type. Find the available flavors and characteristics for the zone with:
-
ibmcloud ks flavors --zone <zone>
-
Set the resource_quota. Find the available resource quota definitions with:
- ibmcloud resource quotas
- Set environment_name to the name of the Cloud Foundry space we want to create
- Initialize Terraform
- terraform init
- Create a new Terraform workspace for the development environment
- terraform workspace new development
- terraform workspace select development
- Look at the Terraform plan
- terraform plan -var-file=../credentials.tfvars -var-file=development.tfvars
- Plan: NN to add, 0 to change, 0 to destroy.
- Apply the changes
- terraform apply -var-file=../credentials.tfvars -var-file=development.tfvars
Once Terraform completes, it will have created:
- a resource group
- a Cloud Foundry space
- a Kubernetes cluster with a worker pool and a zone attached to it
- a database
- a Kubernetes secret with the database credentials
- a storage
- a Kubernetes secret with the storage credentials
- a logging(LogDNA) instance
- a monitoring(Sysdig) instance
- a development.env file under the outputs directory in your checkout. This file has environment variables you could reference in other scripts
- the environment specific terraform.tfstate under terraform.tfstate.d/development.
We can repeat the steps for testing and production.
To reuse an existing resource group
Instead of creating a new resource group, we can import an existing resource group into Terraform>
- Retrieve the resource group ID
- ibmcloud resource group <resource_group_name> --id
- Change to the terraform/per-environment folder of the checkout
- Copy the template tfvars file. There is one per environment:
-
cp development.tfvars.tmpl development.tfvars
cp testing.tfvars.tmpl testing.tfvars
cp production.tfvars.tmpl production.tfvars - Initialize Terraform
- terraform init
- Create a new Terraform workspace for the development environment
- terraform workspace new development
- terraform workspace select development
- After initializing Terraform, import the resource group into the Terraform state
- terraform import -var-file=../credentials.tfvars -var-file=development.tfvars ibm_resource_group.group <id>
- Tune development.tfvars to match the existing resource group name and structure
- Apply the changes
- terraform apply -var-file=../credentials.tfvars -var-file=development.tfvars
Assign user policies
In the previous steps, roles in Cloud Foundry organization and spaces could be configured with the Terraform provider. For user policies on other resources like the Kubernetes clusters, we will be using the roles folder in the cloned repo.
For the Development environment as defined in this tutorial, the policies to define are:
| IAM Access policies | |
|---|---|
| Developer |
|
| Tester |
|
| Operator |
|
| Pipeline Service ID |
|
Given a team may be composed of several developers, testers, we can leverage the access group concept to simplify the configuration of user policies. Access groups can be created by the account owner so that the same access can be assigned to all entities within the group with a single policy.
For the Developer role in the Development environment, this translates to:
resource "ibm_iam_access_group" "developer_role" {
  name        = "${var.access_group_name_developer_role}"
  description = "${var.access_group_description}"
}
resource "ibm_iam_access_group_policy" "resourcepolicy_developer" {
  access_group_id = "${ibm_iam_access_group.developer_role.id}"
  roles           = ["Viewer"]

  resources = [{
    resource_type = "resource-group"
    resource      = "${data.terraform_remote_state.per_environment_dev.resource_group_id}"
  }]
}

resource "ibm_iam_access_group_policy" "developer_platform_accesspolicy" {
  access_group_id = "${ibm_iam_access_group.developer_role.id}"
  roles        = ["Viewer"]

  resources = [{
    resource_group_id = "${data.terraform_remote_state.per_environment_dev.resource_group_id}"
  }]
}

resource "ibm_iam_access_group_policy" "developer_logging_policy" {
  access_group_id = "${ibm_iam_access_group.developer_role.id}"
  roles           = ["Writer"]

  resources = [{
    service           = "logdna"
    resource_instance_id = "${data.terraform_remote_state.per_environment_dev.logdna_instance_id}"
  }]
}
resource "ibm_iam_access_group_policy" "developer_monitoring_policy" {
  access_group_id = "${ibm_iam_access_group.developer_role.id}"
  roles           = ["Writer"]

  resources = [{
    service           = "sysdig-monitor"
    resource_instance_id = "${data.terraform_remote_state.per_environment_dev.sysdig_instance_id}"
  }]
}
The roles/development/main.tf file of the checkout has examples of these resources for the defined Developer, Operator , tester, and Service ID roles. To set the policies as defined in a previous section for the users with the Developer, Operator, Tester and Function user roles in the development environment,
- Change to the terraform/roles/development directory
-
Copy the template tfvars file. There is one per environment (we can find the production and testing templates under their respective folders in roles directory)>
- cp development.tfvars.tmpl development.tfvars
-
Edit development.
- Set iam_access_members_developers to the list of developers to whom you would like to grant the access.
- Set iam_access_members_operators to the list of operators and so on.
-
Initialize Terraform>
- terraform init
-
Look at the Terraform plan>
terraform plan -var-file=../../credentials.tfvars -var-file=development.tfvars
It should report:
- Plan: 14 to add, 0 to change, 0 to destroy.
- Apply the changes
- terraform apply -var-file=../../credentials.tfvars -var-file=development.tfvars
We can repeat the steps for testing and production.
Step 4: Remove resources
- Navigate to the development folder under roles
- cd terraform/roles/development
- Destroy the access groups and access policies
- terraform destroy -var-file=../../credentials.tfvars -var-file=development.tfvars
- Activate the development workspace
-
cd terraform/per-environment
terraform workspace select development - Destroy the resource group, spaces, services, clusters
-
terraform destroy -var-file=../credentials.tfvars -var-file=development.tfvars
terraform destroy only removes the terraform state information related to a resource group as a resource group cannot be deleted by a user.
- Repeat the steps for the testing and production workspaces
- If you created it, destroy the organization
-
cd terraform/global
terraform destroy -var-file=../credentials.tfvars -var-file=global.tfvars