For up-to-date product documentation, see the IBM MobileFirst Foundation Developer Center.
Configure LDAP ACL management for WebSphere Application Server V8.x
Use LDAP to define the users and groups who can install mobile applications with the Application Center with the Virtual Member Manager (VMM) API.
To configure ACL with LDAP, you define three properties: uid, sn, and cn. These properties enable the login name and the full name of users and the name of user groups to be identified in the Application Center. Then you enable ACL management with VMM. We can configure LDAP based on the federated repository configuration only.
Procedure
- Log in to the WebSphere® Application Server console.
- Select Security > Global security.
- In the User account repository section, select Configure.
- Select your LDAP repository entry.
- Under Additional Properties, select LDAP attributes (WebSphere Application Server V8.0) or Federated repositories property names to LDAP attributes mapping (WebSphere Application Server V8.5).
- Select Add > Supported.
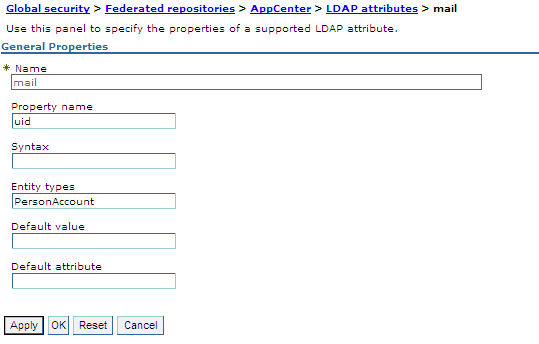
- Enter these property values:
- For Name enter your LDAP login attribute.
- For Property name enter uid.
- For Entity types enter the LDAP entity type.
- Click OK.
Figure 1. Associating LDAP login with uid property (WebSphere Application Server V8.0)
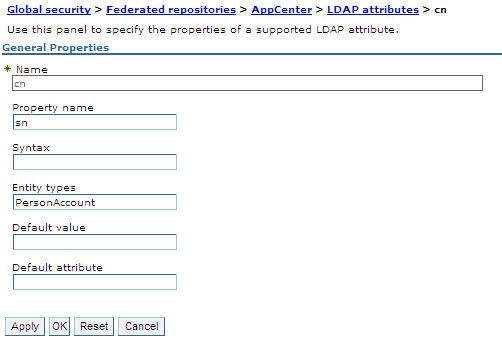
- Select Add > Supported.
- For Name enter your LDAP attribute for full user name.
- For Property name enter sn.
- For Entity types enter the LDAP entity type.
- Click OK.
Figure 2. Associating LDAP full user name with sn property (WebSphere Application Server V8.0)
- Select Add > Supported to configure a group name:
- For Name enter the LDAP attribute for our group name.
- For Property name enter cn.
- For Entity types enter the LDAP entity type.
- Click OK.
- Enable ACL management with LDAP:
- Select Servers > Server Types > WebSphere application servers.
- Select the appropriate application server.
In a clustered environment we must configure all the servers in the cluster in the same way.
- In the Configuration tab, under "Server Infrastructure", click the Java and Process Management tab and select Process definition.
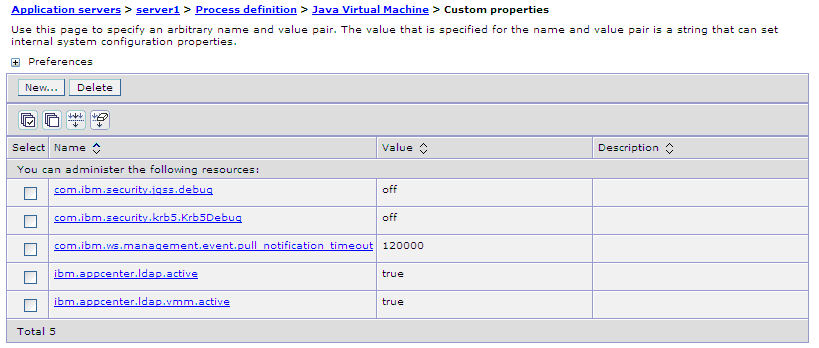
- In the Configuration tab, under Additional Properties, select Java Virtual Machine,
- In the Configuration tab, under Additional Properties, select Custom properties.
- Enter the required property-value pairs in the form.
To enter each pair, click New, enter the property
and its value, and click OK.
Property-value pairs:
- ibm.appcenter.ldap.vmm.active = true
- ibm.appcenter.ldap.active = true
- ibm.appcenter.ldap.cache.expiration.seconds = delay_in_seconds
- Enter the delay in seconds before the LDAP cache expires. If you do not enter a value, the default value is 86400, which
is equal to 24 hours.
Changes to users and groups on the LDAP server become visible to the Application Center after a delay, which is specified by ibm.appcenter.ldap.cache.expiration.seconds. The Application Center maintains a cache of LDAP data and the changes become visible only after the cache expires. By default, the delay is 24 hours. If you do not want to wait for this delay to expire after changes to users or groups, we can call this command to clear the cache of LDAP data:
acdeploytool.sh -clearLdapCache -s serverurl -c context -u user -p password
See Using the stand-alone tool to clear the LDAP cache for details.
Results
The following figure shows an example of custom properties with the correct settings.
Figure 3. ACL management for Application Center with LDAP on WebSphere Application Server V8
What to do next
- Save the configuration and restart the server.
- To use the VMM API, we must assign the IdMgrReader role to the users who run the VMM code, or to the group owners of these users. You must assign this role to all users and groups who have the appcenteruser or appcenteradminroles.
- In the <was_home>\bin directory, where <was_home> is the home directory of your WebSphere Application Server, run the wsadmin command.
-
After connecting with the WebSphere Application Server administrative user, run the following command:
$AdminTask mapIdMgrGroupToRole {-roleName IdMgrReader -groupId your_LDAP_group_id} - Run the same command for all the groups mapped to the appcenteruser and appcenteradminroles.
For individual users who are not members of groups, run the following command:
$AdminTask mapIdMgrUserToRole {-roleName IdMgrReader -userId your_LDAP_user_id}We can assign the special subject "All Authenticated in Application's Realm" as roles for appcenteruser and appcenteradmin. If you choose to assign this special subject, IdMgrReader must be configured in the following way:
$AdminTask mapIdMgrGroupToRole {-roleName IdMgrReader -groupId ALLAUTHENTICATED} - Enter exit to end wsadmin.
Parent topic: LDAP with WebSphere Application Server V8.x