Staging maintenance fixes on Windows
On Windows systems, we can use multiple installations of IBM MQ on the same server to control the release of maintenance fixes.
Before starting
Set up your configuration modeled on the first row of Figure 1. We can apply this scenario to any version of IBM MQ from IBM WebSphere MQ Version 7.1 onwards. In this scenario it is assumed you have a number of applications and two queue managers, QM1 and QM2, running on a server. IBM WebSphere MQ Version 7.0.1 is not installed on the server.- Install two copies of IBM MQ. In the example, they are named Inst_1 and Inst_2.
- Make Inst_1 primary by running setmqinst.
- Associate all the queue managers on the server with Inst_1 by running setmqm.
- Start all the queue managers on the server.
- Show and connect all direct connections with the queue managers associated with Inst_1 in IBM MQ Explorer.
- Set up remote connections to all the queue managers in each instance of IBM MQ Explorer.
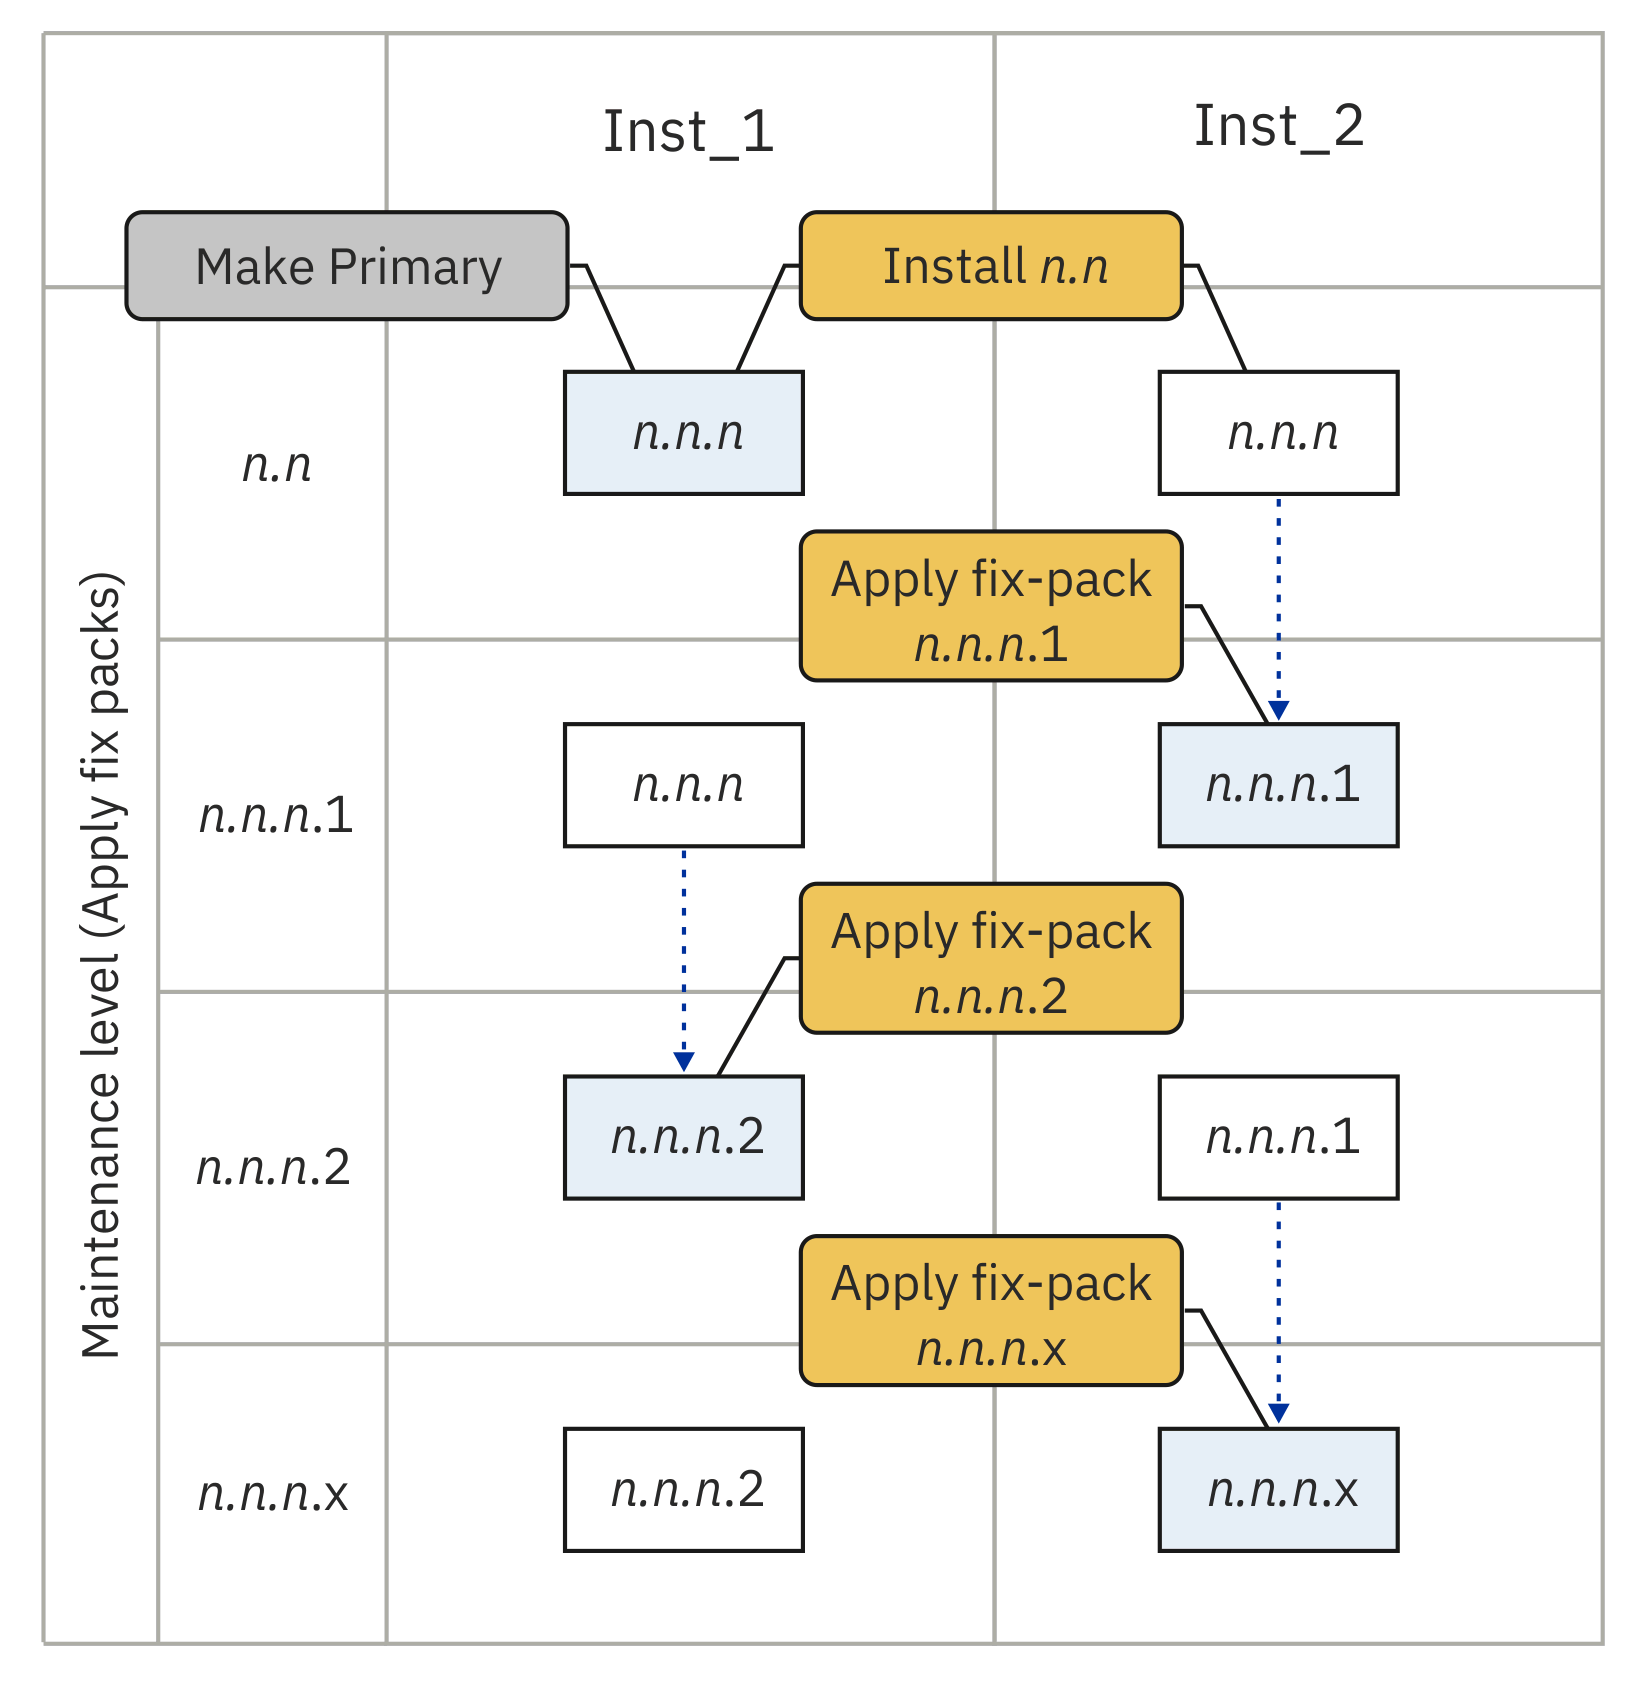
We can install multiple copies of IBM MQ on a server to stage the release of IBM MQ fixes. Figure 1 illustrates a way of using two installations to roll out fixes. In this approach, you maintain two fix levels on a server, with the aim of getting all queue managers and applications to the production fix level before replacing the previous level on fix pack with the next level.
Which installation an application uses is driven by the queue manager an application connects to. The setmqm command associates a queue manager with an installation. We can associate a queue manager with a different installation as long as the installation is at the same or higher command level. In this example, all the installations are at the same command level. You can associate or reassociate a queue manager with either of the installations running any of the fix packs.
In the example, an application links to the primary installation. When it connects to a queue manager, IBM MQ switches the linkage to the installation associated with the queue manager; see Multi-installation queue manager coexistence on UNIX, Linux, and Windows.
For applications built with the link options described in the product documentation, the simplest way to configure the link library search path for IBM MQ applications is to make an installation primary. Only if it is important to pick up a fix in the IBM MQ link library itself, must you review the search path. Either we must make the installation with the IBM MQ link library fix primary, or make a local adjustment for the application, perhaps by running the setmqenv command. See Migrating IBM MQ library loading to a later version on Windows.
Running commands is a different matter. Commands are always run from the primary installation, or the installation you have selected by running the setmqenv command. If you run a command from the wrong installation, the command fails. For example, if QM1 is associated with Inst_1, running the Windows command, Inst_2_Installation_path/bin/strmqm QM1 fails.
If we are using IBM MQ Explorer and you have two installations, you also have two IBM MQ Explorer instances. One linked to one installation, and one to the other. Each IBM MQ Explorer shows locally connected queue managers that are associated with the same installation as the instance of IBM MQ Explorer. To monitor all the queue managers on a server, set up remote connections to the queue managers associated with the other installations.
Procedure
- Download the first fix pack, for example, Version 9.2.0, Fix Pack 1, when it is released. See Where to find downloadable installation images.
- Apply the fix pack you downloaded to Inst_2. See Applying and removing maintenance on Windows.
- Verify Inst_2.
-
Transfer the queue managers to Inst_2 one at a time.
-
Stop QM1 and the applications connected to it.
The endmqm command informs an application that the queue manager it is connected to is stopping; see Stopping a queue manager.
Note: Applying maintenance level updates to multi-instance queue managers on Windows describes how to apply maintenance to a multi-instance queue manager. A multi-instance queue manager can continue to run on one server, while maintenance is applied to another server. -
Set up the local environment to the installation Inst_2 by using the setmqenv command
"Inst_2_INSTALLATION_PATH\bin\setmqenv" -s
The -s option sets up the environment for the installation that runs the setmqenv command.
-
Associate the queue manager with Inst_2 by using the setmqm command:
setmqm -m QM1 -n Inst_2
-
Start QM1 by using the strmqm
command:
strmqm QM1
- Repeat substeps c and d for QM2.
-
Set up IBM MQ Explorer for Inst_2.
- Start the Inst_2 instance of IBM MQ Explorer Tip: On Windows, hover over the IBM MQ icon in the system tray. The hover help shows the installation name associated with the IBM MQ Explorer instance.
- Click IBM MQ > Queue Managers > Show/Hide Queue Managers... >
- Click each directly connected queue manager listed in the Hidden Queue Managers list > Show.
- Click Close.
-
Stop QM1 and the applications connected to it.
-
Set Inst_2 primary by using the setmqinst command:
"Inst_2_INSTALLATION_PATH\bin\setmqinst" -i -n Inst_2
- Download the next fix pack for the version of our product, for example, Version 9.2.0, Fix Pack 2, when it is released. See Where to find downloadable installation images.
- Apply the fix pack that we have just downloaded to Inst_1. See Applying and removing maintenance on Windows.
- Verify Inst_1.
-
Transfer queue managers to Inst_1 one at a time.
-
Follow the procedure in step 4
Replacing Inst_2 by Inst_1 in the instructions.
-
Follow the procedure in step 4
-
Set Inst_1 primary by using the setmqinst
command:
"Inst_1_INSTALLATION_PATH\bin\setmqinst" -i -n Inst_1
- Repeat steps 1 to 5 for the odd-numbered fix packs of our product.
- Repeat steps 6 to 10 for the even-numbered fix packs of our product.
Parent topic: Applying and removing maintenance on Windows
Related concepts
Related information
- Installing IBM MQ server on Windows
- Associating a queue manager with an installation
- Change the primary installation