IBM Tivoli Composite Application Manager (ITCAM)
- Overview
- Install on Linux/UNIX
- Checklist
- Prerequisites
- Additional requirements
- Tasks
- UNIX Permissions
- Check the heap size
- HP-UX: Tune HotSpot JVM garbage collection
- Adjust ports for firewalls or other applications
- Verify there are no invalid mounted file systems
- Enable user ID and password input from sas.client.props (RMI connectors)
- Enable user ID and password input from soap.client.props (SOAP connectors)
- Gather info for GUI install
- GUI installation and configuration
- Silent installation and configuration
- Additional configuration tasks
- Unconfigure using the Configuration Tool
- Install and configure ITCAM for WAS on Windows
- Appendix A. Obtain installation images for Windows, Linux, UNIX systems
- Appendix B. Start an installation from the IBM WAS LaunchPad
- Appendix C. Start and stop ITCAM for WAS
- Appendix D. ITCAM for WAS configuration parameters
- Appendix E. Guidelines for specifying silent values on Windows, UNIX, and Linux
- Appendix F. What to do if ITCAM for WAS configuration fails
- Appendix H. Using regular expressions
See also...
- Monitoring performance with IBM Tivoli Composite Application Manager for WAS v8.5
- Tivoli blog
- Tivoli Composite Application Manager Wiki
- Tivoli Composite Application Manager Forum
Overview
IBM Tivoli Composite Application Manager, bundled with WAS v7, provides transaction statistics, including response times. Statistics are rendered using Tivoli Performance Viewer. Later versions of do not require separate install of ITCAM, to use Tivoli Performance Viewer.
To monitor an appserver using a managing server or monitoring agent, install ITCAM for Application Diagnostics Data Collector. ITCAM for WAS does not communicate with the managing server or monitoring agent components of ITCAM for Application Diagnostics.
See also:
Install and configure ITCAM for WAS on Linux and UNIX systems
Checklist for installation and configuration on Linux and UNIX systems
- Obtain the installation images.
- Choose the installation option that best meets the needs of your environment.
GUI Installs ITCAM for WAS using InstallShield. Silent Command-line interface. Install in a demo environment and then later in a production environment using similar options. Install multiple instances of ITCAM for WAS that have shared options. - Verify that your computer meets the system and software prerequisites, and perform the pre-installation tasks
- Install and configure ITCAM for WAS.
Prerequisites and pre-installation tasks for ITCAM for WAS on Linux and UNIX systems
Supported operating system and appserver combinations
- AIX 5.3 with the 5300-07-01 Service Pack or later (32–bit and 64–bit)
- AIX 6.1 with the 6100-00-02 Service Pack or later (32–bit and 64–bit)
- HP-UX 11.iv2 PA-RISC and Itanium (64-bit)
- HP-UX 11.iv3 PA-RISC and Itanium (64-bit)
- Solaris 9 with the latest Patch Cluster (SPARC) (32-bit)
- Solaris 10 with the latest Patch Cluster (SPARC and Opteron) (64-bit)
- Red Hat Enterprise Linux 4.0 Update 5 and above (IA32/PPC/Z where Z=31-bit), (32-bit)
- Red Hat Enterprise Linux 4.0 Update 5 and above (Opteron/EM64T/PPC/Z), (64-bit)
- Red Hat Enterprise Linux 5.0 Update 1 and above (IA32/PPC/Z where Z=31-bit), (32-bit)
- Red Hat Enterprise Linux 5.0 Update 1 and above (Opteron/EM64T/PPC/Z), (64-bit)
- SuSE Linux Enterprise Server 9 with the latest Service Pack (IA32/PPC/Z where Z=31-bit), (32-bit)
- SuSE Linux Enterprise Server 9 with the latest Service Pack (Opteron/EM64T/PPC/Z), (64-bit)
- SuSE Linux Enterprise Server 10 SP1 (IA32/PPC/Z where Z=31-bit), (32-bit)
- SuSE Linux Enterprise Server 10 SP1 (Opteron/EM64T/PPC/Z), (64-bit)
Supported JDKs for the ITCAM for WAS
The supported JDKs for the ITCAM for WAS are the same as the supported JDKs for the particular appserver you will be monitoring.Additional requirements for Linux and UNIX operating system
ITCAM for WAS must be installed on the same machine as the appserver you will be monitoring.ITCAM for WAS can not be configured for an appserver instance where the Data Collector for ITCAM for WebSphere 6.1, ITCAM for Web Resources 6.2, or ITCAM Agent for WebSphere Applications 7.1 (a component of ITCAM for Application Diagnostics) is configured. However, these products can be installed on the same host and configured for different appserver instances.
Prerequisite libraries
The ITCAM for WAS installer and configuration utility require several libraries to run in graphics mode.
- X libraries, including libX11, libXmu and libXp
- The PAM library
- GLib 2
On Linux systems, the following additional libraries are required:
- libstdc++ versions 2.95 and 3.3 (known as libstdc++-compat in some distributions)
- libselinux, if the SELinux kernel is used
If the libraries are not available, the installer and configuration utility will fail. You can use silent installation and configuration without installing the libraries. The following packages are required in certain Linux distributions:
| Distribution | Packages |
|---|---|
| Red Hat Enterprise Linux AS, version 4.0, for IBM System z 31-bit | compat-libstdc++-295-2.95.3-81.s390.rpm compat-libstdc++-33-3.2.3-47.3.s390.rpm xorg-x11-deprecated-libs-6.8.2-1.EL.13.36.s390.rpm xorg-x11--libs-6.8.2-1.EL.13.36.s390.rpm pam-0.77-65.1.i386.rpm libselinux-1.19.1-7.i386.rpm glib2-2.4.7-1.i386.rpm cracklib-2.7-29.i386.rpm cracklib-dicts-2.7-29.i386.rpm |
| Red Hat Enterprise Linux AS, version 4.0, for IBM System z 64-bit | compat-libstdc++-295-2.95.3-81.s390.rpm compat-libstdc++-33-3.2.3-47.3.s390.rpm pam-0.77-66.14.s390.rpm xorg-x11-deprecated-libs-6.8.2-1.EL.13.36.s390.rpm xorg-x11--libs-6.8.2-1.EL.13.36.s390.rpm libstdc++-3.4.6-3.s390.rpm |
| Red Hat Enterprise Linux for Mainframe Computing, version 5.0 (5.20.2 and later) 64-bit | compat-libstdc++-295-2.95.3-85.s390.rpm compat-libstdc++-33-3.2.3-61.s390.rpm libX11-1.0.3-8.el5.s390.rpm libXp-1.0.0-8.s390.rpm pam-0.99.6.2-3.14.el5.s390.rpm xorg-x11-xauth-1.0.1-2.1.s390.rpm |
| SUSE Linux Enterprise Server 9 for IBM System z 31-bit | compat-2004.7.1-1.2.s390.rpm compat-32bit-9-200407011411.s390x.rpm pam-32bit-0.99.3.0-29.4.s390x.rpm pam-modules-32bit-10-2.2.s390x.rpm XFree86-libs-32bit-9-200512021711.s390x.rpm |
| SUSE Linux Enterprise Server 9 for IBM System z 64-bit | compat-2004.7.1-1.2.s390x.rpm compat-32bit-9-200407011411.s390x.rpm pam-32bit-0.99.3.0-29.4.s390x.rpm pam-modules-32bit-10-2.2.s390x.rpm XFree86-libs-32bit-9-200512021711.s390x.rpm |
| SUSE Linux Enterprise Server 10 for IBM System z 64-bit | compat-32bit-2006.1.25-11.2.s390x.rpm pam-32bit-0.99.3.0-29.4.s390x.rpm pam-modules-32bit-10-2.2.s390x.rpm xorg-x11-libs-32bit-6.9.0-50.14.s390x.rpm xorg-x11-devel-32bit-6.9.0-50.14.s390x.rpm xorg-x11-6.9.0-50.14.s390x.rpm |
| Red Hat Enterprise Linux AS and ES, version 4.0 for x86-32 and x86-64 | compat-libstdc++-296-2.96-132.7.2.i386.rpm compat-libstdc++-33-3.2.3-47.3.i386.rpm xorg-x11-6.8.1-23.EL.src.rpm pam-0.77-65.1.src.rpm |
| Red Hat Enterprise Linux, versions 5.0 and 5.1 for x86-32 and x86-64 | libXp-1.0.0-8.i386.rpm libXmu-1.0.2-5.i386.rpm compat-libstdc++-33-3.2.3-61.i386.rpm compat-libstdc++-296-2.96-138.i386.rpm |
| SUSE Linux Enterprise Server 9 for x86-32 | compat-libstdc++-2.8.0-2cl.i386.rpm rpm-4.1.1-177.9.i586.rpm pam-0.78-8.i586.rpm xorg-x11-6.8.2-30.i586.rpm |
| SUSE Linux Enterprise Server 9 for x86-64 | compat-libstdc++-2.8.0-2cl.i386.rpm xorg-x11-6.8.2-30.x86_64.rpm pam-0.78-8.i586.rpm |
| SUSE Linux Enterprise Server 10 for x86-32 | compat-libstdc++-5.0.7-6.x86_64.rpm xorg-x11-6.8.2-100.13.i586.rpm pam-0.99.6.3-29.1.i586.rpm |
| SUSE Linux Enterprise Server 10 for x86-64 | compat-libstdc++-5.0.7-6.i586.rpm xorg-x11-6.8.2-100.13.x86_64.rpm pam-0.99.6.3-29.1.i586.rpm |
| Red Hat Enterprise Linux AS, version 4 and 5 for IBM POWER, 32-bit and 64-bit | compat-libstdc++-33-3.2.3-47.3.ppc.rpm xorg-x11-6.8.1-12.ppc.rpm pam-0.77-66.23.ppc.rpm |
| SUSE Linux Enterprise Server 9 and 10 for IBM POWER, 32-bit and 64-bit | compat-libstdc++-5.0.7-22.2.ppc.rpm xorg-x11-devel-6.9.0-50.54.5.ppc.rpm xorg-x11-libs-6.9.0-50.54.5.ppc.rpm pam-0.99.3.0-29.4.ppc.rpm |
Tasks to install ITCAM for WAS v7 on Linux and UNIX
- Obtain the installation images.
- Install using one of the following methods...
- GUI installer
- Silent
- Perform "Additional configuration tasks”
UNIX Permissions
- The user who installs ITCAM for WAS must have privileges (read, write, and execute) of accessing the appserver.
- The files in the WAS_HOME directory must be owned by the user who installs ITCAM for WAS.
- The appserver server instance owner ID must have write permission to the directory where the installer will create log files. By default, it is /var/ibm/tivoli/common/CYN/logs.
- Root privileges are not required unless your appserver is owned by the root user.
- If the appserver instance has a non-root owner ID, use the same owner ID to install ITCAM for WAS.
Additional requirements when using the appserver ID (non-root owner ID)
If the appserver instance has a non-root owner ID, use the same owner ID as the appserver to install ITCAM for WAS. To use that ID, first perform the following procedure to avoid communication problems:
- Make sure that the appserver owner ID can write to the DC_home directory, which must be empty. This will be specified during the installation.
- Make sure the user has read and write privileges to one of the following system temporary directories. These directories will be used by the InstallShield
portion of the installation program
Operating system Directory Solaris or HP-UX If it exists: /var/tmp/ibm_am_installer_dc, If not: /var/tmp Linux and all other UNIX platforms If it exists: /tmp/ibm_am_installer_dc. If not: /tmp The InstallShield portion of the installation program does not need to actually write to this directory. There are procedures to perform before running the installation program if you want to specify a different temporary directory for InstallShield to write to.
- Make sure the user is able to log to /var/ibm/tivoli.
You might have to create this directory as root and use the chown command to change ownership to the user.
The installation and configuration programs do not need to actually write to this directory as you use installation program to specify a different log directory to write to.
- Give user read and write privileges to...
- WAS_HOME/profiles/profile/logs
- WAS_HOME/profiles/profile/logs/wsadmin.traceout
- WAS_HOME /profiles/profile/logs/wsadmin.valout
If WAS was installed by root and the appserver instance created from that installation of WAS was created and is owned by a non-root user...
- As the root user, run...
-
chown -R wasuser:wasgroup WAS_HOME/properties/version/history
...where wasuser and wasgroup are the user and group for the appserver instance.
- As the non-root user...
-
./versioninfo.sh
If after running the versioninfo.sh command, you encounter information about the appserver version (instead of an error message), you know that you have performed the chown commands successfully.
Checking the heap size
On each WAS appserver, verify heap is not less than 384 MB. From the WAS console.
-
Server | Application Servers server_name | Configuration | Server Infrastructure | Java and Process Management | Process Definition | Additional Properties: Java Virtual Machine
Set Maximum Heap Size to at least 384 MB
For Linux in a Network Deployment environment, it is a requirement (not merely a recommendation) that you increase the Maximum Heap Size to a value above 256 ; otherwise, the installation might fail with the following error message:
-
CYNCR8522E: The system was unable to retrieve a list of known servers from server server_name using SOAP port port_number .
HP-UX: tuning HotSpot JVM garbage collection
For HotSpot JVM, the default NewSize and MaxNewSize might be too small for some applications if these applications allocate large numbers of short living objects. Some tuning is recommended for an application that allocates many short living objects:
-
-XX:+DisableExplicitGC -XX:NewSize=128m -XX:MaxNewSize=256m
Also, the default MaxPermSize might be small for some applications, too. It is recommended to use
-
-XX:MaxPermSize=128m or -XX:MaxPermSize=256m
NewSize, MaxNewSize, and MaxPermSize should be changed based on the Maximum (-Xmx) and Minimum (-Xms) heap settings of the JVM.
Adjusting ports for firewalls or for use with other applications
At various times during the installation, specify or accept the defaults for port numbers used by ITCAM for WAS to communicate with the appserver using SOAP or RMI. Make sure that you record the correct port, and that the firewall does not prevent communication on this port from ITCAM for WAS to the appserver.
For a Network Deployment environment, ITCAM for WAS will need to use the SOAP or RMI port to communicate with the dmgr, which is usually located on a different host. In this case, take special care that the firewall does not block communication on this port. Consult the documentation for your firewall program to determine which ports are being blocked by your firewall.
Making sure there are no invalid mounted file systems
There might be file systems that are specified as mounted in /etc/filesystems that are not actually mounted or have lost connection with the ITCAM for WAS machine. Verify the following commands can be run successfully and without error messages:
-
df -a
df -k
If this not the the case, the installation will hang without producing any error messages. To prevent this, either mount all file systems listed, or comment out all files systems that are not mounted. On Linux this file is called /etc/fstab.
Mounting the ITCAM for WAS DVD on HP-UX
to use the DVD to install ITCAM for WAS on HP-UX, run the following command when mounting the DVD:-
mount -F cdfs -o ro,cdcase,rr /dev/dsk/dvd_device/mnt/cdrom
Enable user ID and password input from sas.client.props for RMI connector types
If WAS global security is enabled, to have the configuration program retrieve the RMI connection user ID and password from sas.client.props, instead of entering them in the panel or as silent configuration option, edit...
-
WAS_HOME/profiles/profile/properties/sas.client.props
...and set...
-
com.ibm.CORBA.loginSource=properties
com.ibm.CORBA.securityEnabled=true
com.ibm.CORBA.loginUserid=user_ID
com.ibm.CORBA.loginPassword=password
Encrypt the password:
-
cd WAS_HOME/profiles/profile/bin
PropFilePasswordEncoder.bat WAS_HOME/profiles/profile/properties/sas.client.props com.ibm.CORBA.loginPassword
Enable user ID and password input from soap.client.props for SOAP connector types
If WAS global security is enabled, to have the configuration program retrieve the SOAP connection user ID and password from soap.client.props, instead of entering them in the panel or as silent configuration option, edit...
-
WAS_HOME/profiles/profile/properties/soap.client.props
...and set...
-
com.ibm.SOAP.securityEnabled=true
com.ibm.SOAP.loginUserid=user_ID
com.ibm.SOAP.loginPassword=password
Encrypt the password:
-
cd WAS_HOME/profiles/profile/bin
PropFilePasswordEncoder.bat WAS_HOME/profiles/profile/properties/soap.client.props com.ibm.CORBA.loginPassword
Gathering information about values specified during installation and configuration
An ITCAM for WAS installation cannot span over multiple hosts. Install ITCAM for WAS separately on each host, and configure it for each appserver instance.
For a Network Deployment environment, we install on nodes, supplying the host name of the dmgr. We do not need to install or configure ITCAM for WAS on the dmgr itself.
By default, the installer will create log files in...
-
/var/ibm/tivoli/common/CYN/logs
For GUI installation and configuration, there are three types of fields that appear in the installer:
| Prefilled, editable | Either accept the default that is provided or enter your own value. |
| Blank | You must enter a value of your own. |
| Prefilled, noneditable | You cannot change the provided value. These fields will not be mentioned in the steps that follow. |
The installation and configuration programs will not accept values for directory paths if the following special characters are included: \u `!@#$*()+=[]{}|:;’"<>,?
The InstallShield portion of the installation program writes to one of the following directories...
| OS | Directory |
|---|---|
| Solaris or HP-UX | If it exists: /var/tmp/ibm_am_installer_dc. If not, /var/tmp |
| Linux and all other UNIX platforms | If it exists: /tmp/ibm_am_installer_dc. If not, /tmp |
To change temporary file location, do not use launchpad.sh, instead, run the executable directly with the following option:
-
-is:tempdir /path/to/tmpdir
For example:
-
./setup_DC_aix.bin -is:tempdir /opt/ibm/tmp
The user for the installation should have read, write, and execute privileges to this directory.
The installation program will write to the following log directory by default:
-
/var/ibm/tivoli/common/CYN/logs
To change log directory, do not use launchpad.sh, instead, run the executable directly with the following option:
-
-V LOG_DIR=/path/to/logdir
For example:
-
./setup_DC_aix.bin -V LOG_DIR=/opt/ibm/log
The user for the installation should have read and write privileges to this directory.
GUI installation and configuration of ITCAM for WAS on UNIX and Linux
- If running the installation from a remote computer, run...
-
xhost + hostname
...on the computer where you are sitting, where hostname is the fully qualified host name of the computer on which ITCAM for WAS is being installed.
- Log on to the computer on which you want to install ITCAM for WAS using the user that has permissions to perform the installation.
- If running the installation from a remote computer, run...
-
export DISPLAY=local_machine:0.0
...where local_machine is the fully qualified host name of the computer where you are sitting.
If running the installation from the computer where ITCAM for WAS is being installed, enter...
-
export DISPLAY=localhost:0.0
- Start the instance of the appserver that will be monitored by ITCAM for WAS.
In a Network Deployment environment start the Node Agent and dmgr before the installation. Starting the instance of the appserver is not necessary.
- Start the installation program using either...
- WAS LaunchPad
- ITCAM for WAS installation image...
IBM AIX setup_DC_aix.bin Solaris setup_DC_sol.bin Linux setup_DC_lin.bin HP-UX setup_DC_hp11.bin
setup_DC_hp11_ia.bin (HP-UX IA 64-bit)
- The installation program displays a window asking for a path for writing log files.
Accept the default or click the Browse button to select a different path. The current user must have write permissions for this path. The first window for the installation program opens, displaying the Welcome window.

If the installation program detects that your computer does not match the basic prerequisites for starting the installation, a failure window opens instead of the Welcome window.
- Click Next to show the Choose Destination window to select the installation directory.

- Accept the default installation directory path in the Product Installation Directory field, or click Browse to change this path.
You cannot install ITCAM for WAS in a directory path that includes the following types of characters: Traditional Chinese, Simplified Chinese, Japanese, Korean, Spanish special characters, German special characters, Portuguese Brazilian special characters, French special characters, Italian special characters.
If you specify a directory that does not exist, the installation program creates the directory.
- Click Next to accept the default installation directory path in the Directory Name field; you can also change this path by typing or browsing to a different directory and then click Next.
- Click Next to open the Generate Response File window.

- To install ITCAM for WAS on this computer, select...
-
Install the Data Collector on this computer
To create a response file for a subsequent silent installation, select...
-
Save your settings in a response
...and enter the file path ending with a file name. For example:
-
/temp/response.opt
To only create a response file, and not install ITCAM for WAS, unselect...
-
Install the Data Collector on this computer
A response file is only generated if the GUI installation completes successfully.
- Click Next to open the Review Installation Information window. Read the summary information about the ITCAM for WAS installation

- Click Install to begin the installation. When the installation is finished, the Launch Data Collector Configuration Tool opens.

- Check if the latest level of maintenance, such as fix packs or interim fixes, needs to be applied
- To run the Configuration Tool now, select Launch the configuration tool, then click Next to continue. To run the Configuration Tool at a later time, make sure Launch the configuration tool is not selected, and click Next to continue.
To run the configuration tool later
-
cd DC_home/config_dc
./config_dc.sh - The Configuration Tool opens, displaying the Welcome window

The Configuration Tool depends on file...
-
DC_home/config_dc/dcInputs.txt
...which must contain appropriate values or must have been generated by the installer. Do not modify this file. Inappropriate values result in the failure of the Configuration Tool connecting with the selected appserver
- Click Next to open the Choose Configure or Unconfigure window

- Select Configure servers for data collection, and click Next.
The software searches for installations of WAS version 7 on your computer and then displays a list.

- If the appserver profile that ITCAM for WAS will monitor is displayed, select it and click Next.
If the profile for the appserver that will be monitored by ITCAM for WAS was not detected, specify another profile for the appserver. Select the check box, then Browse to and select your profile. The list of detected WAS profiles only includes installations of WAS 7.0 or later.
A window that shows information about the selected appserver displays

- Confirm the information for the following by clicking Next
WAS Home Location of the directory for the profile under WAS_HOME /profiles. For example... -
/opt/IBM/WebSphere/AppServer/profiles/default
Java Home Location of the java directory under WAS_HOME. For example... -
/opt/IBM/WebSphere/AppServer/java
WAS Version IBM WAS version. For example, 7.0.0.0 WAS Profile Name of the WAS profile. For example, WebSphere_Portal A window for entering information to establish ITCAM for WAS and appserver communication displays.

Field Description Host Name Fully qualified host name or IP address of the appserver instance that ITCAM for WAS will monitor. Do not include a protocol in the host name. For example, type... -
myserver.ibm.tivoli.com
...not...
-
https://myserver.ibm.tivoli.com
If using a Network Deployment environment, provide the host name of the dmgr instead.
Connector Type Select the type of connection ITCAM for WAS and appserver will use for communication. SOAP Connector Port Connector port used by the appserver instance to send commands using SOAP. The SOAP port is identified -
WAS_HOME/profiles/profile/config/cells/cell/nodes/node /serverindex.xml
If using Network Deployment, provide the SOAP port of the dmgr instead.
RMI Connector Port Connector port used by the appserver instance to send commands using RMI. User Name User ID of a user authorized to log on to the IBM WAS administrative console. This user must have the agent role on the appserver. To retrieve the user name and password from a properties file, select Show Advanced Options. For SOAP connectors, Set username and password stored in soap.client.props. For RMI connectors, set username and password stored in sas.client.props. Password Password corresponding to the user specified in the User Name field. A window for selecting the server for the appserver that connects to ITCAM for WAS displays

- Select the server.
- Click Next.
A window asking for which appserver instances to enable ITCAM for WAS's custom Performance Monitoring Infrastructure (PMI) level displays
- To enable ITCAM for WAS's custom PMI setting for all appserver instances, select...
-
Configure all appservers in the same manner
...and...
-
Apply required PMI settings
Then click Next.
To enable ITCAM for WAS's custom PMI setting only for particular appserver instances, select...
-
Configure each appserver separately
...then select the appserver instances. Then click Next.
In order for ITCAM for WAS data to appear in the Tivoli Performance Viewer (TPV) user interface, enable PMI and the PMI level must be set to custom.
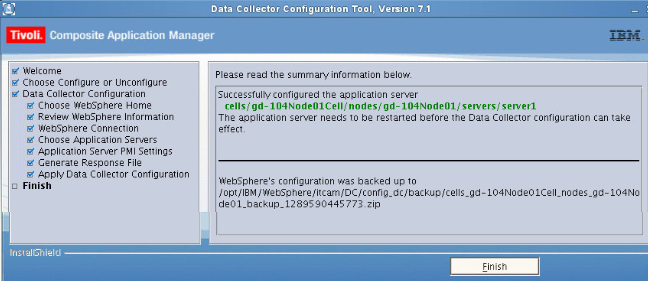
A window asking if you want to configure ITCAM for WAS on this computer, whether you want to back up the IBM WAS configuration before applying the ITCAM for WAS configuration, and whether you want to create a response file from the settings for this configuration displays

- To configure ITCAM for WAS on this computer, make the selection to configure it on this computer. One reason you would not want to configure ITCAM for WAS on this computer is if you are performing the configuration procedure for the sole purpose of creating a response file for a subsequent silent configuration.
To configure the product in the previous step, and to back up the appserver configuration before applying the ITCAM for WAS configuration, select...
-
Back up the appserver configuration before applying changes
If this is selected, the configuration program will invoke WebSphere's backupConfig.sh script before applying ITCAM for WAS configuration. A backup file for the appserver configuration will be saved in the...
-
DC_home/config_dc/backup
If ITCAM for WAS configuration fails, you can use the restoreConfig command to restore the appserver configuration.
- To create a response file for a subsequent silent configuration, select...
-
Save configuration settings in a response file
...and enter the file path ending with a file name. For example:
-
/temp/response.opt
- Click Next. The Configuration Tool will apply the configuration to ITCAM for WAS, then a window indicating the results of the configuration displays

Silent installation and configuration of ITCAM for WAS on UNIX and Linux
You have the option to only install ITCAM for WAS, both install and configure ITCAM for WAS, or only configure ITCAM for WAS using this procedure. If you only want to configure ITCAM for WAS, perform this procedure after ITCAM for WAS has been installed.- Log on to the computer on which you want to install and configure ITCAM for WAS as a user with the proper permissions.
- Start the instance of the appserver that will be monitored by ITCAM for WAS.
If you are in a Network Deployment environment, before the configuration program applies the configuration, it will perform an autosynchronization between the Node Agent and dmgr. You must start the Node Agent and dmgr before the installation. Starting the instance of the appserver is not necessary.
-
If there is no maintenance to apply, you can perform both the installation and configuration by running the executable file once and using one response file. If there is maintenance apply, run the installation and configuration separately. After performing the silent installation, and before performing the silent configuration, apply the latest level of maintenance.
- Perform one of the following procedures:
- Specify configuration options in...
- Use response files created by the GUI installation and configuration programs.
To perform both a silent installation and a silent configuration, make one response file from two generated response files:
- Select...
-
Save settings to the response file
...during the GUI installation and the GUI configuration.
- With a text editor, copy and paste the contents of the response file generated from the installation program into the response file generated by the configuration program.
- Save the newly created response file with a unique name or in another location.
If you are performing only the installation, options for the configuration will be ignored when running the silent installation. If you are performing only the configuration, options for the installation will be ignored when running the silent configuration.
- Select...
- Perform one of the following procedures:
Script to install, or install and configure Script to configure only IBM AIX setup_DC_aix.bin Solaris setup_DC_sol.bin Linux setup_DC_lin.bin HP-UX setup_DC_hp11.bin config_dc.sh - Run...
-
./script.sh -silent [-is:log [ /path/to/file.log ]] [ configuration_option ...] -options /path/to/response.opt
-
./setup_DC_lin390.bin -silent -is:log /opt/tmp/DClog.txt -V DC_ASL_PORT="8885" -options /opt/silent/DC6.opt
./config_dc.sh -silent -V DC_ASL_PORT="8885" -options /opt/silent/DC6.optConfiguration options specified in the response file take precedence over those entered in the command line. For a particular command-line configuration option to take effect, nullify the option in the response file by commenting it out with a pound sign (#).
If you are performing a silent configuration (after ITCAM for WAS has been installed), you cannot use the -is option. Instead run the command in the following way:
-
./config_dc.sh -silent [ configuration_option ...] -options /path/to/reponse.opt
For example:
-
./config_dc.sh -silent -V DC_ASL_PORT="8885" -options /opt/silent/DC6.opt
- If you have performed only a silent installation (LAUNCH_CONFIG="false"), to verify install success, look at...
-
/var/ibm/tivoli/common/CYN/trace-install.log
If you have just performed a silent installation, before executing a silent configuration, apply any required maintenance.
Additional configuration tasks - UNIX and Linux
- Enable ITCAM for WAS in the IBM WAS administrative console.
- Restart the instance of the appserver that will be monitored by ITCAM for WAS.
If the appserver fails to start up, ITCAM for WAS configuration has failed.
- After the configuration, the appserver fails to restart.
- During a GUI configuration, the summary panel for the Configuration Tool indicates the configuration has failed.
- During a silent configuration, the command line indicates a message that the configuration has failed.
- After the configuration, there are messages in the log file that indicate configuration has failed.
If ITCAM for WAS configuration has failed, see Appendix F, "What to do if ITCAM for WAS configuration fails"
- Start ITCAM for WAS in the IBM WAS administrative console.
- Perform the tasks described in each of the following sections, if applicable
If you used root for ITCAM for WAS installation and the appserver is not owned and operated by the root ID
The installer will have the authority to use whatever directories and files it requires. The installer will be able to find most appserver installations on the machine. But, if the appserver is not owned and operated by root ID, you will need to finish the following tasks in order for ITCAM for WAS to work correctly:
- Change ownership to root to appserver owner ID:
ul> chown -R wasOwnerId:wasGroupId DC_home
- Verify you can write to CYN directory...
-
chown -R wasOwnerId:wasGroupId /var/ibm/tivoli/common/CYN
Additional procedure for Security Enhanced Linux (SELinux)
After installing ITCAM for WAS on SELinux, for example Red Hat Enterprise Linux Version 5 or SUSE Linux Enterprise Server Version 11, perform an additional procedure to identify the Data Collector shared libraries.
Run the following command as root...
-
chcon -R -t texrel_shlib_t DC_home/toolkit/lib/architecture_code
Use one of the following values for architecture_code, depending on your Linux platform:
| Linux platform | Architecture code |
|---|---|
| Linux Intel R2.6 (32 bit) | linux-ix86 |
| Linux Intel R2.6 (64 bit) | linux-ix64 |
| Linux ppc R2.6 (32 bit) | linux-ppc |
| Linux ppc R2.6 (64 bit) | linux-ppc64 |
| Linux S390 R2.6 (32 bit) | linux-s390 |
| Linux S390 R2.6 (64 bit) | linux-s390-64 |
Unconfiguring ITCAM for WAS using the Configuration Tool on Windows, UNIX, and Linux
-
1. On UNIX or Linux, if running the uninstallation from a remote computer, enter
- Log on to the computer that you want to uninstall ITCAM for WAS using the same user name that performed the installation.
- On UNIX or Linux, export the DISPLAY variable using one of the following options:
- If running the unconfiguration from a remote computer...
-
export DISPLAY=local_machine:0.0
...where local_machine is the fully qualified host name of the computer where you are sitting.
- If running the unconfiguration from the computer where ITCAM for WAS was installed...
-
export DISPLAY=localhost:0.0
- If running the unconfiguration from a remote computer...
- Verify the instance of the appserver being monitored by ITCAM for WAS is running.
-
cd WAS_HOME/profiles/profile/bin
//serverStatus.sh server_nameIf you are in a Network Deployment environment, before the configuration program applies the unconfiguration, it synchronize nodes.
- Browse to the installation directory for ITCAM for WAS and change to the config_dc directory.
- Run config_dc.sh
The Configuration Tool opens, displaying the Welcome panel.

The Configuration Tool depends on...
-
DC_home/config_dc/dcInputs.txt
This file must contain appropriate values or should have been generated by the installer. Inappropriate values result in the failure of the Configuration Tool to connect to the required appserver.
- Click Next to open the Choose Configure or Unconfigure panel
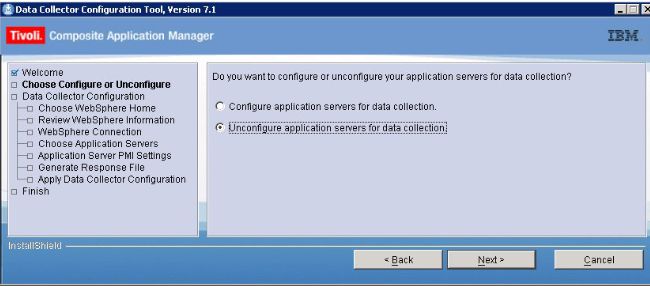
Select Unconfigure appservers for data collection.
- Click Next to view the Choose Application Servers panel

- Select the appservers that you want to unconfigure from the ITCAM for WAS.
- Then click Next. The Restore Original PMI Settings panel displays. Select which appserver instances to restore the original Performance Monitoring Infrastructure (PMI) settings that existed before the ITCAM for WAS configuration

- To restore the original PMI settings that existed before the ITCAM for WAS configuration for all appserver instances, select Unconfigure all appservers in the same manner and Restore original PMI settings. Then click Next
To restore the original PMI settings that existed before the ITCAM for WAS configuration only for particular appserver instances, select Unconfigure each appserver separately
Then click Next to start the unconfiguration process

- The unconfiguration program validates the connection between ITCAM for WAS and the appserver using the information entered when you configured ITCAM for WAS. If the user name, password, or cell name have changed since configuration, the validation will fail. If validation fails, a window displays in which you must enter information about ITCAM for WAS and appserver communication.

A panel with summary information indicating the results of the unconfiguration procedure displays

-
xhost + hostname
...on the computer where you are sitting. Where hostname is the fully qualified host name of the computer on which ITCAM for WAS is being uninstalled.
Silent unconfiguration of ITCAM for WAS on Windows, UNIX, and Linux
- Verify the instance of the appserver being monitored by ITCAM for WAS is running.
-
cd WAS_HOME/profiles/profile/bin
/serverStatus.sh server_nameIf you are in a Network Deployment environment, start node agents and dmgr, then synchronize all nodes. Starting the instance of the appserver is not necessary.
- Specify configuration options in the DC_unconfig.opt response file template and save the file.
-
cd DC_home /config_dc directory.
./config_dc.sh -silent [configuration_option...] -options response_fileFor example...
-
./config_dc.sh -silent -V DC_CCUC_UNCONFIG=true -V DC_ASL_SOAPPORT ="8885" -options /opt/silent /DC6.opt
Configuration options specified in the response file take precedence over those entered in the command line. For a particular command-line configuration option to take effect, first nullify that option in the response file by commenting it out with a pound sign (#)
Uninstalling ITCAM for WAS on Windows, UNIX, and Linux
- On UNIX or Linux, if running the uninstallation from a remote computer, enter xhost + hostname on the computer where you are sitting, where hostname is the fully qualified host name of the computer on which ITCAM for WAS is being uninstalled.
- Log on to the computer on which you want to uninstall ITCAM for WAS using the same user name that performed the installation.
- On UNIX or Linux, export the DISPLAY variable. Do one of the following:
- If running the uninstallation from a remote computer. Enter
export DISPLAY=local_machine:0.0
...where local_machine is the fully qualified host name of the computer where you are sitting.
- If running the uninstallation from the computer where ITCAM for WAS was installed.
-
export DISPLAY=localhost:0.0
- If running the uninstallation from a remote computer. Enter
export DISPLAY=local_machine:0.0
- Stop the instance of the appserver that was being monitored by ITCAM for WAS.
- Back up files from the ITCAM for WAS installation that you still need.
- Depending on your operating system, do one of the following to begin to uninstall ITCAM for WAS:
- Windows
-
Start > Control Panel > Add or Remove Programs > ITCAM for WAS > Change/Remove > Remove > Next
- UNIX or Linux
-
cd DC_home/_uninst
./uninstaller.bin
Run from DC_home/_uninst, otherwise, the InstallShield cannot create the CYN directory in /var/ibm/tivoli/common
The first window for the uninstallation program opens, displaying the Welcome panel

- Windows
- Click Next. The Review Uninstallation Information panel displays the location of the files to be uninstalled

- Read the information in the panel and click Uninstall
- If there are files remaining from a previous or existing ITCAM for WAS installation, select the required options to decide whether to remove these in each of the windows.

You might find that empty folders remain after the uninstallation even if you select Yes to All. This is because the folders are occupied by the appservers during the installation. You can restart your environment and manually remove them after the uninstallation.
- Read the information in the panel and click Finish to complete the uninstallation

- If you used the Add/Remove Programs tool on Windows to uninstall ITCAM for WAS and you get the following message in the Add/Remove Programs tool window...
An error occurred while trying to remove ITCAM for WAS. It may have already been uninstalled. Would you like to remove ITCAM for WAS from the Add or Remove programs list?
...click Yes, then run...
-
cd DC_home\_uninst
uninstaller.exeRepeat steps 7
Unconfiguring ITCAM for WAS in prompt mode
- If WebSphere Global Security is enabled, log in as a WebSphere administrator who will be able to administer the appserver configuration.
- Perform one of the following procedures:
- If you are running the appserver in a Network Deployment environment, ensure that the dmgr and the node agent are running.
- If you are running the appserver in a non-Network Deployment environment, ensure that the instance of the appserver that is being monitored by ITCAM for WAS is running.
- To set any of the configuration options as environment variables before running the unconfiguration script, export the environment variables. For example...
-
export ITCAM_CONNTYPE=RMI
export ITCAM_CLEANUP=yBy exporting these variables, the unconfig.sh script will use them as the new default values. You will not need to enter a value (simply press Enter) when you are prompted for them.
- Run the following command from the
-
cd /u/ecam/bin
./unconfig.sh [options]The unconfig.sh script will use command-line values as the new default values. You will not need to enter a value (simply press Enter) when you are prompted for them. You will be prompted for the path of
By exporting these variables, the unconfig.sh script will use them as the new default values. You will not need to enter a value (simply press Enter) when you are prompted for them.
-
cd /u/ecam/bin
./unconfig.sh [options]The default path for the location of the script is u/ecam/bin.
By setting options in the command line, the unconfig.sh script will use them as the new default values. You will not need to enter a value (simply press Enter) when you are prompted for them. You will be prompted for the path of WAS_HOME :
-
Enter the path of the WAS user install root [/u/ WAS7000]:
- Enter the HFS path name of WAS_HOME and press Enter.
The configuration script uses this path to search for the wsadmin.sh script that was used to configure the target appserver for ITCAM monitoring during the configuration.
You should respond with a valid HFS path name, for example,
-
/u/ WAS7000
You will be prompted to select one of the discovered occurrences of the wsadmin.sh script:
Found wsadmin.sh in the following locations:
1) /u/was7000/DeployMgr/AppServer/bin/wsadmin.sh
2) /u/was7000/DeployMgr/AppServer/profiles/default/bin/wsadmin.sh
2) /u/was7000/DeployMgr/DeploymentManager/bin/wsadmin.shEnter the number of the wsadmin to use for unconfiguration
- Enter the number that corresponds to the path for the appropriate wsadmin.sh script and press Enter. The script will use the wsadmin.sh that you selected to find all server instances that are running on this node. Then you will be prompted to select one of the discovered instances of the appserver:
-
1) IBM123
2) IBM124
3) IBM125
4) IBMabcEnter the number of the server to select:
- Enter the number that corresponds to the appropriate instance of the appserver that you want to unconfigure and press Enter. You will be prompted whether you want to remove the runtime directory for the appserver instance that is being unconfigured:
Server "IBM123" has been selected
The runtime directory for IBM123 is: /u/ecam/runtime/was70.TIVOLI.IBM123 Do you wish to remove this directory? (y|n) [n]: - Enter y or n and press Enter. Entering y indicates that you want to remove the existing runtime directory for the appserver instance. Whether you enter y or enter n, the WAS customization done for ITCAM for WAS will be removed.
You will be prompted whether you want to remove ITCAM statements from the server.policy file
ITCAM configuration adds statements to the Java 2 security file server.policy. Since this policy file is shared by all servers on this node, you should only remove these statements when the last server configured for ITCAM is unconfigured.
-
Do you wish to remove ITCAM changes to the server.policy file? (y|n) [n]:
Enter y if you have unconfigured ITCAM for WAS for all server instances on this node. Otherwise. enter n . The script will unconfigure ITCAM for WAS.
For successful unconfiguration, look for messages similar to the following:
-
Successfully unconfigured data collector for server IBM123
The runtime unconfiguration script creates a log of all the unconfiguration operations that it performs. You can review the log for any error conditions, and you might be requested to provide the log contents to IBM Software Support. The log file is called unconfig.log and is located in the runtime directory under config_home . For example...
-
/u/ecam/runtime/unconfig.log
Prerequisites and pre-installation tasks for ITCAM for WAS v7 on Windows
Required disk space...
- 200 megabytes for the installation image
- 440 megabytes for installing the product
Supported Windows platforms:
Windows Server 2003 all Editions 64–bit supported for AMD64 and EM64/T only Windows Server 2003 R2 all Editions 64–bit supported for AMD64 and EM64/T only Windows XP Professional SP2 32-bit and 64-bit Windows Vista Business SP1 and Windows Vista Enterprise SP1 32-bit and 64-bit Windows Server 2008 Standard, Enterprise, and DataCenter 32-bit and 64-bit ITCAM for WAS v7 JDK is the same the monitored WAS appservers.
Co-locate ITCAM for WAS on the same host as the WAS appserver to be monitored.
Do not configure ITCAM for WAS for an appserver instance where any of the following are installed...
- ITCAM Agent for WAS 7.1 (Component of ITCAM for Application Diagnostics)
- ITCAM for Web Resources 6.2
- Data Collector for ITCAM for WebSphere 6.1
Note that these products can be co-located on the same host as ITCAM for WAS v7 if they are configured for different appserver instances.
Windows Permissions
The user who installs ITCAM for WAS must have read, write, and execute privileges on the appserver.
Administrator privileges are not required unless the appserver is owned by a user with administrator privileges.
The appserver instance owner ID must have write permission to the directory where the installer creates log files. Default is
-
C:\IBM\tivoli\common\CYN\logs
Checking the heap size
Log on to the IBM WAS administrative console, and for each appserver, navigate to...
-
Server | Application Servers | server_name | Configuration | Server Infrastructure | Java and Process Management | Process Definition | Additional Properties: Java Virtual Machine
...and set value for Maximum Heap Size to at least 384 MB.
Adjusting ports for firewalls or for use with other applications
Verify firewalls do not prevent communication on the SOAP and RMI ports ITCAM for WAS uses to communicate with the appserver dmgr.
Enable user ID and password input from sas.client.props for RMI connector types
- Edit...
-
WAS_HOME/profiles/profile/properties/sas.client.props
- Set the following properties...
-
com.ibm.CORBA.loginSource=properties
com.ibm.CORBA.securityEnabled=true
com.ibm.CORBA.loginUserid=user_ID
com.ibm.CORBA.loginPassword=password - Encrypt the password:
-
cd WAS_HOME/profiles/profile/bin
PropFilePasswordEncoder.bat /path/to/sas.client.props com.ibm.CORBA.loginPassword
Enable user ID and password input from soap.client.props for SOAP connector types
Instead of entering the user ID and password during installation in either the GUI panel or silent configuration option, you can use the configuration program to retrieve the user ID and password from soap.client.props when using an SOAP connection to WebSphere Application Server when global security is enabled.
- Edit...
-
WAS_HOME/profiles/profile/properties/soap.client.props
- Set the following properties...
-
com.ibm.SOAP.securityEnabled=true
com.ibm.SOAP.loginUserid=user_ID
com.ibm.SOAP.loginPassword=password - Encrypt the password...
-
cd WAS_HOME/profiles/profile/bin
PropFilePasswordEncoder.bat /path/to/soap.client.props com.ibm.SOAP.loginPassword
Information to know before the installation
For an example of the values you may need to provide, see "Options for installing and configuring ITCAM for WAS"
An ITCAM for WAS installation cannot span over multiple hosts. Install ITCAM for WAS separately on each host, and configure it for each appserver instance.
For a Network Deployment environment, for node configuration, on each node, we supply the host name of the dmgr. We do not need to install or configure ITCAM for WAS Application Server on the dmgr itself.
For a silent installation, copy the installation images to a hard disk.
By default, the installer creates log files in:
-
C:\IBM\tivoli\common\CYN\logs\trace-install.log
For GUI installation and configuration, there are three types of fields in the installer:
Prefilled, editable Either accept the default provided, or enter your own value. Blank Must enter a value of your own. Prefilled, noneditable Cannot change the provided value. These fields are not mentioned in the steps that follow. The installation and configuration programs do not accept values for directory paths if the following special characters are included:
-
\u `!@#$*()+=[]{}|:;’"<>,?
GUI installation and configuration of ITCAM for WAS on Windows
- Log on to the target computer and start the instance of the appserver to be monitored by ITCAM for WAS.
For Network Deployment environments, start the Node Agent and dmgr. Starting the instance of the appserver is not necessary.
- If Terminal Services is enabled on Windows 2003 Server, put the server into installation mode.
-
change user /install
You can ignore the following message:
-
Install mode does not apply to a Terminal server configured for remote administration
- Start the installation program using either...
- Start the installation program using the IBM WAS LaunchPad.
- Start setup_DC_w32.exe from directory containing the ITCAM for WAS installation image.

- Click Next to show the Choose Destination window to select the installation directory.
You can accept the default installation directory path in the Product Installation Directory field, or click Browse. If you specify a directory that does not exist, the installation program creates the directory.
- Click Next to open the Generate Response File window. In this window, you can choose whether to install ITCAM for WAS on this computer and whether to create a response file from the settings for this installation.

To install ITCAM for WAS on this computer, select..
-
Install the Data Collector on this computer
To create a response file for a subsequent silent installation, select...
-
Save your settings in a response file
...and enter the file path ending with a file name. For example:
-
C:\temp\response.opt
- Click Next to open the Review Installation Information window. Read the summary information about the ITCAM for WAS installation.

- Click Install
The Install and Configure Files window shows the progress of the installation.

- When the installation is finished the Launch Data Collector Configuration Tool opens.

To run the Configuration Tool now, select...
-
Launch Data Collector Configuration Tool
You can run the configuration tool at a later date by running..
-
DC_HOME/config_dc/config_dc.bat
- The Configuration Tool opens, showing the Welcome window.

The Configuration Tool depends on file...
-
DC_home/config_dc/dcInputs.txt
Do not modify this file. Inappropriate values result in the failure of the Configuration Tool connecting with the selected appserver.
- Click Next to open the Choose Configure or Unconfigure window.
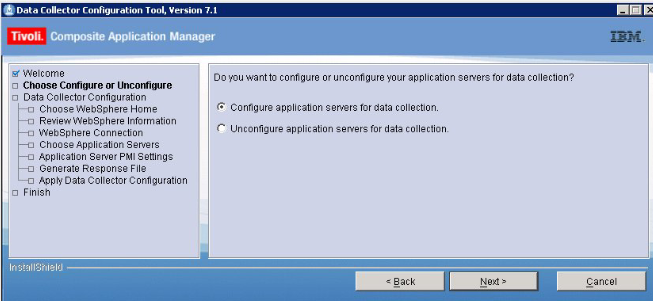
- Select...
-
Configure appservers for data collection
...and click Next. The software searches for installations of WAS version 7 on your computer and then displays a list of servers.
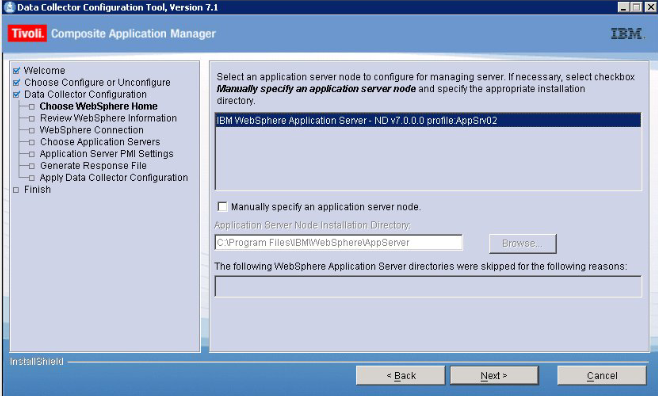
- Select an appserver profile to monitor, then click Next .
- If desired appserver profile is not detected, select...
-
Manually specify an appserver node
...and browse to your profile.
- Click Next to open the Review WebSphere Information window which shows information about the selected appserver.

Application server information...
Field Description WebSphere Application Server Home The location of one of the directories for the profile under WAS_HOME /profiles. For example... -
C:\WebSphere\AppServer\profiles\default
Java Home Location of the Java directory under WAS_HOME. For example... -
C:\WebSphere\AppServer\java
WebSphere Application Server Version The version. For example, 7.0.0.1 WebSphere Application Server Profile The name of the profile. For example, WebSphere_Portal. Confirm the information in the window, by clicking Next
- On the the WebSphere Connection window, enter information for communication between ITCAM for WAS and the appserver.
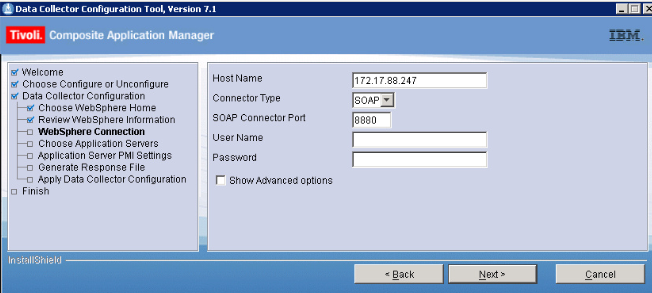
- Fields for establishing ITCAM for WAS and appserver communication
Field Description Host Name Fully qualified host name or IP address of the appserver instance that ITCAM for WAS will monitor. If you are using a host name, do not include a protocol in the host name. For example, type... -
myserver.ibm.tivoli.com
...not
-
https://myserver.ibm.tivoli.com
For a server in a Network Deployment environment, provide the host name of the dmgr instead.
Connector Type Type of connection that ITCAM for WAS will use to communicate to the appserver: SOAP or RMI SOAP Connector Port Connector port used by the appserver instance to send and receive commands using SOAP. The SOAP port is identified in... -
WAS_HOME/profiles/profile/config/cells/cell/nodes/node /serverindex.xml
If using Network Deployment, provide the SOAP port of the dmgr instead.
RMI Connector Port Connector port used by the appserver instance to send commands using RMI. User Name Set if Global Security is enabled. User authorized to log on to the IBM WAS administrative console. Must have the agent role on the appserver. To leave blank and to retrieve the user ID from a properties file select Show Advanced Options. For SOAP connectors, username and password are stored in soap.client.props. For RMI connectors, use username and password stored in sas.client.props. Password Set if Global Security is enabled. Password corresponding to the user specified in the User Name field. To retrieve the password from a properties file, select Show Advanced Options. For SOAP connectors, Use username and password stored in soap.client.props. appears. For RMI connectors, use username and password stored in sas.client.props. - Click Next to open the Choose Application Servers window

Select the server instance, or several instances, you want to configure for monitoring with ITCAM for WAS.
- Click Next to open the Application Server PMI Settings window. Select the Performance Monitoring Infrastructure (PMI) Level you want to use.

To enable custom PMI setting for all appserver instances, select...
-
Configure all appservers in the same manner | Apply required PMI settings | Next
To enable custom PMI setting only for particular appserver instances, select...
-
Configure each appserver separately
...then select the appserver instances. Then click Next
For ITCAM for WAS data to appear in the TPV user interface, enable PMI and set PMI level to custom.
- When you click Next after completing either option the Generate Response File window opens.

To configure the appserver for data collection, select...
-
Configure appservers for data collection
To back up the appserver configuration before applying the ITCAM for WAS configuration, select...
-
Back up the WebSphere Application Server configuration before applying the configuration
The configuration program starts the WebSphere backupConfig script before applying ITCAM for WAS configuration. Backup file is stored in...
-
DC_home/config_dc/backup
If ITCAM for WAS configuration fails, you can use the restoreConfig.sh command to restore the appserver configuration.
- To create a response file for subsequent silent configuration.
-
Save configuration settings in a response file
Enter path to file. For example...
-
C:\temp\response.opt
If the configuration process fails, the response file will not be created,
- Click Next
The Configuration Tool applies the configuration to ITCAM for WAS, and then a window indicating the results of the configuration displays

Running the restoreConfig command restores the original appserver configuration to the temporary directory.
- Copy the server.xml, variables.xml, and pmi-config.xml files from under the temporary directory...
-
temp_dir/restored_configuration_home/cells/cell/nodes/node/servers/server_name
...to...
-
DMGR_HOME: WAS_HOME/profiles/profile/config/cells/cell/nodes/node/servers/server_name
For example:
-
/opt/IBM/WebSphere/AppServer/profiles/default/config/cells/tivCell01/nodes/tivNode01/servers/server1
Here is an example of the path for the three files that you are copying from under the temporary directory:
-
tmp/restore/cells/Cell01/nodes/Node01/servers/server1
- Perform a node sync from the dmgr's administrative console for the node.
- In the dmgr's administrative console, save changes to the master configuration.
- Restart the appserver that is being monitored by ITCAM for WAS.
Silent installation and configuration of ITCAM for WAS on Windows
Specify the location of a response file when you run the silent installation and configuration from a command line.
You have the option to only install ITCAM for WAS, both install and configure ITCAM for WAS, or only configure ITCAM for WAS. You can run the installation and configuration separately.
- Log on to the computer on which you want to install and configure ITCAM for WAS as a user with the proper permissions.
- Start the instance of the appserver that will be monitored by ITCAM for WAS.
If you are in a Network Deployment environment start the Node Agent and the dmgr before the installation. Starting the instance of the appserver is not necessary.
- If Terminal Services is enabled on Windows 2003 Server, put the server into installation mode.
-
change user/install
Ignore the following message:
-
Install mode does not apply to a Terminal server configured for remote administration
- Verify if latest level of maintenance (fix packs or interim fixes) needs to be applied
- You can either specify configuration options in...
-
installation_image_directory/ilent/DC_was.opt
...or you can use response files created by the GUI installation programs. To perform both a silent installation and silent configuration, make one response file from two generated response files, during the GUI installation and configuration, select...
-
Save settings to the response file
...and then, with a text editor, copy and paste the contents of the response file generated from the installation program into the response file generated by the configuration program. Save the newly created response file with a unique name or in another location.
- If you are performing only the installation, options for the configuration will be ignored when running the silent installation. If you are performing only the configuration, options for the installation will be ignored when running the silent configuration.
- To install, or install and configure, ITCAM for WAS, run setup_DC_w32.exe. To only configure ITCAM for WAS, run config_dc.bat
-
setup_DC_w32.exe -silent [-is:log [ /path/to/file.log ]] [ configuration_option ...] -options /path/to/response.opt
...or...
-
config_dc.bat -silent [-is:log [ /path/to/file.log ]] [ configuration_option ...] -options /path/to/response.opt
...where...
log_file_name Path and name of the log file that the silent installer will write to. Wrap path in double-quotes (") if it contains spaces. configuration_option One or more configuration options not included in the response file. response_file
Examples...
-
setup_DC_w32.exe -silent -is:log "C:\log\DClog.txt" -V DC_ASL_PORT="8885" -options C:\itcam\images\silent\DC6.opt
config_dc.bat -silent -V DC_ASL_PORT="8885" -options C:\itcam\images\silent\DC6.opt
Configuration options specified in the response file take precedence over those entered in the command line. For a particular command-line configuration option to take effect, first nullify that option in the response file by commenting it out with a pound sign (#).
If you are performing a silent configuration (after ITCAM for WAS has been installed), you cannot use the -is option. Instead run the command in the following way:
-
config_dc.bat -silent [ configuration_option ...] -options response_file
For example:
-
config_dc.bat -silent -V DC_ASL_PORT="8885" -options C:\itcam\images\silent \DC6.op
- If you have performed only a silent installation (LAUNCH_CONFIG="false"), to verify whether the installation was successful, check...
-
C:\IBM\tivoli\common\CYN\logs\trace-install.log
Additional configuration tasks
- Enable ITCAM for WAS in the IBM WAS administrative console.
- Restart the instance of the appserver that will be monitored by ITCAM for WAS.
If the appserver fails to start up, see Appendix F, "What to do if ITCAM for WAS configuration fails"
- Start ITCAM for WAS in the IBM WAS administrative console.
- If Terminal Services is enabled on Windows 2003 Server, put the server into execute mode.
-
change user /execute
Appendix A. Obtain installation images for Windows, Linux, UNIX systems
Download the installation software from the web or use the images on the ITCAM for WAS CD. Choose a directory in which to store the installation images, then expand the software packages into that directory.Appendix B. Start an installation using LaunchPad
Run...
-
./launchpad.sh

- Click ITCAM for Web Resources Data Collector Installation
A panel from which you can launch the installation displays.
- Click Launch the installer for the ITCAM Data Collector
This launches the installation program for ITCAM for WAS.
Appendix C. Start and stop ITCAM for WAS
To enable ITCAM for WAS, in the IBM WAS administrative console, navigate to...
-
Monitoring and Tuning | Performance Monitoring Infrastructure (PMI) | appserver | Configuration tab | Enable Performance Monitoring Infrastructure (PMI) check box | Additional Properties | ITCAM for WAS | Enable ITCAM for WAS Data Collector check box | OK
The system saves the change to the local repository, while TPV sends the status to ITCAM for WAS through an MBean call. ITCAM for WAS will update the status to the local repository. For example, ITCAM for WAS will set environment variable...
-
ITCAM_DC_ENABLED=true
Restart the instance of the appserver that will be monitored by ITCAM for WAS.
To use ITCAM for WAS after enabling it, start it and then enable counters
Disable ITCAM for WAS
To disable ITCAM for WAS, in the IBM WAS administrative console, go to...-
Monitoring and Tuning | Performance Monitoring Infrastructure (PMI) | appserver | Configuration tab | Additional Properties | ITCAM for WAS
...and clear the check box...
-
Enable ITCAM for WAS Data Collector check box
...and click OK.The system saves the change to the local repository, while TPV sends the status to ITCAM for WAS through an MBean call. ITCAM for WAS will update the status to the local repository. For example, ITCAM for WAS will set environment variable...
-
ITCAM_DC_ENABLED=false
Restart the instance of the appserver that was being monitored by ITCAM for WAS.
Start ITCAM for WAS
In the IBM WAS administrative console, click...
-
Performance Monitoring Infrastructure (PMI) | appserver | Additional Properties | ITCAM for WAS | Runtime tab | Start Monitoring
The system starts monitoring the ITCAM for WAS module, and the TPV sends the signal to ITCAM for WAS through a JMX call. ITCAM for WAS will register all performance modules from the PMI registry and start monitoring.
To use ITCAM for WAS after starting it, enable counters
Stop ITCAM for WAS
In the WAS console, click...
-
Performance Monitoring Infrastructure (PMI) | appserver | Additional Properties | ITCAM for WAS | Runtime tab | Stop Monitoring
The system stops monitoring the ITCAM for WAS module, and TPV sends the signal to ITCAM for WAS through a JMX call. ITCAM for WAS will unregister all performance modules from the PMI registry and stop monitoring
Enable ITCAM for WAS counters
To enable ITCAM for WAS counters:
- Start ITCAM for WAS.
- In the IBM WAS administrative console, click...
-
Performance Monitoring Infrastructure (PMI) | appserver instance | Runtime tab | Custom radio button | ITCAM Application Performance
- In the list displayed, select the counters you want to monitor, and click Enable
Disable ITCAM for WAS counters
To disable ITCAM for WAS counters in the IBM WAS administrative console, click...-
Performance Monitoring Infrastructure (PMI) | appserver | Runtime tab | Custom radio button | ITCAM Application Performance
In the list displayed, clear the counters you do not want to monitor, and click Disable
Enable instrumentation of web service requests
If web service caching is enabled in WAS, TPV reports requests as servlets, not web services.
To view web service requests in TPV, disable web service caching in WAS...
-
WAS administrative console | Servers | WebSphere Application Servers | server_name | Web Container Settings | Web Container
...and clear the option...
-
Enable Servlet Caching
Click OK. Save the changes and restart WebSphere Application Server.
Counters displayed in the Tivoli Performance Viewer
Enabling counters allows data to be displayed in the TPV. You can choose to display the particular data by enabling selected counters. The data will not display when the correlative counters are disabled.
| Counter | Description |
|---|---|
| RequestCount | Number of requests completed since the counter was enabled or reset. |
| AverageResponseTime | Average response time of requests in milliseconds. |
| MinimumResponseTime | Fastest response time since the counter was enabled or reset in milliseconds. Available only at the instance level. |
| MaximumResponseTime | Slowest response time since the counter was enabled or reset in milliseconds. Available only at the instance level. |
| LastMinuteAverageResponseTime | Average response time of requests completed in the last minute in milliseconds |
| 90%ResponseTime | 90% median of requests in milliseconds. Maximum limit on the number of requests' response time stored to calculate the 90% response time can be set by defining....
...in.... Default is 50. Available only at the instance level. The 90% median is calculated by taking the sample at the 90% of the total samples. The formula to calculate the 90% median sample is...
For example, if the current sample size is 31 (from 0 - 30)...
If the result is not an integer, like when current sample size is 32...
This will be done by returning 10% of the 27th sample and 90% of the 28th sample. |
| AverageCPUUsage | Average CPU usage of requests in milliseconds. |
| MinimumCPUUsage | Least intensive CPU usage since the counter was enabled or reset in milliseconds. Available only at the instance level. |
| MaximumCPUUsage | Most intensive CPU usage since the counter was enabled or reset in milliseconds. Available only at the instance level. |
| LastMinuteAverageCPUUsage | Average CPU usage of requests completed in the last minute in milliseconds. |
| 90%CPUUsage | 90% median of requests in milliseconds. The maximum limit on the number of requests' CPU usage stored to calculate the 90% CPU usage can be set by defining...
...in... Default is 50. Available only at the instance level. The 90% median is calculated by taking the sample at the 90% of the total samples. The formula to calculate the 90% median sample is...
For example, if the current sample size is 31 (from 0 - 30)...
|
Appendix D. ITCAM for WAS configuration parameters
Edit...
-
DC_home/runtime/server/custom/toolkit_custom.properties
...and set paramters in format: parameter =value
Do not change any settings in this file, except the settings listed below. If the file does not exist, create it. Restart the appserver after the parameters are changed
| Configuration parameter | Description |
|---|---|
| eCAM.90Percent.buffer.limit | Number of sample used to calculate 90% metrics. |
| eCAM.PMI.Threadpool.size | Thread pool size to update the PMI statistics. Updating the PMI statistics is decoupled from the application thread so it will not lengthen the application response time. The default value is 2. If the thread pool size is too small, updating the PMI statistics will slow down and more memory will be used. Unless the appserver is running out of memory, there is no need to fine tune this parameter. |
| eCAM.memory.limit | Amount of memory in Megabytes that the ITCAM for WAS will use. Default is 20. When the memory limit is reached, new PMI statistics will not be created. New applications and requests will not show up in the PMI. An error message will be logged in the ITCAM log file...
|
| eCAM.disable.BCI | When true, ITCAM for WAS will disable the BCI engine when it first starts. Used to reduce the memory usage of the ITCAM for WAS. Default is true |
Appendix E. Specify silent values on Windows, UNIX, and Linux
Requirements for a response file
Response files preserve configuration data for an installation, configuration, or unconfiguration, so that you can identify configuration details at a later date. The following is general information and applies to any response file you create for ITCAM for WAS.A response file must have the following characteristics:
- Contains the configuration options for your installation, configuration, or unconfiguration. Configuration options can be sorted in any order.
- Does not contain null values. If you do not specify a value for a configuration option, either comment out the line with a pound sign (#), or set the value string to NULL.
- Does not contain the -silent flag, the -options flag, or -is
- If there are any spaces in the value string to the right of the equal sign (=), the value must be enclosed in double-quotation marks ("). It is best to enter the value between the double-quotation marks that are already there in the response file template.
Configuration options specified in the response file take precedence over those entered in the command line. For a particular command-line configuration option to take effect, first nullify that option in the response file by commenting it out with a pound sign (#).
Reasons to use command-line vs. response file configuration options
This section lists some reasons to manually type configuration options, instead of including them in the response file:
- To reuse the response file in multiple installations and configurations, when some of the options are unique to each.
To reuse a response file in multiple installations, and accomodate command-line options that are unique to each installation, nullify unique options in the response file by commenting them out with a pound sign (#). We do this because response file options take precedence over command-line options.
- To safeguard the password by manually entering it during each installation, configuration, or unconfiguration.
If you record the password in the option (.opt) file, the password is unencrypted and visible to anyone who opens the file. However, if you are using a response file generated from the Configuration Tool, the response file contains an encrypted password and there is no need to type it in the command line for the purpose of password protection.
The following examples set one of the passwords on the command line and rely on a response file to provide all other configuration details:
setup_DC_w32.exe -silent
                 -V DC_ASL_PASSWD="tivoli"
                 -options C:\itcam\images\silent\dc_scenario1.opt

./setup_DC_lin390.bin -silent
                      -V DC_ASL_PASSWD="tivoli"
                      -options /opt/IBM/itcam/images/silent/DC7.opt
Silent install configuration options syntax
You can use configuration options in the command line or in a response file. There are three flags for configurations options...
- -P entity_ID.dataItem ="value"
- -V entity_ID.dataItem ="value"
- -W entity_ID.dataItem ="value"
...where...
| entity_ID | Entity involved in an installation, configuration, or unconfiguration, such as the log settings for the installation, configuration, or unconfiguration. |
| dataItem | Name of an attribute, such as the installation path or the communications port. |
| value | Value for an attribute of an entity involved in an installation, configuration, or unconfiguration, such as port=8100 |
Options for installing and configuring ITCAM for WAS on Windows, UNIX, Linux, and IBM i
Installation settings...
| Option string | Description | Required? | ||||||
|---|---|---|---|---|---|---|---|---|
| -V disableOSPrereqChecking=true|false | Whether OS-level checking is turned on before installation. Set true to have program ignore the results of the OS-level checking. Set false to turn on OS-level checking before the installation, and have the program exit if the OS on the target machine has not met minimum requirements. | Required | ||||||
| -P installLocation | Path of the installation directory for ITCAM for WAS. Default directory path:
| Optional | ||||||
| -V LAUNCH_CONFIG=true|false | Whether to launch the Configuration Tool after installation. | Required | ||||||
| -V DEFER_CONFIG=true|false | Whether to defer running the Configuration Tool to a later time. | Required |
Configuration settings
| Option string | Description | Required? |
|---|---|---|
| -V DC_BACKUP_ WAS=true|false | Set true to back up the appserver configuration using backupConfig.sh before applying the ITCAM for WAS configuration. Backup file is saved to...
If configuration fails, you can use restoreConfig to restore the appserver configuration. | Optional |
| -V DC_ITCAMF WAS=true|false | Whether to configure the ITCAM for WebSphere Data Collector. | Required |
| -V DC_CCUC_CONFIG=true|false | Whether to run the Configuration Tool for the purpose of configuring ITCAM for WAS. | Required if -V LAUNCH_CONFIG=true |
| -V DC_CCUC_UNCONFIG | Whether to run the Configuration Tool for the purpose of unconfiguring ITCAM for WAS. | Required |
| -V DC_RECONFIG_ALLOW | Whether reconfiguring ITCAM for WAS is allowed. Setting true indicates that reconfiguration of ITCAM for WAS is allowed. Setting false indicates that the installer will exit if the specified appserver has been configured already. | Required |
| -V DC_CAS_ WAS | Whether to configure the WAS. Setting true indicates that WAS will be configured. Setting false indicates that WAS will not be configured. | Required |
| -V APP_SERVER_NAMES | Path to the appserver. For example, cells/Node06Cell/nodes/Node06/servers/server1 | Required |
| -V APPLY_PMI_TO_ALLSERVERS=true|false | Whether the custom PMI settings apply to all appserver instances. | Required |
| -V ITCAM_PMI_ENABLE=true|false | Whether to enable ITCAM for WAS's custom PMI setting for this particular appserver instance. | Required if you indicated -V APPLY_PMI_TO _ALLSERVERS =true |
| -V server_name_ITCAM_PMI_ENABLE=true|false | Whether to enable ITCAM for WAS's custom PMI setting for this particular appserver instance. | Required if you indicated -V APPLY_PMI_TO _ALLSERVERS =false |
| -V WS_NODE_NAME=value | Navigation to the appserver. Default: cells/Node01Cell/nodes/Node01. | Optional |
| -V DC_WD_PROFILEHOME=value | Path of the profile for the appserver. Example: /opt/IBM/AppServer/profiles/profile6 | Required |
| -V DC_WD_JAVAHOME=value | Path for the location of the Java home directory. Example: /opt/IBM/AppServer/java | Optional |
| -V DC_WD_PROFILENAME=value | Name of the profile for the appserver. Example: WebSphere_Portal. | Required |
| -V DC_WD_ WASBASEDIR | Path for the location of the appserver base directory. Example: /opt/IBM/AppServer | Required |
| -V DC_WD_ WASVER | Version of the appserver. Specify 70. | Required |
| -V DC_ASL_HOSTNAME | Fully qualified host name or IP address of the server where ITCAM for WAS will be installed. Example: ibmmachine.usca.ibm.com. If using Network Deployment, provide the fully qualified host name or IP address of the dmgr instead. | Required |
| -V DC_ASL_CONNTYPE=SOAP|RMI | The type of connection the appserver and ITCAM for WAS will use for communication. The default is SOAP. | Required |
| -V DC_ASL_PORT=value | For SOAP connectors, enter the connector port used by the appserver instance to send commands using SOAP. The default is 8880. The SOAP port is identified in the following file for the instance of the appserver that ITCAM for WAS will monitor:
WAS_HOME/profiles/profile/config/cells/cell/nodes/node/serverindex.xml If you selected RMI as the connector type, enter the connector port used by the appserver instance to send commands using RMI. If using Network Deployment, provide the port of the dmgr instead. | Optional |
| -V DC_ASL_USERNAME=value | User ID of a user authorized to log on to the WAS console. This user must have the agent role on the appserver. | Required if Global Security is enabled. |
| -V DC_ASL_PASSWD=value | Password for the user who is authorized to log on to the WAS console. | Required if Global Security is enabled. |
| -V DC_ASL_USECLIENTPROP=true|false | Whether the Global Security of WAS is enabled. Setting true indicates that the Global Security of WAS is enabled. The configurator will use the user ID and pasword in soap.client.props/sas.client.props. Setting false indicates that the Global Security of WAS is disabled. The configurator will use the user ID and password in the response file. | Optional |
Message generation
| Option string | Description | Required? |
|---|---|---|
| -W LogSetting.consoleOut=true|false | Whether to display messages issued by the installation and configuration program on the console. | Required |
| -W LogSetting.logLevel=value | Trace level setting for the installation and configuration log files. This log file lists error, warning, informational, and debug messages that are issued by the installation and configuration program. Access the installation and configuration log files in:
| Optional |
| -V LOG_DIR=value | Writable directory to which the installation and configuration programs will write log files. Useful if the default directory is not writable on your systems. If you set this new option, the installation and configuration programs will use it as real log path even if the default log path is writable. | Required if the default log file directory is not writable. |
Options for unconfiguring ITCAM for WAS on Windows, UNIX, and Linux
Options for the unconfiguration of ITCAM for WAS...
| Option string | Description | Required? |
|---|---|---|
| -V DC_CCUC_CONFIG=true|false | Set true to run the Configuration Tool for the purpose of configuring ITCAM for WAS. | Required |
| -V DC_CCUC_UNCONFIG=true|false | Set true to run the Configuration Tool for the purpose of unconfiguring ITCAM for WAS. | Required |
| -V APP_SERVER_NAMES=value | Path to the appservers you want to unconfigure. You can unconfigure several appserver instances at one time using a single response file. It is required that you list all of the paths for the appserver instances that you are configuring, separated by a comma and a space. This is required even if the appserver instances are located in the same node and cell and have the same associated user name and password. After specifying -V APP_SERVER_NAMES, specify one complete set of required options for each appserver instance that is being unconfigured. If you are unconfiguring more than one appserver instance, prefix the option with the string "SERVER1_" for the first appserver instance that is listed in -V APP_SERVER_NAMES. Prefix the option with the string "SERVER2_" for the second appserver instance that is listed in -V APP_SERVER_NAMES. Follow this pattern for the rest of the appserver instances to be unconfigured.See“Examples of modified response file templates” on page 127 for an example of how this is done. | Required |
| -V APPLY_PMI_TO_ALLSERVERS=true|false | To restore the original IBM WAS PMI settings that existed prior to the ITCAM for WAS configuration for all appserver instances that are being unconfigured, specify true . | Required |
| -V RESTORE_ORIGIN_PMI_SETTING=true|false | To restore the original IBM WAS PMI settings that existed prior to the ITCAM for WAS configuration for all appserver instances that are being unconfigured, specify true . | Required if you indicated -V APPLY_PMI_TO _ALLSERVERS=true |
Options for monitoring installation, configuration, or unconfiguration messages
The following two configuration options control the display or logging of installation, configuration, or unconfiguration messages. These options can help you monitor and debug all phases of an installation, configuration, or unconfiguration.
| -W LogSetting.consoleOut=true|false | Whether to display messages issued by the installation, configuration, or unconfiguration program on the console. If you use this option with a native launcher, it must be used in combination with the -is:javaconsole option. |
| -W LogSetting.logLevel=value | Level of tracing for the installation, configuration, or unconfiguration log files. The amount of tracing for a specific level includes the messages for that level and all messages at a higher severity. For example, if you choose the WARNING trace level, the following messages are logged: WARNING, ERROR, and FATAL . During the installation, configuration, or unconfiguration, maximum logging is turned on by default. Access the installation, configuration, or unconfiguration log files in...
/var/ibm/tivoli/common/ CYN/logs (UNIX and Linux) |
Trace level settings for installation, configuration, or unconfiguration log files...
| Option string | Description |
|---|---|
| -W LogSetting.logLevel=FATAL | Log fatal messages. A fatal message reports an error from which the program cannot recover. A fatal message is the most severe message. |
| -W LogSetting.logLevel=ERROR | Log error messages. An error message reports a serious failure. An error message is less severe than a fatal message. |
| -W LogSetting.logLevel=WARNING | Log warning messages. A warning message reports that an abnormal condition has occurred. The condition might or might not require the user to take action. |
| -W LogSetting.logLevel=INFO | Log information messages. An information message indicates a condition that is worth noting but does not require the user to take action. |
| -W LogSetting.logLevel=DEBUG_MIN | Log debug messages that provide minimal detail. DEBUG_MIN is appropriate for a software trace that is always running. It provides some information about the program state with only minimal impact to performance. DEBUG_MIN is the default setting for installation, configuration, or unconfiguration log files |
| -W LogSetting.logLevel=DEBUG_MID | Log debug messages that provide a medium amount of detail. The DEBUG_MID setting produces a level of detail between DEBUG_MIN and DEBUG_MAX . |
| -W LogSetting.logLevel=DEBUG_MAX | Log debug messages that provide the most detail about program execution. Program performance is usually not an issue when debugging in this mode. |
| -W LogSetting.logLevel=ALL | Enable all message logging. |
Examples of modified response file templates
The following are examples of response file templates modified with suitable values. They correspond to values that would be specified if you were installing and configuring ITCAM for WAS on WAS version 7 and modifying the DC_was.opt template:
Installation and configuration on Windows:
##
# Log Parameters
##
-V LOG_DIR="C:\PROGRA~1\IBM\tivoli\common"
##
# Install Parameters
##
-V disableOSPrereqChecking="true"
-W LogSetting.logLevel="ALL"
-W LogSetting.consoleOut="false"
-P installLocation="C:\Program Files\IBM\itcam\WebSphere\DC"
-V LAUNCH_CONFIG="true"
-V DEFER_CONFIG="false"
##
# Configuration Parameters
##
-V DC_CCUC_CONFIG="true"
-V DC_CCUC_UNCONFIG="false"
-V DC_RECONFIG_ALLOW="true"
-V DC_CC_ITCAMF WAS="true"
-V DC_CAS_ WAS="true"
-V APP_SERVER_NAMES="cells/IBMUSERNode01Cell/nodes/IBMUSERNode01/servers/server1"
-V APPLY_PMI_TO_ALLSERVERS="true"
-V SERVER1_ITCAM_PMI_ENABLE="true"
-V WS_NODE_NAME="cells/IBMUSERNode01Cell/nodes/IBMUSERNode01"
-V DC_WD_PROFILEHOME="C:\Program Files\IBM\WebSphere\AppServer\profiles\AppSrv01"
-V DC_WD_PROFILENAME="AppSrv01"
-V DC_WD_JAVAHOME="C:\Program Files\IBM\WebSphere\AppServer\java"
-V DC_WD_ WASBASEDIR="C:\Program Files\IBM\WebSphere\AppServer"
-V DC_WD_ WASVER="70"
-V DC_ASL_HOSTNAME="111.222.1.44"
-V DC_ASL_CONNTYPE=SOAP
-V DC_ASL_PORT="8880"
-V DC_ASL_USERNAME="NULL"
-V DC_ASL_PASSWD="NULL"
-V DC_BACKUP_ WAS="true"
-V REDIRECT_GC_LOG="false"
Installation and configuration on UNIX or Linux:
##
# Log Parameters
##
-V LOG_DIR="/var/ibm/tivoli/common/CYN/logs"
##
# Install Parameters
##
-V disableOSPrereqChecking="true"
-W LogSetting.logLevel="ALL"
-W LogSetting.consoleOut="false"
-P installLocation="/opt/IBM/itcam/WebSphere/DC"
-V LAUNCH_CONFIG="true"
-V DEFER_CONFIG="false"
##
# Configuration Parameters
##
-V DC_CCUC_CONFIG="true"
-V DC_CCUC_UNCONFIG="false"
-V DC_RECONFIG_ALLOW="true"
-V DC_CC_ITCAMF WAS="true"
-V DC_CAS_ WAS="true"
-V APP_SERVER_NAMES="cells/IBMUSERNode01Cell/nodes/IBMUSERNode01/servers/server1"
-V APPLY_PMI_TO_ALLSERVERS="true"
-V SERVER1_ITCAM_PMI_ENABLE="true"
-V WS_NODE_NAME="cells/IBMUSERNode01Cell/nodes/IBMUSERNode01"
-V DC_WD_PROFILEHOME="/opt/IBM/WebSphere/AppServer/profiles/AppSrv01"
-V DC_WD_PROFILENAME="AppSrv01"
-V DC_WD_JAVAHOME="/opt/IBM/WebSphere/AppServer/java"
-V DC_WD_ WASBASEDIR="/opt/IBM/WebSphere/AppServer"
-V DC_WD_ WASVER="70"
-V DC_ASL_HOSTNAME="111.222.1.44"
-V DC_ASL_CONNTYPE=SOAP
-V DC_ASL_PORT="8880"
-V DC_ASL_USERNAME="NULL"
-V DC_ASL_PASSWD="NULL"
-V DC_BACKUP_ WAS="true"
-V REDIRECT_GC_LOG="false"
Unconfiguration on UNIX or Linux:
-V DC_CCUC_CONFIG="false"
-V DC_CCUC_UNCONFIG="true"
-V APP_SERVER_NAMES="cells/Cell01/nodes/Node01/servers/WebSphere_Portal,cells/Cell01/nodes/Node01/servers/server1"
-V APPLY_PMI_TOALLSERVERS=true
-V RESTORE_ORIGIN_PMI_SETTING=true
#-V RESTORE_ORIGIN_PMI_SETTING_LIST=true,true
-V SERVER1_DC_ASL_HOSTNAME="hijklmnop01.us.ibm.com"
-V SERVER1_DC_ASL_CONNTYPE="SOAP"
-V SERVER1_DC_ASL_PORT="10033"
-V SERVER1_DC_ASL_USERNAME="name1"
-V SERVER1_DC_ASL_PASSWD="password1"
-V SERVER1_DC_ASL_USECLIENTPROP="false"
-V SERVER2_DC_ASL_HOSTNAME="abcdefg01.us.ibm.com"
-V SERVER2_DC_ASL_CONNTYPE="SOAP"
-V SERVER2_DC_ASL_PORT="10005"
-V SERVER2_DC_ASL_USERNAME="name2"
-V SERVER2_DC_ASL_PASSWD="password2"
-V SERVER2_DC_ASL_USECLIENTPROP="false"
Appendix F. What to do if ITCAM for WAS configuration fails
You know the ITCAM for WAS (ITCAM for WAS) configuration has failed if any of the following has occurred:
- After the configuration, the appserver fails to restart.
- During a GUI configuration, the summary panel for the Configuration Tool indicates the configuration has failed.
- During a silent configuration, the command line indicates a message that the configuration has failed.
- After the configuration, there are messages in the Tivoli common log file that indicate configuration has failed.
If ITCAM for WAS configuration has failed, you can do the following to try to complete the configuration successfully:
- Restore the appserver configuration that you had before attempting the failed configuration.
- Run the GUI or silent configuration again
Restoring the appserver configuration after a failed ITCAM for WAS configuration
These instructions apply only to the Windows, UNIX, and Linux platforms.
If the appserver fails to start up, you can use the restoreConfig command to restore the appserver configuration. Perform one of the following procedures:
In a non-Network Deployment environment:
- Locate the backup configuration file that was created in...
-
DC_home/config_dc/backup
- Stop all instances of appservers.
- Run the restoreConfig command...
-
cd Appserver_home/profiles/profile/bin
./restoreConfig.sh DC_home/config_dc/backup/backup_fileFor example...
-
./restoreConfig.sh /opt/IBM/itcam/WebSphere/DC/config_dc/backup/WebSphereConfig_2008-04-22.zip
- Restart the instance of appserver that is being monitored by the Data Collector.
In a Network Deployment environment:
- Locate the backup configuration file that was created in the DC_home/config_dc/backup directory.
- Stop all instances of appservers.
- Run the restoreConfig command
-
cd Appserver_home/profiles/profile/bin
./restoreConfig.sh DC_home/config_dc/backup/backup_file -location temp_directoryFor example...
-
./restoreConfig.sh /opt/IBM/itcam/WebSphere/DC/config_dc/backup/WebSphereConfig_2008-04-22.zip -location /tmp/restore
Enable privacy filtering
Used to filter out SQL, cookie, and HTTP Request query strings. When this property is set to true, these data are not collected by ITCAM for WAS.- Stop the appserver instance that is being monitored by ITCAM for WAS.
- Edit...
-
install_home/runtime/appserver_version.node.server_name/appserver_version.node.server_name.datacollector.properties
...and set...
-
secure.filter.on=true
- Start the appserver instance that is being monitored by ITCAM for WAS.
The following statement is printed out to the ITCAM for WAS log when privacy filtering is properly configured:
-
Privacy Filter is On. Http Request Query String, SQL String and Http Cookie data is not trasmitted.
Appendix H. Using regular expressions
Regular expressions are sets of symbols and characters that are used to match patterns of text. You can use regular expressions to search specific IP addresses across your Web environment. Regular expressions also enable you to search a simple, fixed URI or a complex URI pattern that matches one or more groups of transactions.
Regular expressions library
An extensive library of regular expression characters and operators is available for your URI filters and IP address specifications. The International Components for Unicode (ICU) open-source development project provides this library for your use. The next section provides the most frequently used expressions for this product. However, you can refer to the following Web page for a full description of the ICU regular expression library and an explanation of how to use the characters and operators for complex expressions: http://oss.software.ibm.com/icu/userguide/ regexp.html
Frequently used regular expressions
The following list highlights characters and operators most frequently used in regular expressions:
| \ | Quotes the character that follows it, which treats that character as a literal character or operator (not a regular expression). When you want the following characters to be treated as literal, precede them with a backslash:
In other words, use a backslash followed by a forward slash ( \/) to include a forward slash in a URI filter. Use a backslash followed by a period ( \.) to include a period in a URI filter. Example: to specify the URI pattern http://www.ibm.com/, use the following regular expression:
To specify all URIs that begin with http://www.ibm.com/, use the following regular expression:
|
| . | Matches any one character. Example : to match both ibm2 and ibm3 within a string, use ibm . such as in the following example:
|
| (?: ... ) | Non-capturing parentheses. Groups the included pattern, but does not provide capturing of matching text. Somewhat more efficient than capturing parentheses. Example: you can use the non-capturing parenthesis to group expressions to form more complicated regular expressions. To match a URI that starts with one of the following:
or
...you would do a grouping with a pipe sign (|) (represents or):
|
| * | Matches the preceding element zero or more times. You must quote this character. Example : the expression, ca*t, matches cat, caat, ct, and caaaaat. The term cabt, would not return as a match. |
Specify exclusions with the bang (!) operator (Quality of Service listening policies only)
Note: This section applies to the entry of URI and client IP filters for Quality of Service listening policies only.
You can use an exclamation point ( !), also called the bang operator, to filter out transactions that might match the regular expressions already entered, but that should not be considered valid transactions for this listening policy. These exclusions are considered negative filters. You can enter these exclusions as additional URI or client IP filters. The formatting of these additional filters is as follows:
- URI Filter Exclusions
Use only fixed strings. For example, you can use the following strings:
-
!http://www.ibm.com/
!http://www.ibm.com/hr/index.html
!http://www.ibm.com/it/errorpage.html - Client IP Exclusions
The following are valid:
-
!*.24.45.46
!12.*.45.56
!12.24.*.56
!12.24.45.*
!12.24.45.56You can replace any "octet" (there are four in an IP address: octet . octet . octet . octet) with a wildcard (*). Note that this is not the regular expression wildcard (.*) from the positive filters.