IBM BPM, V8.0.1, All platforms > Create processes in IBM Process Designer > Modeling processes > Building services > Building a Decision service
Scenario: Creating a Decision service in a Personalized Notification process
This scenario shows you how to create, configure and test Business Action Language (BAL) rules in a Decision service. The scenario presents a sample business process that is used by a bank to notify a customer when a payment is made from a specific account.
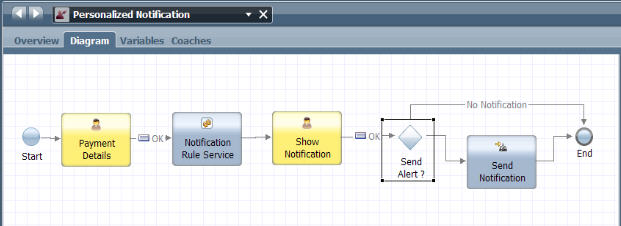
This scenario assumes that there is an existing business process definition called Personalized Notification that includes a decision gateway named Send Alert. The process includes a Decision service with BAL rules to decide whether a notification is sent to the customer. The Decision service defines the conditions that must evaluate to true in order for the notification step to be triggered. Using the following steps, you can attach the NotificationRulesService to the Send Alert decision gateway. The rules in the Decision service control whether the sequence flow coming out of the gateway follows the "No notification" decision path, or the "Send notification" decision path.
Procedure
To add a Decision service to the Personalized Notification process, complete these steps:
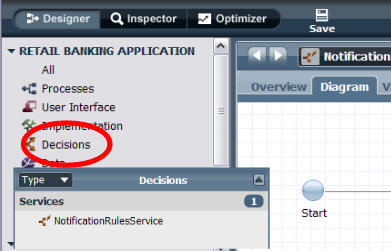
- Create a new Decision service called NotificationRulesService.
- In the Library panel on the left side of the Process Designer window, move the mouse cursor over the Decisions item in the list of library items for the process application.
- Click the plus sign next to Decisions to add a new Decision service.
- In the Create New window, click Decision Service.
- In the New Decision Service window, enter NotificationRulesService as the Decision service name, then click Finish.
 You can find more information about adding a Decision service in the related topic "Adding a Decision service to a process."
- Add a BAL Rule component called AlertRules to the NotificationRulesService Decision service.
- Verify that you are editing the NotificationRulesService Decision service.
- Click BAL Rule in the component palette and drag the BAL Rule component icon from the palette to the service diagram.
- In the Properties tab, enter AlertRules ad the name for the new BAL Rule component.
- Click Save, or use the Ctrl+S keyboard shortcut to save the Decision service.
 You can find more
information about adding a BAL rule component in the related topic "Adding a BAL Rule component to a service."
You can find more
information about adding a BAL rule component in the related topic "Adding a BAL Rule component to a service."
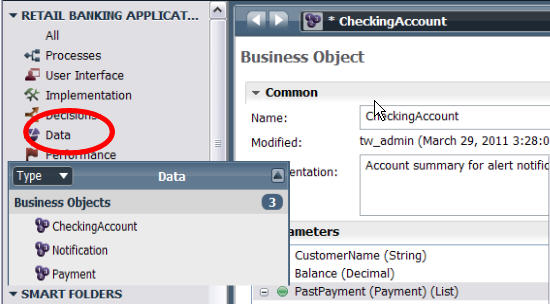
- Create a business object called CheckingAccount that contains parameters such as CustomerName, Balance and Payments.
- Add a business object from the Process Designer library
panel.
- Click the indicator next to the process application name in the library panel to see the categories of library items in the current process application.
- Click the plus sign next to the Data library item.
- In the Create New window, click Business Object.
- In the New Business Object window, enter CheckingAccount as the name for the business object, then click Finish.
- In the Behavior section of the Business Object panel, select Complex Structure Type as the Definition Type.
- Add parameters to the CheckingAccount business object.
- In the Parameters section of the Business Object panel, click Add.
- In the Parameter Properties section, add the CustomerName parameter with the variable type set to String, the Balance parameter with the variable type set to Decimal, and the PastPayment parameter with the variable type set to Payment.
- Click Save, or use the Ctrl+S keyboard shortcut to save the Decision service.
 You can find more information about creating a business object in the related topic "Adding variable types and business objects to a Decision
service."
You can find more information about creating a business object in the related topic "Adding variable types and business objects to a Decision
service."
- Add a business object from the Process Designer library
panel.
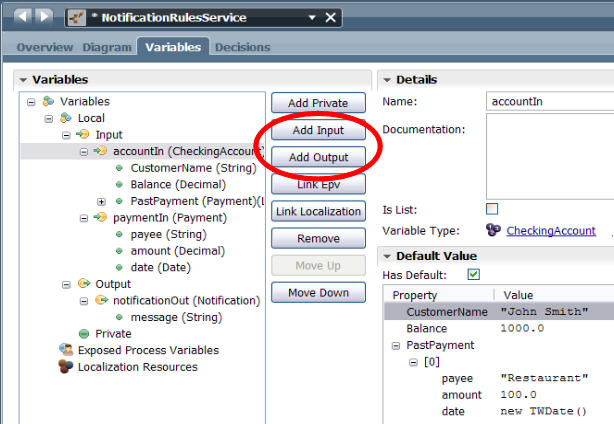
- Define which of the parameters are used as input variables
to the Decision service, such as CustomerName, Balance and PastPayment, and which parameters are output variables from the Decision service, including the notification message.
- Make sure you are editing the NotificationRulesService Decision service.
- Click the Variables tab.
- Click Add Input to add the input
variables:
- In the Details section, enter accountIn as the name for the input variable.
- Click Select next to Variable type and click CheckingAccount in the list.
- Click the plus sign next to accountIn in the Variables list to confirm that CustomerName, Balance and PastPayment are included in the list.
- Click Add Output to add the output
variable, notificationOut.
- In the Details section, enter notificationOut as the name for the output variable.
- Click Select next to Variable type and click Notification in the list.
- Click the plus sign next to notificationOut in the Variables list to confirm that message is included in the list.
- Click Save, or use the Ctrl+S keyboard shortcut to save the Decision service.
 You can find more information about defining Decision service variables in the related topic "Adding and modifying Decision service variables."
- Use the BAL Rule editor to create rules in the AlertRules
BAL Rule component.
- Make sure you are editing the NotificationRulesService Decision service.
- Click the Diagram tab, then click to select the AlertRules BAL Rule component.
- Click the Decisions tab. By default, the rule editor opens with an empty BAL rule window. The rule window contains a basic template for a simple rule, with one condition ( if) and one action ( then).
- Click inside the rule window to begin creating a new
rule from the template.
- Click the condition placeholder, next to if, to use the Content Assist menu to complete the condition. Add the following condition statements by double-clicking on each as it appears in the list. If the list closes before you can select a condition statement, press Shift+Spacebar to reopen the Content Assist menu.
- if the amount of
- paymentIn
- is more than
- the balance of
- accountIn
if the amount of paymentIn is more than the balance of accountIn
- Click the condition placeholder, next to if, to use the Content Assist menu to complete the condition. Add the following condition statements by double-clicking on each as it appears in the list. If the list closes before you can select a condition statement, press Shift+Spacebar to reopen the Content Assist menu.
- Click the action placeholder next to then and add the following condition statements.
- set the message of
- notificationOut
- to
- string
When you double-click to select string, the edit cursor appears between two double quotation marks. Type the notification message, Payment takes account overdrawn between the double quotation marks.
The second part of the rule ( then) looks like this:
then set the message of notificationOut to
 "Payment takes account overdrawn";
- Add a second rule editor window. Click the plus sign
in the upper right corner of the BAL rule editor panel. Repeat the previous sequence of steps to create a second rule that looks like
this:
if there is no payment in the past payments of accountIn
 where the payee of this payment is the payee of paymentIn ,
then
set the message of notificationOut to the message of notificationOut + "\n" +
 "Payment to new payee: " + the payee of paymentIn ;
- Click Save, or use the Ctrl+S keyboard shortcut to save the Decision service.
 You can find more information about using the BAL Rule editor in the related topic "Creating a rule using the rule editor."
- Attach the NotificationRulesService Decision service to the Send Alert decision gateway.
- Make sure you are editing the NotificationRulesService Decision service.
- In the business process definition diagram, click the Send Alert decision gateway icon to select the decision gateway.
- Click the Properties tab.
- Click Decision.
- In the Decision Service section, click Select. Click to select the NotificationRulesService Decision service.
- Click Implementation in the Properties tab.
- Under the Decisions heading, add a variable statement to each decision to control the output of the decision gateway.
 You can find more information about decisions
in the implementation of a gateway, and attaching a Decision service to a gateway, in the related topic "Attaching a Decision service to a decision gateway."
You can find more information about decisions
in the implementation of a gateway, and attaching a Decision service to a gateway, in the related topic "Attaching a Decision service to a decision gateway."
- Test the Decision service and the BAL rules created and attached to the decision gateway.
- Verify that you are editing the NotificationRulesService Decision service and the AlertRules BAL Rule component.
- In the NotificationRulesService Decision service, click to select the Send Alert decision gateway.
- Set a breakpoint for the gateway. Set breakpoints at specific locations in the process where you want the process flow to pause during testing so that you can determine the status of the process, and identify any errors that might have occurred.
- In the AlertRules BAL Rule component panel, click the Debug
 icon in the banner above the rule editor windows.

- The IBM BPM Debug Service opens in a new browser window.
- When Process Designer prompts you to change to the Inspector interface, click Yes. The prompt to switch to the Inspector perspective might be covered up by the Debug window.
- Click Step in the Debug window to run the Decision service one step at a time. The Inspector clearly identifies any errors in the Execution State panel. The Inspector also tells you where the error happened, and links directly to the source of the problem. The Debug service browser window captures error and exception messages. For more information about using the Debug service and the Inspector window to identify and fix Decision service problems, refer to the related topic "Debugging a Decision service."
- If you make any changes to resolve errors in the Decision service or the BAL rules, click Save, or use the Ctrl+S keyboard shortcut to save the Decision service.
What to do next
When you have finished creating, configuring and testing the AlertRules BAL rules in the NotificationRulesService Decision service, then you have completed the scenario procedures. If you want to refine or share the rules created in Process Designer, you can export the rules into a project file and import them into IBM WebSphere ILOG JRules. For more information, refer to the related topic "Exporting, migrating and connecting BAL rules to a rule server."
Related tasks:
Adding a Decision service to a process
Adding a BAL Rule component to a service
Adding variable types and business objects to a Decision service
Adding and modifying Decision service variables
Create rules using the rule editor
Attaching a Decision service to a decision gateway
Debugging a Decision service
Scenario: Exporting rules to a Rule Execution Server