IBM BPM, V8.0.1, All platforms > Authoring services in Integration Designer > Get started with IBM Integration Designer > Create a new project > Create and wiring components
Business services: Top-down development
When using the top-down development approach to build an assembly diagram, you define the components for your application and then implement them.
Top-down development is used for creating new applications. For this type of development, you first model the application in the assembly diagram by creating components for the required services. Then, you define interfaces to access each service and add them to each component. Finally, based on the service calling requirements, you wire the components together. When the wiring is completed, you generate the SCA implementations from the components in the assembly diagram. The implementations (such as business processes, state machines, and so forth) provide the required services (business logic) for your application
Top-down StockPortfolio example
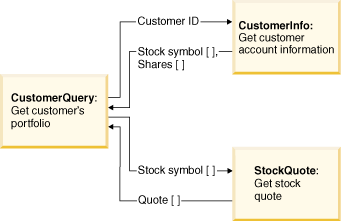
To illustrate the concepts covered in this topic, we will use a simple example of building a brand new customer stock portfolio query application that accesses several new services to retrieve information. The application accepts a customer ID and returns the customer's portfolio information. The application does not use any existing services so we will need to develop implementations for all the services.
Three services are required:
- Service to retrieve the portfolio information for a customer by invoking two other services
- Service to access the customer's account information
- Service to find out the current stock price
We will also need to allow a JavaServer Pages (non-SCA ) application to invoke the query.
The following picture shows this application:
To simplify our discussion, we will create a single module for the application. All the new services will be added to this module.
Top-down development steps
This topic provides some general instructions on how you can use the assembly editor to build the integrated application. Detailed step-by-step instructions on how to use tools will not be covered but they are available from the related information at the end of this topic.
Here are the steps:
-
Create a module
Create a module, StockPortfolio, for the new application. We will assemble services and build the integrated application in its module assembly. All service implementations and resources will be created in the module.
-
Edit the module assembly
Open the StockPortfolio module assembly with the assembly editor and start to model the integrated application.
-
Create components
Using the assembly editor, create the components that will provide the required services for your application.
- From the palette, select the Untyped Component and drop it onto the canvas. Edit the name of the component to change it to "CustomerQuery".
- Repeat the last step twice to create two other components, one with the component name CustomerInfo and the other, StockQuote.
Here is an example of the StockPortfolio assembly diagram with the three new components:

If you know the type of implementation that will be used for the component (for example, a human task component), you can select that type of component from the palette instead of the untyped component. If, later, you change your mind, you can use the Change Type action to change the implementation type; see "Working with implementations" under related tasks for instructions on how to do this.
-
Add interfaces to components
Next, you are going to create the interface for each component. Interfaces define the operations and input/output used to invoke a service.
- Invoke the interface editor to create a new interface. In the Business Integration view, right-click to select New > Interface. Create a new interface, CustomerQueryInterface, and add its operations with input and output.
- Select CustomerQuery component in the assembly diagram and click the Add Interface icon,

. Select CustomerQueryInterface and add it to the component.
There is also a simpler method to launch the interface editor from the assembly editor and add new interfaces to the components:
For example, select the CustomerQuery component in the assembly diagram and click the Add Interface icon,
. In the Add Interface window that is opened, click New to launch the Interface editor. Once the new interface is created, you can finish adding it to the component.
With this second method, the operations and input and output are not yet defined in the new interface. Later, you have to open the interface with the interface editor and add its operations and input and output before generating the implementation for the component. (You do not need the operations and input and output to wire components.)
- Repeat the previous step to create and add the interfaces to the CustomerInfo and StockQuote components.
The interfaces have been added to the components in the following assembly diagram:

-
Wire components
You are ready to wire the components. Wiring is done from the source to the target.
- In the assembly editor, move the mouse pointer over the CustomerQuery component and an orange box with a handle appears around the component. Drag the handle to the CustomerInfo component to wire them together. A matching reference for CustomerInfoInterface will be created on CustomerQuery.
- Repeat the previous step to wire CustomerQuery to StockQuote.
All the components are wired in the following assembly diagram:

-
Create component implementations
You need to decide the type of implementation for each component before generating the implementations. Also, the wiring and definitions for all the interfaces should be completed before this step. Select each component and right-click to select Generate Implementation and the required implementation type. The implementation is created and opened in the editor for authoring.
The following assembly diagram shows the three components with generated implementations:

-
Add stand-alone references
To allow a JavaServer Pages (JSP) file, which is not an SCA application, to invoke the CustomerQuery service, you will need to create a stand-alone references node.
The following assembly diagram has the stand-alone references node:

You have finished using the top-down approach to build the new module. If any one of the components in the assembly diagram has to be used outside the module, create an export for the component's interface. Here, an export has been added for the CustomerQuery component:

Also, if you want the service implementations to be in separate modules, you will need to add more steps, for example, to:
- Create more modules
- Create a library and add dependencies on the library to share resources such as business objects and interfaces
- Create exports of services so that they can be used in other modules.
Related concepts:
Business integration projects
Related tasks:
Organizing projects using integration solutions
Use a Java project with a module
Calling WSDL interfaces from Java references
Related information:
Create a new project
Developing an application from a model