IBM BPM, V8.0.1, All platforms > Authoring services in Integration Designer > Troubleshooting > Use the Server Logs view for problem determination
Get started with the Server Logs view
In IBM Integration Designer, the Server Logs view is the designated tool for working with server console and log records. Typically, the process of using the Server Logs view for problem determination begins when you encounter problems when testing your application using the integration test client or another tool. In this end-to-end introduction to the Server Logs view, it is assumed that you are working with the test client when you encounter problems in your application.
In this introduction to problem determination using the Server Logs view, you complete the following high-level steps:
- Test your application in the test client and discover problems.
- Enable cross-component tracing on the server.
- Rerun the test in the test client.
- Use the Server Logs view to investigate the problems.
- Fix the problems.
- Rerun the test in the test client to ensure that the problems are fixed.
- Disable cross-component tracing.
To get started with the Server Logs view:
Procedure
- Test
your application in the test client and discover problems:
- Open your application in the integration test client, as shown in the following figure:
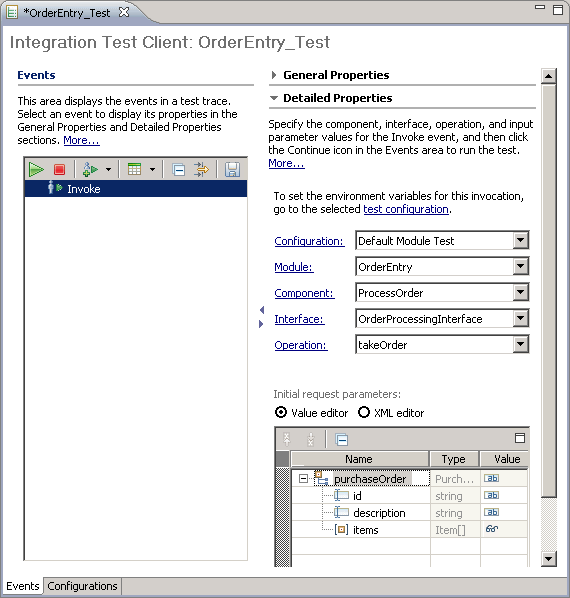
- In the Detailed Properties area, ensure that the correct operation is selected, as shown in the figure
below:

- In
the value editor, specify some input data for the invocation, as shown
in the following figure:

- Click the Continue icon

. Depending on the current deployment state of your application, the Deployment Location wizard may open, as shown in the figure below:

- If the Deployment Location wizard opens, ensure that a deployment location is selected in the Deployment location list and then click Finish.
- If security is enabled, a User Login window will open. In the window, specify the user ID and password that you selected when installed IBM Integration Designer and then click OK.
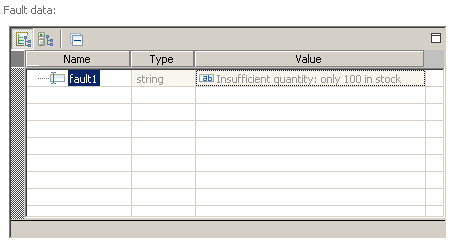
- In the Events area of the test client, examine each of the events to determine the status of the invocation. In this application, an error was encountered during the invocation and the second Response
event is flagged with a red exclamation mark, as shown in the following figure:

If the Response event that is flagged with the error symbol is selected in the Events area, the value editor may display the cause of the error, as shown in the following figure:
However, the test client cannot determine the cause of all possible errors.
For example, if a module is invoked that is not part of the test configuration, the Server Logs view is the only place where you can view the interactions between the components in the module that have resulted in errors. For this reason, the Server Logs view is ultimately a more powerful problem determination tool than the test client.
- Leave the test client open. (If you need to close the test client, ensure that you save the test trace.)
- Open your application in the integration test client, as shown in the following figure:
- Enable cross-component tracing on the server:
- In
the workbench, click the Server Logs tab and then click the tab that contains the console output of the server where you deployed your application, as shown in the following figure:
If the server console tab is not displayed in the Servers Logs view, click the down arrow icon beside the Load Server Console or Log icon

, then select Load from Server Console > server_name from the menu, where server_name is the name of the server for the console that you want to load. (You can use the same menu to load server log files from a server log directory or from anywhere in the file system.)
- In the Server Logs view, click the View Menu icon

. A menu opens.
- From the Cross-Component Trace State menu, select the Enabled with Data Snapshot menu item. This will cause invocation records to be generated in the server console and logs and the record properties will include invocation data.
- Optionally, click the Clear Server Console icon

. All records are removed from the server console tab.
- In
the workbench, click the Server Logs tab and then click the tab that contains the console output of the server where you deployed your application, as shown in the following figure:
- Rerun the test in the test client:
- If you closed the test client, open it again by loading the test trace.
- In the Events area, right-click the top-level Invoke event and select Rerun. The test client displays the same information that was displayed in the initial test. However, as a result of enabling cross-component tracing, invocation records have now been generated into the server console tab of the Server Logs view. And some of the invocation records may be flagged with red Fail symbols to indicate errors.
- Use the Server Logs view to investigate any problems:
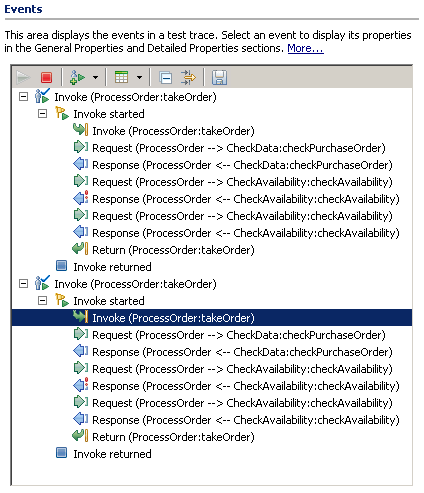
- In the Events area of the test client, select the nested Invoke event
that was generated by rerunning the test, as shown in the following figure:
- Right-click the selected Invoke event and select Show in Server Logs View. The Server Logs view displays the invocation records that are associated with the invocation events in the test client.
- In the Type column of the Server Logs view, ensure that the top-level Start invoke record is highlighted.
- In the Server Logs view tool bar, click the Expand icon

. All of the nested invocation records are expanded, as shown in the following figure:
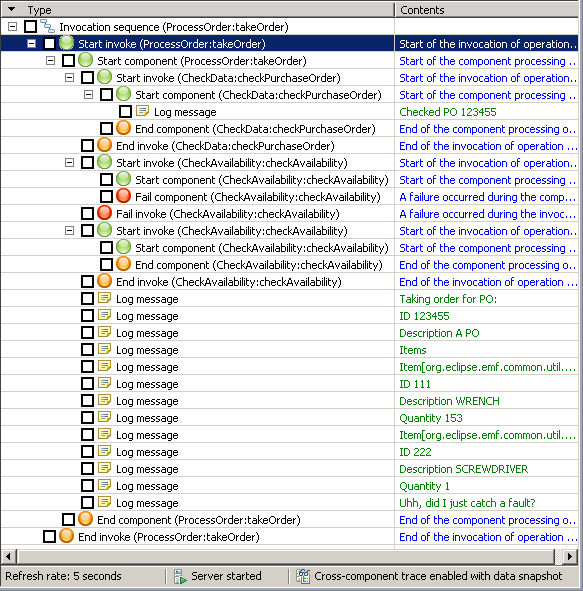
In the figure, you could work with the records by opening the Properties window for the Fail Invoke record to gain additional insight into the Fail component invocation record that is displayed above it.
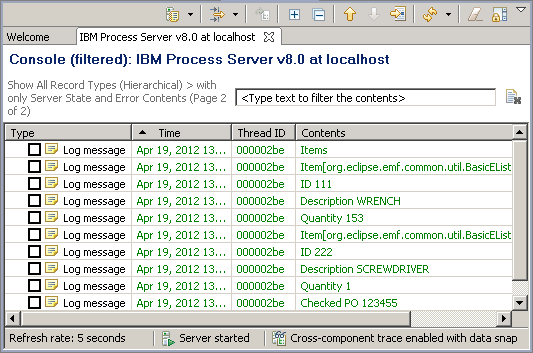
You can also view the Contents column where the contents of each record are displayed, as shown in the figure below:

- Right-click a Start record (such as a Start
Invoke, Start Component, or Start
Import record) and then select Properties.
The Properties window opens, as shown in the following figure:
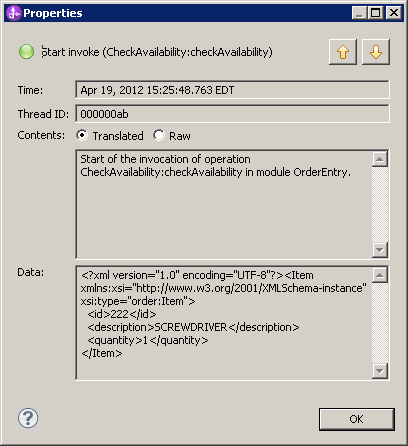
In the Properties window box, you can view the contents in either the default translated format or in the raw native format in which the record was originally generated. Also, when cross-component tracing with data capture is enabled and you open the Properties window for a Start record, a Data area is displayed that contains invocation data for the record.
- In the Server Logs view, click the Select Records to Display icon

. A menu opens. By default, the All Record Types (Hierarchical) > with only Server State and Error Contents menu item is selected.
- From the menu, select the Invocation Failure
Types menu item. The server console tab is filtered to display only invocation failure records, as shown in the following figure:

You can use the other menu items to filter the server console records (or log records) according to other criteria.
- In the Events area of the test client, select the nested Invoke event
that was generated by rerunning the test, as shown in the following figure:
- Use the information that you obtain from the server records to determine what needs to be done to fix the problems. This is an easier task than in the past because invocation records are now interspersed with exception records in the Server Logs view, which makes it easy to identify the components that failed and caused the exceptions to occur.
- Rerun the test in the test client to ensure that the problems are fixed.
- Disable cross-component tracing on the server:
- Click the Server Logs tab and then click the tab that contains the console output of the server where you deployed your application.
- In the Server Logs view, click the View Menu icon
. A menu opens.
- From the Cross-Component Trace State menu, select the Disabled menu item.