Deploy service stubs
Overview
You deploy and run service stubs on a stub server, which is a small application server dedicated to running service stubs. The client application, or test, addresses the stub server instead of the actual application of the original service.
The local stub server runs in the workbench on the local computer. Service stubs can be accessed locally or over the network by client applications or service tests. The local stub server is automatically stopped when you close the workbench.
If you are using IBM Rational Performance Tester, you can deploy stub servers on remote computers that are running the Agent Controller on Linux and Windows platforms.
This allows you to reduce the load on your local computer and to set up a dedicated stub server for performance testing. Remote stub servers remain active when the workbench is closed and can be stopped and started manually from the Stub Monitor view.
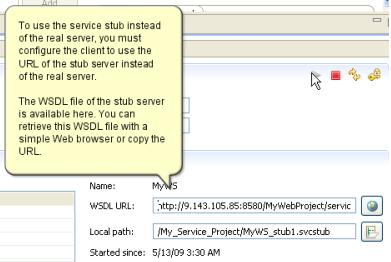
To use a service stub instead of the original service, change the endpoint of the client application or service test to replace the URL of the original application with the URL of the stub server.
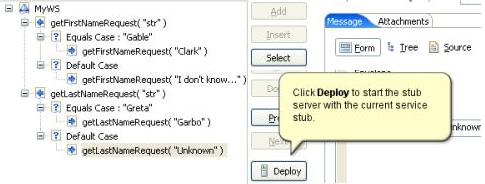
- In the stub editor, click the Deploy button.
Alternatively, you can right-click the stub in the test navigator and select...
-
Deploy On | Local stub server
This opens the Stub Monitor view.
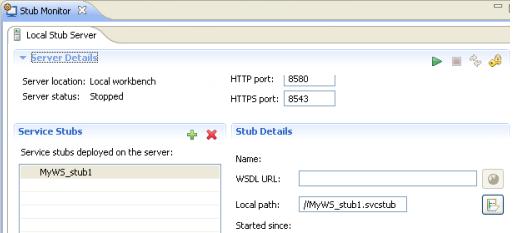
- In the Stub Monitor view, click
 Run.
Run.
If you make any changes to the service stub, the stub is redeployed to the stub server after saving.
- To add more service stubs to the stub server, click Add and select a service stub from the workspace.
- To deploy a stub server on a remote stub server, in the Stub Monitor view...
- Click New
The Add Location window opens. The first page of the wizard lets we specify general properties for the remote location.
- In Host name, set the IP address or the fully qualified host name of the remote computer.
- In Name, type a descriptive name for the remote computer.
- In Deployment Directory field, set the directory on the remote computer that will store the test assets, for example: C:\tmp.
The directory, which will be created if it does not exist, stores the temporary files that are needed during a schedule run.
- In the Operating System field, select the operating system of the remote computer, and then click Next.
The second page of the wizard lets we specify the IP aliasing properties for this location.
- To deploy multiple stub servers on a single computer, select...
-
Enable IP Aliasing
...to make it appear as though each stub server has its own IP address.
- Select...
-
Use IP addresses from all network interfaces
...or select...
-
Only use IP addresses from the following network interfaces
...to use addresses from a subset of network interfaces.
Click Add to add the name of an interface and Edit to change the interface name. Specify network interfaces in the form eth0, eth1. If you do not use this form, the connection attempt fails.
- Click Next. The third page of this wizard lets we specify file locations.
- Specify a project directory and a File name to store the information about the new remote location, and then click Finish.
- Click New
- Copy the URL of the service stub from the Stub Monitor view and paste it into the configuration of the client application.
You can also directly access the WSDL specification of the service stub, which is a copy of the original WSDL with replaced URL endpoints.
What to do next
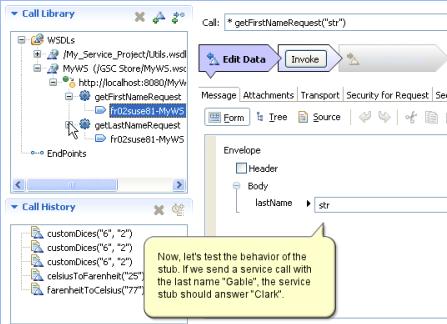
You can validate that the service stub is responding correctly by using the generic service client to invoke a call.

Related:
Service stub overview
Create a service stub
Edit a service stub
Add stub servers to a performance schedule
Record service stub activity in a log file
Error 404 - Not Found
The document you are looking for may have been removed or re-named. Please contact the web site owner for further assistance.