Android scripts in IBM Rational Performance Tester
Overview
IBM Rational Performance Tester v8.3 does not have built-in functions to record a test for a mobile client application. This document discusses using an Android emulator proxy to serve pages for Rational Performance Tester.
Another option, not discussed here, is to use the Worklight console preview feature.
Configure android emulator proxy
- Download and install Android SDK
Install at least the following components:
- Android SDK
- Desired Android platforms (at least one is required)
- SDK platform-tools (install the latest version)
The Eclipse plug-in is available, though it is required only for development purposes.
Download and install latest version of JDK. The JRE alone is not sufficient.
- Create a virtual device.
- In the Android SDK, open a terminal and run...
-
cd c:\Tools
android - From the Virtual devices tab, select New.
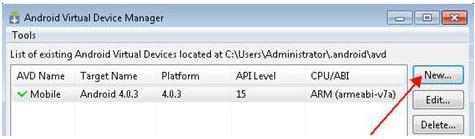
- Fill in the following details for the AVD:
Name Name of the virtual device Target Android platform SD Card Leave Size empty if you don't need an SD card for the tests. Otherwise, specify the required size. Hardware Allocate at least 1 GB of memory to the virtual device. Add new property "Device RAM Size", and set the value to 1024 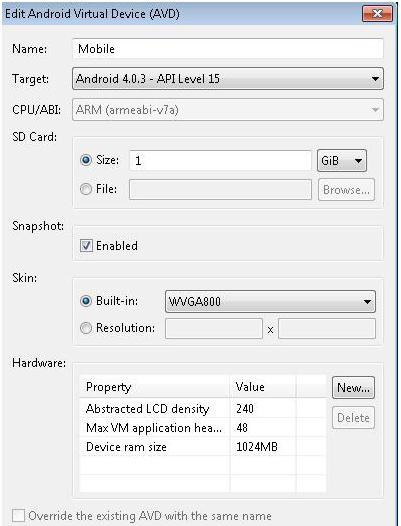
- In the Android SDK, open a terminal and run...
- Optional. Install a native application
You can skip this step if you will use only the Android browser
To record RPT tests from a native Android application...
- Start the virtual device before installing the native application.
Start the virtual device from the AVD Manager (Start), or by running...
-
cd c:\Tools
emulator -avd virtual_device_name - Install the native application
-
cd c:\Platform-tools
adb install appname.apkTo uninstall, run...
-
cd c:\Platform-tools
adb uninstall appname.apkAs we update code, we periodically package and install it on the emulator. The emulator preserves the application and its state data across restarts, in a user-data disk partition.
To ensure that the application runs properly as you update it, you may need to delete the emulator's user-data partition, by starting the emulator with the -wipe-data option.
emulator -avd virtual_device_name -wipe-data
You can also wipe data when starting from the Android Virtual Device Manager...
- To upload files to the target application from your mobile device, push them into the virtual device.
-
cd c:\Platform-tools
push filename /sdcard/filenameAlternatively, push files into the virtual device by using the Eclipse plug-in.
- Start the virtual device before installing the native application.
- Configure proxy settings
- From the virtual device, and go to..
-
Settings | Wireless & Networks | More | Mobile Networks | Access Point Names | TelKila (internet)
- From the Edit Access page, set...
Name TelKila APN internet Proxy Absolute IP address of your machine. For example: 10.152.135.80.
Do NOT use 127.0.0.1, localhost, or hostname.Port RPT proxy port. Default is 1080. Username Not set Password Not set Server Should be the same as the proxy.
- From the virtual device, and go to..
- Record and generate the script
- Start Rational Performance Tester
- Select...
-
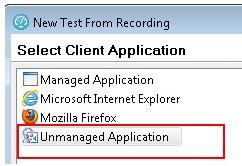
File | New | Test From Recording | Create a test from a new recording | HTTP Test

- Select Unmanaged Application as the client application.
- Define the proxy recorder settings. Leave the default proxy port unless you need to specify a different value.

- When the recorder has started, you can start your mobile application and record the Rational Performance Tester script.
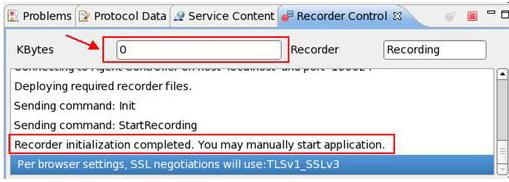
If you have performed all of the steps correctly, you will see the KBytes counter number increasing in the Recorder Control tab as you run the HTTP requests from your mobile client
Add comments for each interaction with the mobile application during the recording so you can identify the transactions afterward.
- After you have manually completed all of the transactions to record from your mobile client, you can stop the recorder by clicking on the Stop button in the Recorder Control tab. The test will generate automatically and you can customize and replay it.
- Click Finish.
Android command line parameters
- emulator -avd <avd_name> [-<option> [<value>]] ... [-<qemu args>]
| Category | Option | Description | Comments | |||||||
|---|---|---|---|---|---|---|---|---|---|---|
| AVD | -avd <avd_name>
@<avd_name> | Required. Specifies the AVD to load for this emulator instance. | Create an AVD configuration before launching the emulator. | |||||||
| Disk Images | -cache <filepath> | Use <filepath> as the working cache partition image. | An absolute or relative path to the current working directory. If no cache file is specified, the emulator's default behavior is to use a temporary file instead. See -help-disk-images. | |||||||
| -data <filepath> | Use <filepath> as the working user-data disk image. | Optionally, specify a path relative to the current working directory. If -data is not used, the emulator looks for a file named userdata-qemu.img in the storage area of the AVD being used (see -avd). | ||||||||
| -initdata <filepath> | When resetting the user-data image (through -wipe-data), copy the contents
of this file to the new user-data disk image. By default, the emulator copies...
| Optionally, specify a path relative to the current working directory. See -help-disk-images. | ||||||||
| -nocache | Start the emulator without a cache partition. | See also -cache <file>. | ||||||||
| -ramdisk <filepath> | Use <filepath> as the ramdisk image. | Default:
Optionally, specify a path relative to the current working directory. See -help-disk-images. | ||||||||
| -sdcard <filepath> | Use <file> as the SD card image. | Default value is...
Optionally, specify a path relative to the current working directory. See -help-disk-images. | ||||||||
| -wipe-data | Reset the current user-data disk image (, the file specified by -datadir and -data, or the default file). The emulator deletes all data from the user data image file, then copies the contents of the file at -inidata data to the image file before starting. | See also -initdata and -help-disk-images. | ||||||||
| Debug | -debug <tags> | Enable/disable debug messages for the specified debug tags. | <tags> is a space/comma/column-separated list of debug component names. Use -help-debug-tags to print a list of debug component names. | |||||||
| -debug-<tag> | Enable/disable debug messages for the specified debug tag. | Use -help-debug-tags to print a list of debug component names that you can use in <tag>. | ||||||||
| -debug-no-<tag> | Disable debug messages for the specified debug tag. | |||||||||
| -logcat <logtags> | Enable logcat output with given tags. | If the environment variable ANDROID_LOG_TAGS is defined and not empty, its value will be used to enable logcat output by default. | ||||||||
| -shell | Create a root shell console on the current terminal. | You can use this command even if the adb daemon in the emulated system is broken. Pressing Ctrl-c from the shell stops the emulator instead of the shell. | ||||||||
| -shell-serial <device> | Enable the root shell (as in -shell and specify the QEMU character device to use for communication with the shell. | <device> must be a QEMU device type. See the documentation for 'serial -dev'. Examples include:
| ||||||||
| -show-kernel <name> | Display kernel messages. | |||||||||
| -trace <name> | Enable code profiling (press F9 to start), written to a specified file. | |||||||||
| -verbose | Enable verbose output. | Equivalent to -debug-init.
You can define the default verbose output options used by emulator instances in the Android environment variable ANDROID_VERBOSE. Define the options to use in a comma-delimited list, specifying only the stem of each option: -debug-<tags>. Here's an example showing ANDROID_VERBOSE defined with the -debug-init and -debug-modem options: ANDROID_VERBOSE=init,modem For more information about debug tags, use <-help-debug-tags>. | ||||||||
| Media | -audio <backend> | Use the specified audio backend. | ||||||||
| -audio-in <backend> | Use the specified audio-input backend. | |||||||||
| -audio-out <backend> | Use the specified audio-output backend. | |||||||||
| -noaudio | Disable audio support in the current emulator instance. | |||||||||
| -radio <device> | Redirect radio modem interface to a host character device. | |||||||||
| -useaudio | Enable audio support in the current emulator instance. | Enabled by default. | ||||||||
| Network | -dns-server <servers> | Use the specified DNS server(s). | The value of <servers> must be a comma-separated list of up to 4 DNS server names or IP addresses. | |||||||
| -http-proxy <proxy> | Make all TCP connections through a specified HTTP/HTTPS proxy | The value of <proxy> can be one of the following:
http://<username>:<password>@<server>:<port> The http:// prefix can be omitted. If the -http-proxy <proxy> command is not supplied, the emulator looks up the http_proxy environment variable and automatically uses any value matching the <proxy> format described above. | ||||||||
| -netdelay <delay> | Set network latency emulation to <delay>. | Default value is none. See the table in Network Delay Emulation for supported <delay> values. | ||||||||
| -netfast | Shortcut for -netspeed full -netdelay none | |||||||||
| -netspeed <speed> | Set network speed emulation to <speed>. | Default value is full. See the table in Network Speed Emulation for supported <speed> values. | ||||||||
| -port <port> | Set the console port number for this emulator instance to <port>. | The console port number must be an even integer between 5554 and 5584, inclusive. <port>+1 must also be free and will be reserved for ADB. | ||||||||
| -report-console <socket> | Report the assigned console port for this emulator instance to a remote third party before starting the emulation. | <socket> must use one of these formats:
tcp:<port>[,server][,max=<seconds>] Use -help-report-console to view more information about this topic. | ||||||||
| System | -cpu-delay <delay> | Slow down emulated CPU speed by <delay> | Supported values for <delay> are integers between 0 and 1000.
Note that the <delay> does not correlate to clock speed or other absolute metrics — it simply represents an abstract, relative delay factor applied non-deterministically in the emulator. Effective performance does not always scale in direct relationship with <delay> values. | |||||||
| -gps <device> | Redirect NMEA GPS to character device. | Use this command to emulate an NMEA-compatible GPS unit connected to an external character device or socket. The format of <device> must be QEMU-specific serial device specification. See the documentation for 'serial -dev' | ||||||||
| -nojni | Disable JNI checks in the Dalvik runtime. | |||||||||
| -qemu | Pass arguments to the qemu emulator software. | Make sure it is the last option specified, as all options after are interpretted as qemu-specific options. | ||||||||
| -qemu -enable-kvm | Enable KVM acceleration of the emulator virtual machine. | This option is only effective when the system is set up to use
KVM-based VM acceleration.
You can optionally specify a memory size (-m <size>) for the VM, which should match
your emulator's memory size:
-qemu -m 512 -enable-kvm -qemu -m 1024 -enable-kvm | ||||||||
| -qemu -h | Display qemu help. | |||||||||
| -gpu on | Turn on graphics acceleration for the emulator. | This option is only available for emulators using a system image with API Level 15, revision 3 and higher. For more information, see Using the Android Emulator. | ||||||||
| -radio <device> | Redirect radio mode to the specified character device. | The format of <device> must be QEMU-specific serial device specification. See the documentation for 'serial -dev' | ||||||||
| -timezone <timezone> | Set the timezone for the emulated device to <timezone>, instead of the host's timezone. | <timezone> must be specified in zoneinfo format. For example:
"Europe/Paris" | ||||||||
| -version | Display the emulator's version number. | |||||||||
| UI | -dpi-device <dpi> | Scale the resolution of the emulator to match the screen size of a physical device. | The default value is 165. See also -scale. | |||||||
| -no-boot-anim | Disable the boot animation during emulator startup. | Disabling the boot animation can speed the startup time for the emulator. | ||||||||
| -no-window | Disable the emulator's graphical window display. | |||||||||
| -scale <scale> | Scale the emulator window. | <scale> is a number between 0.1 and 3 that represents the desired scaling factor. You can also specify scale as a DPI value if you add the suffix "dpi" to the scale value. A value of "auto" tells the emulator to select the best window size. | ||||||||
| -raw-keys | Disable Unicode keyboard reverse-mapping. | |||||||||
| -noskin | Don't use any emulator skin. | |||||||||
| -keyset <file> | Use the specified keyset file instead of the default. | The keyset file defines the list of key bindings between the emulator and the host keyboard. For more information, use -help-keyset to print information about this topic. | ||||||||
| -onion <image> | Use overlay image over screen. | No support for JPEG. Only PNG is supported. | ||||||||
| -onion-alpha <percent> | Specify onion skin translucency value (as percent). | Default is 50. | ||||||||
| -onion-rotation <position> | Specify onion skin rotation. | <position> must be one of the values 0, 1, 2, 3. | ||||||||
| -skin <skinID> | This emulator option is deprecated. | Please set skin options using AVDs, rather than by using this emulator option. Using this option may yield unexpected and in some cases misleading results, since the density with which to render the skin may not be defined. AVDs let you associate each skin with a default density and override the default as needed. For more information, see Managing Virtual Devices with AVD Manager. | ||||||||
| -skindir <dir> | This emulator option is deprecated. | See comments for -skin, above. | ||||||||
| Help | -help | Print a list of all emulator options. | ||||||||
| -help-all | Print help for all startup options. | |||||||||
| -help-<option> | Print help for a specific startup option. | |||||||||
| -help-debug-tags | Print a list of all tags for -debug <tags>. | |||||||||
| -help-disk-images | Print help for using emulator disk images. | |||||||||
| -help-environment | Print help for emulator environment variables. | s | ||||||||
| -help-keys | Print the current mapping of keys. | |||||||||
| -help-keyset-file | Print help for defining a custom key mappings file. | |||||||||
| -help-virtual-device | Print help for Android Virtual Device usage. |
See also
- Record Android client application test scripts in IBM Rational Performance Tester
- Android How-to's
- Use the Android Emulator
Author: Michael Pareene
Ascendant Technology
michael.pareene@atech.com