IBM Rational Performance Tester v7.x: Reporting and scheduling
- Overview
- Configure a performance schedule
- Customizing reports and overlaying counters
- Add performance counters to an existing graph
- Drag-and-drop counters onto an existing report
- Conclusion
- Resources
Overview
Resource monitoring is the observation of a property or asset over time for the purpose of gathering statistical data. A resource can be a physical system or a process executing on a system.
In terms of debugging a failing application, Resource Monitoring allows a performance tester to determine whether there is a lack of system-level resources or an issue with the application itself.
Rational Performance Tester v7 resource monitoring allows real-time monitoring of systems and system processes, including memory and database processes. Three resource monitoring data collectors provided...
- Generic Resource Monitoring platform
- Windows Performance Monitor for Microsoft Windows systems
- rstatd for Linux and UNIX systems
- IBM Tivoli Monitoring (ITM) for monitoring a variety of platforms
Additional data collectors can be added into the product using Eclipse Platform extensions, which will then be automatically loaded by the Resource Monitoring platform.

Because each data collector will have a specific mechanism for retrieving data from a remote host, the Resource Monitoring platform is designed to allow custom Java code to be written to implement the data collection mechanism using a common interface.
Retrieved data is transformed into the Eclipse Test and Performance Tools Platform (TPTP) statistical model format, which is based on the Eclipse Modeling Framework (EMF), and is designed to be a generic method of storing statistical data using XML.
The open source Eclipse TPTP project provides APIs that abstract the details of storing this data.
All of the data collectors provided in Rational Performance Tester have a specific mechanism of retrieving data; however, once the data is gathered the collectors transform this data into the common statistical model format.
Configure a performance schedule
Resource monitoring is enabled in Schedules.
Selecting the top-most node in the Schedule Contents section of the Performance Schedule Editor. A tab labeled Resource Monitoring in the Schedule Element Details section contains the configuration parameters that are used when the schedule in context is executed.

| Enable resource monitoring | Activate the resource monitoring feature for the performance schedule you are working with.
It can be used as an on or off switch for resource monitoring as a whole. |
| Ignore invalid resources when executing the schedule | Suppress error messages about resource monitoring data sources.
These errors can occur if the data sources are unreachable or invalid. If you select this option, view logs to see the error messages. |
| Data Source table in the Resource Monitoring tab | Display configured data sources collected when this schedule executes.
If this is a new schedule, the Data Source table will be empty. If you have previously added resource monitoring data sources to this schedule, you can Edit or Remove them. Remove does not delete the data source from the file system; it merely removes it from this view because other test schedules or applications might still use the data source. |
| Add New | Allow a user to configure a new resource monitoring location |
| Host | Target host name to monitor during the execution of the performance schedule. |
When using IBM Tivoli Monitoring as the data source, the host field is the location of the resource management collection agent (or monitoring agent) and not the Tivoli Enterprise Monitoring Server.
When using Windows Performance Monitor or UNIX rstatd monitor as the data source, the host field is the target Windows or UNIX system that has to be monitored.
Numerous data collectors are available in the Data Sources list. If required, several data sources can be configured for one location by selecting the desired data sources from the check box list on the left-hand side of the dialog.

Click Add Existing if you have existing locations in your workspace that to add and configure to the current working performance schedule.
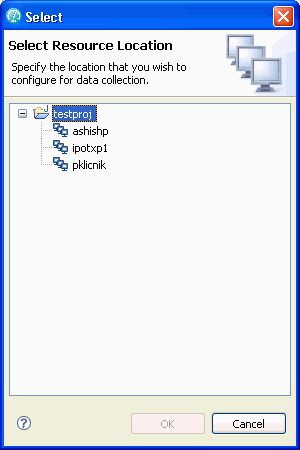
Once you have enabled resource monitoring specify the data sources to collect from.
Any configuration changes you make for a particular data source are stored with that location. This means that you have to set up a data source only once. If you export a schedule, it will contain the data source configuration information. This includes potentially sensitive information, such as stored passwords.
To capture accurate resource monitoring data, ensure that the clocks on all systems are synchronized. If you do not synchronize the clocks on the workbench and on all of the systems under test, resource counters are displayed inaccurately (with respect to time) in the reports.
Customizing reports and overlaying counters
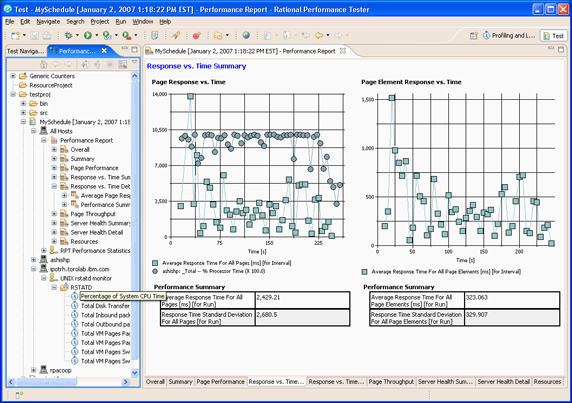
You can place resource data over rendered graphs, allowing one to correlate two separate data sets, such as page response time and % processor time.
Correlation of resource data with response time data help an analyst to determine if there is an issue with the system, capacity of the environment, or the application itself.
There are two ways to overlay counters on a report:
- Add performance counters to an existing graph.
- Drag-and-drop counters onto an existing report.
Add performance counters to an existing graph
Right-click on an existing graph and select...
Add/Remove Performance Counters | Resource Monitoring Counter
...to display the Resource Counters configuration dialog. This menu item is available from any graph in the Performance Report view.

The Resource Counters configuration dialog allows you to select specific counters and adjust the scaling factor for each counter. Adjusting the scaling factor for a counter is important when trying to analyze correlation between counters that have different data types. For example, processor time is a percentage quantity where as memory is measured in bytes.
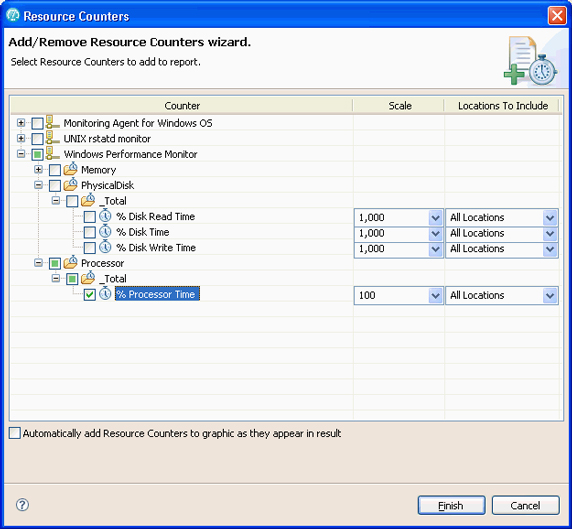
Once the counters are selected and the configuration dialog is complete, the counters are drawn on the selected graph. Hovering over any data point using the mouse will provide a tool-tip containing information about the data point, such as the value of the observation.

Drag-and-drop counters onto an existing report
Drag-and-drop counters from the Performance Test Run view onto an existing report. Expanding the tree control in this view allows the user to select specific counters. The tree is organized by the host name, under which are listed the data collection agents, such as UNIX rstatd monitor.
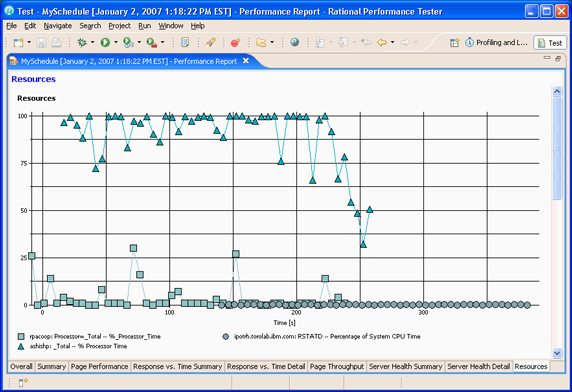
A suggested report to modify with user-defined counters is the Resources report, the last tab in the Performance Report view. This report spans the entire view allowing more working area than other reports in the view.
The layout of the graph can also be customized using the Customize menu item when you right-click on the graph. This action allows you to set the X and Y axis limits, legend, and change the time range.
Conclusion
The procedures described here are common to resource monitoring using IBM Rational Performance Tester, in the succeeding parts to this article we will describe how to configure the resource monitoring data collectors provided for Rational Performance Tester:
- Windows™ Performance Monitor for Microsoft® Windows® systems
- rstatd for Linux®/UNIX® systems
- IBM Tivoli® Monitoring (ITM) for monitoring a variety of platforms
Resources
- Learn more about resource monitoring with IBM Rational Performance Tester in Part 2, Part 3 and Part 4 of this article.
- Learn more about IBM Rational Performance Tester on developerWorks.
- Learn about IBM Rational software quality.
- Visit the Microsoft Developer Network (MSDN), Performance Monitoring page.
- Study the Eclipse Test and Performance Tools Platform documentation
- Read the IBM Tivoli Monitoring v6.1.0: Installation and Setup Guide (First Edition, November 2005), GC32-9407
- "Administering OMEGAMON Products: CandleNet Portal, V195 July 2004 Candle Corporation"
- RSTAT - RFC 1831, 1832, and 1833 (These are the RFCs consulted when implementing the RSTAT monitoring component.)
- Learn more about rstat on the HP-UX reference page.
- Browse the technology bookstore for books on these and other technical topics.
Get products and technologies
- Get a trial download of Rational Performance Tester.
- Here is the
IBM Performance Optimization Toolkit.
Discuss
- Participate in the discussion forum.
- Check out developerWorks
blogs and get involved in the developerWorks community.