Preparing WebSphere Portal for remote testing and debugging
Some items may need to be configured on the remote WebSphere Portal during testing and debugging. If you are doing any of these things, follow the steps below.
- Testing or debugging with multiple users to the same remote server.
- Testing or debugging a JSR 168 portlet on WebSphere Portal 5.0.2.
- Debugging to a remote Server Attach server.
- Testing or debugging to a remote server behind a firewall.
- Testing or debugging to a remote server running on a Linux system.
- In the Portal Administration, create a user to access a portlet. Testing or debugging a portlet on a remote server automatically adds the required permissions. To use a single WebSphere Portal for multiple users, every user must use their own user id. Otherwise, the portlet application you are previewing or you previewed may be accidentally uninstalled by someone whose user id is the same as yours. Or your preview page may be accidentally updated, if the label is also the same.
- If you are using the JSR 168 Portlet API on a WebSphere Portal v5.0.2 server, enable the portlet container of WebSphere Portal for JSR 168 by setting portal.enable.jsr168 = true in ConfigService.properties in the wp_root/shared/app/config/services directory.
- To
use remote Server Attach to debug a portlet or portal on a server, the portal
server must first be started in debug mode. Follow these steps:
- Open the Administrative console of the WebSphere Application Server.
- Expand the Servers group and select Application Servers.
- In the right pane, click on WebSphere_Portal.
- On the following screen, scroll down and click Debugging Service.
- On the debugging server page, ensure that the Startup check box is selected. Make a note of the port numbers in use. You will need these port numbers when you configure the Server Attach server (although the defaults are usually fine)
- Click OK to save your configuration.
- Restart the server.
- If you are debugging to a WebSphere Application Server Version 5 server,
configure the JVM by following these steps.
- Start the WebSphere Application Server.

Select Programs > IBM WebSphere > Application Server > Start the Server.

Enter the following from the command prompt:cd WebSphere_install_root/bin ./startServer.sh server1
where WebSphere_install_root is the directory where WebSphere Application Server is installed. - Start the HTTP Server.
- Start the Administrative Console by opening a Web browser to
the following URL:
http://localhost:9090/admin
- Log in.
- Expand Servers and select Application Servers > WebSphere_Portal.
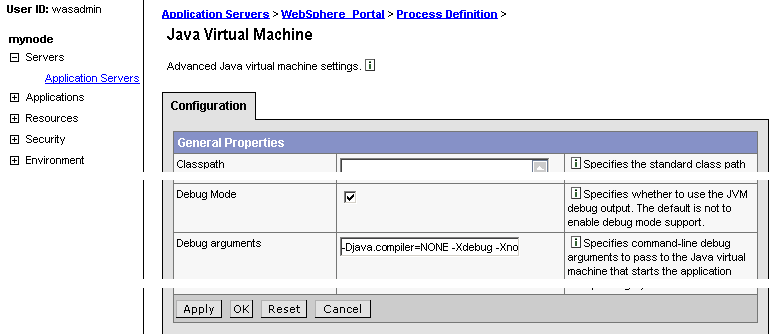
- In the Additional Properties, select Process Definition > Java Virtual Machine.
- In the General Properties, select the Debug Mode check box.
- Enter the following string for the Debug arguments:
-Djava.compiler=NONE -Xdebug -Xnoagent -Xrunjdwp:transport=dt_socket,server=y,suspend=n,address=7777
where address specifies the JVM debug port number. The default value is 7777.

- Click Apply > Save > Save .
- Stop WebSphere Application Server, and start WebSphere Portal.

- Select Programs > IBM WebSphere > Application Server > Stop the Server.
- Select Programs > IBM WebSphere > Portal Server > Start the Server.

cd WebSphere_install_root/bin
./stopServer.sh server1
./startServer.sh WebSphere_Portal
where WebSphere_install_root is the directory where WebSphere Application Server is installed.
- Start the WebSphere Application Server.