Deploy a portlet using xmlaccess
- Modify DeployPortlet.xml to reflect your application.
<?xml version="1.0" encoding="UTF-8"?> <request build="20140424-1749" type="update" version="8.5.0.0" xmlns:xsi="http://www.w3.org/2001/XMLSchema-instance" xsi:noNamespaceSchemaLocation="PortalConfig_8.5.0.xsd"> <portal action="locate"> <web-app action="update" active="true" domain="rel" objectid="Z1_0OKIHCK0KGV000AC87V79N2001" removable="true" uid="wcmsupport.WCMSupportTools.26e0076942.webmod"> <url>file://localhost/WCMSupportTools80.war</url> <context-root>/wps/PA_WCMSupportTools</context-root> <display-name>PA_WCMSupportTools</display-name> <access-control externalized="false" owner="undefined" private="false"/> <servlet action="update" active="true" domain="rel" name="WCMSupportTools" objectid="ZV_0OKIHCK0KGV000AC87V79N2003" remote-cache-dynamic="false"/> <portlet-app action="update" active="true" defaultlocale="en" domain="rel" name="wcmsupport.WCMSupportTools.26e0076942" objectid="Z2_0OKIHCK0KGV000AC87V79N2005" uid="wcmsupport.WCMSupportTools.26e0076942"> <access-control externalized="false" owner="undefined" private="false"/> <portlet action="update" active="true" defaultlocale="en" domain="rel" name="WCMSupportTools" objectid="Z3_0OKIHCK0KGV000A C87V79N2007" provided="false" servletref="ZV_0OKIHCK0KGV000AC87V 79N2003"> <access-control externalized="false" owner="undefined" private="false"> <role actionset="User" update="set"> <mapping subjectid="all authenticated portal users" subjecttype="user_group" update="set"/> </role> </access-control> </portlet> </portlet-app> </web-app> </portal> </request> - Copy war file into installableApps directory...
-
cp WCMSupportTools80.war C:/IBM/WebSphere/wp_profile/installableApps/
- Deploy the portlet...
-
cd opt/IBM/WebSphere/Profiles/wp_profile/PortalServer/bin
./xmlaccess.sh -in /tmp/DeployPortlet.xml -out DeployPortlet_out.xml -url http://localhost:10039/wps/config -user wpsadmin -password wpsadm - Check the output file
-
/opt/IBM/WebSphere/Profiles/wp_profile/PortalServer/bin/DeployPortlet_out.xml
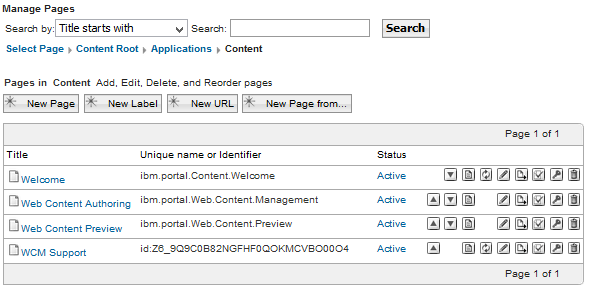
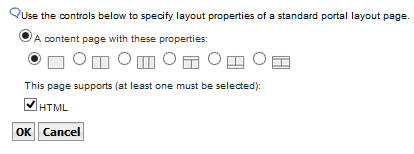
- Create a page called "WCM Support"

When creating the page, use the "Standard Portal Layout" then select a one column layout.
- Use Manage Pages to add WCM Support portlet to WCM Support page