Publish and deleting personalization rules using a script
We can use a WebSphere Portal Personalization provided script, pznload, to export, publish, and delete Personalization rules on local or remote servers. We can script the delivery of rules and campaigns
from staging to production, or the offline publishing between disconnected
systems (such as when production servers are secured behind a firewall).
We can use this function to quickly revert production servers to an earlier state.
Publish via the command-line is a two step process. First, you export the personalization rules to transfer from the authoring environment to a remote system. After exporting and saving the required objects, we use the pznload script to send this data to the appropriate server.
- We can export the personalization rules on the site or we can run the pznload command. Select one of the following methods to export personalization objects from the site:
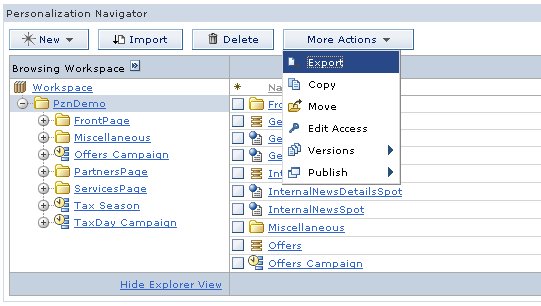
- Click More Actions > Export in the Personalization
Navigator. You are prompted for a location to save a nodes file. This file contains an XML representation of all the currently selected personalization objects. We can export entire folders.
Figure 1. Exporting a folder to the file system
- Run the following command
pznload --export --out filename --serverUrl url --targetPath path --targetWorkspace workspace --username username --password password
...where out designates the location of the exported data on the local system and targetPath is the object (and childrenthat will be exported:
- Click More Actions > Export in the Personalization
Navigator. You are prompted for a location to save a nodes file. This file contains an XML representation of all the currently selected personalization objects. We can export entire folders.
- Choose the appropriate option to send this data to the appropriate server:
The pznload script is located in the PortalServer_root/pzn/prereq.pzn/publish/ directory.
This program accepts a number of command line options and has a set of nodes files to publish. Invoke pznload with the --help option to see a list of all options. The most important arguments are described here:
- serverUrl
- The URL of the remote publish servlet. If you do not specify a value the program will attempt to connect to a WebSphere Portal server running on the local machine.
- targetWorkspace
- The name of the workspace to publish to. The default workspace name on all IBM Content Manager run time edition installations is ROOTWORKSPACE.
- targetPath
- The location in the target workspace which will be the parent for the published nodes. The target path must exist prior to publishing. Example: If the Export function was used on the folder /Projects/HR website, then the target path should be specified as /Projects so that the published resources are once again located in /Projects/HR website.
- username
- A valid user on the target system with sufficient access rights.
- password
- The password for the user
-
./pznload.sh --serverUrl url --targetPath path --targetWorkspace workspace --username username --password password
Before performing this task, you may want to view and print the appropriate IBM WebSphere Portal Enable for z/OS worksheets located on the wiki to help define the variables.
- Start the WebSphere Portal Customization Dialog.
- In the Portal configuration panel, select Application configuration tasks.
- Select Configure Personalization.
- Select Define variables. Reminder: Press
F1 to display the help panel if you need assistance defining the variables.
- Generate the customization jobs.
- Follow the Customization Dialog instructions for submitting the customization jobs.
- To delete objects where TargetPath is the object (and all associated childrenthat will be deleted.
pznload --delete --targetPath path -serverUrl url --targetPath path --targetWorkspace workspace --username username --password password
After a publish is started, you see status messages in the command console.
Parent: Publish personalization rules overview
Previous: Publish personalization rules
Next: Publish personalization rules over SSL
Related: