WebSphere
Configuration
Before using the WebSphere monitor, several of the WebSphere server jars must be installed in NeoLoad jmxlib/websphere directory.
WebSphere 6.0
To connect NeoLoad to WebSphere 6.0, copy the following files from the WebSphere directory to the <install-dir>/jmxlib/websphere directory:
- <websphere>/AppServer/java/jre/lib/ibmcertpathprovider.jar
- <websphere>/AppServer/java/jre/lib/ext/ibmjceprovider.jar
- <websphere>/AppServer/etc/tmx4jTransform.jar
- <websphere>/AppServer/lib/admin.jar
- <websphere>/AppServer/lib/bootstrap.jar
- <websphere>/AppServer/lib/classloader.jar
- <websphere>/AppServer/lib/client.jar
- <websphere>/AppServer/lib/emf.jar
- <websphere>/AppServer/lib/ffdc.jar
- <websphere>/AppServer/lib/idl.jar
- <websphere>/AppServer/lib/iwsorb.jar
- <websphere>/AppServer/lib/j2ee.jar
- <websphere>/AppServer/lib/mail-impl.jar
- <websphere>/AppServer/lib/management.jar
- <websphere>/AppServer/lib/nls.jar
- <websphere>/AppServer/lib/pmi.jar
- <websphere>/AppServer/lib/pmij2ee.jar
- <websphere>/AppServer/lib/ras.jar
- <websphere>/AppServer/lib/runtime.jar
- <websphere>/AppServer/lib/sas.jar
- <websphere>/AppServer/lib/soap.jar
- <websphere>/AppServer/lib/utils.jar
- <websphere>/AppServer/lib/wasjmx.jar
- <websphere>/AppServer/lib/wasproduct.jar
- <websphere>/AppServer/lib/wsexception.jar
- <websphere>/AppServer/lib/wsprofile.jar
- <websphere>/AppServer/lib/wssec.jar
- <websphere>/AppServer/lib/wssoap.jar
- <websphere>/AppServer/lib/security.jar
After copying the files, it is unnecessary to restart NeoLoad. The files are automatically synchronized with the Monitoring Agent once the changes have been made.
WebSphere 6.1
To connect NeoLoad to WebSphere 6.1, copy the following files from the WebSphere directory to the <install-dir>/jmxlib/websphere directory:
- <websphere>/AppServer/runtimes/com.ibm.ws.admin.client_6.1.0.jar
- <websphere>/AppServer/runtimes/com.ibm.ws.webservices.thinclient_6.1.0.jar
- <websphere>/AppServer/plugins/com.ibm.ws.runtime_6.1.0.jar
- <websphere>/AppServer/lib/webadmin/management.jar
- <websphere>/AppServer/etc/tmx4jTransform.jar
With the FixPack 11 or later, it is required to copy also the following file:
- AppServer\plugins\org.eclipse.osgi_*.jar
After copying the files, it is unnecessary to restart NeoLoad. The files are automatically synchronized with the Monitoring Agent once the changes have been made.
WebSphere 7.0
To connect NeoLoad to WebSphere 7.0, copy the following files from the WebSphere directory to the <install-dir>/jmxlib/websphere directory:
- <websphere>/AppServer/runtimes/com.ibm.ws.admin.client_7.0.0.jar
- <websphere>/AppServer/runtimes/com.ibm.ws.webservices.thinclient_7.0.0.jar
- <websphere>/AppServer/plugins/com.ibm.ws.runtime.jar
- <websphere>/AppServer/lib/webadmin/management.jar
- <websphere>/AppServer/etc/tmx4jTransform.jar
After copying the files, it is unnecessary to restart NeoLoad. The files are automatically synchronized with the Monitoring Agent once the changes have been made.
WebSphere 8.0
To connect NeoLoad to WebSphere 8.5, copy the following files from the WebSphere directory to the <install-dir>/jmxlib/websphere directory:
- <websphere>/AppServer/runtimes/com.ibm.ws.admin.client_8.5.0.jar
- <websphere>/AppServer/runtimes/com.ibm.ws.orb_8.5.0.jar
- <websphere>/AppServer/runtimes/com.ibm.ws.webservices.thinclient_8.5.0.jar
- <websphere>/AppServer/plugins/com.ibm.ws.runtime.jar
- <websphere>/AppServer/lib/webadmin/management.jar
- <websphere>/AppServer/etc/tmx4jTransform.jar
After copying the files, it is unnecessary to restart NeoLoad. The files are automatically synchronized with the Monitoring Agent once the changes have been made.
WebSphere 8.5
To connect NeoLoad to WebSphere 8.5, copy the following files from the WebSphere directory to the <install-dir>/jmxlib/websphere directory:
- <websphere>/AppServer/runtimes/com.ibm.ws.admin.client_8.5.0.jar
- <websphere>/AppServer/runtimes/com.ibm.ws.orb_8.5.0.jar
- <websphere>/AppServer/runtimes/com.ibm.ws.webservices.thinclient_8.5.0.jar
- <websphere>/AppServer/plugins/com.ibm.ws.runtime.jar
- <websphere>/AppServer/lib/webadmin/management.jar
- <websphere>/AppServer/etc/tmx4jTransform.jar
After copying the files, it is unnecessary to restart NeoLoad. The files are automatically synchronized with the Monitoring Agent once the changes have been made.
WebSphere Liberty 8.5 - 9.0
You first need to activate monitoring in WebSphere Liberty to configure the monitor.
- To activate monitoring
In the <websphere_liberty>/usr/servers/serverName/server.xml file, locate the <featureManager> section and add the two features below:
<feature>monitor-1.0</feature>
<feature>restConnector-1.0</feature>
To connect NeoLoad to WebSphere Liberty, copy the following file from the WebSphere Liberty directory to the <install-dir>/jmxlib/websphere_liberty directory:
<websphere_liberty>/clients/restConnector.jar
After copying the file, it is unnecessary to restart NeoLoad.
The files are automatically synchronized with the Monitoring Agent once the changes have been made.
Supported versions
The WebSphere monitor supports WebSphere 6.0.X, WebSphere 6.1.X, WebSphere 7.0.X, WebSphere 8.0.X and WebSphere 8.5.X.
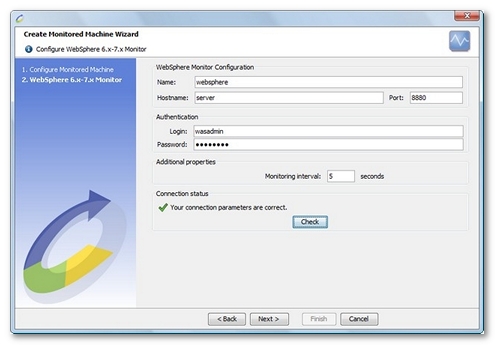
Connection settings
Defining a monitor for a WebSphere server requires the name or IP address of the machine to be monitored, as well as the connection port (the default port is 8880). The port is the WebSphere server SOAP connection port (SOAP_CONNECTOR_ADDRESS in the administration console). In addition to these settings, a valid user account must be provided with which to connect to the WebSphere Administration Console.
- Warning: NeoLoad requires the PMI interface to be enabled on the monitored WebSphere server. To activate it, click on the Servers > Application servers node in the administration console and select the desired server. Next, click on the Configuration tab and check the Enable Performance monitoring option. Click OK to confirm, and re-start the application server for the changes to take effect.
Create a WebSphere monitor
NeoLoad makes it possible to create a new monitor either using the monitored machine creation wizard, as described in Create and configure a monitored machine, or from an existing monitored machine, as described in Create and configure a monitor.
NeoLoad automatically selects the most appropriate counters available on the server, for example, failed transactions, data pool states...
- Warning: After updating a WebSphere installation, all the monitored counters need to be deleted then re-selected. If the counter selection or the alert levels have been changed, the settings may be saved to a file. Once the counters have been deleted, the settings may be reloaded.
Available counters

WebSphere counters are automatically determined, based on all the Manageable Objects available. Since WebSphere counters are dynamic, retrieving all the counters can take several seconds. Clicking on a counter displays its description. These are the most common categories.
- JDBC Provider. Data counters for this category contain usage information about the JDBC connection pools for a database. Examples include the number of managed connections or physical connections and the total number of connections or connection handles.
- ThreadPool. Data counters for this category contain information about the thread pools for Object Request Broker (ORB) threads and the Web Container pools used to process HTTP requests. Examples include the number of threads created and destroyed, the maximum number of pooled threads allowed, and the average number of active threads in the pool.
Information: The % UsedPoolSize/count counter shows the percentage of the current thread pool used. This figure may exceed 100% if the thread pool has been configured to be extensible: in this case, the application server allows the maximum number of threads configured to be exceeded.
- JVM (Java Virtual Machine API). Data counters for this category contain information about the memory used by a process, as reported by JVM runtime. Examples are the total memory available and the amount of free memory for the JVM. JVM runtime also includes data from the JVMPI. This data provides detailed information about the JVM running the application server.
- Session manager. Data counters for this category contain usage information for HTTP sessions. Examples include the total number of accessed sessions and the average number of concurrently active HTTP sessions.