WebSphere Lombardi Edition 7.2 > Manage the Process Center repository
Manage library items in the Designer view
The procedures in this section provide details about how to effectively manage and maintain Lombardi library items in the Designer view. The Designer offers several tools to ensure that you can quickly and easily access items that you work with on a regular basis. Plus, the Designer enables you to move or copy items between existing or new process applications and toolkits. You can also revert to previous versions of individual library items using snapshots.
Before performing any of the following tasks, start Lombardi Authoring Environment and access the Designer view as explained in Start Lombardi Authoring Environment.
Navigating the library
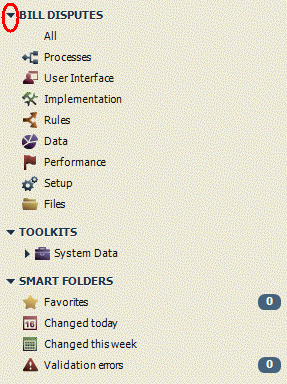
When you open the Designer view in Lombardi Authoring Environment, the library is displayed on the left :
You can perform the following actions in the library:
- Click the indicator highlighted in red in the preceding image to see the categories of library items in the current process application (named Bill Disputes).
- Click a category to see the individual items stored in the library. For example, click Processes to see a list of the business process definitions (BPDs) included in the process application named Bill Disputes. When viewing the list of individual library items, you can right-click an item to perform actions such as tagging or deleting items.
-
Mouse over a category and then click the plus sign that displays next to the category to add a new library item. For example, if you click the plus sign next to Processes you can add several types of library items, including BPDs and participant groups.
When creating new library items, do not name those items toolkit. Doing so can cause issues when using JavaScript to refer to variables and other Lombardi objects that reside in the toolkit namespace.
- Mouse over the Toolkits category and then click the plus sign to create a dependency on a toolkit. See Manage and using toolkits for more information.
- In the Smart Folders area, you can manage favorites, tagged items, and your custom smart folders. See the following sections for more information.
Create favorites
You can mark library items as favorites for quick and easy access.
-
Click a category to see the individual items stored in the library.
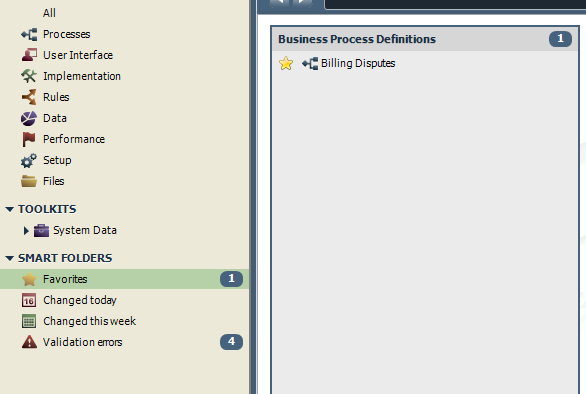
For example, click Processes and then click Business Process Definitions (as shown in the following image) to see a list of the BPDs included in the current process application or toolkit.
-
Move your cursor to the left of a BPD and click the star icon to highlight it as shown in the following example:

In the preceding example, the Billing Disputes BPD is now a favorite.
-
Go to the Smart Folders area, click Favorites, and then click a category to see all items marked as favorites.
In the following example, you can see the favorite added in the previous step:
To remove a favorite, click the star icon next to the item in the Favorites list.
Tagging library items
By default you can sort library items by name or by type. If you want
to sort library items using custom labels, you can attach a tag to them for
quick and easy access.
-
Click a category to see the individual items stored in the library.
For example, click Processes and then click Business Process Definitions to see a list of the BPDs included in the current process application or toolkit.
-
Right-click a library item and select Tags > Add from the menu options.
To choose multiple library items in a category, press and hold the Ctrl key and then click each item.
If the tag you want already exists, select it from the list. If not, select New from the list, enter the name for the new tag and click OK.

-
To view tagged items, click a category in the library and then use the drop-down list shown in the following image to switch to the Tag option:

Now library items are categorized according to tags as shown in the following image:

- To remove an existing tag from a library item, right-click the library item and then select Tags > [Tag_name] from the menu options. The selected tag is no longer associated with the library item.
Organize library items in smart folders
You can arrange library items in smart folders for quick and easy access. Lombardi Designer includes several default smart folders such as the Changed today folder, which includes all library items in the current process application that were changed on the current day. The Changed today and Changed this week smart folders include library items changed by all users who have access to the current process application.
In addition to the default smart folders, you can create custom smart folders. Custom smart folders can be private or shared.
-
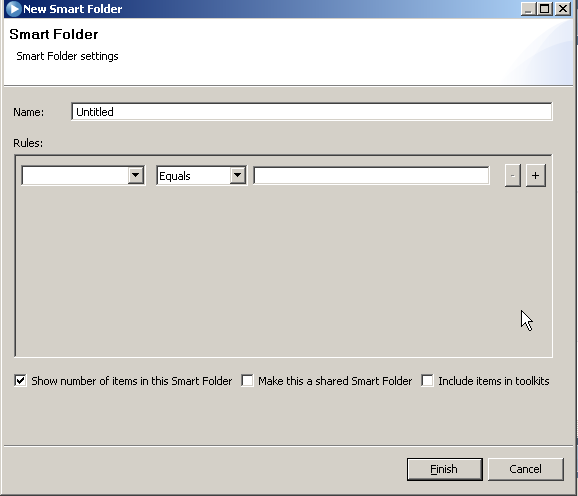
Click the plus sign next to Smart Folders in the Library as shown in the following image:

- In the Create new smart folder dialog, enter the name for the new folder.
-
Select from the available menus to establish rules to determine which library items to include. You can include library items based on the presence of a particular tag, creation date, item type, and so on.
In the following example, the first rule establishes that we want library items that are marked as favorites.
-
Click the plus sign to add another rule. In the following example, our second rule establishes that we want library items that were modified before the selected date.
You can continue adding rules using the plus sign. When you click the plus sign next to a particular rule, the new rule is added immediately after the current rule. You can use the minus sign to remove unwanted rules.
Lombardi Designer evaluates the rules from top to bottom. If no rules match existing library items, the smart folder is empty.
-
You can optionally enable the following check boxes:
Show number of items in this smart folder Enable this option causes the Designer to display the number of library items in the folder when you mouse over or select the folder. Make this a shared smart folder If you enable this option, anyone who has access to the current process application or toolkit can view this smart folder and its contents, but cannot edit the rules for the folder. Include items in toolkits If you enable this option, library items within the toolkits that this process application depends upon are also included in the smart folder. - Click Finish to save the smart folder settings.
Copying or moving library items
In the library in the Designer view, you can copy or move existing library items to a new or existing process application or toolkit.
To move or copy items, you must have write access to the target process application or toolkit.
The following table describes how copy and move operations are different:
| Copy a library item | Creates a new library item that is a duplicate of the original item. The newly created item is not associated with the original item from which it was copied. |
| Move a library item | Relocates the original item to a new or different process application or toolkit. |
When you copy library items, any references to those items in the source process application or toolkit are unaffected because the original items remain and are still referenced.
When you move library items, those changes can affect existing implementations and other references. For example, if the implementation for an activity is a nested process and you move the nested process, whether the activity's implementation (reference to the nested process) is good or is broken depends upon where you move the nested process
| If you move the nested process to... | The reference... |
|---|---|
| A new toolkit | Is good because Lombardi automatically creates a new dependency on the new toolkit. |
| An existing toolkit that the source process application is not currently using | Is good because Lombardi automatically creates a new dependency on the existing toolkit. |
| An existing toolkit that the source process application is currently using | Is broken until you update the existing toolkit dependency to the new snapshot of the toolkit that Lombardi automatically creates. See Update a toolkit dependency in the Designer view for instructions. |
| A new or existing process application | Is broken because process applications cannot depend upon each other. When moving library items to process applications, be sure to move all related items to avoid broken references. Lombardi automatically resolves broken references when related items are not moved simultaneously. |
To ensure that you move all related library items, identify related items using the Where Used tab at the bottom of the Designer, and then tag the related items. You can then display the tagged items which enables you to easily move or copy them as a group.
To move or copy library items, follow these steps:
- Select the library items that you want to move or copy. To choose multiple items in a category, press and hold the Ctrl key and then click each item.
-
Right-click and select Copy items to or Move items to from the menu options as shown in the following image.

-
Select the option that you want from the pop-up menu. The top of the list displays all process applications and toolkits created by the current user. The other options include the following:
Other Process App or Toolkit... When you select this option, the Designer displays all existing process applications and toolkits to which you have write access. New Process Application... When prompted, enter a name for the new process application and click OK. The acronym for the new process application is set to the first letter of each word in the process application name. New Toolkit... When prompted, enter a name for the new toolkit and click OK. The acronym for the new toolkit is set to the first letter of each word in the toolkit name. The Designer moves or copies the selected library items to the designated process application or toolkit. If you copy or move a library item with the same name as an item in the target process application or toolkit, the Designer appends a number to the end of the moved or copied item. The original item in the target has no number and the copied or moved item name is followed by the number 2.
Reverting to a previous version of a library item
In the library in the Designer view, you can revert to a previous version of a library item. For example, if you realize that a service you created in a previous snapshot is closer to the implementation that you need than the current version, you can revert to the previous version of the service.
Before reverting a library item, open the item and check the Where Used tab at the bottom of the Designer. If the item is being used in multiple processes or services, check with the other developers on your team before making changes. If a single item is being implemented across a process application, it is best to create a toolkit, add the item to the toolkit, and then create a dependency on the toolkit.
To revert to a previous version of a library item, follow these steps:
- Go to Revision History in the Designer.
-
Open the snapshot where the previous version of the library item that you want resides by clicking the indicator next to the snapshot as shown in the following image:
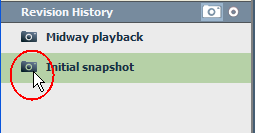
The Designer displays a message in the toolbar to indicate that it is showing all items in the process application as they existed when the snapshot called Initial snapshot was created:
-
Find the item that you want, right-click it, and select Revert.
The current version of the same library item in your process application is replaced with this snapshot version.
As soon as the revert operation is complete, the Designer returns to the current working version of your process application. All library items are current and the item that you chose to revert has been replaced by its previous version.

Copying a library item from a snapshot
In the library in the Designer view, you can copy a library item from an older snapshot to the current version of your process application. For example, if a service was developed and then deleted, you can go back to a snapshot where the service was still present and copy it to the current working version of your process application.
To copy a library item from a previous snapshot, follow these steps:
- Go to Revision History in the Designer.
-
Open the snapshot where the library item that you want resides by clicking the indicator next to the snapshot :
The Designer displays a message in the toolbar to indicate that it is showing all items in the process application as they existed when the snapshot called Initial snapshot was created:
-
Find the item that you want, right-click, and select Copy to Tip.
The selected library item is now available in the current working version of your process application. If you copy an old item with the same name as a current item, the Designer appends a number to the end of the older copied item:
Understand concurrent editing
Lombardi enables multiple users to simultaneously access and make changes to the library items in the Designer view.
Each user must be connected to the same Process Center and each user must have write access to the process application or toolkit where the library items reside. When editing concurrently with other users, ensure your connection status is good
When working in the Designer view, you can see when other users are working in the same process application and library item as shown in the following image:

When multiple users are working on the same library item, such as a BPD, each user can see the changes as edits are saved. To ensure that all users are aware of the library items that are open and the changes being made, the Designer provides the following notifications:
- If you open a BPD or library item that is already opened by other users, the Designer notifies you.
- If another user starts to edit a BPD or other library item that you have open, the Designer notifies you that the edits are taking place and who is making the changes as shown in the following example.
- If you attempt to edit a library item that another user is currently editing, the Designer notifies you that you cannot make changes by displaying the text Read Only next to the item name as shown in the following example.
- If multiple users start to edit a library item at the same time, the Designer displays a warning icon to notify each user and then enables them to either immediately save their changes or discard them.
The following example shows the notification provided by the Designer when another user is editing an item that you have open:

With concurrent editing, you can collaborate with other team members to build the library items that you need for your project. For example, you can communicate about your ideas and edits using instant messaging and see the results in the Designer view as they happen.
Parent topic: Manage the Process Center repository