WebSphere Lombardi Edition 7.2 > Create reports
Create a basic custom report
The following sample shows how to use the ad-hoc wizard to leverage data captured in a timing interval so that you can compare the duration of a set of tasks for different process variables.
Create a timing interval
Let's say we have a BPD in which orders are submitted for approval and
we want to compare the duration of the approval process for orders from
different departments.
- For this sample process, we're already autotracking the order ID, type, amount, department, and status.
-
To be able to compare the duration of the approval process for these orders, we go to the BPD diagram and add the Submit, Reject, and Approved tracking points shown in the following image:
- We need to create a tracking group to hold the timing interval data. In the library in the Designer, click the plus sign next to the Performance category and select Tracking Group from the list of components. For this sample, we name the tracking group SampleRequest and click Finish.
-
Then, for each tracking point, select the icon in the BPD diagram, go to the Implementation option in the properties, and select the SampleRequest tracking group as shown in the following image:
-
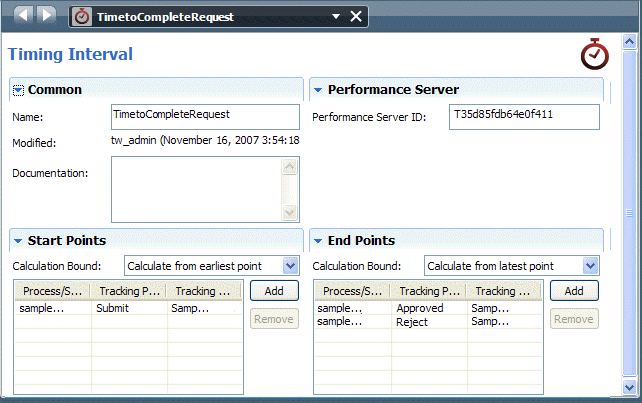
Now we need to create the timing interval. In the library in the Designer, click the plus sign next to the Performance category and select Timing Interval from the list of components. After we name the interval (TimeToCompleteRequest) and click Finish, we add the start and end tracking points . Notice that we select the Submit tracking point for the start of the interval with Calculate from earliest point and the Approved and Reject tracking points for the end of the interval with Calculate from latest point:


To use this timing interval to compare the duration of orders using the ad-hoc report wizard, see following report sample.
Create a basic report that uses the timing interval
Now let's use the ad-hoc wizard to take advantage of the timing
interval discussed in the preceding section. Because we've configured a timing
interval, we can compare the duration of the review process for orders from
different departments as outlined in the following steps:
- In the Designer in Lombardi Authoring Environment, open the diagram of the BPD.
-
Select File > Ad-Hoc Report Analysisfrom the main menu.
-
Choose the settings that you want for the report from the wizard. For example, in the following image, we've selected the dept variable for the X-axis binding and the TimetoCompleteRequest timing interval for the Y-axis binding with the function of SUM (total) since we want to show the total duration. We choose Milliseconds in Minutes for the Convert field since we want to see duration in minutes. We leave the default chart layout (Stock Bar Chart), and then click the Refresh icon in the upper right to preview our chart directly within the wizard:
-
Satisfied with the chart's appearance and data, we click the Create Report icon in the upper right :
-
In the Create Report dialog, we type in a name for the report and click Finish.
- To create a scoreboard so that we can display the report in Lombardi Proses Portal, click the plus sign next to the Performance category in the library and select Scoreboard from the list of components.
-
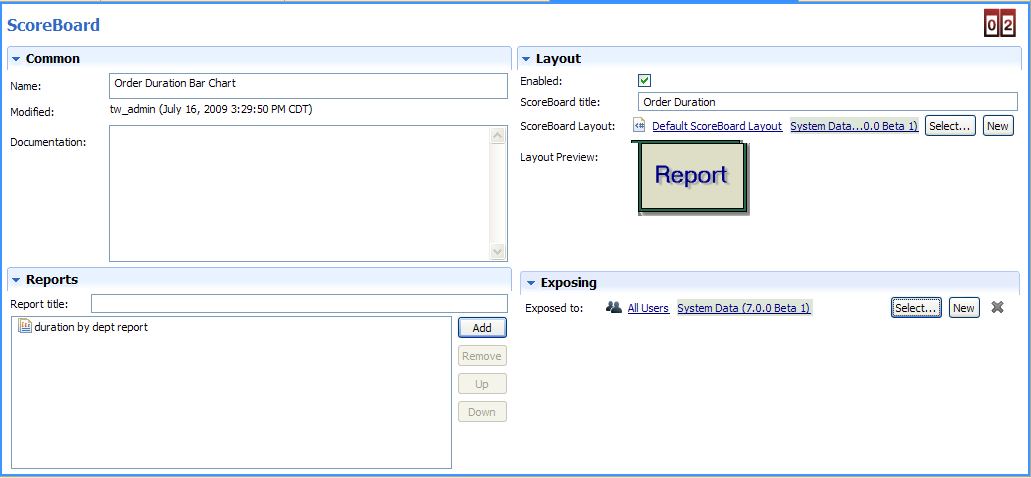
In the New Scoreboard dialog, name the scoreboard Order Duration Bar Chart, leave the default layout setting (Default Scoreboard Layout), and click Finish :
-
In the scoreboard we've created, under the Reports heading, we click the Add button, find our report, and click it to add it to the scoreboard. Then, under the Layout heading, we click the Enabled checkbox and provide a title for the scoreboard. We also click the Select button next to the Exposed to option and pick the participant group whose members can view this scoreboard in Lombardi Process Portal as shown in the following image:
-
Now when we access Lombardi Process Portal, we can see the title of the Scoreboard (Order Duration) in My Scoreboards on the left of the portal. When we click Order Duration, Lombardi Process Portal displays the report:
-
To control access to the scoreboard in different environments:
Environment Required configuration Development (on Process Center Server) In the Designer in Lombardi Authoring Environment, create a new participant group or adjust the members of the existing participant group to whom the scoreboard is exposed. See Create a participant group. Runtime (Process Server in test, staging, or production environment) After installing a process application snapshot that includes the scoreboard, adjust the members of the participant group to whom the scoreboard is exposed


Parent topic: Create reports