Portal Express, Version 6.0
Operating systems: i5/OS, Linux, Windows
Set up SSL
This section describes the overall tasks that are required to configure SSL for IBM® WebSphere® Portal Express. Some of these tasks are performed on the IBM WebSphere Application Server and the Web server.
- Configure the Web server to support HTTPS.
This involves setting up the Web server to accept inbound connections from client browsers over SSL. The Web server must have a port defined (usually 443), and the necessary certificates and keys must be installed.
If this is a production environment, obtain a certificate from a certificate authority. For testing purposes, you can use IKEYMAN to generate a self-signed certificate.
For Internet Information Server, create SSL keys by using the Web server's Version 6.0 resource tool kit.
- Configure the WAS plugin for the Web server.
The plugin forwards WebSphere Portal Express traffic that is received over SSL to WAS, which will then forward the traffic to WebSphere Portal Express.
- In configurations where the Web server and WebSphere Portal Express reside on separate machines, requests to the Web server are rerouted to the application server.
Under these circumstances, you can also configure SSL between the Web server and the application server to provide more complete security. This requires that you create additional keyfiles for the Web server plugin and for the embedded HTTPS of WebSphere Application Server.
Key files and trust files of the deployment manager must be manually copied to each node in the cell as part of enabling SSL.
For detailed instructions on configuring SSL between the Web server and the application server, refer to the section entitled...
7.3.1: Secure the transport channel between Web server and WebSphere, of the IBM WebSphere Application Server V6.1 Security Handbook SG24-6316-00
The settings described in this section are viable for any level of WAS V6.0 or higher.
Always create a new SSL repository for the external Web server and change the WebSphere_Portal server's secure transport channel to use the new SSL repository. Do not modify the default SSL repository.
- Add or change the following two property parameters in configuration services, as described in Setting configuration properties:
redirect.login.ssl = true
host.port.https = alias_port...where alias_port is the port number that is used for the virtual host alias that is specified in a previous step (usually 443). The parameter redirect.logout.ssl determines the protocol that is used when you click the logout button. If this parameter is set to true, https is used. If this parameter is set to false, http is used. This setting is not affected by the protocol that is used to access the main page.
- Update the Transport Security Constraint.
This step is only required if you need to completely secure the portal protected area over HTTPS. You can modify the transport guarantee so that WAS will enforce the use of SSL for all pages under the /myportal/ URL.
Edit...
directory/wps_expanded/wps.war/WEB-INF/web.xml/web.xml
Change the security-constraint tag of the protected URL, /myportal/*, to use HTTPS by setting each occurrence of the transport guarantee value of 'NONE' to 'CONFIDENTIAL':
<security-constraint id="SecurityConstraint_1"> <web-resource-collection id="WebResourceCollection_1"> <web-resource-name></web-resource-name> <url-pattern>/myportal/*</url-pattern> <http-method>DELETE</http-method> <http-method>POST</http-method> <http-method>GET</http-method> <http-method>PUT</http-method> </web-resource-collection> <auth-constraint id="AuthConstraint_1"> <description></description> <role-name>All Role</role-name> </auth-constraint> <user-data-constraint id="UserDataConstraint_4"> <transport-guarantee>CONFIDENTIAL</transport-guarantee> // replace NONE by CONFIDENTIAL </user-data-constraint> </security-constraint> - Export the WebSphere Portal Express EAR file.
Use the EARExpander tool of WAS to expand the contents of the exported EAR file.
Theme JSPs and deployment files are managed as part of the main application and are thus part of the EAR file. You must update and redeploy EAR files when changing JSPs or deployment related xml files; otherwise, your changes will be deleted when the EAR file is updated.
- Edit the JSP and JSPF files that provide the login link. You can search the theme directories under...
../wps_expanded/wps.war/themes/
...for all JSP and JSPF files that include the following string...
"wps.Login"
This attribute should appear in a tag similar to this:
<wps:urlGeneration contentNode="wps.Login" portletWindowState="Normal">
The exact structure of this tag can vary depending on how it was constructed by the page designer. JSP comments might also be used to indicate where the login link is located:
<%-- login button --%>
- After finding the login link, change or add the ssl="true" attribute to the <wps:urlGeneration> tag of the anchor, for example:
<wps:if loggedIn="no" notSelection="wps.Login">
 <wps:urlGeneration contentNode="wps.Login"
      portletWindowState="Normal" ssl="true">
 <td class="wpsToolBar" valign="middle" nowrap>
 <a href="<% wpsURL.write(escapeXmlWriter); %>" class="wpsToolBarLink">
 <wps:text key="link.login" bundle="nls.engine"/>
 </a>
 </td>
 </wps:urlGeneration>
</wps:if>
The previous examples use the 'wps:' prefix to designate JSP tags from the portal tag library in portal.tld. Your custom JSPs might use a different tag prefix.
- Use the EARExpander command to collapse the directory back into the EAR file and update the WebSphere Portal Express EAR file through the wsadmin tool; see steps 4 through 6 in Deploying themes and skins in a production environment.
If this is a clustered environment, verify that the EAR changes have synchronized to all nodes. Restart the servers on each node.
- Edit the JSP and JSPF files that provide the login link. You can search the theme directories under...
- When using a remote Web server in a standalone or clustered environment, perform the following steps if one of the following scenarios is true:
- If you need to allow direct access to the WebSphere_Portal node on the internal port, for example...
http://www.ibm.com:10038/wps/portal
...you will need to create a Web container Transport chain and specify the virtual host alias port (usually 443).
- If this is a clustered environment, you will need to make this update on each WebSphere_Portal node in the cluster.
- From the WAS Administrative console go to...
Servers | Application Servers | WebSphere_Portal | Web Container Settings | Web Container Transport Chains | New
- Select a name for the transport chain.
- Select the WebContainer-Secure template...
templates/chains|webcontainer-chains.xml...
- Select Next.
- Specify the Port name; for example 443.
- Specify the Port number, usually 443.
- Click Next.
- Click Finish to confirm the creation of the transport chain.
- Click Save.
- If this is a clustered environment, synchronize the changes to all nodes.
- If you need to allow direct access to the WebSphere_Portal node on the internal port, for example...
- Perform the following steps only if using the Login portlet:
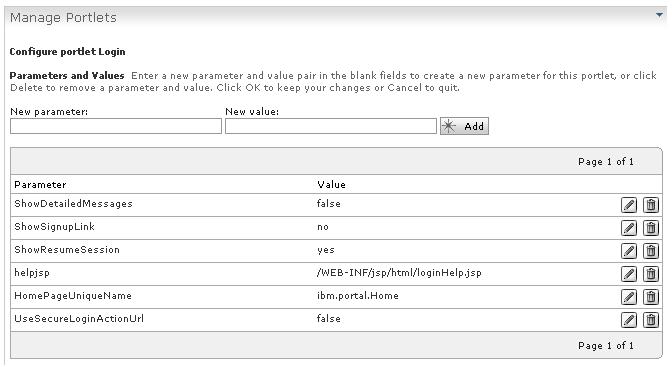
- The Login portlet uses the UseSecureLoginActionUrl parameter to control the generation of the login action URL. Set this parameter to true to use a secure URL for login.
- Use the Portlets administration portlet to do the following:
- Go to...
Administration | Portlet Management | Portlets
- Search for Title start with = "Login".
- Select the Configure portlet icon.
- Edit parameter UseSecureLoginActionUrl and set the parameter to true.
To remove the "Sign up" link, set ShowSignupLink to No
- Go to...
- Stop and restart the server1 and WebSphere_Portal servers
If this is a clustered environment, verify that the EAR changes have been successfully synchronized to all nodes. Stop and restart the servers on all nodes.
- Follow these steps to test your changes:
- Launch the home page in a Web browser through an HTTP URL that is not secure (for example, http://hostname.example.com:10038/wps/portal, where hostname.example.com is the fully qualified host name of the machine where WebSphere Portal is running and 10038 is the default transport port that is created by WAS.).
- Verify that the login link in the banner area uses the HTTPS schema for the link to the login page.
- Go to the login screen and verify that this page is already protected; the URL must be HTTPS and the browser must indicate that the page is protected.
A browser security prompt might appear after you click the login link to accept the server certificate.
- Log off.
- Log in using an HTTP URL that is not secure and that points directly to the protected area (for example, http://www.ibm.com:10038/wps/portal).
- Verify that you are requested to login and that the login page and the portal page afterwards are protected through SSL.
If the security-constraint has not been modified to CONFIDENTIAL, SSL will not protect the login page and the portal pages.
Related information
- IBM WebSphere Application Server V6 Security Handbook, SG24-6316-00
- Security planning overview
- Managing digital certificates
- http://www.redbooks.ibm.com/