Deploy DX Container to Microsoft Azure Kubernetes Service (AKS)
Learn how to deploy HCL WebSphere Portal (DX) 9.5 CF_182 and higher container release
along with Ambassador to Kubernetes, as verified in Microsoft Azure Kubernetes Service
(AKS).
Prerequisites
Prior to using the procedure below, it is assumed that the HCL DX Administrator is
generally experienced in using Kubernetes. Additionally, the DX Administrator must have the appropriate access to the target environment. If not, following are some preliminary steps
that need to be taken.
Setup KUBECONFIG to refer to the target server. This will ensure any
kubectl commands executed locally affect the target environment.
Use kubectl get {pods, pv, storageclass} to get appropriate
information from the artifacts running in the target Kubernetes environment.
Note: Reference the latest HCL DX 9.5
Container Release and Update file listings in the Docker
deployment topic.
Deployment
Download and extract the contents of the HCL DX 9.5 CF_182 package to the local file
system. Figure 1. Download and extract example
In Microsoft Azure Kubernetes Service (AKS), load, tag, and push the HCL Digital Experience images into your MS Azure Container Registries.
Note: In Microsoft Azure, when
using AKS a single Container Registry, or multiple Container Registries may be used. See
theMicrosoft Azure Container Registry documentation
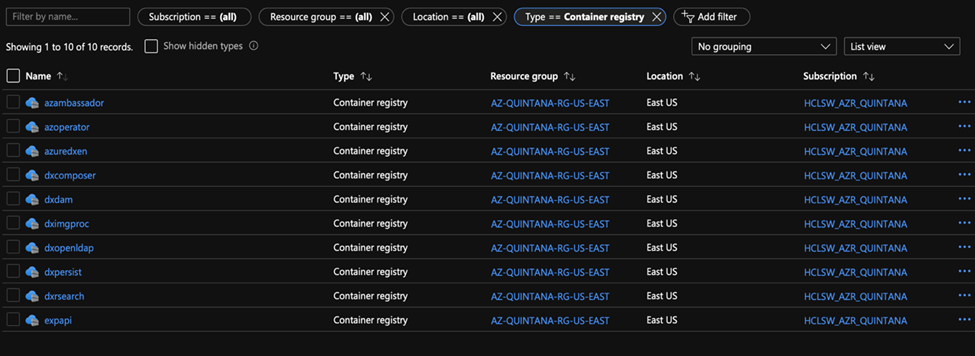
for additional information about this topic.In this example, 10 Container
Registries are created:Figure 2. Create Container Registries example for HCL DX 9.5 Docker images
As an alternative, DX Administrators can use a single or fewer registries
and create 'Repositories' within. In this example, a Container Registry named
azambassador with a repository 'ambassador' is shown:Figure 3. Sample Container Registry azambassador
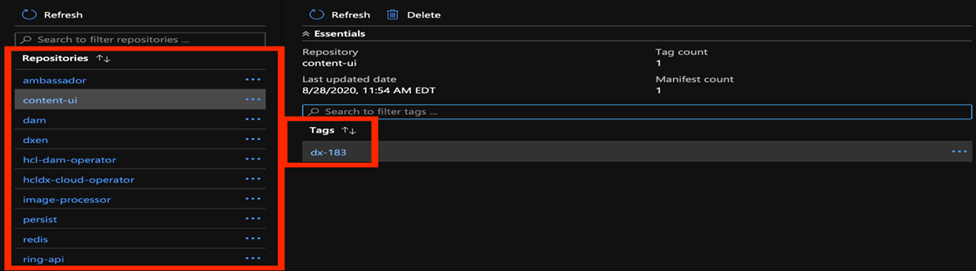
Administrators can tag and push another image into this Container Registry
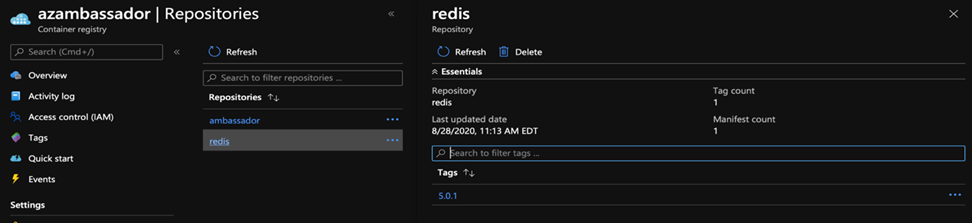
to get a second repository. Figure 4. azambassador Repository
In the following example, the Ambassador Redis image is added:Figure 5. Ambassador Redis image
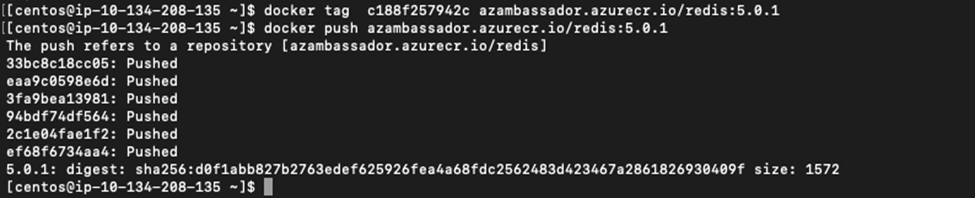
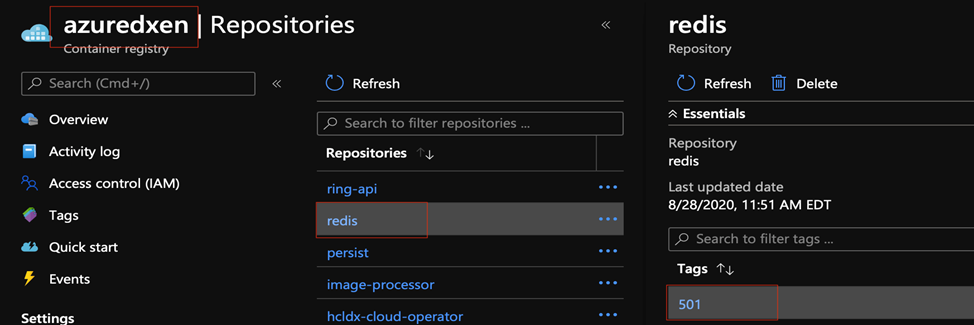
The HCL DX 9.5 Container deployment does not assume 1, or many registries
are defined, and either definition setup will work. In the following example, the HCL DX
9.5 Redis 5.0.1 image is added to the azambassador Container Registry. This example
shows loading the HCL DX 9.5 CF_182 and higher container into a local repository,
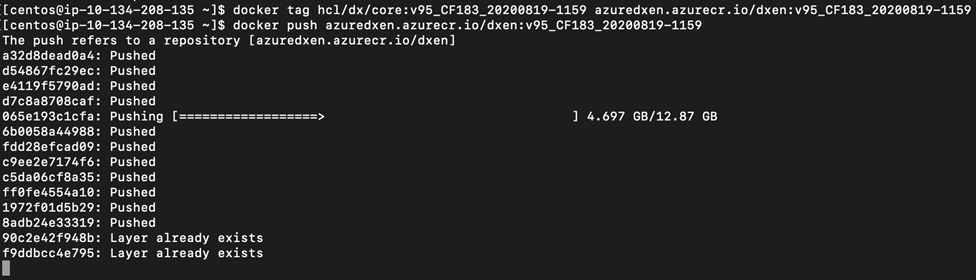
tagging it and pushing it to the azuredxen Container Registry in the dxen
'Repository'.Figure 6. azuredxen Container Registry
Install the HCL WebSphere Portal 9.5 CF_182 or higher core images
Load the HCL DX 9.5 CF_182 or higher images to your deployment. The following example
uses the CF_183 version in the load
command:
Docker tag and docker push to the Azure environment:Figure 8. Docker tag and push
Once complete, the image will be viewable in the Microsoft Azure repository:Figure 9. azuredxen Repository
Reminder : Consult the HCL WebSphere Portal 9.5 Deployment - Docker topic for
the latest list of HCL DX 9.5 Container files available. HCL DX 9.5
Container Update CF_183 files are used in these examples:
To install HCL DX 9.5 core software to Microsoft Azure AKS, the following images are required:
hcl-dx-cloud-operator-image-v95
hcl-dx-core-image-v95
hcl-dx-ambassador-image
hcl-dx-redis-image
Images included in the 'other' package are optional and used to support use of OpenLDAP, Remote Search, the Experience API, Content Composer, and Digital Asset
Management components and services.
See examples that show how to load HCL DX 9.5
images to MS Azure below.In the following example the items are loaded into the azuredxen Content Registry and multiple repositories are created.
Images are tagged with dx-183 reflecting the HCL DX 9.5 Container
Update CF_183 version images used in this deployment. Figure 10. Loaded items in azuredxen
At this stage, the ./deploy/operator.yaml needs to be properly
updated and the operator, and Redis image details need to be provided:
Next, replace the values: "REDIS_REPO","REDIS_IMG_ENV",'REDIS_TAG_ENV' with proper
values. See the following example: Figure 11. Redis repo values
Reviewing the Azure dashboard, administrators can see the following for redis:Figure 12. Azure dashboard
Deploy the Custom Resource Definition using the scripts/deployCrd.sh file. See the following example: Figure 13. Custom Resource Definition deployment
Important : Ensure there is an available persistent volume for the deployment or a self-provisioning storage class. The HCL DX Help Center topic (Sample Storage
Class and Volume for HCL WebSphere Portal 9.5 Container Deployments) can be
referenced for related guidance. In this example, a storage class named
dx-deploy-stg and a volume dxdeployhave been
created: Figure 14. dxdeploy volume
NAMESPACE - the project or the namespace to create or use for
deployment.
REPLICAS - the number of initial instances for the deployment.
REPOSITORY - your local repository, the repository used by Kubernetes.
IMAGENAME - the name of the dxCore image, as added to the repository
above.
IMAGETAG - the tag for the target image as added to the repository
above.
VOLUMENAME - the volume to be used by the deployment for persistence, this
must use AccessMode
ReadWriteMany .
STORAGECLASS - the storage class name used to create the persistent
volume.
DBTYPE - the database type. By default, and initially, this is Derby. HCL DX
9.5 uses Apache Derby, Oracle Database, DB2, or Microsoft SQL Server. Acceptable
values are derby, oracle, db2, or
msSql.
INGRESSIMAGE - The image name to use for Ambassador.
INGRESSTAG - The image tag to use for Ambassador.
The command output shows the values as they align with the deployment, and the result of each step.DX Administrators can use 'kubectl get pods -n
az-emo' to check the pods as they are starting. See the following example:
Figure 15. kubectl get pods
Figure 16. Checking the pods
While waiting for the pods to start up DX Administrators must create a tls secret for
ambassador as follows:
In this example, an existing key and certification created using openssl was
used.
Use SSL, administrators can create a private key: 'openssl genrsa -out
my-key.pem 2048'
Use OpenSSL, administrators can create a certificate signed by the private key:
'openssl req -x509 -key my-key.pem -out my-cert.pem -days 365 -subj
'/CN=my-cert'
At this stage, the deployment will write out the wp_profile into the persistent
volume, and configure HCL DX 9.5 a minimum default configuration. See the HCL DX 9.5
Container Requirements and Customization topics for additional
information.
Once the HCL DX 9.5 dx-deployment-0 pod is running, administrators can access the HCL DX
9.5 deployment by obtaining the ambassador service details. Command examples to obtain
this information:
'kubectl get svc -n az-demo' or
'kubectl get svc ambassador -n az-demo'Figure 18. kubectl get
Use the external IP address obtained via the kubectl get command
(https://external-ip/wps/portal ), select the resulting URL obtained to access the HCL DX 9.5 deployment.Figure 19. External IP
Note: It is required to ensure the MS Azure AKS load balancer configured permits
external access. Consult the MS Azure documentation for Load Balancer
setup and default configuration details.
(Optional) Deploy the OpenLDAP, Experience API, Content Composer, and Digital Asset
Management components to Microsoft AKS
Create a config map with the same name as the dx statefulset used to deploy the HCL DX
9.5 CF_182 and higher Core image software. By default, the dx statefulset is
dx-deployment, as shown in this example:Figure 20. dx statefulset
Administrators
can also create the config map in a yaml file and deploy it with the following instructions (example): kubectl create -f my_config_map.yaml -n
az-demo.
After creating the config map, the HCL DX 9.5 CF_182 and higher deployment will go into
'init' mode, and restart a couple of times after the new options are configured.
Administrators can check the status via the command line using the command (example)
kubectl get pods -n az-demo:Figure 22. get pods
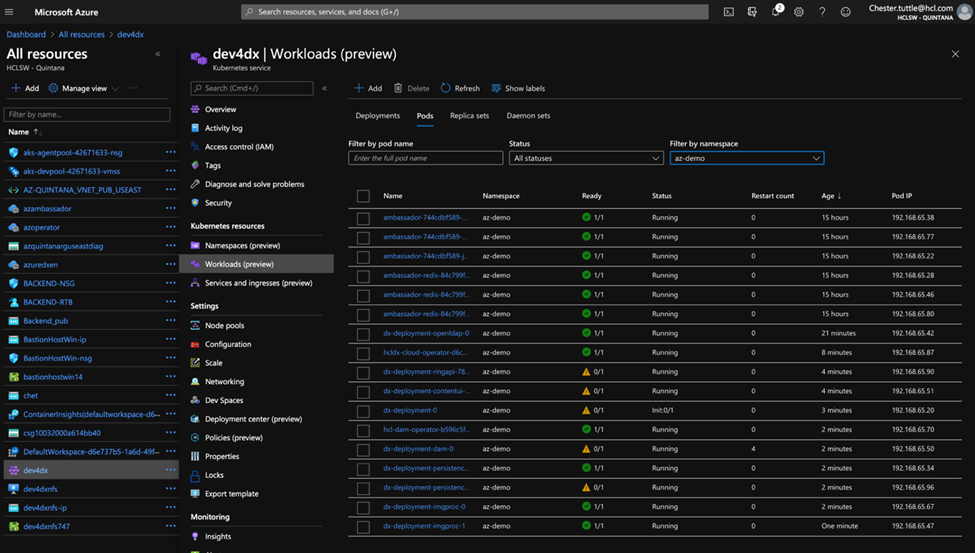
As an alternative approach, administrators can check the status of the deployment
progress through the MS Azure AKS dashboard:Figure 23. Microsoft AKS dashboard
In this deployment of HCL DX 9.5 core and optional images, the DX core image will be the last container to start successful. Note that it will restart twice.
Once restarts are complete, administrators can confirm the deployment and configuration
of the DX core and OpenLDAP, Experience API, Content Composer, and Digital Asset
Management images as follows:
OpenLDAP image deployment validation:
Navigate to Practitioner Studio > Administration > Security >
Users and Groups , and search for all available groups:Figure 24. Searching for available groups
The group ldap_test_users should appear in this listing.
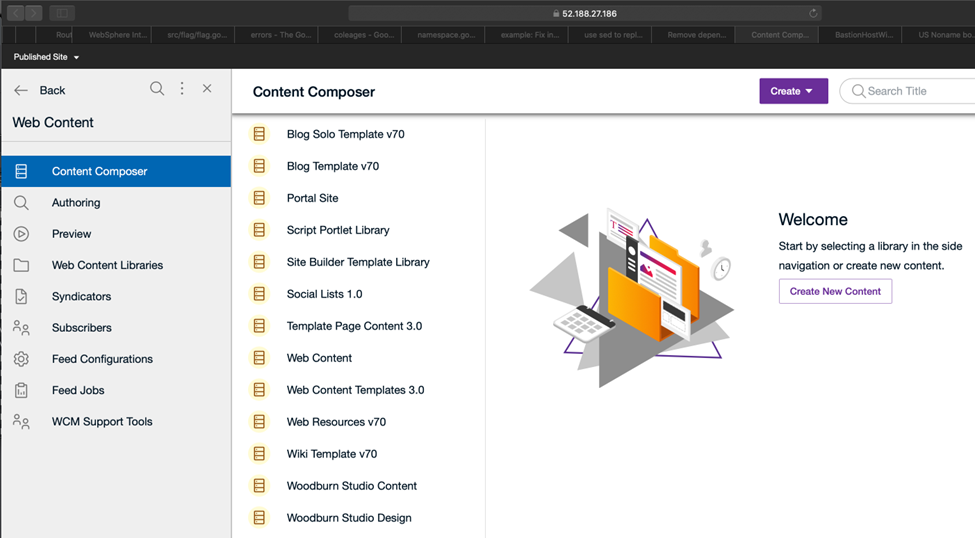
To validate the Content Composer and Experience API image deployments, navigate to Practitioner Studio > Web Content > Content Composer :Figure 25. Content Composer validation
To validate the Digital Asset Management and Experience API image deployments,
navigate to Practitioner Studio > Digital Assets :Figure 26. DAM validation
To validate access to the Experience API, administrators and developers should be
able to access the Experience API at the following URL:
https://external-ip/dx/api/core/v1/explorer/
See the following section for additional information:
NAMESPACE - the project or the namespace to create or use for
deployment.
REPLICAS - the number of initial instances for the deployment.
REPOSITORY - your local repository, the repository used by Kubernetes.
IMAGENAME - the name of the dxCore image, as added to the repository
above.
IMAGETAG - the tag for the target image as added to the repository
above.
VOLUMENAME - the volume to be used by the deployment for persistence, this
must use AccessMode
ReadWriteMany .
STORAGECLASS - the storage class name used to create the persistent
volume.
DBTYPE - the database type. By default, and initially, this is Derby. HCL DX
9.5 uses Apache Derby, Oracle Database, DB2, or Microsoft SQL Server. Acceptable
values are derby, oracle, db2, or
msSql.
INGRESSIMAGE - The image name to use for Ambassador (Native K8s).
INGRESSTAG - The image tag to use for Ambassador (Native K8s).For
example:
Once the database is transferred, the DBTYPE will need to be updated so we can
scale the instances higher. Additionally, once the database is transferred, the number
of replicas could be increased.
Delete the HCL WebSphere Portal 9.5 Azure AKS deployment
Remove the entire deployment requires several steps, this is by design.
To remove the deployment in a specific namespace, run the removeDx.sh script:
./scripts/removeDx.sh NAMESPACE
NAMESPACE - the project or the namespace created or used for
deployment.
To remove a namespace, use any of the following commands:
Kubernetes
command:
'kubectl delete -f dxNameSpace_NAMESPACE .yaml'
where
NAMESPACE is the namespace to be removed
The persistent volume associated to the deployment needs to be cleaned up by your Administrator. To reuse a persistent volume, see the following steps:
Open the persistent volume in a visual editor (vi) using the