bindconf
Overview
The BIND Configuration Tool (bindconf) creates the /etc/named.conf configuration file and the zone configuration files in the /var/named directory each time you apply your changes.
If you require more functionality than this tool provides, you can create the /etc/named.conf configuration file using the BIND Configuration Tool and then add your customized settings. However, once you manually modify the configuration file, you cannot use BIND Configuration Tool to edit the custom configuration settings that were added manually.
The BIND Configuration Tool requires the X Window System and root access. To start the BIND Configuration Tool, use one of the following methods:
- On the GNOME desktop, go to the Main Menu Button (on the Panel) => Programs => System => DNS Configuration.
- On the KDE desktop, go to the Main Menu Button (on the Panel) => System => DNS Configuration.
- Type the command bindconf at a shell prompt (for example, in an XTerm or GNOME-terminal).
The BIND Configuration Tool configures the default zone directory to be /var/named. All zone files specified are relative to this directory. The BIND Configuration Tool also includes basic syntax checking when values are entered. For example, if a valid entry is an IP address, you are only allowed to type numbers and the dot (.) character into the text area.
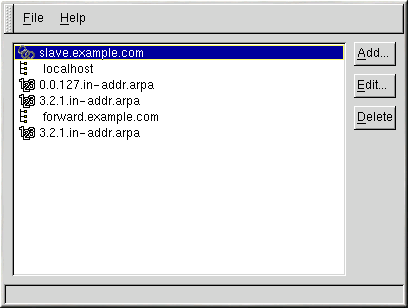
The BIND Configuration Tool allows you to add a forward master zone, a reverse master zone, and a slave zone. After adding the zones, you can edit or delete them from the main window as shown in Figure 15-1.
After adding, editing, or deleting a zone, choose File => Apply to write the /etc/named.conf configuration file and all the individual zone files in the /var/named directory. Applying your changes will also have the named service reload the configuration files. You can also choose File => Exit and click Yes to Do you want to apply your changes before exiting?
Adding a Forward Master Zone
To add a forward master zone (also known as a primary master), click the Add button, select Forward Master Zone, and enter the domain name for the master zone in the Domain name text area.
A new window as shown in Figure 15-2 will appear with the following options:
Name Domain name that was just entered in the previous window. File Name File name of the DNS database file, relative to /var/named. Contact Email address of the main contact for the master zone. Primary Name Server (SOA) State of authority (SOA) record. This specifies the name server that is the best resource of information for this domain. The default value is @, which means that the SOA is the same as the domain name entered in the Name field above. Serial Number The serial number of the DNS database file. This number must be incremented each time the file is changed, so that the slave name servers for the zone will retrieve the latest data. The BIND Configuration Tool increments this number each time the configuration changes. It can also be incremented manually by clicking the Set button next to the Serial Number value. Time Settings The Refresh, Retry, Expire, and Minimum TTL (Time to Live) values that are stored in the DNS database file. Records Add, edit, and delete record resources of type Host, Alias, and Name server.
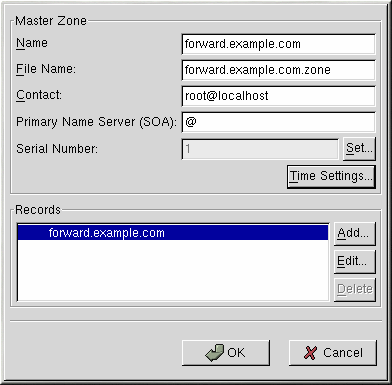
The configuration shown in Figure 15-2 creates the following entry in /etc/named.conf:
zone  "forward.example.com" {
	type master;
	file  "forward.example.com.zone";
};
It also creates the file /var/named/forward.example.com.zone with the following information:
$TTL 86400
@	IN	SOA	@  root.localhost (
			1 ; serial
			28800 ; refresh
			7200 ; retry
			604800 ; expire
			86400 ; ttl
			)
After configuring the Forward Master Zone, click OK to return to the main window as shown in Figure 15-1. From the pulldown menu, choose File => Apply to write the /etc/named.conf configuration file, write all the individual zone files in the /var/named directory, and have the daemon reload the configuration files.