Create a WebSphere Commerce service module
The WebSphere Commerce service module contains all the assets used by a WebSphere Commerce service. If we are planning on providing new WebSphere Commerce services, we must create a new service module, then further customize and extend the assets that it creates.Before beginning
Task info
The Java Emitter Template (JET) is used to generate the base code for the new service module from a simple XML file. By describing the service module in a specialized XML syntax, the service modules can be generates. We can start with the service module implementation without having to spends hours with the setup and configuration of a service module. What to do before you create a new service:
- Determine whether a new service is needed or an existing service can be extended. When custom information is required, there are three options:
- Include custom information in the UserData area of an existing noun
- Include custom information as an overlay of an existing noun
- Create a custom service
- Determine the service name. A service consists of a collection of related nouns and the operations that can be performed on those nouns. For example, the Catalog service consists of the Catalog, CatalogGroup, and CatalogEntry nouns and supports retrieving, creating, updating, and deleting these nouns.
- Determine the service nouns. See Nouns.
- Determine the operations (verbs) for each noun. See Verbs.
- Determine the service implementation (SOI versus BOD). For more about the differences between the two implementations, see SOI and BOD service modules.
Procedure
To create a new WebSphere Commerce service module:
- Start WebSphere Commerce Developer.
- Create the pattern application definition file to create the base code:
- Create the service module input file.
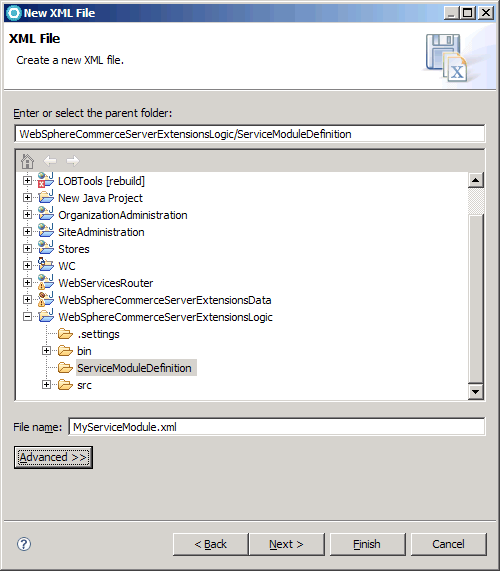
- Right-click the WebSphereCommerceServerExtensionsLogic project and select New > Other > XML > XML and click Next.

- Click Next.
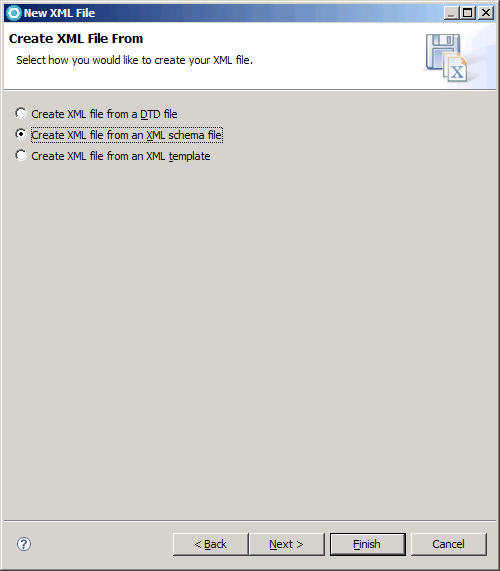
- Select Create XML file from an XML schema file and click
Next.

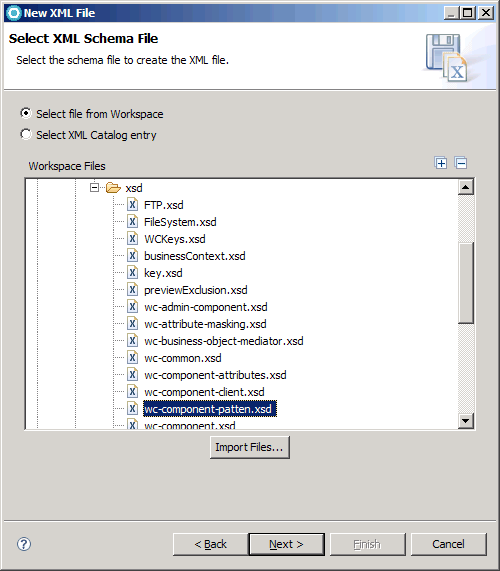
- Select Select file from Workspace, select WC > xml > config > xsd > wc-component-pattern.xsd and click Next.

- Click Finish.
- Right-click the WebSphereCommerceServerExtensionsLogic project and select New > Other > XML > XML and click Next.
- Create the XML file to describe the WebSphere Commerce service module. Start by copying the following XML sample.
<_pattern:commerceComponent xmlns:_pattern="http://www.ibm.com/xmlns/prod/commerce/foundation/pattern"
    xmlns:xsi="http://www.w3.org/2001/XMLSchema-instance"
    xsi:schemaLocation="http://www.ibm.com/xmlns/prod/commerce/foundation/pattern
    ../../WC/xml/config/xsd/wc-component-patten.xsd "
    name="MyServiceModuleName" packagenameprefix="com.mycompany.commerce" company="MyCompany"
    namespace="http://www.mycompany.com/xmlns/prod/commerce/9/MyServiceModuleName" nlsprefix="myco" type="SOI/BOD">
  <_pattern:noun name="MyBusinessObject" get="true" process="true" change="true" sync="false" />
</_pattern:commerceComponent>
Where My Company is your company name. This file is used to create the starter assets and configuration for a service module. Within this file, the subsystem and company information is required. Also required is each noun that is to be included with the subsystem and the supported verbs for that noun. Currently, WebSphere Commerce supports only four verbs and the pattern addresses only these four verbs.
- Replace the following values under commerceComponent with values appropriate for our implementation:
- name=" MyServiceModule"
- The name of your new service module
- packagenameprefix="com.mycompany.commerce"
- Used to prefix the generated starter store code.
Note: Do not include the component name in this prefix.
- namespace=http://www.mycompany.com/xmlns/prod/commerce/myservicemodule
- The namespace to associate with your component. This namespace represents our organization.
- nlsprefix="mycompany"
- The XML schema prefix to associate with the name space. To avoid collision with the WebSphere Commerce prefix, do not use an underscore (_) as the first character of the namespace prefix.
- type="SOI/BOD"
- Specify the type of service module. If you specify SOI, the pattern creates a service module
that provides service-oriented integration into your existing controller commands, access beans, and
EJBs.
If you specify BOD, the pattern creates a service-oriented architecture service module that uses commands that are developed using the BOD command framework. These BOD commands act upon Structured Data Objects (SDOs) and use the Business Object Mediator to persist and retrieve these SDOs.
- Replace the following values under noun
name="MyBusinessObject" Where: MyBusinessObject is the name of your new noun.
Nouns define the name of each data element in the logical model, and assign that name to a data type. The data type can be a primitive XML schema type such as boolean, or a complex type. A complex type is a construct of data elements such as CurrencyType which contains price (represented by a double type) and currency (represented as a string). A noun can contain one or more noun parts (sometimes referred to as noun elements). A Noun part is a complex XML type within a noun that can be acted upon independently. Noun parts represent parts of a logical noun. Separating a noun into parts simplifies coding by reducing the scope of commands and mediators. Instead of handling the entire noun, code is limited to only processing the noun part. When a request arrives, it is broken into its different parts and the appropriate command for each part is run. For example, the CatalogEntry noun contains a list of descriptions. A catalogEntry description is considered a noun part and is processed using the ChangeCatalogEntryDescriptionCmdImpl and ChangeCatalogEntryDescriptionMediator. For each of the verbs, Get Request / Show Response, Process Request / Acknowledge Response, Change Request / Respond Response, and Sync Request / ConfirmBOD Response, indicate whether we want to support this operation against your noun. Example:
get="true"
process="true"
change="true"
sync = "false"
Note: We can create multiple <noun> elements in one service module. Do not choose Get, Process, Change, or Sync as the name of your noun (they are reserved for use as verbs).
- Save the file.
- Create the service module input file.
- Right-click MyServiceModule.xml and select Run As > Run Configurations...
- Select JET Transformation and click the New icon.
- In the Transformation section:
- Select the following ID: com.ibm.commerce.toolkit.internal.pattern.componentprojects
- Click OK.
- After the pattern is applied, verify that the following projects are created:
- MyServiceModule-Client
- Contains the client library Java code.
- MyServiceModule-DataObjects
- Contains the XSD, WSDL, and generated SDOs.
- MyServiceModule-Server
- Contains the component facade implementation.
- MyServiceModule-UnitTests
- A module for unit test the client implementation.
- MyServiceModuleServicesHTTPInterface
- The web module used to enable the service module for web services over HTTP.
- MyServiceModuleServicesJMSInterface
- The EJB module used to enable the service module for web services over JMS.
Note:
- We can ignore the compilation error messages. Java objects that represent the noun do not yet exist, and are generated in the next step. In addition, the newly generated projects are not yet added to the WebSphere Commerce Application and cannot resolve dependencies on WebSphere Commerce code.
- Informational messages in the following form can be
ignored:
CHKJ2500I: change<<Noun>>(javax.xml.soap.SOAPElement) in method
javax.xml.soap.SOAPElement must be serializable at runtime (EJB 2.0: 7.10.5).
That is, SOAPElement objects can be serialized.
- Each generated project also contains a prefix, either SOI or
BOD, depending on the selected type of your implementation. For example,
MyServiceModule-Client would be either
SOIMyServiceModule-Client or
BODMyServiceModule-Client.
- If you specify SOI, the pattern creates a service module that provides service-oriented integration into your existing controller commands, access beans, and EJBs.
- If you specify BOD, the pattern creates a service-oriented architecture service module that use commands developed using the BOD command framework. These BOD commands act upon Structured Data Objects (SDOs) and use the Business Object Mediator to persist and retrieve these SDOs.
- Add the generated modules to the WebSphere Commerce Application.
- Next steps:
- Create your SDO genmodel file.
Note: Complete up to step 3.g. Do not do step 3.h and step 3.i, these steps are redundant and are carried out later in the next page.
- Generate code from your SDO genmodel file.
Note: Step 7 requires you to Set SDO Defaults that reverts your setup from the previous step. Therefore, after you complete step 7, Set SDO Defaults, redo the step for ensuring that the EMF genmodel can generate compatible objects.
- Create the component facade for an SOI service module.
- Implementing the service commands in the BOD command framework.
- Create the client library.
- Create your SDO genmodel file.
Related concepts
Service Data Objects (SDO)
Client library for WebSphere Commerce services
Logging and tracing
Get Request and the Show Response
Process request and the acknowledge response
Change Request / Respond Response
Sync request and the ConfirmBOD response
Related tasks
Testing a WebSphere Commerce service with a unit test case
Creating and updating Service Data Objects (SDO)
Creating the client library
Creating the component facade