Tutorials > Content management > Create a content-managed resource > Creating the new resource
Create a mapping between the entity bean and the database table
Procedure
- In the Enterprise Explorer view, right click WebSphereCommerceServerExtensionsData and select Java EE > EJB to RDB Mapping (1.x - 2.x) > Generate Mapping.
- Select Create a new backend folder and click Next.
- Select Meet-In-The-Middle and click Next.
- Click New in the Select database connection screen. The New Connection screen opens.
- From the Select a database manager list, select the appropriate option:
 DB2 for Linux, UNIX, and Windows
 Oracle
- In the JDBC driver drop-down list, select the appropriate option:
 IBM Data Server Driver for JDBC and SQLJ Default
 Oracle 10 - Oracle OCI Driver Default
- In the Properties section, enter the following information:

- Database
- Name of the DB2 database instance.
- Host
- localhost
- Port number
- Port number where db2c_DB2 service is listening.
- User name
- User name of DB2 administrator.
- Password
- Password for DB2 administrator.

- SID
- Name of the oracle database instance.
- Host
- localhost
- Port number
- Port number where oracle service is listening.
- User name
- User name of oracle administrator.
- Password
- Password for oracle administrator.
- Click Next to create a new database connection.
- On the Selective Database Import page, select the schema_name.EXTCATALOGDSC table, where schema_name is the name of the schema, and click Next.
- Select Match by Name and Type and click Finish to open the Mapping Editor.
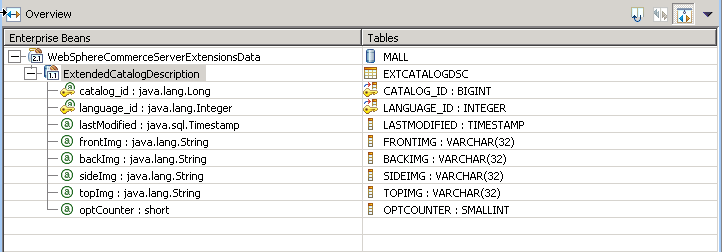
- In the Enterprise Beans pane, select the ExtendedCatalogDescription bean. In the Tables pane, select the EXTCATALOGDSC table.
- Right click the ExtendedCatalogDescription bean and select Match By Name. The fields in the ExtendedCatalogDescription bean are now mapped to the columns in the EXTCATALOGDSC table.
- The Overview pane should look like this screen capture.

- Save the file and close the mapping editor.