Tutorials > Sales Center > Extend a page in an editor
Determine what extend
In this step, we will determine which user interface element of the IBM Sales Center client to extend and gather information about that extension point, such as its id.
Procedure
- Import the com.ibm.commerce.telesales.ui.impl.* plug-ins as binary projects. By importing these plug-ins as projects, we will be able to search for the id of the user interface element to change:
- In the Plug-ins view, select all the plug-ins that begin with com.ibm.commerce.telesales.ui.impl.
- Right-click the selected plug-ins and select Import > As Binary Project. The plug-in projects display in the Package Explorer view.
- In the Plug-ins view, select all the plug-ins that begin with com.ibm.commerce.telesales.ui.impl.
- Enable widget hover logging. When widget hover logging is enabled, you can hover the mouse pointer over the user interface widget to change, and its id will display in the console of the IBM Sales Center development environment:
- In the IBM Sales Center development environment, click Run > Run.
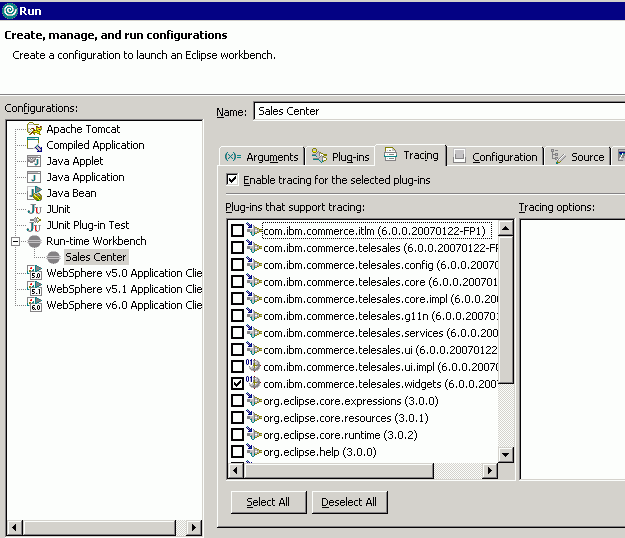
- In the Run window, select the Trace tab.
- Select Enable tracing for the selected plug-ins.
- In the Plug-ins and support tracing pane, select com.ibm.commerce.telesales.widgets.
- In the right pane, ensure debug, debug/logging, and debug/widgetHoverLogging are selected. Your screen should appear similar to the following screen capture:

- Click Run.
- In the IBM Sales Center development environment, click Run > Run.
- After the IBM Sales Center client opens, click Open > Sales Center - Order Management.
- Log on and select a store, such as ConsumerDirect.
- Click Order > Create.
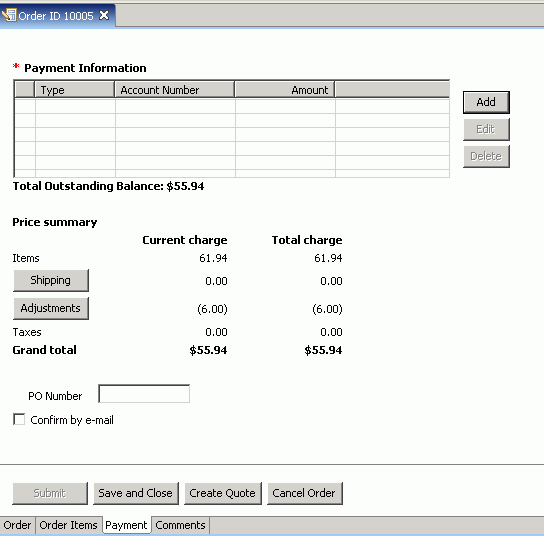
- Navigate to the user interface element to modify. In this tutorial, to modify the Payment page of the order editor:

Hover over this page, then examine the console in the IBM Sales Center development environment. You should see the following text: Mouse hover control ID is 'com.ibm.commerce.telesales.ui.impl.orderPaymentPageComposite'. This is the id of the user interface widget to change.
- Determine in which plug-in this id is defined:
- From the Search menu, select File.
- In the File Search tab, in the Containing text field, enter orderPaymentPageComposite.
- Click Search. The Search view shows that the orderPaymentPageComposite is defined in the com.ibm.commerce.telesales.ui.impl.order plug-in.
- From the Search menu, select File.
- Close the IBM Sales Center client.
- Disable the widget hover logging:
- Click Run > Run.
- In the Run window, select the Trace tab.
- Deselect Enable tracing for the selected plug-ins.
- Click Apply.
- Click Close.
- Click Run > Run.
Examine the orderPaymentPageComposite definition
Examine the default definition of the page we will modify:
- Expand com.ibm.commerce.telesales.ui.impl.order
- Double-click fragment.xml to view its contents.
- Click the fragment.xml tab.
- Find the following composite definition: <extension point="com.ibm.commerce.telesales.widgets.compositeDefinitions"> <gridCompositeDefinition layoutId="tableCompositeGridLayout"> <row > <control controlId="orderPaymentComposite" dataId="fillHorizontalGridData"/> </row> <row > <control controlId="orderPaymentPriceSummaryComposite" dataId="orderGeneralPageDefaultData"/> </row> <row > <control controlId="emptyLabel" dataId="fillHorizontalGridData"/> </row> <row > <control controlId="orderPONumberLabel" dataId="orderGeneralPageIndentedLabelData"/> <control controlId="orderPONumberText" dataId="orderItemPageGrandTotalTextGridData"/> </row> <row > <control controlId="orderEmailConfirmation" dataId="fillHorizontalIndentGridData"/> </row> </gridCompositeDefinition> </extension>
- Note the gridCompositeDefintion id, orderPaymentPageCompositeDefinition. You will add new fields and labels for the gift message information.