Tutorials > Management Center > Create the Project BOD service module
Generate the Project service module projects
The Java Emitter Template (JET) is an Eclipse-enabled template engine for generating applications based on model-driven architecture transformations. By defining a simple XML file describing the module, the JET plug-in for Rational Application Developer (RAD) can generate the basic WebSphere Commerce service module code for you. Afterwards, you can complete the module by filling in the specific business logic, to start directly with the service module implementation without having to spend hours with the setup and configuration of a service module.
In this lesson, you are going to use the Java Emitter Template (JET), provided by WebSphere Commerce for service module generation, to generate the base code for your Project service module. A significant amount of Java code in a WebSphere Commerce service module can be abstracted and generated so that you can focus on implementing the code specific to each service module, for example, the nouns and the business logic.
Procedure
- Start
WebSphere Commerce Developer.
- Open the Enterprise Explorer view from the Java EE perspective.
- Create the application definition
file to create the base code for the TutorialStore service module.
- Create the service module input file.
- Right-click on the WebSphereCommerceServerExtensionsLogic project
and select New > Folder.
- Enter ServiceModuleDefinition as the folder
name. This creates a single location to store all service module input
files.
- Right-click the ServiceModuleDefinition folder and select New > File.
- Enter project.xml as the filename and click Finish.
- Right-click on the WebSphereCommerceServerExtensionsLogic project
and select New > Folder.
- Paste the following application definition into the
file:
<_pattern:commerceComponent xmlns:_pattern="http://www.ibm.com/xmlns/prod/commerce/foundation/pattern"
xmlns:xsi="http://www.w3.org/2001/XMLSchema-instance"
xsi:schemaLocation="http://www.ibm.com/xmlns/prod/commerce/foundation/pattern ../../WC/xml/config/xsd/wc-component-pattern.xsd "
name="Project" packagenameprefix="com.mycompany.commerce" company="myCompany"
namespace="http://www.mycompany.com/xmlns/prod/commerce/9/project" nlsprefix="myprj" type="BOD">
<_pattern:noun name="Project" get="true" process="true" change="true" sync="false">
<_pattern:nounpart name="Material" xpath="/Material" />
<_pattern:nounpart name="Tool" xpath="/Tool[]" />
<_pattern:nounpart name="Instruction" xpath="/Instruction[]" />
<_pattern:nounpart name="Description" xpath="/Description[]" />
<_pattern:nounpart name="CollectionRel" xpath="/Collection[]" />
</_pattern:noun>
<_pattern:noun name="ProjectCollection" get="true" process="true" change="true" sync="false">
<_pattern:nounpart name="Description" xpath="/Description[]" />
</_pattern:noun>
</_pattern:commerceComponent>
The definition indicates the name of the noun (ProjectCollection) and the verbs that are enabled for the pattern (Get, Process, and Change, but not Sync). This file determines the assets and code to be generated for you.
- Save the file.
- Create the service module input file.
- Right-click project.xml and
select Run As > Input
for Jet Transformation.
- In the Transformation section:
- Select the following ID:
- com.ibm.commerce.toolkit.internal.pattern.componentprojects
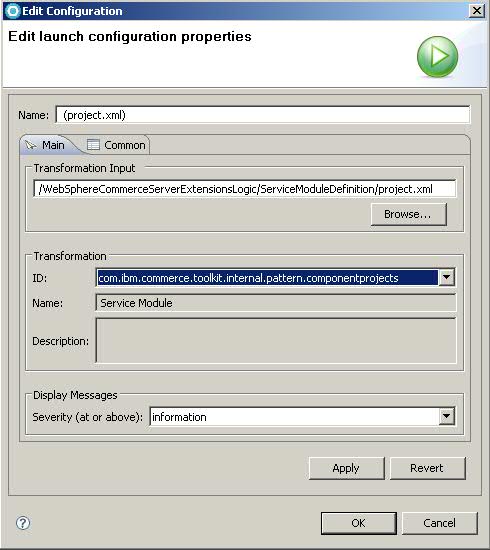
- Click OK.
- Select the following ID:
- The pattern is applied. Verify that the following projects
are created, by switching to the Navigator view:
- Project-Client:
- This project contains client specific code used to build requests and handle responses from the Project Web service.
- Project-DataObjects:
- This project holds the XSD file that defines the Project noun and the Service Data Objects generated from the Project and ProjectCollection nouns.
- Project-Server:
- This project contains the server-side business logic for the Project and ProjectCollection nouns.
- ProjectServicesHTTPInterface:
- This project enables the Project-Server for Web services over HTTP.
- ProjectServicesJMSInterface:
- This project enables the Project-Server for Web services over JMS.
- Project-UnitTests:
- This project contains ready built unit tests to verify the Project component.
Build errors will show up in the projects at this stage because data objects have not yet been generated. Continue the tutorial to generate these objects and resolve the build errors.
- Update the WC project.
- Right-click the WC project and select Refresh.
- Expand WC > xml > config > com.mycompany.commerce.project.
- Rename wc-component-client.xml to wc-component-client-J2SEWebService-example.xml
- Rename wc-component-client-local-example.xml to wc-component-client.xml
- Rename wc-component-client.xml to wc-component-client-J2SEWebService-example.xml
- Right-click the WC project and select Refresh.
- Change the datasource JNDI name:
- In the Enterprise Explorer view, navigate to Project-Server > ejbModule > META-INF
- Right-click ibm-ejb-jar-bnd.xmi;
then select Open With > XML
Editor.
- Verify that the following jndiName values
are specified:
 jdbc/WebSphere Commerce DB2 DataSource
demo
jdbc/WebSphere Commerce DB2 DataSource
demo
 jdbc/WebSphere Commerce Oracle
DataSource demo
jdbc/WebSphere Commerce Oracle
DataSource demo
 jdbc/WebSphere Commerce Cloudscape
DataSource demo
jdbc/WebSphere Commerce Cloudscape
DataSource demo
If the JNDI name field is empty or incorrect, make the necessary changes for the desired database.
- In the Enterprise Explorer view, navigate to Project-Server > ejbModule > META-INF
- Update the build dependencies for the service module:
This is necessary as build dependencies are managed using the Java EE Module dependencies instead of the project classpath.
- Add the service module to the WebSphere Commerce application.
- Expand WC, right-click WebSphereCommerceServer and
select Open With > Application
Deployment Descriptor Editor.
- Click Add, select Module and
click OK.
- Under Module, click Add, select Project-Server, and click Finish.
- Under Module, click Add, select ProjectServicesHTTPInterface, and click Finish.
If Add is greyed out and cannot be clicked, verify that Application, the first option, is highlighted in the modules list.
- Under Actions, click Manage
Utility JARs, select Project-Client and Project-DataObjects.
Click OK.
- Save the changes made in the Application Deployment Descriptor Editor.
- Expand WC, right-click WebSphereCommerceServer and
select Open With > Application
Deployment Descriptor Editor.
- Right-click the Project-Server project and select Properties.
- Select Java EE Module Dependencies.
- Select the following JAR files and projects:
- Enablement-RelationshipManagementData.jar
- Enablement-RelationshipManagementLogic.jar
- Enablement-BaseComponentsData.jar
- Foundation-Core.jar
- Foundation-DataObjects.jar
- Foundation-Extension.jar
- Foundation-Server.jar
- Project-Client.jar
- Project-DataObjects.jar
It is safe to ignore any warnings that may occur during this step.
- Enablement-RelationshipManagementData.jar
- Click OK.
- Add the service module to the WebSphere Commerce application.
In this lesson, you have used the Java Emitter Template (JET) to generate the base code for the Project component. Your next task is to generate the data objects that are required to implement the logical data model of the Project noun, which is defined in the Project.xsd and ProjectCollection.xsd files.