Tutorial: Using Struts tags, action forms, and validation
 Attention: This tutorial is currently under revision. The content might contain errors or inaccuracies. Subscribe to this page to be notified when an updated version is available.
This tutorial is designed to show you how to use Struts tags, action forms, and validation in the context of WebSphere Commerce store development.
In this tutorial, we will replace the default Contact Us page of the consumer direct sample store shown in the following figure.

- Create an HTML form, along with assets and configuration necessary for its validation and processing.

Time required
Expect this tutorial to take about 2 hours to complete.
Audience
This tutorial is intended for WebSphere Commerce Store developers.
Prerequisites
Saving the sample code
Before beginning this tutorial, download the WC7StrutsSample.zip package that contains the starting point for this programming tutorial. Save this file onto the development machine. As an example, you might save the file into the WCDE_INSTALL/ directory.
Configure WebSphere Commerce Developer for Web service development
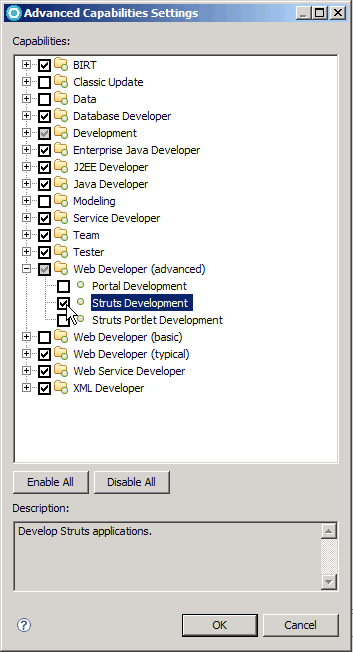
You must enable Struts Development in WebSphere Commerce Developer, if it is currently disabled:
- Select Window > Preferences.
- Select General > Capabilities.
- Click Advanced... and select Web Developer (advanced) > Struts Development, if it is currently disabled.

- Click OK to accept the changes and close the Advanced Capabilities Settings window.
- Click OK to accept the changes and close the Preferences window.
Prepare the workspace
Before beginning this tutorial, prepare the workspace.
Knowledge prerequisites
Before beginning this tutorial ensure that you have:
- An understanding of the Java programming language.
- An understanding of JSP pages, including JSTL.
- An understanding of Struts.
Lessons in this tutorial
- Prepare the workspace
In this step, we will import sample code into the WebSphere Commerce workspace. This sample code is the starting point for the tutorial. - Enable back-end logic
In this step, we will enable the back-end logic, whose implementation you imported in the previous step. - Review the replacement Contact Us JSP page featuring a form
In this step, you review a new JSP page, called MyContactUsDisplay.jsp, which is designed to replace the default Contact Us page of the consumer direct sample store, ContactDisplay.jsp. Its main distinguishing feature is an HTML form, which collects user input to be processed by the back-end logic you enabled in the previous step. - Create a dynamic action form
In this step, we will create a dynamic action form to hold the HTML form data in MyContactUsDisplay.jsp. - Associate the action form with an action
In this step, we will create a dynamic action form for the HTML form data in MyContactUsDisplay.jsp. - Changing the implementation of the Contact Us view
In this step, we will change the mapping of the Contact Us view from the original ContactDisplay.jsp page to the MyContactUsDisplay.jsp page you created in preceding steps. - Test the new implementation of the Contact Us view
This section refers to testing the new implementation of the Contact Us view. - Add the Validator plug-in
In this and the remaining steps of the tutorial, we will enable form validation for the HTML form data in the MyContactUsDisplay.jsp page. - Describe the Validator rules to be used for the HTML form data
The Struts Validator framework comes with a rich set of default validator rules, applicable to a number of business scenarios. These rules have been imported for you into the Stores project in the form of the /WEB-INF/validator-rules.xml file that you specified in the Validator plug-in declaration in the previous step. In this step, we will examine the contents of the validator-rules.xml file. You will then describe which validator rules should be used for which fields of the HTML form and how.To do so, we will create the /WEB-INF/validation.xml file that you specified in the Validator plug-in declaration in an earlier step:
- Add the consumer direct store error message properties files as a Struts
This section refers to adding the error message properties files as a Struts. - Add custom messages to the consumer direct store error message properties
In this step, we will add the Validator default error messages, the own custom error messages, as well as some general error message display information to the consumer direct store error message properties files. - Enable the action form to work with the Validator framework
In this step, we will change the implementation class of the action form from DynaActionForm to its subclass, DynaValidatorForm, specifically designed to work with the Validator framework. - Update the controller command configuration
In this step, we will update the MyContactUsCmd configuration to work with the Validator framework. - Update MyContactUsDisplay.jsp to display validation error messages
This section explains how to display validation error messages. - Test the validation functionality
This section explains the testing of the validation functionality.