Developing > Persistence layer > WebSphere Commerce integration with WebSphere Portal > Customizing WebSphere Commerce Portal integration > Use the provided WebSphere Commerce MVCPortlet class (MVC style) > Create cooperative portlets
Defining a source portlet
When creating Cooperative portlets, the first step is to define the source portlet.
In the portlet samples, a few Cooperative portlets have been created. All sample JSR 168 portlets can be further customized to send or receive data with the Rational Application Developer upon certain portlet actions.
- Portlets that can send data to other portlets are called source portlets.
- Portlets that can receive data from other portlets are called target portlets.
A portlet can be both a source and target portlet. The Commerce Cashier Portlet is pre-defined as a source and target portlet.
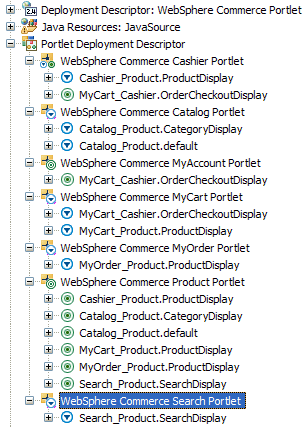
Under Rational Application Developer's J2EE or Web perspective, cooperative portlets can be identified under the Portlet Deployment Description.
- A portlet with source capability has one or more
 symbols.
- A portlet with target capability has one or more
 symbols.
The following paragraphs explain how portlet properties and actions are defined among the sample portlets.
Take a look at the Commerce Search Portlet. This portlet is responsible for sending search data to the Commerce Product Portlet. The steps described below require the steps in Defining a target portlet and Wiring the source and target portlets, in order to transfer the criteria from a source to a target portlet. Here is what you see in the sample portlet by default after completing the following steps.

About this task
To define this source property:
-
In the J2EE or Web perspective, expand MVCPortlet > Portlet
Deployment Descriptor. Right-click Commerce Search Portlet and
select Cooperative > Enable this Portlet to Send Data (Source).

A dialog opens that lets you define the Data Type URI and the Java Type. The Data Type URI can be any string that can uniquely identify the property to be transferred among all portlets. The string:
http://www.ibm.com/xmlns/prod/commerce/portlet/search/product
is the namespace shared among all sample portlets. The Search_Product.criteria is the type name. You can see that the # separator is used between the namespace and the type name. In this example, the portlet requires a simple type of java.lang.String to be transferred to a target portlet.
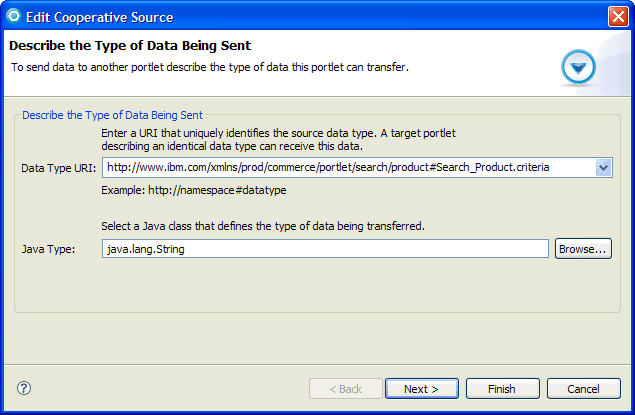
You will need this Data Type URI and Java Type to configure the corresponding target portlet receiving this data.
- Click Next.
-
Fill in the all the fields on the dialog as displayed in the following
example:
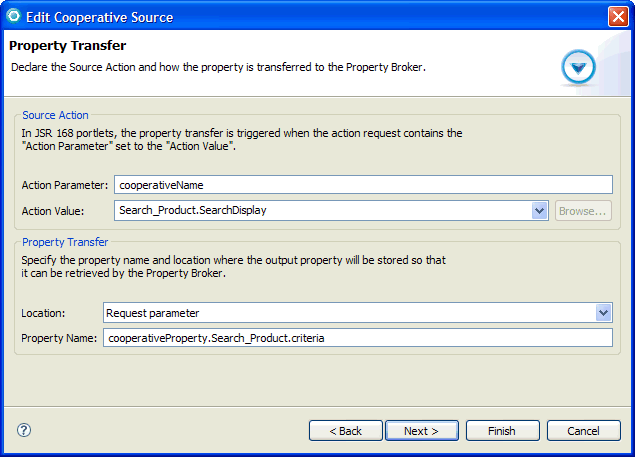
The Action Parameter defines the parameter name that can be found as part of the portlet request. This parameter should be submitted by the portlet jsp (in this case, Search.jsp) as part of the portlet request parameters. For example:
portlet:param name="cooperativeName" value="Search_Product.SearchDisplay" />
If the Action Value specified in the dialog matches the one submitted by Search.jsp, the property transfer is initiated. This property is transferred to a target portlet only when the value of cooperativeName is Search_Product.SearchDisplay .
The Property Name defines the name of the property to be found in the source portlet request and transferred to the target portlet. The Location field specifies how the Property Broker can find the name-value pair from the portlet request in the source portlet class processAction() method. For example, a parameter of criteria will be found in the portlet request parameter list for the source portlet when the property transfer happens.
- Click Next.
-
Fill in the Captions for the Property and Action. Choose
values from the existing resource bundle, or enter in an appropriate message.

- Click Next.
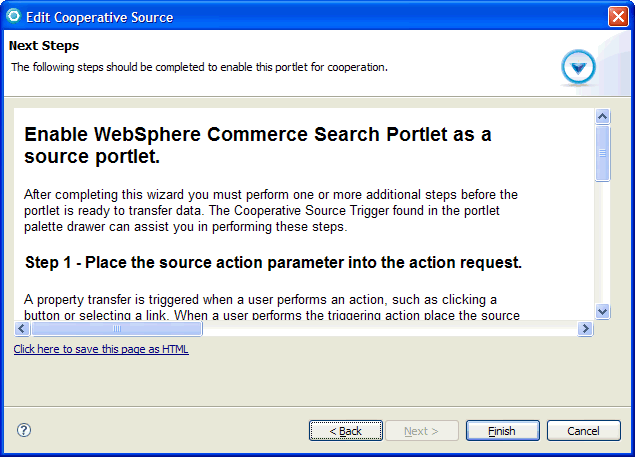
-
Read the documentation described on the final dialog, then click Finish to
complete.
Ensure that both source and target portlets are deployed to WebSphere Portal on the same page. If these portlets are located on different pages, cross-page wires are needed. See the Customizing pages topic in the WebSphere Portal documentation for more information.
- Optional: To send multiple data types from the source portlet, repeat steps 2-8 for each data type.
- Define a target portlet for the destination for your data.
Next topic: Define a target portlet
Related concepts
WebSphere Commerce integration with WebSphere Portal
WebSphere Commerce Portal integration event handlers
Related tasks
Related reference
WebSphere Commerce portlet samples
 Last updated: 25 November 2009