Configure logging
Enabling tracing at server startup
- Open the WAS Administrator's Console and go to...
Troubleshooting | Logs and Trace | server | Diagnostic Trace | Configuration tab

- Select the Enable log check box to enable tracing, or clear the check box to disable tracing.
- Select whether to direct trace output to either a file or an in-memory circular buffer.
- Select Advanced from the drop down menu for the desired trace output format for the generated trace.
- Save the desired format for the generated trace.
- Save the changed configuration
- In the left navigation tree:
- Expand...
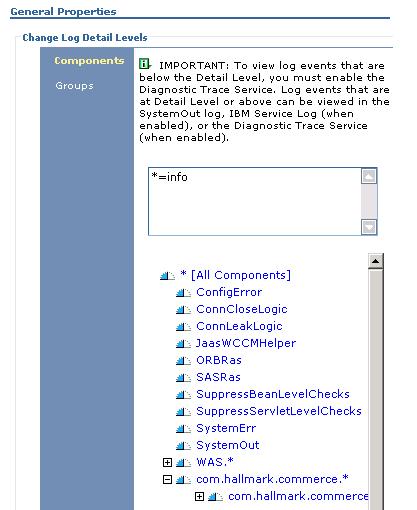
Troubleshooting | Logs and Trace | server | Change Log Detail Levels.
 You will now be presented with
the option of changing Configuration or Runtime.
You will now be presented with
the option of changing Configuration or Runtime.
Changes made to Configuration are stored on the file system and applied when the server starts. A server restart is required to pick up any changes. Modifications to Runtime are applied immediately and are lost during server restarts.
- Expand...
- Click the Configuration tab.
- You can now make changes to the logging settings by expanding com.ibm.websphere.commerce.*.
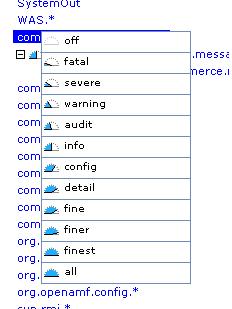
This will present you with all the different components in WebSphere Commerce that can be logged. Click on each component that you are interested in and select the desired logging level. You can select different WebSphere Commerce Components from the list in the tab, or you may enter a trace string to set the trace specification to the desired state.
See also: Start trace on startup
If you are tracing multiple components you should separate them by a colon.
For example:
com.ibm.websphere.commerce.WC_SERVER=all:com.ibm.websphere.commerce.WC_ORDER=all
- Save the changed configuration.
- Start the server.
Enable tracing on a WebSphere Commerce instance
You can modify the trace service state that determines which components are being actively traced for a running server which is federated, by using the following procedure.
- Open the WAS Administrator's Console.
- In the left navigation tree:
- Expand...
Troubleshooting | Logs and Trace | server | Change Log Detail Levels | Runtime
You can select different WebSphere Commerce Components from the list in the tab, else you may enter a trace string to set the trace specification to the desired state.
com.ibm.websphere.commerce.WC_SERVER=all
If you are tracing multiple components you should separate them by a colon. For example:
com.ibm.websphere.commerce.WC_SERVER=all:com.ibm.websphere.commerce.WC_ORDER=all
- Click Apply.
- (Optional) If a change from the existing Trace Output is desired then
do the following :
- Expand Troubleshooting > Logs and Trace. The Logging and Tracing page displays in the workspace on the right. The Logging and Tracing page displays in the right windows.
- Click on the server for which you want to enable the trace (for example, server1). The window refreshes to display the logging and tracing options for your server.
- Change log detail levels. The Diagnostic Trace Service window displays in the workspace.
- Select the Runtime tab.
- Configure the change as desired in the trace output.
- Click Apply.
For more information about any of these steps see the Enabling trace on a running server topic in the WAS Information Center.
- Expand...
Ensure that diagnostic trace service is enabled
If the Diagnostic Trace Service is not enabled, enable it and restart the server before use runtime tracing.
- Open the WAS Administrative Console.
- In the left navigation tree, perform the following steps:
- Expand Troubleshooting > Logs and Trace. The logging and tracing page displays in the workspace on the right.
- Click on the server for which you want to enable the tracing (for example, WebSphere Commerce Server or WebSphere Commerce Payments Server). The window refreshes to display the logging and tracing options for your server.
- Click Diagnostic Trace. The Diagnostic Trace service window displays in the workspace.
- Click the Configuration tab.
- Ensure that the Enable trace check box is selected.
Enable runtime tracing using JACL
The following script, tracespec.jacl can also be used to enable runtime tracing. The usage is as follows:
- To display current trace:
- AIX|Linux|Solaris: WAS_installDir/bin/wsadmin.sh -port SOAP_PORT -f tracespec.jacl
- Windows: WAS_installDir\bin\wsadmin.bat -port SOAP_PORT -f tracespec.jacl
- To enable runtime trace:
- AIX|Linux|Solaris: WAS_installDir/bin/wsadmin.sh -port SOAP_PORT -f tracespec.jacl TRACE_SPEC
- Windows: WAS_installDir\bin\wsadmin.bat -port SOAP_PORT -f tracespec.jacl TRACE_SPEC
For example:
To enable WC_USER tracing, use:
C:\WebSphere\AppServer\wsadmin.bat -port 8881 -f tracespec.jacl
com.ibm.websphere.commerce.WC_USER=all
To disable tracing use:
C:\WebSphere\AppServer\wsadmin.bat -port 8881 -f tracespec.jacl
*=all=disabled
You can run the script file also. Click here to run the .jacl file.
Different components that can be traced
It is recommended that you use the WAS recommended tracing. See the Working with trace topic in the WebSphere Application Server Information Center for more information.
The components that can be traced are:
Related Concepts
Logging services
Application server log files
Related tasks
Enabling access logging
Related Reference
Trace components