Nodes
Managing nodes is a concept specific to a ND environment. Nodes are managed by the deployment manager through a process known as a node agent that resides on each node. To manage a node in a ND environment, the node must be defined, and the node agent on each WAS node must be started.
Nodes are created when you create a profile. Nodes are added to a cell through federation
Start and stop nodes
A node consists of the node agent and the servers. There are several ways to start and stop a node and node agent or to stop them individually. Before using any of these methods, be sure to note whether it affects the entire node, including servers, or just the node agent.
Starting a node agent
When a node agent is stopped, the deployment manager has no way to communicate with it.
Therefore, the node agent cannot be started using the dmgr console and has to be started with the startNode command run from the profile node system.
startNode.bat(sh) [options]

options: -nowait
         -quiet
         -logfile <filename>
         -replacelog
         -trace
         -script [<script filename>] [-background]
         -timeout <seconds>
         -statusport <portnumber>
         -profileName <profile>
         -recovery
         -help
Note that a user ID and password are not required.
startNode command example for a node agent: AIX operating system
PROFILE/AppSrv85_01/bin/startNode.sh
ADMU0116I: Tool information is being logged in file PROFILE/AppSrv85_01/logs/nodeagent/startServer.log
ADMU0128I: Starting tool with the AppSrv85_01 profile ADMU3100I: Reading configuration for server: nodeagent
ADMU3200I: Server launched. Waiting for initialization status.
ADMU3000I: Server nodeagent open for e-business; process id is 712746
Starting a node on z/OS using the START command
To start a node agent on z/OS using the START command, use the following format: START nodeagent_procname,JOBNAME=server_shortname, ENV=cell_shortname.node_shortname.server_shortname
For example: START WPACRA,JOBNAME=WPAGNTA,ENV=WPCELL.WPNODEA.WPAGNTA
Stopping a node agent
To stop a node from the dmgr console:
- In the dmgr console, click System administration | Node agents.
- Select the box beside the node agent for the server, and click Stop.
To stop a node using a command prompt:
- Open a command window.
- Enter the stopNode command.
After you stop the node agent, the deployment manager has no way to communicate with the servers on that node. The servers might be up and running, but the dmgr console cannot determine their status.
Usage: stopNode [options]

 options: -nowait
          -stopservers [-saveNodeState]
          -quiet
          -logfile <filename>
          -replacelog
          -trace
          -timeout <seconds>
          -statusport <portnumber>
          -conntype <connector type>
          -port <portnumber>
          -username <username>
          -password <password>
          -profileName <profile>
          -help
stopNode command
PROFILE/AppSrv85_01/bin/stopNode.sh -username wsadmin -password foo
ADMU0116I: Tool information is being logged in file PROFILE_HOME/logs/nodeagent/stopServ
ADMU0128I: Starting tool with the MyServer01 profile ADMU3100I: Reading configuration for server: nodeagent
ADMU3201I: Server stop request issued. Waiting for stop status.
ADMU4000I: Server nodeagent stop completed.
Stopping a node on z/OS using the STOP command
To stop a node agent on z/OS:
-
STOP nodeagent_JOBNAME
For example:
-
STOP WPAGNTA
Stopping a node (the node agent and servers)
We can use the dmgr console to stop a node and its servers with one action.
- From the dmgr console, click System administration | Nodes.
- Select the box beside the node, and click Stop.
Restarting a node agent
We can restart a running node agent from the dmgr console by completing the following steps from the dmgr console:
- Click...
-
System administration | Node agents
- Select the box beside the node agent for the server, and click Restart.
Node agent synchronization
During a synchronization operation, a node agent checks with the deployment manager to see if any configuration documents that apply to the node were updated. New or updated documents are copied to the node repository, and deleted documents are removed from the node repository.Automatic synchronization
Automatic configuration synchronization between the node and the deployment manager is enabled by default. We can configure the interval between synchronizations in the dmgr console:- Expand System administration | Node agents in the dmgr console.
- Select the node agent process on the appropriate server to open the Properties page.
- In the Additional Properties section, click...
-
File synchronization service
- Configure the synchronization interval. By default, the synchronization interval is set to one minute.
The default synchronization interval on z/OS is five minutes.
Increase the synchronization interval in a production environment to reduce the impact of system usage.
Note that a separate setting about synchronization exists as an dmgr console preference. The option...
-
Synchronize changes with Nodes
...when selected, indicates that any time a change is saved to the console, it is automatically synchronized out to the running nodes. To set this preference, click System administration | Console Preferences, and select the Synchronize changes with Nodes option.

Forced synchronization
Synchronization can be forced by clicking...
-
System administration | Nodes | node | [Synchronize | Full Synchronization]
Synchronize performs an immediate synchronization on the selected node. This type of synchronization is optimized for performance and only synchronizes changed files. If there are issues with manually edited files, this action might not result in a complete synchronization.
The Full Synchronization option disregards optimization and ensures the node and cell configuration are identical.
Using the syncNode command
The syncNode command can be used from the node to force the synchronization of a node�s local configuration repository with the master repository on the deployment manager node.
The syncNode command is normally only used in exception situations. To use the syncNode command, the node agent must be stopped. We can use the -stopservers and -restart options on the syncNode command to stop the node agent and application servers, and then restart the node agent.
The syntax of the syncNode command is:
syncNode.bat(sh) [options]
 syncNode command
Usage:

syncNode dmgr_host
         [dmgr_port]
         [-conntype <type>]
         [-stopservers]
         [-restart]
         [-quiet]
         [-nowait]
         [-logfile <filename>]
         [-replacelog]
         [-trace]
         [-username <username>]
         [-password <password>]
         [-localusername <localusername>]
         [-localpassword <localpassword>]
         [-profileName <profile>] [-help]
The command is executed from the node. The -stopservers and -restart options are used to stop all the servers on the node, including the node agent, and then restart the node agent after the synchronization.
syncNode usage examples
-
PROFILE_HOME/bin/syncNode.sh nodename 8884 -stopservers -restart -username wsadmin -password foo
ADMU0116I: Tool information is being logged in file PROFILE_HOME/logs/syncNode.log
ADMU0128I: Starting tool with the MyServer01 profile
ADMU0401I: Begin syncNode operation for node nodename with Deployment Manager saw211-sys1: 8884
ADMU0505I: Servers found in configuration:
ADMU0506I: Server name: nodeagent
ADMU0506I: Server name: MyServer01
ADMU0506I: Server name: MY_ODR_1
ADMU0506I: Server name: MyServer02
ADMU0506I: Server name: MyServer03
ADMU2010I: Stopping all server processes for node saw211-Node01
ADMU0510I: Server MyServer01 is now STOPPED
ADMU0512I: Server MY_ODR_1 cannot be reached. It appears to be stopped.
ADMU0512I: Server MyServer02 cannot be reached. It appears to be stopped.
ADMU0512I: Server MyServer03 cannot be reached. It appears to be stopped.
ADMU0510I: Server nodeagent is now STOPPED
ADMU0016I: Synchronizing configuration between node and cell.
ADMU0018I: Launching Node Agent process for node: saw211-Node01
ADMU0020I: Reading configuration for Node Agent process: nodeagent
ADMU0022I: Node Agent launched. Waiting for initialization status.
ADMU0030I: Node Agent initialization completed successfully. Process id is: 737330 ADMU0402I: The configuration for node saw211-Node01 has been synchronized with Deployment Manager saw211-sys1: 8884
Removing a node from a cell
There are two ways to remove a node from a network distributed administration cell.
When a node is removed, it is restored to its original configuration.
Using the dmgr console
From the dmgr console:
- Click...
-
System administration | Nodes
- Select the check box beside the node to remove, and click Remove Node.
This method runs the removeNode command in the background.
Using the removeNode command
The removeNode command detaches a node from a cell and returns it to a stand-alone configuration.
The syntax of the removeNode command is:
-
removeNode.bat(sh) [options]
Options...
Usage: removeNode [-force]
                  [-quiet]
                  [-nowait]
                  [-statusport <port>]
                  [-logfile <filename>]
                  [-replacelog]
                  [-trace]
                  [-username <username>]
                  [-password <password>]
                  [-profileName <profile>][-help]
To use the command:
- Change the directory to the PROFILE_HOME/bin directory.
- Run removeNode. All parameters are optional for this command.
On z/OS, the removeNode.sh command is in...
-
INSTALL_ROOT/bin
You need to specify the -profileName parameter to specify the profile for the node to remove.
The command performs the following operations:
- Connects to the deployment manager process to read the configuration data.
- Stops all of the running server processes of the node, including the node agent process.
- Removes servers in the node from clusters.
- Restores the original stand-alone node configuration. This original configuration was backed up when the node was originally added to the cell.
- Removes the node's configuration from the master repository of the cell. The local copy of the repository held on each node is updated at the next synchronization point for each node agent. Although the complete set of configuration files are not pushed out to other nodes, some directories and files are pushed out to all nodes.
- Removes installed applications from application servers in the cell that are part of the node being removed.
- Copies the original application server cell configuration into the active configuration.
The command provides the -force option to force the local node's configuration to be decoupled from the cell even if the deployment manager cannot be contacted. However, if this situation occurs, the cell's master repository then has to be separately updated to reflect the node�s removal, for example, through manual editing of the master repository configuration files.
removeNode example
-
PROFILE_HOME/bin/removeNode.sh -profileName MyServer01 -username wsadmin -password foo
ADMU0116I: Tool information is being logged in file PROFILE_HOME/logs/removeNode.log
ADMU0128I: Starting tool with the MyServer01 profile
ADMU2001I: Begin removal of node: saw211-Node01
ADMU0009I: Successfully connected to Deployment Manager Server: saw211-sys1:8884
ADMU0505I: Servers found in configuration:
ADMU0506I: Server name: nodeagent
ADMU0506I: Server name: MyServer01
ADMU0506I: Server name: MY_ODR_1
ADMU0506I: Server name: MyServer02
ADMU0506I: Server name: MyServer03
ADMU2010I: Stopping all server processes for node saw211-Node01
ADMU0512I: Server MyServer01 cannot be reached. It appears to be stopped.
ADMU0512I: Server MY_ODR_1 cannot be reached. It appears to be stopped.
ADMU0512I: Server MyServer02 cannot be reached. It appears to be stopped.
ADMU0512I: Server MyServer03 cannot be reached. It appears to be stopped.
ADMU0510I: Server nodeagent is now STOPPED
ADMU2021I: Removing all servers on this node from all clusters in the cell.
ADMU2014I: Restoring original configuration.
ADMU2017I: The local original configuration has been restored.
ADMU0306I: Note:
ADMU2031I: Any applications that were uploaded to the aix1_Cell_85_01 cell configuration during addNode using the -includeapps option are not
uninstalled by removeNode.
ADMU0307I: You might want to:
ADMU2032I: Use wsadmin or the Administrative Console to uninstall any such applications from the Deployment Manager.
ADMU0306I: Note:
ADMU2033I: Any buses that were uploaded to the aix1_Cell_85_01 cell configuration during addNode using the -includebuses option are not uninstalled by removeNode.
ADMU0307I: You might want to:
ADMU2034I: Use wsadmin or the Administrative Console to uninstall any such buses from the Deployment Manager.
ADMU2024I: Removal of node saw211-Node01 is complete.
Renaming a node
The renameNode command allows you to modify the node name of a federated server.
renameNode.bat(sh) [options]
 renameNode command syntax
Usage:
renameNode dmgr_host dmgr_port nodename
           [-nodeshortname <name>]
           [-conntype <type>]
           [-logfile <filename>]
           [-trace]
           [-username <username>]
           [-password <password>]
           [-help]
To run the command:
- Change to the PROFILE_HOME/bin directory of the deployment manager.
- Run the renameNode command.
The command:
- Connects to the deployment manager.
- Stops all servers.
- Changes the node configuration on the deployment manager.
- Synchronizes the node.
Recovering an existing node
We can use the -asExistingNode option of the addNode command to recover and move nodes of a deployment manager. Using -asExistingNode federates a new custom node to a deployment manager as an existing node. Information in the dmgr master configuration is used to transform the custom node into the existing node.
Other addNode options for node configuration are incompatible with the -asExistingNode option. Do not use -asExistingNode with the following incompatible options:
- -includeapps
- -includebuses
- -startingport
- -portprops
- -nodeagentshortname
- -nodegroupname
- -registerservice
- -serviceusername
- -servicepassword
- -coregroupname
- -excludesecuritydomains
For example, assume there is a node profile named Profile85 on a host named aix1, and the profile is federated to a deployment manager. Profile85 is damaged and we have to recover it.
To recover...
- Stop the Profile85 node agent.
- Remove the damaged node...
-
./manageprofiles.sh -delete
To recover the damaged node on another machine, the host name for that machine has to be aix1.
- On host aix1, create a profile with the same profile path, profile name, and node name as the unavailable one.
- Run the addNode command with the -asExistingNode option...
cd NEW_PROFILE/bin
./addNode.sh dmgr_host \
             dmgr_port \
             -asExistingNode \
             -username user_name \
             -password foo
Node groups
In a ND environment, we can have nodes in a cell with different capabilities. However, there are restrictions on how the nodes can coexist.
Node groups are created to group nodes of similar capability together to allow validation during system administration processes. Effectively, this situation means that a node group establishes a boundary from which servers can be selected for a cluster.
Nodes on distributed platforms and nodes on the IBM i platform can be members of the same node group, but they cannot be members of a node group containing a node on a z/OS platform.
Do not confuse node groups with "groups of nodes" in the job manager. These are two different concepts.
A default node group called DefaultNodeGroup is automatically created for you when the deployment manager is created, based on the deployment manager platform. New nodes on similar platforms are automatically added to the default group. A node must belong to at least one node group but can belong to more than one.
As long as we have nodes in a cell with similar platforms, we do not need to do anything with node groups. New nodes are automatically added to the node group. However, before adding a node on a platform that does not have the same capabilities as the deployment manager platform, create the new node group.
Working with node groups
We can display the default node group and its members by clicking...
-
System Administration | Node Groups

We can perform a number of actions:
- To create a new node group, click New.
The only thing needed to enter is the name of the new node group.
- To delete a node group, select the box to the left of the node group name, and click Delete.
- To display a node group, click the node group name.

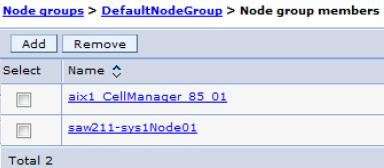
- To add a node to a node group, display the node group, and click Node group members in the Additional Properties section.
When the list appears, click Add. We can select from a list of nodes.