Tutorial: Make a federated repository
- Introduction
- Some limitations
- Configure a federated repository
- Built-in file-based repository
- Set up a federated repository using a database repository
- Set up a federated repository using an LDAP repository
- Add Active Directory LDAP
- Add IBM Tivoli Directory Server
- Configuration and customization of LDAP attributes
- Map LDAP search filters
- Add users and groups to an LDAP based repository
Introduction
Federated repositories can map entries from multiple individual user repositories into a single virtual repository realm. The root of each repository is mapped to a base entry, which is a starting point within the hierarchical namespace of the virtual realm. To the WAS runtime, there is only one registry, which all applications in the cell share.
Virtual Member Manager
Virtual Member Manager incorporates...
- WebSphere Member Manager (derived from WebSphere Portal)
- WAS secure administration functions
..to...
- Provide a repository-independent programming interface.
- Support pluggable repositories.
- Achieve a single view of multiple repositories.
Realm identities include...
- Built-in file-based repository
- One or more external LDAP repositories.
- A JDBC accessible database repository.
Unlike with the local operating system, standalone LDAP directory, or custom registry options, federated repositories provide user and group management with read and write capabilities.
We can add, create, and delete users and groups using...
- User/group management API
- Administrative console
- wsadmin commands
Only one user repository can be configured to be the target for creating users/groups using the console. By default, this is the file repository. This can be changed.
Use wsadmin commands or native tools to create users/groups in other repositories.
User names must be unique across all repositories. Users cannot have the same uid in different LDAP directories, even under different org structures.
If a repository in the federation is down, you will not be able to authenticate (even as an admin), regardless of which repository your particular ID is stored in. The VMM component always checks all repositories before allowing an authentication to succeed.
Although VMM supports multiple realms, WAS only supports a single realm, defined at the cell level.
Configure a federated repository
The next sections will show how to set up a federated repository using:
- The built-in file-based repository
- A database repository
- LDAP repositories with Active Directory and Tivoli Directory Server
Built-in file-based repository
- Go to...
Security | Secure administration, applications and infrastructure | Available realm definitions (drop down) | Federated repositories | Configure

- Enter a realm name.
By default, the Realm name is...
- defaultWIMFileBasedRealm
This name can be changed to any appropriate name for your environment; it does not need to be same as the realm's base entry.
Throughout this tutorial, we will leave the realm name as the default.
- Accept the default base entry...
- o=defaultWIMFileBasedRealm
All users created under this base entry will have a fully qualified name of...
- uid=UID, o=defaultWIMFileBasedRealm
For example...
- uid=wasadmin, o=defaultWIMFileBasedRealm
In a flat file-based repository, a base entry is the root of all the entries within the repository.
In a hierarchical LDAP repository, a base entry is mapped to the top of a subtree in the directory information tree (DIT).
Since the file-based repository is not hierarchical, all objects within the file repository will be stored under this base entry
- Choose the automatically-generated server identity.
WAS V6.1+ distinguishes between...
- user identities for administrators who manage the environment
- server identities for authenticating server to server communications
In V6.1+ server identities are automatically generated and are not stored in a repository.
For V5.0.x or 6.0.x nodes, ensure V5.x or V6.0.x server identities are defined in the repository for the cell by the server user identity and password.
- Enter the administrative user.
We will use "wasadmin" in the file based repository.
- Click OK.
- Enter and confirm the password for the administrative user ID, then click OK.
- Check...
-
Enable administrative security
- Uncheck...
-
Java 2 security
- Select...
-
Available realm definitions drop-down | Federated repositories | Set as current

- Click on Apply, save the changes, and then restart the server.
Administrative security is now enabled. The file repository is configured and users and groups can be added to the file repository through the admin console.
The file repository is stored in...
-
c:/IBM/WAS70/profiles/profileName/config/cells/cellName/fileRegistry.xml
This file contains user and group identifiers, including the encrypted passwords for the user entries.
The passwords for a user is encrypted using a one way hash by applying the message digest algorithm specified in the VMM configuration file (wimconfig.xml). The default value for the message digest algorithm is SHA-1. The algorithm can be updated to a different value using the wsadmin command updateIdMgrFileRepository. One of the parameters we can use with this command is the messageDigest Algorithm.
There are ways to crack the password.
- Log out and log back in using the administrative user ID and password.
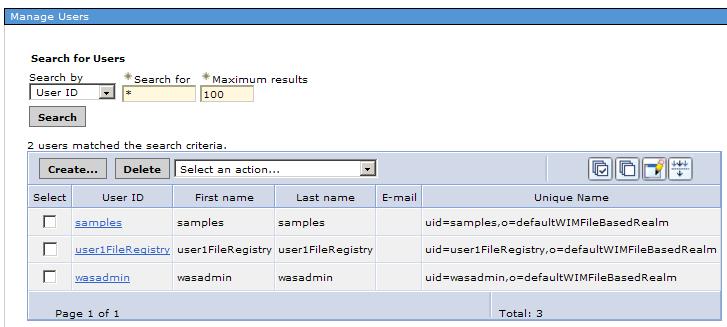
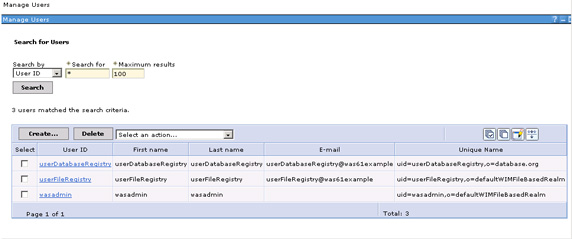
- Go to the Manage Users pane and search for existing users. Search with a wildcard value * to see users in the default file repository.

-
Add a user called user1FileRegistry to the registry.
In this tutorial, user name format is...
-
userRegistrynameRegistry
This simplifies identifying the repository to which the user belongs. This naming convention is not required.
When finished, the Search for users screen will show two users...
Set up a federated repository using a database repository
A database repository has predefined schemas that support the standard Virtual Member Manager entity types of...
- PersonAccount
- Group
- OrgContainer
You cannot use a database that already contains user and group information.
The database repository supports groups containing users in other repositories using the command...
-
updateIdMgrRepository repositoriesForGroups
File based and LDAP repositories do not have this capability.
The database repository cannot be configured through the admin console. It can be only configured using wsadmin. The example below uses an IBM DB2 database. Any other database supported by WAS can be used instead, and the steps will be similar.
Configure a DB2 database repository using the JDBC type 4 driver
- Make a backup of...
-
c:/IBM/WAS70/profiles/profileName/config/cells/cellName/wim/config/wimconfig.xml
All changes pertaining to the configuration of a new repository are made to file wimconfig.xml. Restores can be performed using your backup of wimconfig.xml.
- Create a DB2 database named wimDB.
Later we will create tables using wsadmin.
- Configure a DB2 datasource with the JNDI name...
- jdbc/wimDB
For DB2 classes not found exceptions, set the WAS variable DB2_JDBC_DRIVER_PATH. For example...
-
c:/IBM/SQLLIB/java
- Set up the repository by using this wsadmin command to create the wimDB tables (replace c:/IBM/WAS70 with the actual value of the WAS_HOME environment variable):
-
WAS_HOME=c:/IBM/WAS70
wsadmin
$AdminTask setupIdMgrDBTables {-schemaLocation "c:/IBM/WAS70/etc/wim/setup" -dbPropXML "c:/IBM/WAS70/etc/wim/setup/wimdbproperties.xml" -databaseType db2 -dbURL jdbc:db2:wimDB -dbDriver com.ibm.db2.jcc.DB2Driver -dbAdminId db2admin -dbAdminPassword db2admin -dn o=setgetweb.com -reportSqlError true}Database-specific SQL files for creating the wimDB tables will be found in...
- c:/IBM/WAS70/etc/wim/setup
For DB2, the SQL files are located under...
- c:/IBM/WAS70/etc/wim/setup/database/db2
The -dn entry in the command above defines the root for the distinguished names of the objects to be stored in the database repository. This is not necessarily the same as the base entry for the database repository in the federation. User and groups within the database repository will be created under this root distinguished name, which can be whatever you want it to be. For example...
-
o=setgetweb.com
Successful completion of this command will create the tables shown below as displayed in the DB2 control center...

- Register the DB repository with the VMM...
-
$AdminTask createIdMgrDBRepository {-id DB2Repos -dataSourceName jdbc/wimDB -databaseType db2 -dbURL jdbc:db2:wimDB -JDBCDriverClass com.ibm.db2.jcc.DB2Driver -dbAdminId db2admin -dbAdminPassword db2admin}
In this command, the ID used here (DB2Repos) is the repository identifier of this repository in the federated repository. This command set the datasource name along with the values required to access the database repository using a direct JDBC connection. This is needed, since there are situations in which the runtime might need to access the federated repository when no datasource is available; in such a situation, direct JDBC access will be used.
- Configure a base entry for this repository...
WAS v6.1...
-
$AdminTask addIdMgrRepositoryBaseEntry {-id DB2Repos -name "o=setgetweb.com" -nameInRepository="o=setgetweb.com" } -->
WAS v7.0
-
$AdminTask addIdMgrRepositoryBaseEntry {-id DB2Repos -name o=setgetweb.com}
The base entry name here,...
- "o=setgetweb.com,"
...is same as the value of the -dn option of the setupIdMgrDBTables command. In this case, we used the same name for the base entry name in the federated repository (-name>), as that in the actual database repository (-nameInRepository). This is not required; the base name in the federated repository can be set to a different name than the actual repository root DN.
- Add the new baseEntry to the default or base realm:
-
$AdminTask addIdMgrRealmBaseEntry {-name "defaultWIMFileBasedRealm" -baseEntry "o=setgetweb.com"}
- Save the configuration:
-
$AdminConfig save
- Quit wsadmin and restart the server. The database repository is now configured.
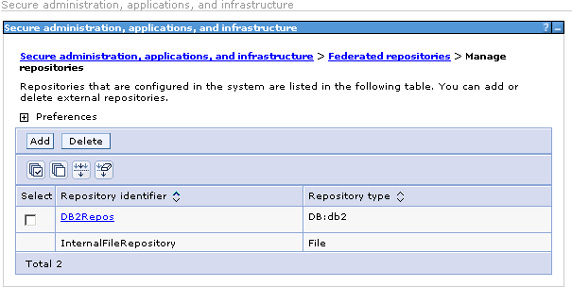
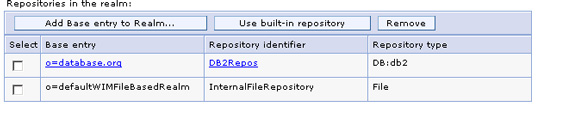
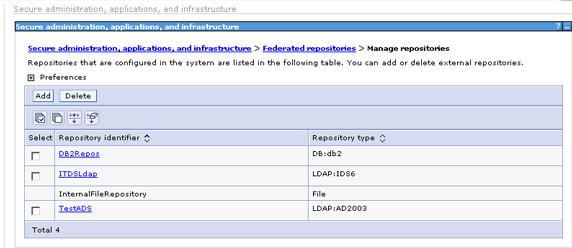
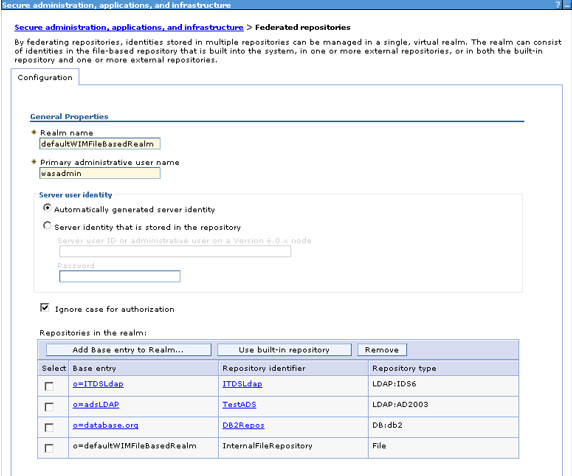
- When you log into the admin console, you will see that the database repository is now part of the federation.
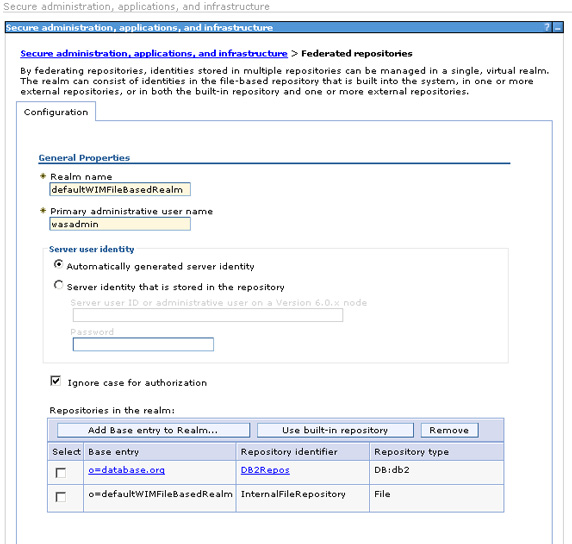
Also, on the Manage repositories panel, the database repository shows up as a defined repository. (Removing a repository from the federation does not delete the repository definition; that is a separate step.)
- There are no users in the database repository yet. When new users are created in the admin console, they are also created in the file based repository. However, you need to make a configuration change if you also want to be able to add users to the database repository from the console. Let's now look at how to update the federated repository configuration in the admin console so that when users are created they also get created in the database repository rather than in the default file-based repository.
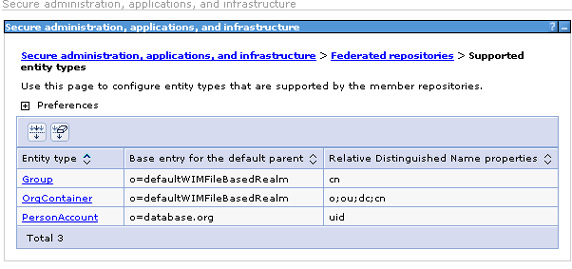
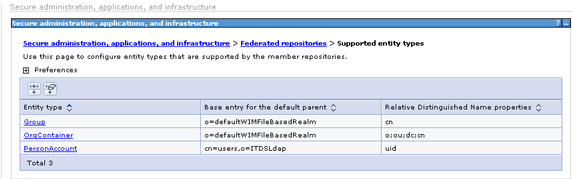
Navigate to the federated repository configuration panel at Secure administration, applications, and infrastructure = Available Realm Definitions = Configure and select Supported entity types.
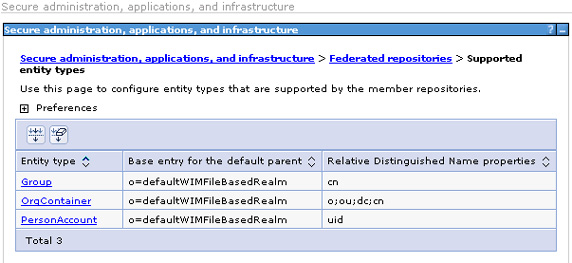
- To modify default user creation so that it uses the database repository, the base entry for the default parent has to be changed to the database repository base entry (that is,...
- o=setgetweb.com
). In this example, change it for the PersonAccount which will enable you to add users to the database repository. (We won't show the details, but you would clearly want to do this for Groups as well.) Select PersonAccount.
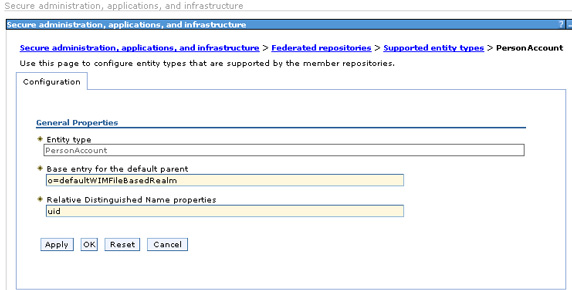
- Change the value of Base entry for the default parent to...
- o=setgetweb.com
and Apply.
- Save the changes and restart the server for the base entry change to take effect.
When new users are added using the admin console, they can be placed in only one repository: whichever repository is the current default as defined by the base entry you set. If you need to add users to other repositories, use the native tools available to you with those products.
- Now, create a user with user ID of userDatabaseRegistry by selecting Users and groups = Manage users = Create, as shown earlier. When done, users from both the file and database repository are displayed.
You have seen how to configure a database repository and make changes such that new users and groups are created in the database repository, instead of the default file-based repository. In the next section, you will see how the federated repository can be configured to add users and groups to LDAP.
Set up a federated repository using an LDAP repository
We will now add two LDAP directories to the configured federated repository, which so far contains two repositories: the default file-based repository and a database repository.
The basic steps for adding an LDAP directory to a federated configuration are:
- Add the LDAP directory to the list of repositories available for configuration for the federated repository.
- Add baseEntries rooted at a particular search base within the LDAP directory. Multiple base entries can be added with different search bases for a single LDAP directory.
The two LDAP directories we will add are:
- Windows Active Directory LDAP
- IBM Tivoli Directory Server.
To add the Active Directory LDAP to the list of available repositories:
- Login to the admin console, then navigate to...
- Security | Secure administration, applications, and infrastructure | Federated repositories | Manage repositories | Add
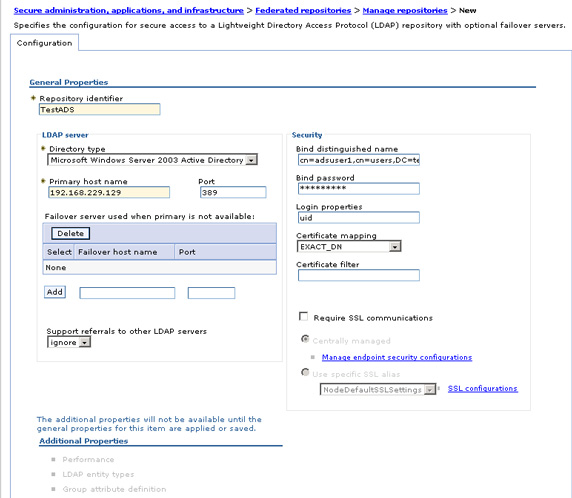
- Enter or select the values, then select OK and save the configuration. This adds the Active Directory LDAP to the list of federated repositories available for configuration. This configuration lets you specify an LDAP failover server. If you wish, we can list multiple LDAP server replicas by IP address or hostname, and the application servers will automatically failover to one of the backup servers if the primary fails. There are additional properties we can configure for the added LDAP; we will look at those later when we discuss customization and configuration of LDAP attributes.
- Now that the repository has been added to the list of federated repositories, a base entry needs to be configured to point to a subtree (search base) in the LDAP directory. The base entry enables the entries in the LDAP subtree to become part of the federated repository realm.
To configure a base entry in the admin console, navigate to Security = Secure administration, applications and infrastructure =Available realm definitions = Federated repositories = Configure.
- The already configured base entries in the realm are shown; in this case, you will see the base entries corresponding to the file-based and database repositories. Now you will add an entry from the Active Directory LDAP. Select Add Base entry to Realm.
- On the following screen, select TestADS for the Repository name, indicating the name of the previously configured Active Directory LDAP. Add the distinguished name of the base entry in the federated repository and the base distinguished name in the Active Directory LDAP directory to specify the search root. The former name defines a logical root entry for this particular repository in the virtual realm, the latter name is the root of the subtree within the LDAP for the set of objects that will become part of the federated repository. What you have actually done here is define a mapping between and LDAP subtree root and a virtual realm root (base) entry, so that all objects from the LDAP under that subtree appear to be in the logical realm under the defined base entry.
If "Distinguished name of a base entry in this repository" is left blank, then the base entry will be mapped to the root ("") of the LDAP server and all the operations will be performed at root. For most LDAP servers this will not work. Thus, you should contact your LDAP administrator to determine the correct root for the directory.

- When you save this, the base entries shown below will display in the federated repositories.

The search base specified is...
- dc=testadsserver,dc=local
In this tutorial, we specify only one subtree for the configured Active Directory LDAP. If you want additional subtrees configured, add additional base entries with appropriate subtree roots.
- Restart the server.
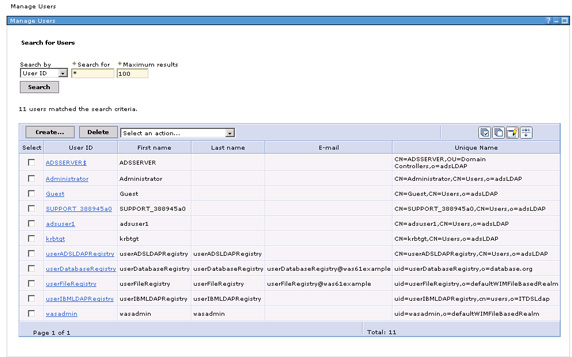
- Now, if you go to the Users and Groups area of the console and search for all users, you will see users from the file-based repository, the database repository, and the Active Directory LDAP server. Note the DN of the LDAP users: it's a concatenation of the actual DN of the user in the LDAP and the base entry that you defined to the federated repository. Note that the subtree root in the actual LDAP (
dc=testadsserver,dc=local) does not show up in the user name; instead, the base entry to which this was mapped in the federated repository is shown. The unique ID of the user is the user ID plus the base entry to ensure uniqueness across repositories within the federation; however, this does not eliminate the requirement that all user IDs across all repositories in the federation must be unique.
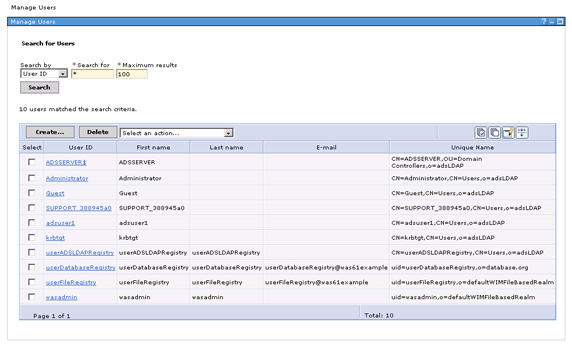
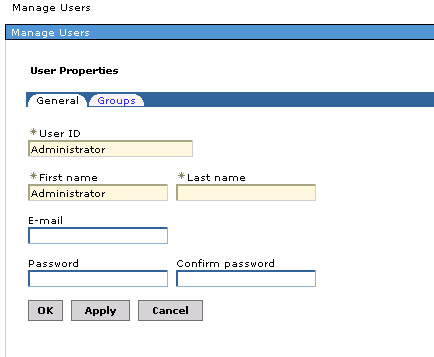
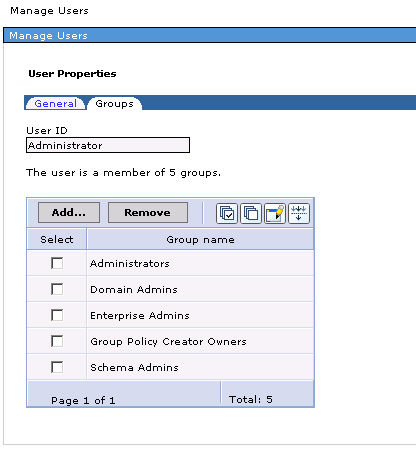
A search on all users shows users from all the repositories; notice the userADSLDAPRegistry, which was created on the ADS server. Similarly, a group search will show groups from all the repositories. Clicking on an individual user gives more information about the user, as well as the groups the user belongs to. For example, Administrator is a user in the Active Directory LDAP; if you click on this user ID, the fiture below will display.
Click on the Groups tab...
Add IBM Tivoli Directory Server
With Active Directory LDAP added, we will now follow similar steps to add IBM Tivoli Directory Server to the list of directories.
- Add a new repository through the admin console as before.
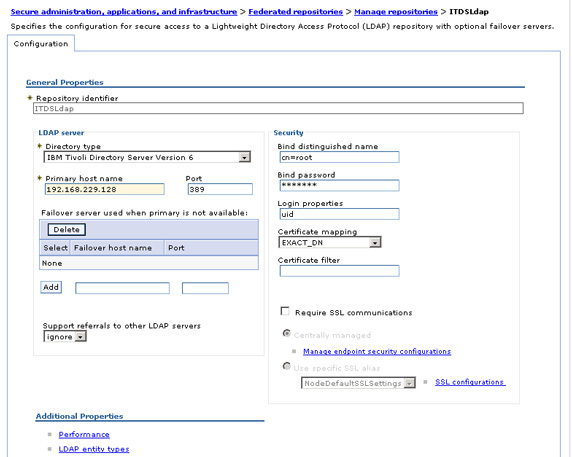
As in the case of Active Directory LDAP, all we need is the Primary host name. Additional LDAP properties need to be configured, which will be discussed later. After adding the IBM LDAP, four repositories will display in the available federated repository list.
- As in the case of Active Directory LDAP, to enable entries from the IBM LDAP to be available within the federated repository, at least one base entry pointing to the base of a subtree needs to be configured. To add a base entry in the admin console, navigate to Security =Secure administration, applications and infrastructure =Available realm definitions = Federated repositories = Configure, then select Add Base entry to Realm.
- On the following panel, select ITDSLdap. Add appropriate Distinguished name in the federated repository (
- Restart the server. Now, a search for users will also show users from the IBM LDAP; the user userIBMLDAPRegistry was created in IBM Tivoli Directory Server using ITDS admin tools within (cn=users, dc=ibm, dc=com).
o=ITDSLdap) and corresponding Base entry in the actual LDAP (
dc=ibm, dc=com). When finished, Apply the changes.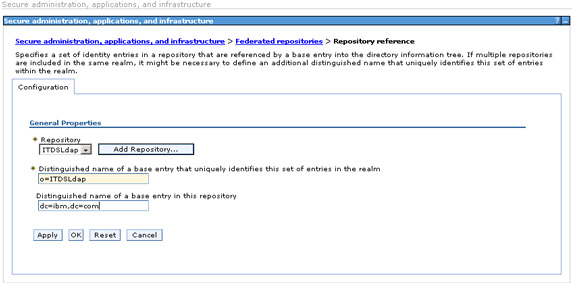
The entries will be added under...
- dc=ibm,dc=com
within the IBM Tivoli Directory Server LDAP as a part of the federated repository under the base entry distinguished name...
- o=ITDSLdap
- Restart the server. Now, a search for users will also show users from the IBM LDAP; the user userIBMLDAPRegistry was created in IBM Tivoli Directory Server using ITDS admin tools within (cn=users, dc=ibm, dc=com).
As with other directories, notice that the user IBMLDAPRegistry is qualified with the base entry in the federated repository to provide the realm unique name.
Configuration and customization of LDAP attributes
In the above sections, you added the LDAP directories with default values and without customizing any LDAP attributes. Here, we will look at additional properties that might need to be configured for LDAP when it is added as a part of federated repository. We say "might" because not all LDAP servers are the same. Different implementations use different object classes to specify user and group information, and different ways of defining group membership. It is therefore likely that the default values will not be adequate. Additional properties that are available are described below, with an example of how to perform the additional configuration for the IBM LDAP directory.
When you add an LDAP to the federated repository, three links for additional properties display at the bottom of the configuration panel:
- Performance
Performance lets you set properties related to search timeouts and search result limits for configured LDAPs. Performance properties would be configured while tuning the federated repository. (See Increasing the performance of the federated repository configuration in the Information Center for more.)
- LDAP entity types
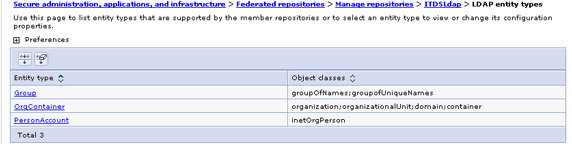
Out-of-the-box, the Virtual Member Manager component defines three entity types that represent object types managed within the federated repository. These provide a way to map object types in different repositories into a common object model in the VMM. These entity types are:
- Group -- the entity representing group-related objects in the repository; maps to group objects in LDAP.
- OrgContainer -- the entity representing organization-related objects; maps to organization objects in LDAP.
- PersonAccount -- the entity representing user-related object; maps to person objects in LDAP.
For example, let's look at the entity type and group object configuration for the IBM LDAP. Groups within IBM LDAP are typically stored under object classes "groupOfNames" and "groupOfUniqueNames". The default value for entity type group is objectclass groupOfNames. You therefore need to add the ObjectClass groupOfUniqueNames to ensure that all group objects defined with this objectclass within the LDAP are correctly mapped to VMM groups.
- In the admin console, navigate to...
- Secure administration, applications, and infrastructure | Federated repositories | Manage repositories | ITDSLdap | LDAP entity types | Group
- Edit the Object classes field to have a value of...
- groupOfNames;groupOfUniqueNames
Note the entries are separated by a semicolon.
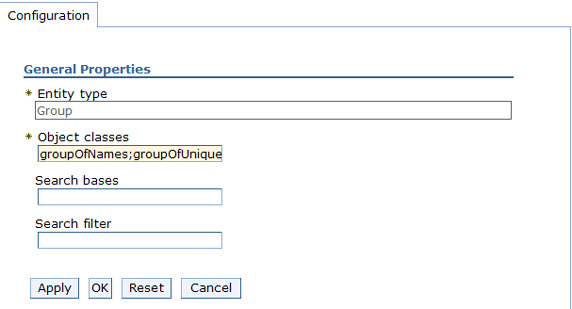
- we can also specify Search bases and a Search filter on this screen. The search bases specified must be subtrees of the base entry in the repository. Here, the base entry is...
- dc=ibm,dc=com
The search filter has to be a subtree of this entry in the LDAP directory. The search filter configuration specifies the LDAP search filter that is used to search this entity type. Using the LDAP search filter syntax, a valid search filter would be:...
- (|(objectclass=groupOfNames)(objectclass=groupOfUniqueNames))
Additional details on mapping LDAP search filters is described below.
- Save the Group entity type configuration with the added Object classes; the configured object classes for the entity type.
- Group attribute definition
For the Virtual Member Manager to understand which groups an object is a member of, you need to define the associated membership attribute for the object class.
- The attributes for an ObjectClass are added under...
- Group attribute definition = Member attributes
In the admin console, navigate to...
- Secure administration, applications, and infrastructure | Federated repositories | Manage repositories | ITDSLdap | Group attribute definition
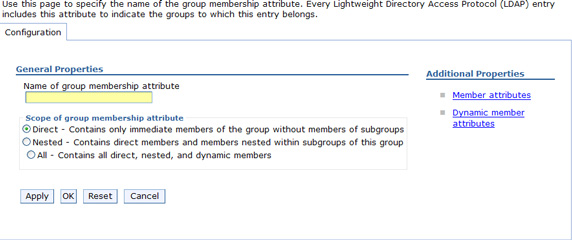
- The Name of group membership attribute specifies an LDAP attribute indicating the groups to which an entry belongs. This entry depends on the LDAP being used. For IBM LDAP, the value is ibm-allGroups. Other LDAP server types will have their own attribute that needs to be configured here. we can also specify whether nested and dynamic group membership is within the scope of the membership attribute. (This article does not cover details of these concepts.) Since not all LDAPs will have a supported attribute for defining group membership, this attribute is optional. If the LDAP you use does support this attribute, be sure to use it to establish group membership and improve performance. If the group membership attribute is not specified, the LDAP repository can establish membership by searching all groups, but the resulting performance will likely be much slower.
- In addition to the group membership attribute name, we can also specify the scope of the group membership attribute. This value indicates how the Virtual Member Manager can traverse through the LDAP directory to determine group membership. Depending on how the LDAP directory actually manages information stored in this attribute, one or more calls may be needed to determine all the groups that the user is a member of. Specifying the scope can improve the performance of such searches. For a given group membership attribute for a given LDAP, it is necessary to know how the given LDAP manages its membership attribute, and what values this attribute will return. For example, for Active Directory LDAP, the scope of the memberOf attribute is Direct, that is, only direct parent groups of the user will be returned. To determine the Nested groups of a user, the VMM must first get the direct groups using the memberOf attribute, then go through the returned groups one by one and get their direct groups, and so on.
This process results in multiple calls to the Active Directory LDAP. To do the same search for IBM Tivoli Directory Server LDAP using ibm-allGroups this elaborate searching is not required, since ITDS maintains all groups, including nested and dynamic group memberships, using that attribute. Therefore, the scope for the attribute should be set to All so that the VMM knows not to make additional unnecessary calls.
- The figure above also shows two Additional Properties that provide the ability to define reverse linkage, which is how groups maintain information about their members, for both static and dynamic groups. For a static group, the membership list is maintained on the object itself as a list of members. For dynamic groups, what is actually maintained in the membership attribute is an LDAP search filter.
For each member object class that defines a group, such as groupOfNames and groupOfUniqueNames, we can define the corresponding member attribute for group membership. In our scenario, the member attribute for the groupOfNames object class is member, which is present by default. We also need to add a uniqueMember member attribute corresponding to the groupOfUniqueNames object class. In the Additional Properties section, select Member Attributes, then click New.
- Add uniqueMember as a new Member name, and groupOfUniqueNames for Object class. Leave the scope default value direct. When finished, the member attributes will appear...
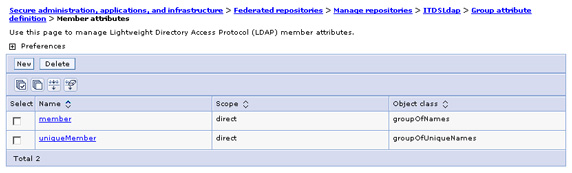
You could also have added member attributes for dynamic groups, but that is beyond the scope of this tutorial. However, we can define both static and dynamic searches for the same object class if you have a hybrid group with both static and dynamic members.
- The attributes for an ObjectClass are added under...
The search filter for an entity type (group, PersonAccount, orgContainer) specifies the LDAP search filter that is used to search this entity type. The search filter syntax is a subset of the standard LDAP filter. Some sample filter values in VMM are shown below and compared to query strings that could have been used in a standalone WAS user registry configuration (without using a federated repository).
- If you want to search by user ID within an LDAP subtree and limit your search to Person objects, then the search filter used would be:...
- ((uid = %v)(objectclass=Person))
In the VMM, this filter would need to be specified differently, since the VMM does not support replacement parameters such as "%v". In the VMM, the filter to substitute uid with the specified value is applied by the VMM runtime during login to the application server, according to the login properties specified for an LDAP configured in the federated repository.
For example, while adding the Active Directory LDAP, the Login properties field is specified to be "uid". During login, this translates to a search filter "uid=value". If it is also necessary to limit the search to Person objects, this would need to be specified in the search filter, in the PersonAccount entity type, as...
- (objectclass=Person)
For the configured Active Directory, this would be as shown...
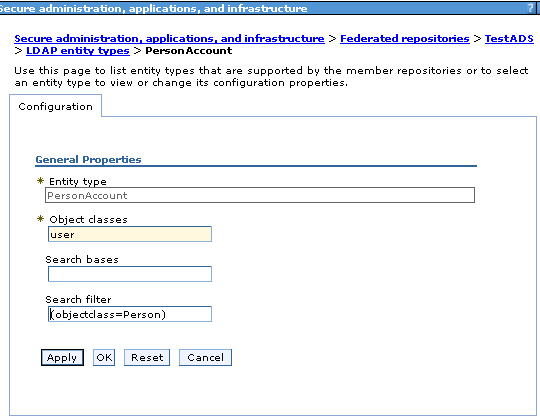
Here, the filter...
- (uid=%v)
...gets implicitly mapped in the VMM runtime. This search filter is potentially also re-mapped from VMM properties to the respective LDAP specific properties. This decoupling enables the use of a standard set of properties across a variety of different registries. In this particular example, the second level of mapping occurs within the VMM, where "uid" gets mapped to an LDAP specific attribute, before the search string is submitted to find the user to the actual LDAP. The mapping of VMM properties to LDAP specific attributes is specified in the VMM configuration file wimconfig.xml.
The next example is of a specific filter for Active Directory that explains the mapping in more detail.
- Next, we will look at a search filter specific to Active Directory LDAP and the changes required to configure such a user search filter in the VMM. This example searches for a user account in an Active Directory LDAP by matching the value in either the "sAMAccountName" or "userPrincipalName" attribute. Here, the LDAP search filter would be:...
- (|(sAMAccountName=%v)(userPrincipalName=%v))
Mapping this search string in VMM translates into mapping the Active Directory attributes to properties that are recognized within the VMM. LDAP specific attributes are mapped in the VMM to VMM defined properties, such as uid, cn, sn, and so on. This method provides a generic LDAP independent schema definition.
To perform this search, you do not actually need to specify a search filter for the LDAP entity type PersonAccount. In fact, as shown in the previous example, replacement expression "%v" is not supported in a search filter in the VMM. All you need to do is make sure that Active Directory user attributes "sAMAccountName" and "userPrincipalName" are mapped to virtual member manager properties, and that these properties are configured in the Login Properties so that the search expression created internally by the runtime will perform the desired mapping. To do this:
- In the wimconfig.xml file, you need to map Active Directory attribute "userPrincipalName" to VMM property "uid". Search for the section in the file where the Active Directory LDAP is configured and add the...
- config:attribute
element for this mapping:
config:repositories xsi:type="config:LdapRepositoryType"
  adapterClassName="com.ibm.ws.wim.adapter.ldap.LdapAdapter"
  id="testads" isExtIdUnique="true" supportAsyncMode="false"
  supportExternalName="false" supportPaging="false"
  supportSorting="false" supportTransactions="false"
  certificateFilter=""certificateMapMode="exactdn"
  ldapServerType="AD2003"
  translateRDN="false"

  config:baseEntries name="o=ads2003"
    nameInRepository="cn=users,dc=testadsserver,dc=local"/
    ...
    config:attributeConfiguration
     ...
    config:attributes name="userPrincipalName"
       propertyName="uid"
    config:entityTypesPersonAccount/config:entityTypes
    /config:attributes

    /config:attributeConfiguration
    ...
/config:repositories
- Map Active Directory attribute "sAMAccountName" to virtual member manager property "cn". As you did above, add the following to the wimconfig.xml file:
config:attributeConfiguration
   ...
  config:attributes name="sAMAccountName"
    propertyName="cn"

  config:entityTypesPersonAccount/config:entityTypes
  /config:attributes
  ...
/config:attributeConfiguration
- In the wimconfig.xml file, you need to map Active Directory attribute "userPrincipalName" to VMM property "uid". Search for the section in the file where the Active Directory LDAP is configured and add the...
- Configure Login Properties to accept properties "uid" and "cn" by specifying the value...
- uid;cn
Now, during login to the application server, if the user ID value is...
-
bob@testadsserver.local
...the search filter will search for...
-
uid=Bob@testadsserver.local
...or...
-
cn=bob@testadsserver.local
Since "uid" is mapped to "userPrincipalName" and "cn" is mapped to "sAMAccountName", the equivalent value of...
-
userPrincipalName=bob@testadsserver.local...
- For group search filters, "cn" is the VMM property used to map group name. Again, for a search filter such as...
- (&(cn=%v)(|(objectclass=groupOfNames)(objectclass=groupOfUniqueNames)))
...the filter "cn=%v" is mapped implicitly by the VMM. The filter...
- (|(objectclass=groupOfNames)(objectclass=groupOfUniqueNames))
...is specified in the entry for search filter for the group entity type.
...or...
-
sAMAccountName=bob@testadsserver.local
...is the search filter executed against the Active Directory LDAP.
- For group search filters, "cn" is the VMM property used to map group name. Again, for a search filter such as...
Adding users and groups to LDAP based repository using the admin console
To create users and groups in the WAS administrative console and have them stored in your LDAP repository instead of the default file-based repository, you need to make configuration changes similar to those you made earlier to add users to the database repository. The base entry for the default parent needs to be changed to that configured for the LDAP repository. For example, for the configured IBM Tivoli Directory Server LDAP:
-
Navigate to...
- Secure administration, applications, and infrastructure | Federated repositories | Configure = Supported Entity Type
-
Change PersonAccount to have BaseEntry...
- cn=users,o=ITDSLdap
-
Save and restart the server. Now, users added through the admin console will be stored in the IBM LDAP.
You have now configured a federated repository with four independent repositories. From an administrative point of view, all the repositories must be available when the application server starts. It is also required that the user ID be unique across all user repositories that are configured under the same federated repository configuration. When a user logs in, the Virtual Member Manager runtime searches each of the repositories for all of the occurrences of that user. If multiple instances of that user are found in the combined repositories, an error message is displayed.
To enable security for J2EE applications, ensure that the application security option in the security configuration section inside the WAS admin console is checked (this option is checked by default).
Installed applications see the different repositories as a single logical repository. Users and groups from all repositories are available for mapping users and groups to protected resources within the J2EE applications. For an example, try accessing...
-
http://hostname:9080/snoop
You should be able to login and authenticate to access this sample application as a user from any of the four configured repositories.