13.2.1 Import source code
To work with the Plants by WebSphere sample application in the Application Server Toolkit, we first need to create an Enterprise Application project and then import the source code.
| 2.
| When asked for a default location for a workspace, browse to a suitable directory and then click OK. Do not check the Use this as the default and do not ask again check box.
|
| 3.
| When the toolkit has launched, close the Welcome page by clicking the X in the Welcome tab, as in Figure 13-2.
|

Figure 13-2 Welcome page
| 4.
| Select File | New | Other.
|
| 5.
| Expand J2EE, select Enterprise Application Project, and then click Next.
|
| 6.
| In the Project name field, enter PlantsByWebSphere, and then click Next.
|
| 7.
| On the Select Project Facets page, keep the defaults (EAR, WebSphere Application Co-existence, and WebSphere Application Extended), and click Next.
|
| 8.
| On the J2EE Modules to Add to the EAR page, click New Module.
|
| 9.
| On the New J2EE Module page, deselect the Application client module and Connector module. Keep the PlantsByWebSphereEJB and PlantsByWebSphereWeb projects as is. Then click Finish.
|
| 10.
| Back on the J2EE Modules to Add to the EAR, click Finish.
|
| 11.
| When the projects have been created, click Yes on the dialog box asking you to switch to the J2EE perspective.
|
You should now see the J2EE perspective with the Project Explorer view, as shown in Figure 13-3.
Note that we did not create a project for the PlantsGalleryWeb module, because that only holds documentation and we do not need that for our example.

Figure 13-3 Project Explorer view with PlantsByWebSphere projects created
When the necessary projects are created, it is time to import the source code.
The defaults for Web modules is to keep source code in the src folder and the compiled Java classes in the build folder. For EJB projects, the source code is kept in the ejbModule folder and the compiled classes in the build folder.
We will start with the EJB source code first:
| 2.
| Select File system from the list, and then click Next.
|
| 3.
| For the From directory field, click Browse and select the <was_home>\samples\src\PlantsByWebSphere\PlantsByWebSphereEJB\ejbModule directory, and then click OK.
|
| 4.
| Select the ejbModule in the left pane.
|
| 5.
| For the Into folder field, click Browse and select the PlantsByWebSphereEJB/ejbModule folder, and click OK.
|
| 6.
| Keep the other options as is (Create selected folders only is selected only) and then click Finish.
|
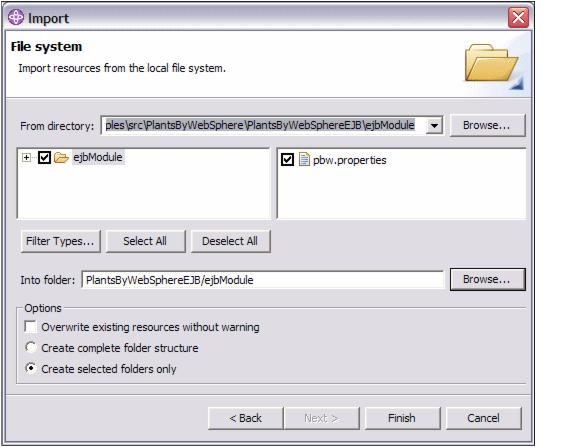
Figure 13-4 Importing EJB module source code
| 7.
| When the question about overwriting existing resources appear, click Yes To All.
|
| 8.
| Repeat the process to import the Web module source code from <was_home>\samples\src\PlantsByWebSphere\PlantsByWebSphereWEB\JavaSource into the PlantsByWebSphereWeb/src folder, and the Web content from <was_home>\samples\src\PlantsByWebSphere\PlantsByWebSphereWEB\WebCointent into the PlantsByWebSphereWeb/WebContent folder
|
|
When you import source code or an EAR file, the workspace rebuilds the project. The build process runs as a separate background thread and can take a minute or two, depending on the application. In the lower right corner of the Application Server Toolkit window, a progress indicator tells you what is happening. When rebuild is complete, any error messages will appear in the Problems view.
|
If you click the Problems tab, you see that the workspace has a lot of problems. This is because the Web module depends on classes in the EJB module, but because we imported the source code, this meta data was not included, so we now need to set up the J2EE dependencies for the Web module to find its required classes.
| 1.
| In the Project Explorer, right-click the PlantsByWebSphereWeb project and select Properties.
|
| 2.
| Select the J2EE Module Dependencies section.
|
| 3.
| Select the PlantsByWebSphereEJB.jar option in the dialog. When selected, the Manifest Class-Path is updated so that the Web project references the EJB project. Click OK when done.
|
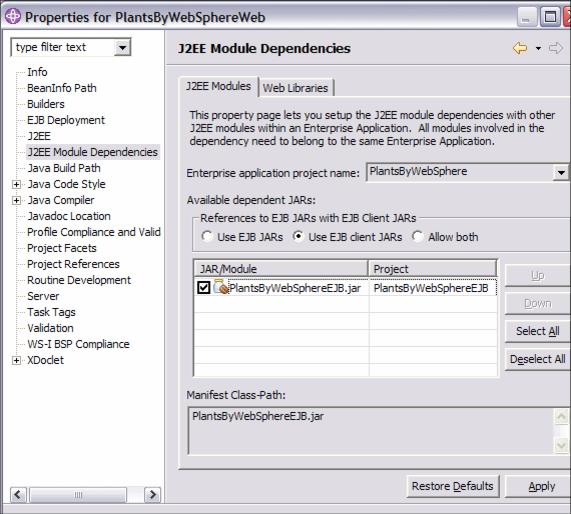
Figure 13-5 Configuring J2EE Module Dependencies
When the class path has been set up correctly and the project rebuilt, all errors in the Problems view should be gone. Still, there are a lot of warning messages.
None of these warnings are critical, though, so you do not need to bother about them. However, if you do want to get rid of them, you can select Window | Preferences | Java | Compiler | Errors/Warnings. Then expand the Unnecessary code section and change the settings for Local variable never read and Unused local or private members settings to Ignore.
The Application Server Toolkit will still warn you about a serialVersionUID field missing from several classes. This is because the toolkit now warns if a class is Serializable (implements java.io.Serializable interface) but does not have a line like:
private static final long serialVersionUID = 12345678L;
To fix this warning, you would add the above line to all serializable classes where it is missing. We will not do that here because the warning is not a severe one, so instead expand the Potential programming problems section and change the setting for Serializable class without serialVersionUID to Ignore. After a full rebuild of the workspace, there should be no warnings in the Problems view.
|
The serialVersionUID is used for "version control" of serializable classes. Whenever you make a change to the class that is incompatible with the previous version, you should also change this number. Best practices dictates you should run the serialver utility (found in the JDK bin directory) to generate the number, but it is perfectly fine just to pick a number out of thin air. If the serialVersionUID line is not present, there is a small performance hit, because the JVM then needs to generate a number on the fly when the class is used.
|
|
Tip: When using the Application Server Toolkit, keep in mind the following:
| -
| To perform a complete rebuild of your project(s), select Project | Clean and then select either to clean current or all projects. This will remove all build problems from the Problems view and perform a complete re-build of the selected projects. This sometimes removes errors and warnings in the Problems view.
|
| -
| As you update and save modules in the toolkit, the contents of the modules are automatically validated and problems are listed in the Tasks view. You can also manually invoke validation of modules by selecting any module and choosing Run Validation from the context menu. To verify the settings for validation, select Window | Preferences and click Validation.
|
|
|