A custom profile defines an empty node on a system. The purpose of this profile is to define a node on a system to be federated to a cell for central management.
As you create the profile, you will have the option to federate the node to a cell during the wizard, or to simply create the profile for later federation. Before you can federate the custom profile to a cell, you will need to have a running deployment manager.
Table 3-4 shows a summary of the options you have during profile creation for a a custom node.
| Typical
| Advanced
|
| The profile name is Customxx.
The profile is stored in <was_home>/profiles/Customxx.
By default, it is not considered the default profile.
| You can specify profile name and location. You can also specify if you want this to be the default profile.
|
|
The node name is <host>Nodexx.
The host name is prefilled in with your system's DNS host name.
|
You can specify node name and host name.
|
|
You can opt to federate the node later, or during the profile creation process.
If you want to do it now, you have to specify the deployment manager host and SOAP port (by default, localhost:8879). If security is enabled on the deployment manager, you will need to specify a user ID and password.
|
|
TCP/IP ports will default to a set of ports not used by any profiles in this WebSphere installation instance.
|
Use the recommended ports for each profile (unique to the installation), use the basic defaults, or select port numbers manually.
|
Custom profile options
This section takes you through the steps of creating a custom profile.
| 1.
| Start the Profile Management Tool. Click Next on the Welcome page.
|
| 2.
| Select the Custom profile option. Click Next.
|
| 3.
| Select the kind of creation process you want to run, typical or advanced. Click Next.
|
If Typical is selected, then you will be sent directly to the option to federate (Figure 3-23).
If Advanced is selected, you will see the next step.
| 4.
| Enter a unique name for the profile or accept the default. The profile name will become the directory name for the profile files.
|
Click the box if you want this directory to be the default profile for receiving commands. Click Next.
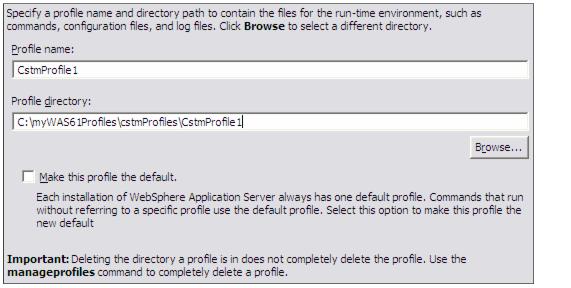
Figure 3-21 Creating a Custom profile: Enter name and location
| 5.
| Enter the new node name and the system host name. The node name defaults to the host name of your system. The wizard recognizes if there are existing nodes in the installation and takes this into account when creating the default node name. Click Next.
|
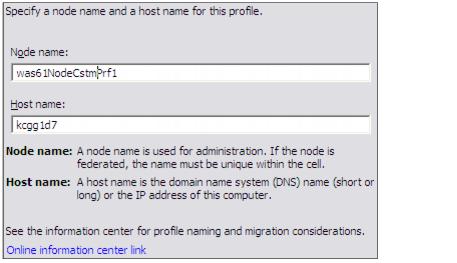
Figure 3-22 Creating a custom profile: Enter host, and node names
| 6.
| If you would like to federate, or add, the new node defined by the profile to a cell as part of the wizard process, leave the Federate this node later box unchecked and enter the host name and SOAP connector port (Figure 3-8) for the deployment manager.
|
|
If you choose to federate now, make sure the deployment manager is started.
|
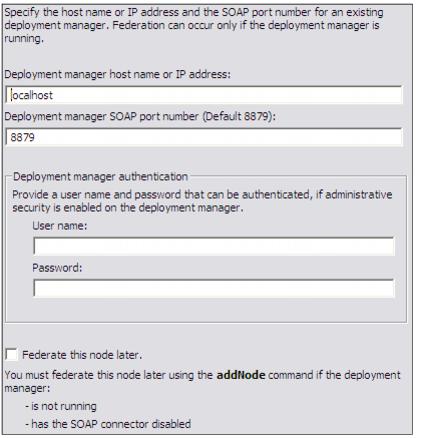
Figure 3-23 Creating a custom profile: Federate now or later
| 7.
| Review the options you have chosen.
|
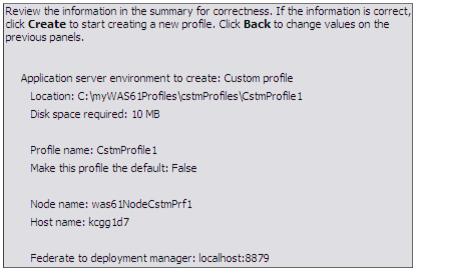
Figure 3-24 Creating a custom profile: Summary
Click Next to create the profile.
This final window indicates the success or failure of the Custom profile creation.
If you have errors, check the log at:
<was_home>/logs/manageprofiles/<profile>_create.log
Note that you will have to click Finish on the window to unlock the log.
You will also find logs for individual actions stored in:
<profile_home>/logs
| 8.
| After the wizard has finished, you will be presented with a screen containing messages indicating the success or failure of the process. And you can launch First Steps if you want or even create another profile. If you have errors, check the log at:
|
<was_home>/logs/manageprofiles/<profile>_create.log
Note that you will have to click Finish on the window to unlock the log.
You will also find logs for individual actions stored in:
<profile_home>/logs
| 9.
| Click Finish to close the wizard and start the First Steps application if you want.
|

Figure 3-25 Custom profile First Steps window